Advanced Programming: Unity Game Dev Course(4)-Closing the Loop

1.Alternate Singleton
主要介绍:
修改Singleton
具体实现:
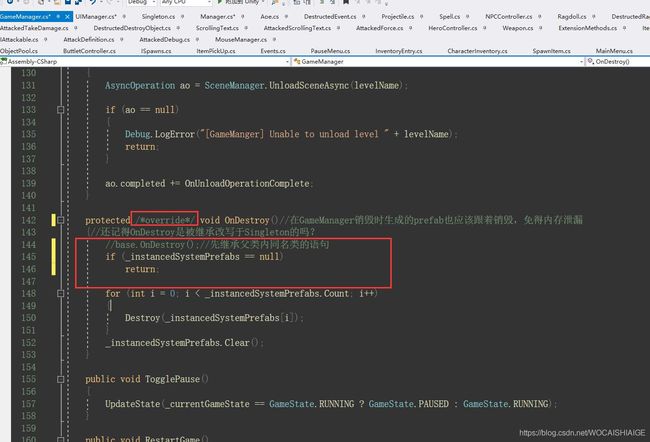
之前Intermediate Programming: Unity Game Dev Courses(1)- Game Managers, Loaders, and the Game Loop教程写的抽象Singleton实际效果并不Single,摁空格键可以多次加载Main场景,如果其他场景里出现Singleton的对象,则会出现Bug,而不是保持一个Singleton。
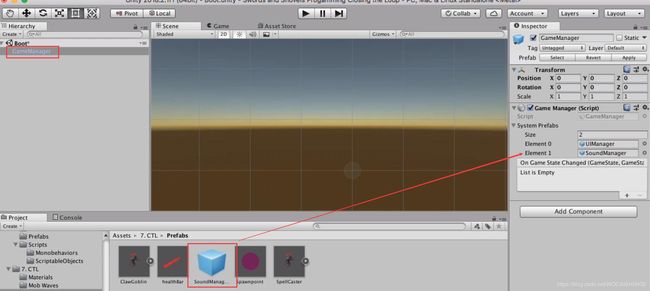
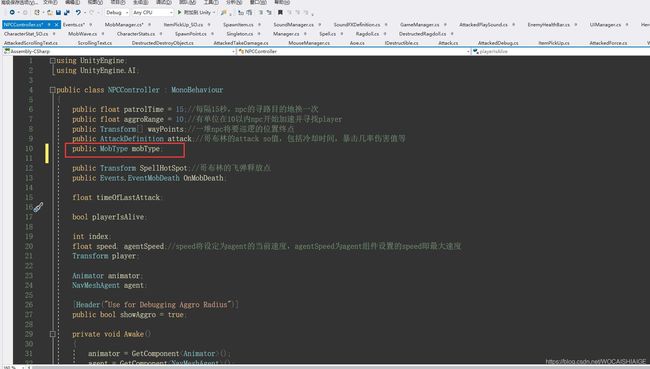
我们新建Singleton模式的脚本在Utils文件夹下,命名为Manager

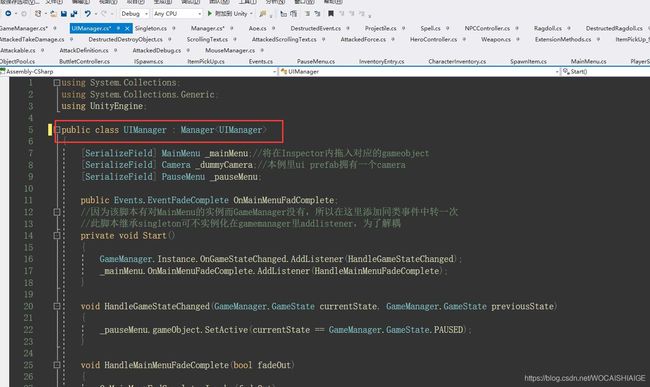
此例使用Singleton模式的有GameManager和UIManager,我们分别修改

2.Enemies
主要介绍:
由固定数量固定地点怪物,改成随机怪物生成(LINQ的使用)
生成多波怪物并且一波强过一波
具体实现:
1.随机怪物生成,和LINQ介绍
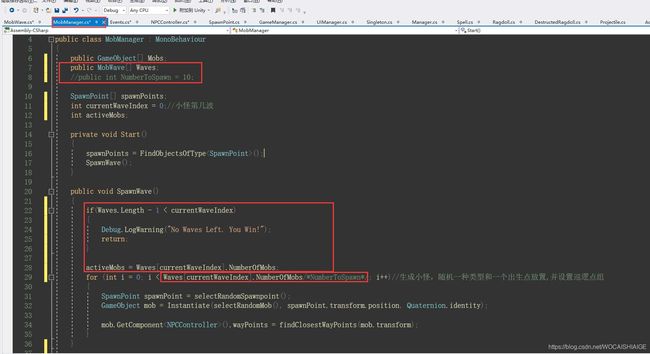
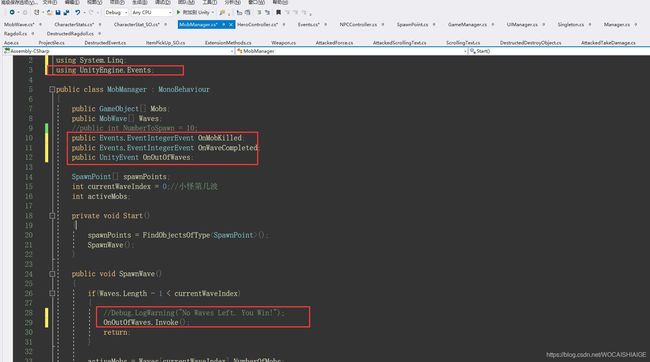
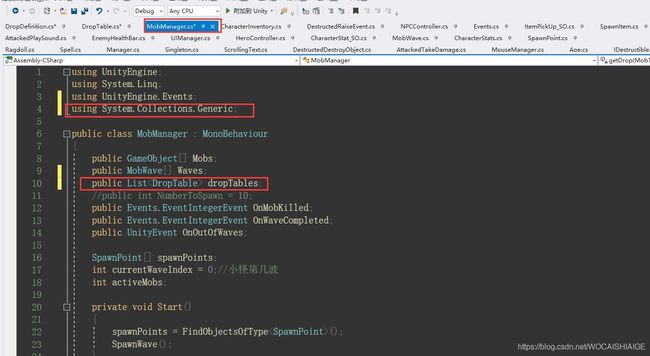
Monobehaviours文件夹下新建脚本MobManager用来生成怪物,并存入巡逻点
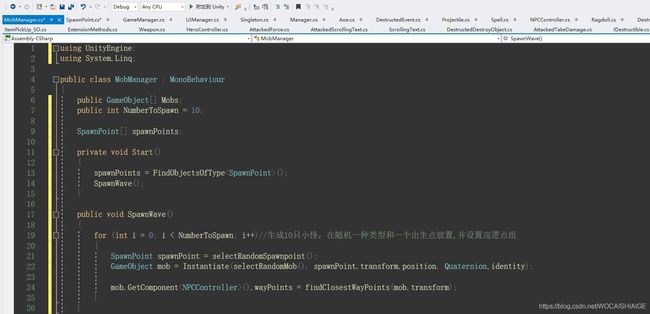

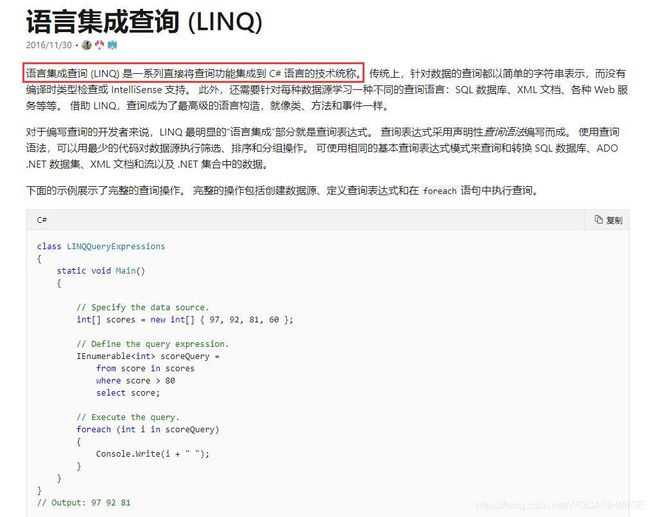
注意里面使用了LINQ,LINQ介绍
把写好的脚本绑到同名对象上
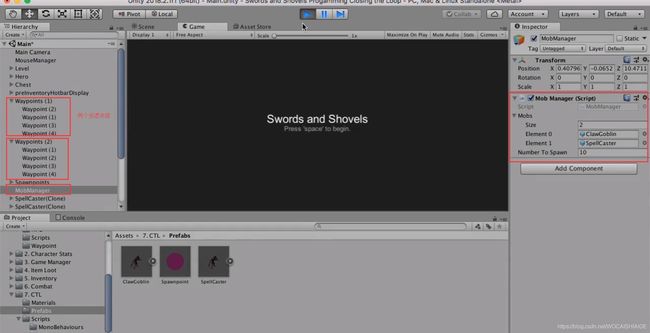
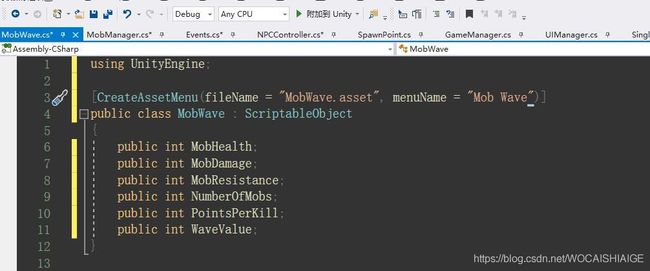
2.通过定义SpawnWave SO类型生成多波怪物
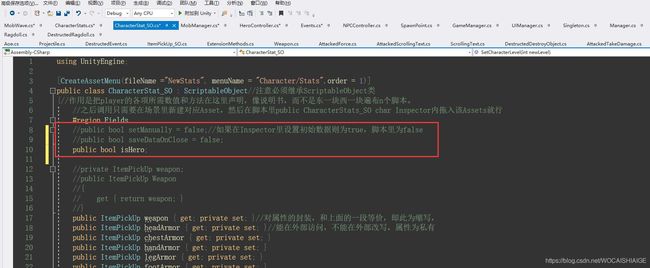
ScriptableObjects文件夹下新建脚本MobWave,为SO类型,定义怪物波相关数据。
在项目里新建两个MobWave类型,表示两拨怪

我们想要player砍死一波怪后生成下一波,直到所有波数的怪物都死了就提示player赢了。
实现思路是每波怪spawn时记录这波一共多少怪,每只怪死了就-1,直到为0.然后生成下一波怪,波数index-1,直到index达到最大值且spawn为0就通关。
怪物死亡触发,我们用UnityEvent。
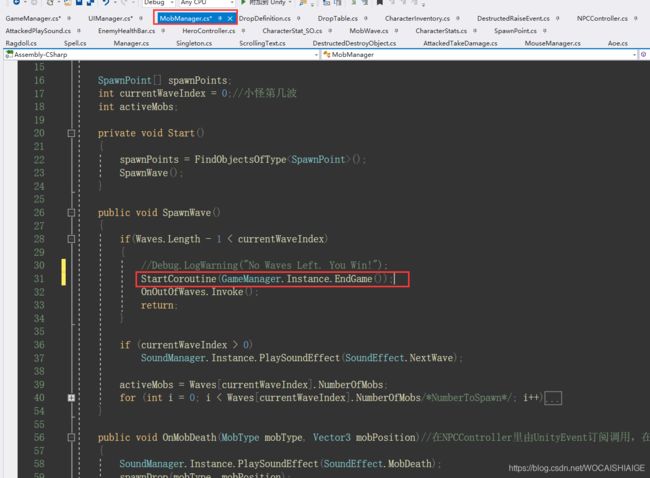
下面先来修改MobManager

然后新建Event,在Events脚本里添加

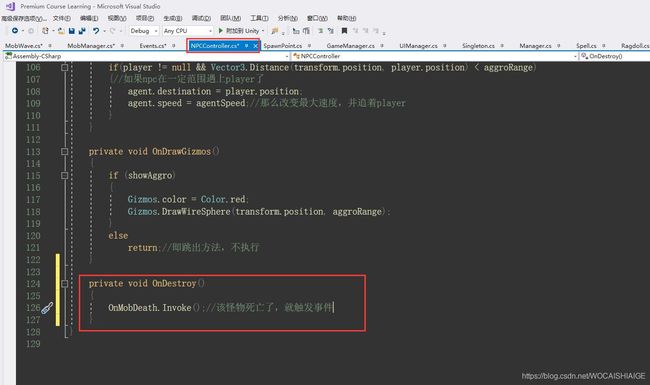
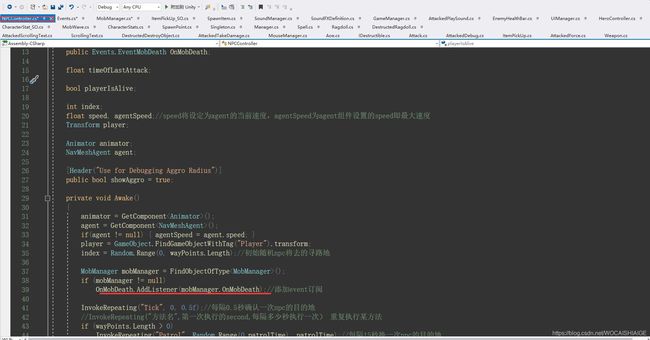
最后在小怪脚本NPCController里修改当怪物死亡触发

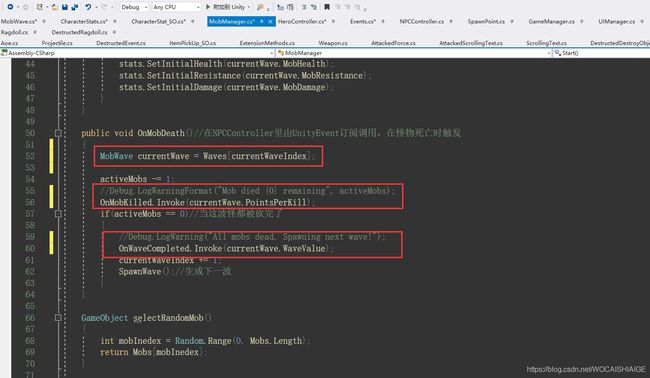
把MobWave数据填入,运行后可看到效果

3.怪物一波比一波强
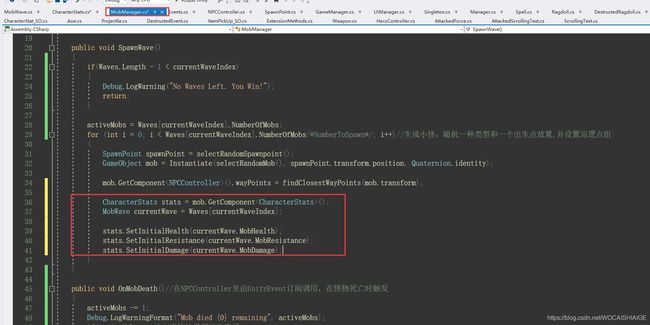
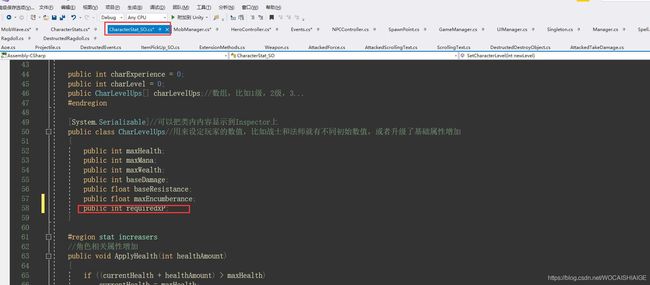
在MobWave SO类型中我们设定了一系列怪物相关数值,上面我们只是用了NumberOfMobs来respawn怪物,下面我们使用它关于怪物的生命值,伤害值,防御值来达成怪物一波强于一波。
首先MobWave SO的设置里第2波的各项数值应该大于第1波,然后我们把之前怪物的固定数值改成读取MobWave
在CharacterStats脚本里添加修改怪物属性的方法


再在MobManager里调用这些方法
3.Hero Progression
主要介绍:
使player升级
具体实现:
我们想要做的是杀死一个怪获得一些经验,等经验满升级条件player就升一级,各项属性也随之增加。
新建Event用于传输exp值

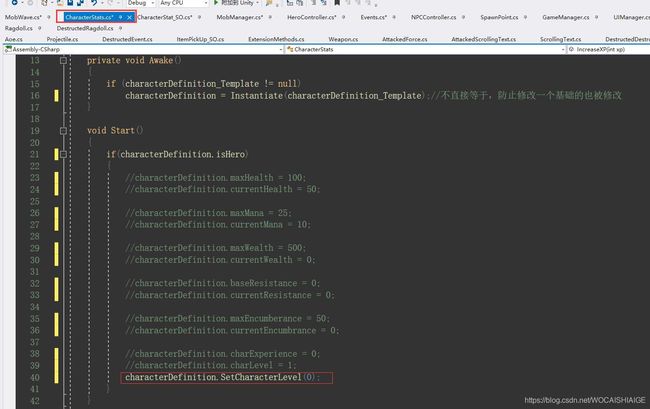
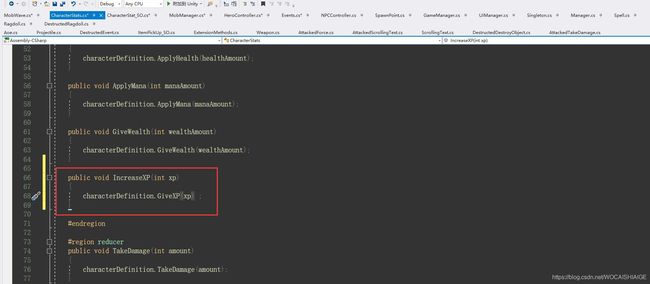
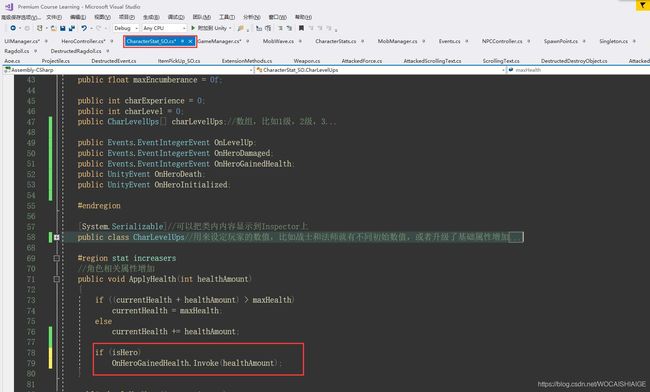
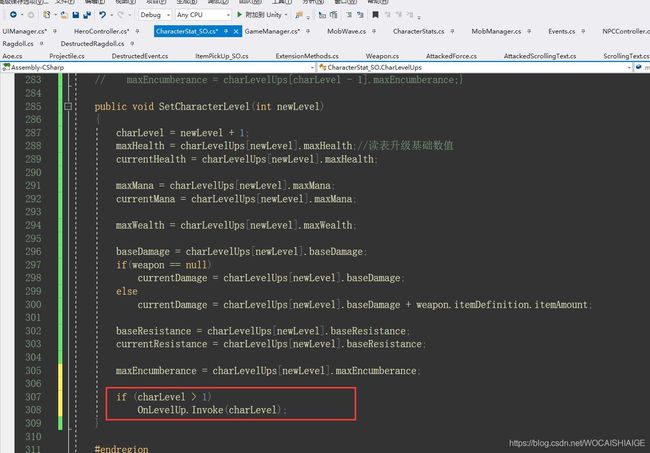
在CharacterStats_SO脚本里添加增加exp的方法,即exp值增加,并检查是否升级,如果升级则升级所有player数值。

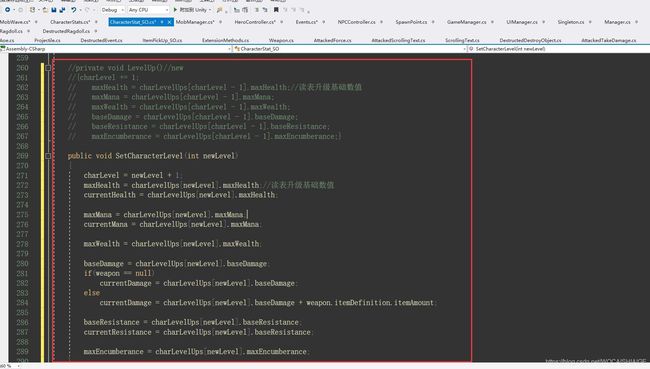
然后在CharacterStats脚本里调用方法,先设置初始player值
然后增加之后怪物死后的回调方法

最后在MobManager里Invoke
把3个回调方法拖入

然后编辑Wave数据,注意第一波的xp为0

逻辑链
enemy身上的NPCController在哥布林生命值低于0时触发→MobManager里的→对player身上的HeroController里的对→player身上的CharacterStats的exp方法→而这些方法的具体实现在CharacterStats_SO里。
4.Player Feedback
主要介绍:
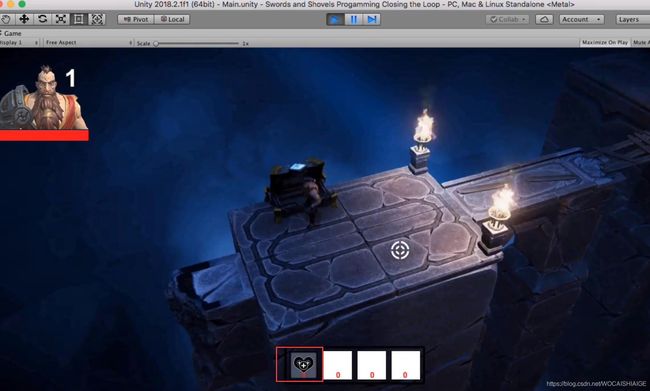
给player添加头像框显示血条和当前等级
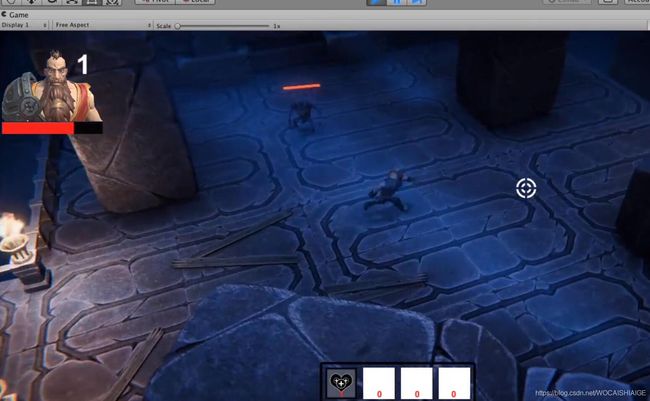
Enemy添加血条
播放音效
具体实现:
1.player头像框
注意血条是由两个同样大小不同颜色的纯色长条图片组成,Health_Full作为血条显示,填充方式为Fill,方向为Herizontal。保存好后把所有头像框setactive为false

然后根据player当前血量和等级显示血条。
我们先在UIManager里写 显示头像框,显示血条和等级的具体实现


然后在GameManager写在那些情况下使用上面的方法,注意里面找HeroController的引用的方式

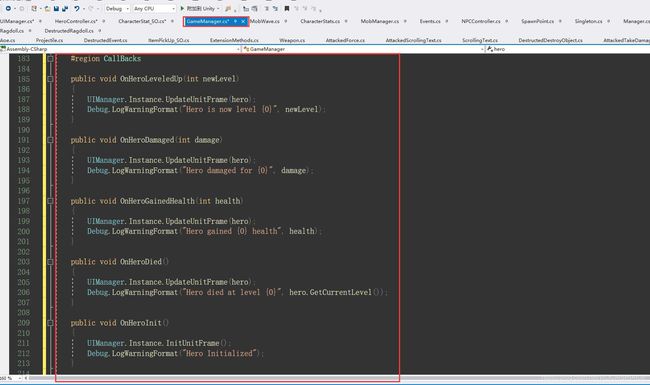
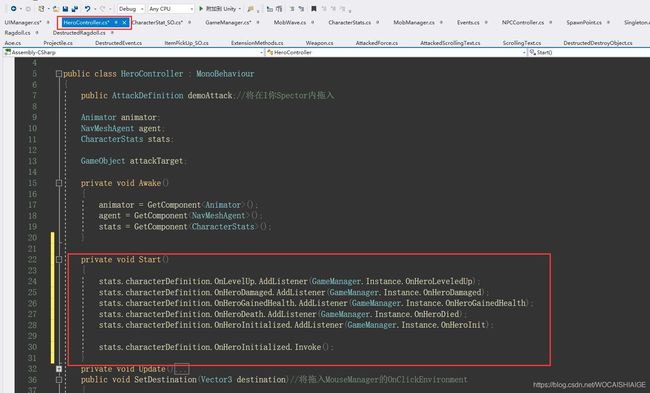
这些方法对应着各种情况,比如升级受伤吸血等,我们把这些情况生成Event发生并在对应情况时Invoke
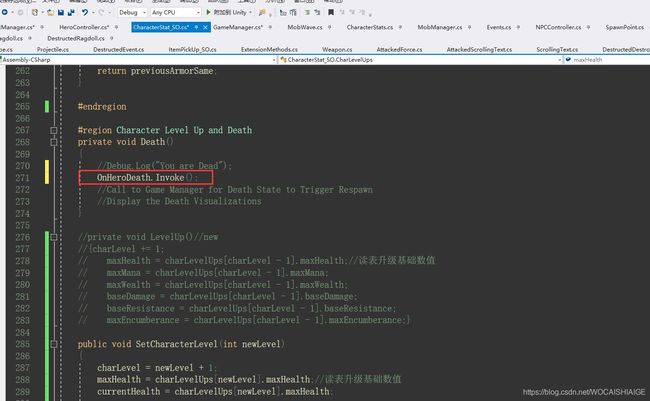
CharacterStats_SO编辑

最后在NPCController里给这些Events添加订阅来调用GameManager里的方法

然后把对应血条和levelText拖入

逻辑链条:
实现血条和等级显示(UIManager)→ CharacterStas_SO里生成各种情况的Event并Invoke → GameManager里写这些Events的Callbacks(对UIManager里方法的使用)→ HeroController里给Events添加订阅Callbacks,因为HeroController由具体的此player数据 CharacterDefinition。
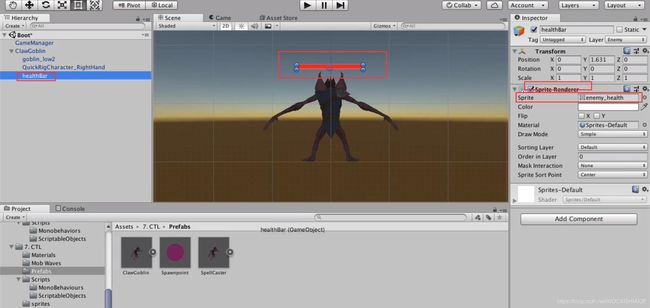
2.给Enemy添加血条
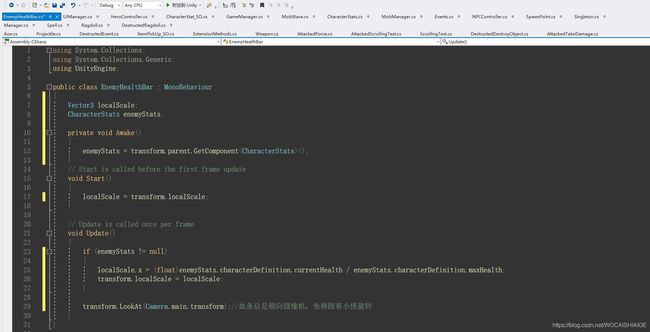
哥布林的Prefab拖到场景,下面新建Sprite命名为HealthBar,拖入血条的图片,然后Monobehaviours文件夹内新建脚本EnemyHealthBar,挂到HealthBar上,Apply后从场景删除
EnemyHealthBar脚本,通过当前血比例设置血条图片的面积scale的x值,并防止血条随着哥布林转动。
3.添加声音
ScriptableObjects下新建脚本SoundFXDefinition,用来定义每个情况下要播放的音频

Monobehaviours文件夹下新建脚本SoundManager

然后在场景新建空对象命名为SoundManager,添加SoundManager脚本,添加AudioSource组件,填入5种情况的enum和对应的clip。
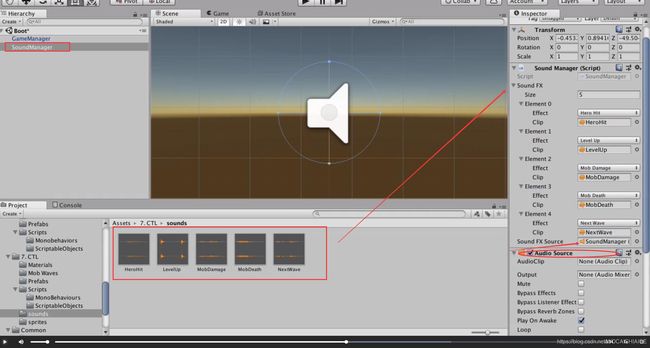
把该SoundManager对象存成prefab在场景删除,然后点击GameManager拖入该prefab,表示在某刻instantiate这些prefab,并添加进gameobject组,等到GameManager Destroy了把组内的这些prefab都destroy并clear组。
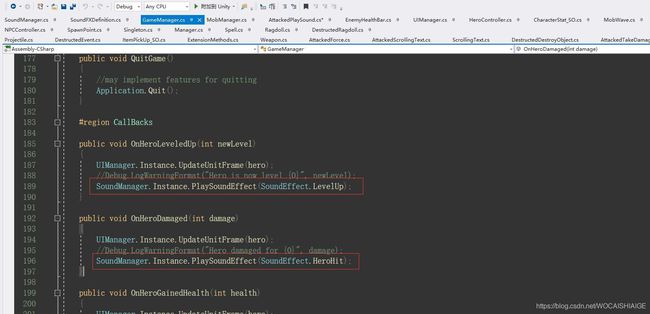
再在GameManager里实现升级音效和player被攻击音效
MobManager里实现小怪死亡和生成下一波怪的音频

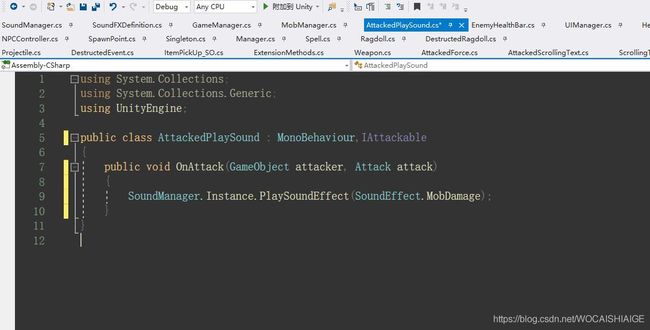
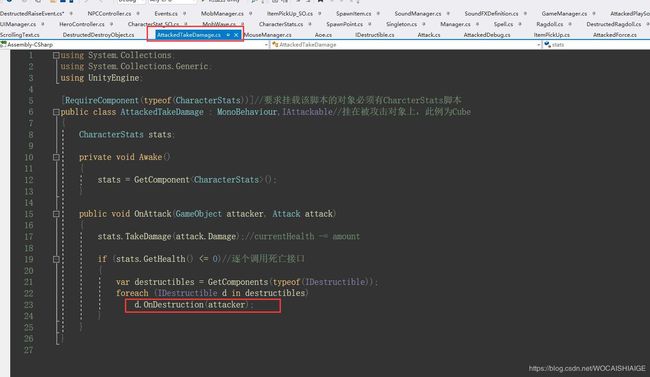
小怪被攻击的音频在哪里实现呢?还记得我们在Combat章里讲的,由IAttackable接口,怪物被攻击后实现所有该接口,所以我们在Combat的Monobehaviours文件夹下新建脚本AttackablePlaySound,继承IAttackable接口
所有IAttackable接口在AttackDefinition类中call,比如Weapon或Spell

5.Drops and Pickups
主要介绍:
添加红药(health potion)
使enemy掉宝
具体实现:
1.添加红药
我们使用之前Loot章所建框架。
项目内新建ItemPickUp_SO型item,命名为Health Position。注意type为Health,是否可交互,是否可储存(是则捡起进入仓库,否则捡起直接使用),是否可叠加,是否使用后销毁。Item Icon是在装备栏的Icon显示,Item Spawn Object是打开箱子后掉落在地上Item的prefab

因为我们已经有Material了(红色药瓶的Render),所以修改脚本SpawnItem

把箱子里的Spawn Item修改为刚才的红药数据,让它只掉红药方便我们测试。

运行游戏,打开箱子,捡起红药。
我们打下怪,血条下了一半,
然后摁1使用红药,红药在装备栏不见了,血条也恢复了。

2.让怪物掉宝
思路是不同的哥布林在死亡时掉不同的宝物,那我们要知道 :哥布林的种类,哥布林被杀死时的当前位置。
修改NPCController,添加怪物种类enum,注意删除了OnDestroy()原因写在下面

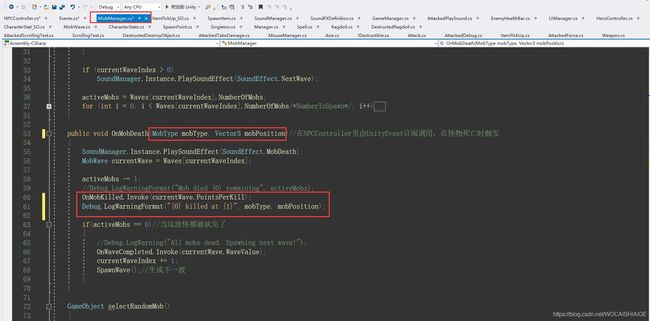
修改MobDeath的Event,带两个参数

注意MobManager.OnMobDeath监听该事件,所以去修改这个方法的参数
MobManager
在事件订阅改好了,我们之前在OnDestroy里Invoke事件,现在OnDestroy删除了,我们需要在哪里触发呢?
还记得Combat章里有一个接口IDestructable吗,专门处理当对象生命值低于0时的各项事务,我们就在这里触发
Combat下Monobehaviours下新建脚本DestructedRaiseEvent
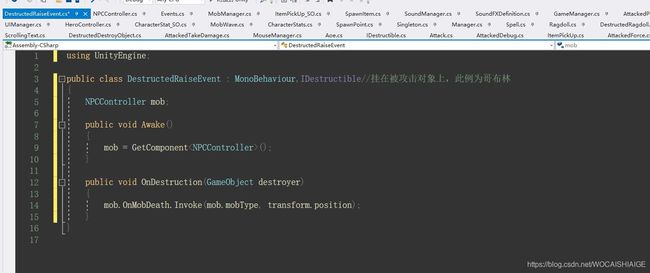
所有的IDestructable接口在这里触发
在哥布林的prefab上挂上,并选择当前种类。运行游戏可以看到哥布林顺利传到了参数并被销毁

现在我们把Inventory章和Combat章结合起来,怪物死亡后获得掉落物
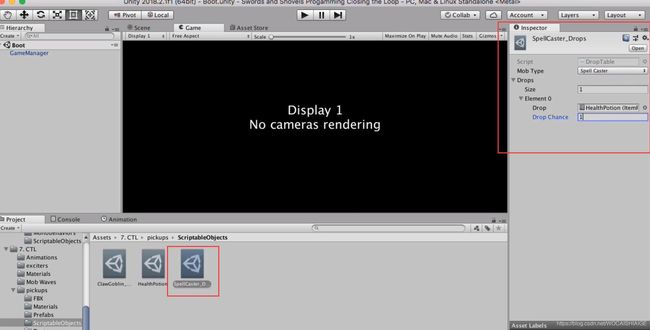
ScriptableObjects里新建DropDefinition和DropTable
DropDefinition是对掉落物的定义
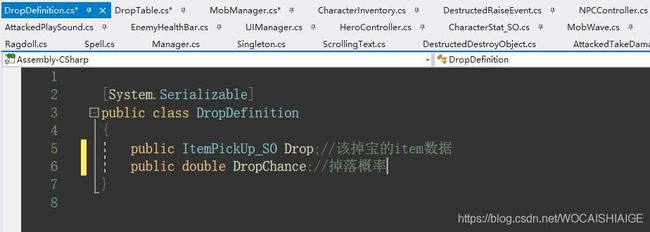
DropTable是对某类怪物掉落组的定义

我们在项目里生成两个掉落组,一个名为ClawGoblin_Drops
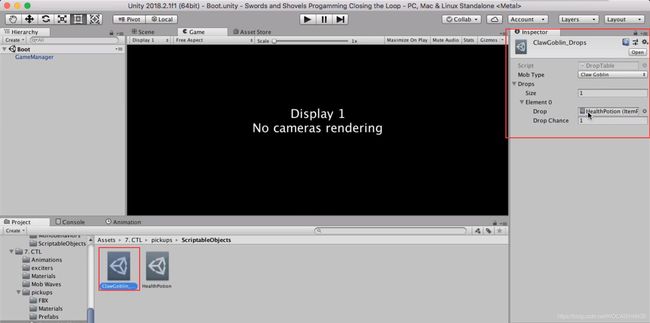
一个名为SpellCaster_Drops
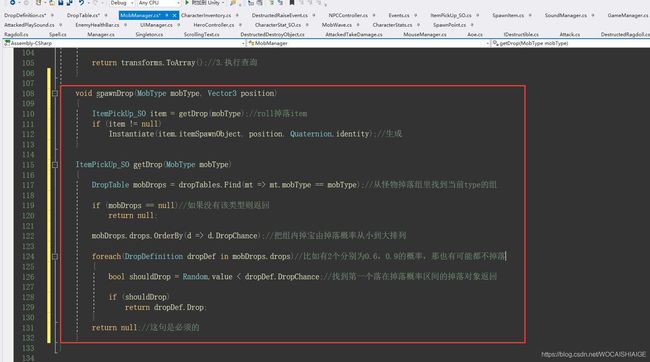
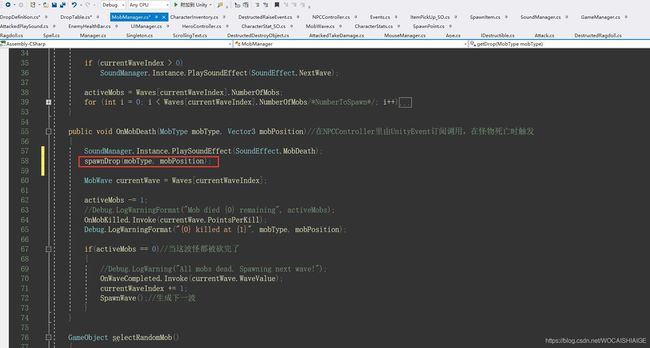
然后在MobManager里通过怪物死亡来,计算掉落物生成掉落物
6.Wrapping Up
主要介绍:
1.GameOver Scene
2.添加新的游戏状态(add a new game state)
3.重构(refactor)Manager
具体实现:
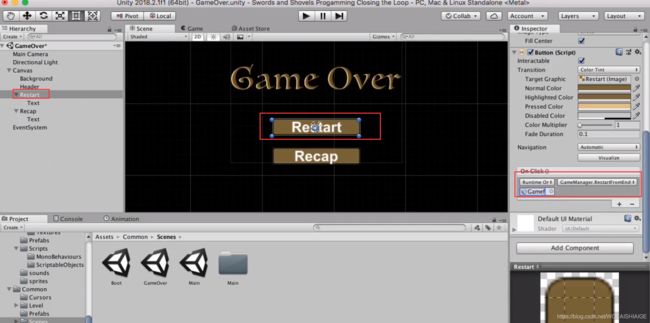
1.添加GameOver Scene
新建场景命名为GameOver,添加入build列表,设置为2D显示方便我们操作。添加Canvas,模式设置为Scale with Screen Size。

然后添加黑底图片和游戏结束图片,注意游戏结束的图片设置(Preserve Aspect保持图片自身的宽高比)

然后添加剩下的按钮,完整的GameOver Scene设置完毕

现在我们来修改脚本,先修改GameManager
UIManager脚本

MobManager脚本
然后来把方法和UI联系起来,先绑Restart按钮
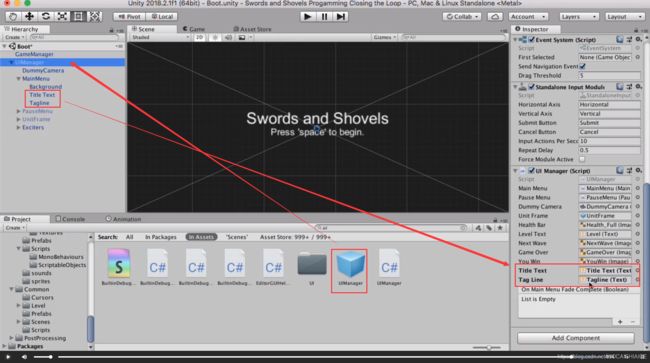
我们想之前实现的游戏设置界面,当摁重新开始时显示摁某个键开始。当现在实现的游戏结束场景中摁Start直接开始游戏而不是显示那个UI的两行字,所以我们再设置。在Boot场景里把UIManager Prefab拉入,拖入对应对象,Apply后删除,点击运行后到结束场景点击运行后就可直接加载场景。
2.保存数据
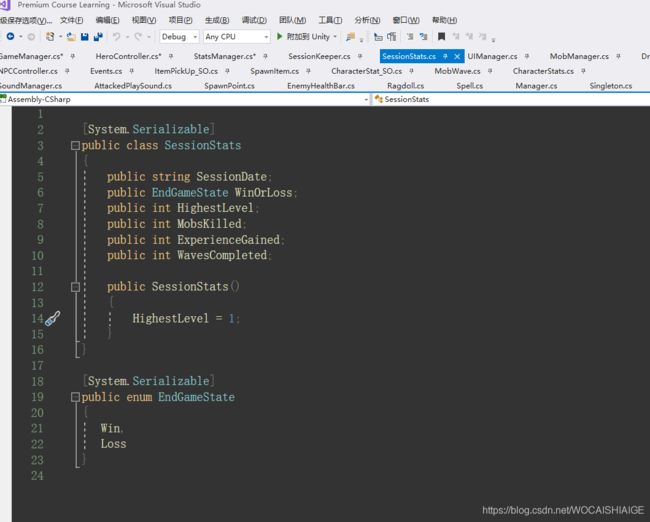
Monobehaviours文件夹下新建脚本命名为SessionStats表示stats格式
接着新建脚本SessionKeeper表示Stats数据List

接着新建脚本StatsManager用来读写数据
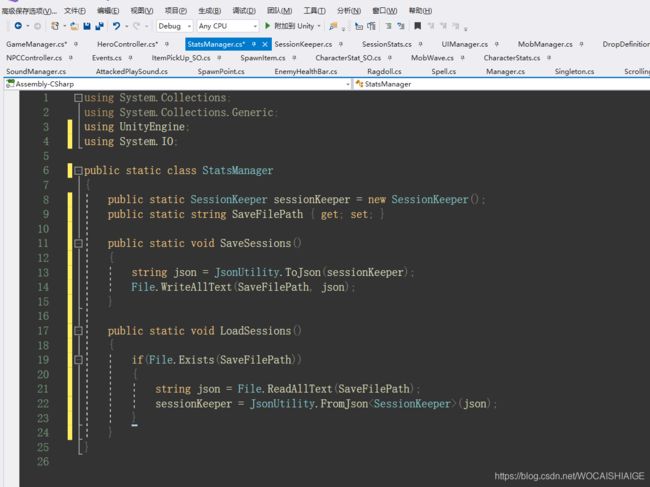
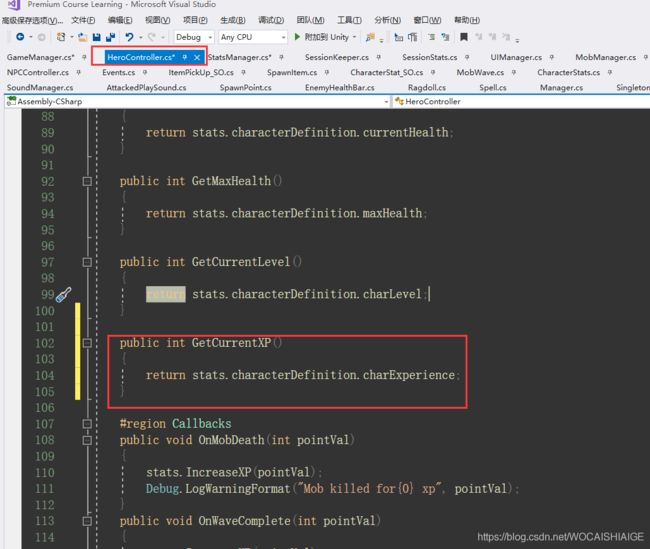
在HeroController脚本里添加读取当前player经验值的方法
然后在GameManager里实现更新数据读取和初始化
在Main场景的MobManager里添加事件监听,怪物死亡数据+1
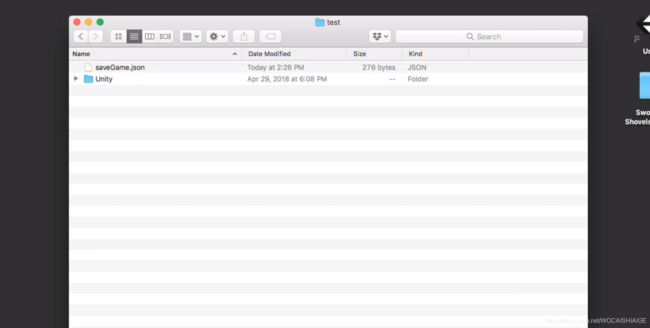
这是教程中运行了两次游戏后的persistent path
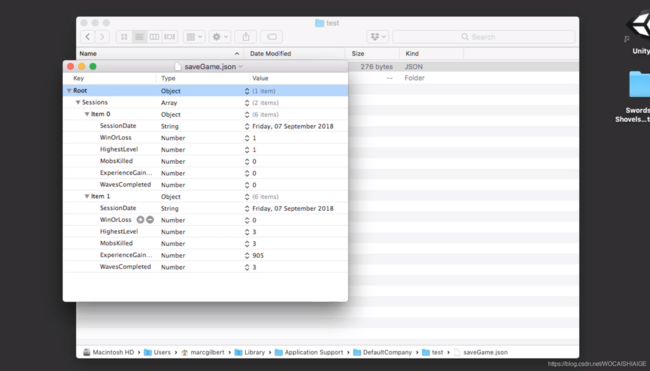
Json正确保存,注意WinOrLoss是枚举,显示是Number
3.向玩家显示stats历程
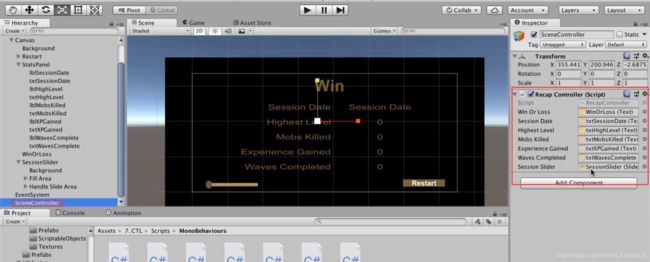
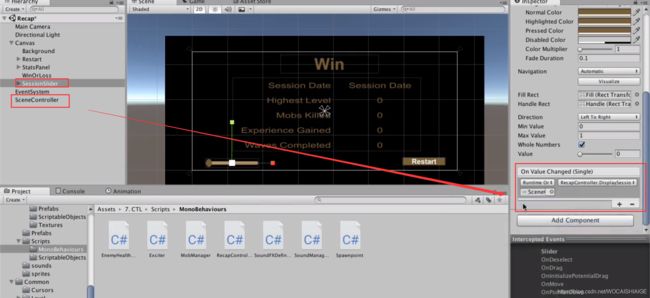
此章教程地址中的Display Session Data部分,如果想要参考怎样做一个历程Scene的UI可以查看,这里主要显示代码方面的实现。Recap场景如下,加入build数列。需要注意的是,下面的Slider的模式选择Whole Numbers,即变化值为整型。

新建脚本RecapController,挂在Recap场景里的SceneControler下

再在GameManager里添加显示Recap场景的方法

然后填入对应对象
然后在Slider里触发
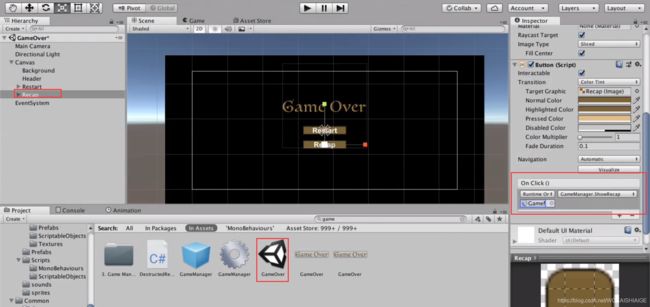
最后在Recap Button触发
7.总结
此章我们对之前这个剑铲游戏重构优化了一下,比如优化Singleton,把怪物由固定生成改成随机生成,使player可以升级,添加了血条音效,添加红药,使怪物死亡掉宝,游戏数据储存等。
课程资源链接