BulePrism进阶教程-6. Object Studio
As we have seen, Business Objects encapsulate the functionality of applications. A Business Object is only intended to be used via a Process and cannot be exposed to Control Room.
6.1. Creating a Business Object
We have briefly looked at Object Studio and seen that it is like Process Studio but with some additional features. In this section, we will look at how Object Studio is used to configure Business Objects.
Exercise 6.1.1 New Business Object
In this exercise, we will create a Business Object that can launch and log into the Order System training application.
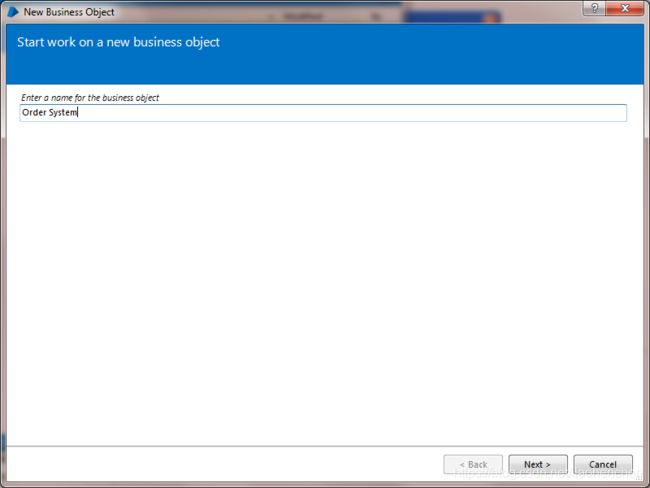
Navigate to Studio and create a new Business Object named Order System. You could use any name but it makes sense to go with the name of the application.
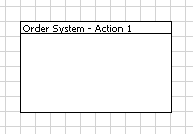
Once you are into Object Studio, you will have three pages - Initialize, Clean Up, and Action 1.
Tip: Initialize and Clean Up are default pages present in every Business Object and we will look at their purpose later on.
Figure 56: New Business Object Wizard
6.2. Application Modeler
We know that the purpose of a Business Object is to integrate with an application so as to provide a Process with the means to use the application. In order to create this integration, we must first “teach” the Business Object about the application by creating an Application Model.
Exercise 6.2.1 Application Modeler Wizard
Object Studio has a feature named Application Modeler that enables us to create a logical representation of an application. In this exercise, we will see how to set up Application Modeler with the basic details of the target application, Order System.
![]()
Figure 57: Application Modeler Toolbar Button
Open Application Modeler by pressing the toolbar button. The first time you open Application Modeler, a dialog box will appear asking for initial setup details.
Follow the steps through using these details:
Select Define a new Application Model with the name Order System.
Windows application type.
Application will be launched from an executable file C:\BluePrism\Training\Applications\Windows\TrainingOrderSystem.exe.
Step through the remaining steps in the Wizard by accepting the default values.
Tip: We will look at advanced topics like command line parameters and invasive techniques later.
Once the steps are complete, you will be presented with the Application Modeler screen.
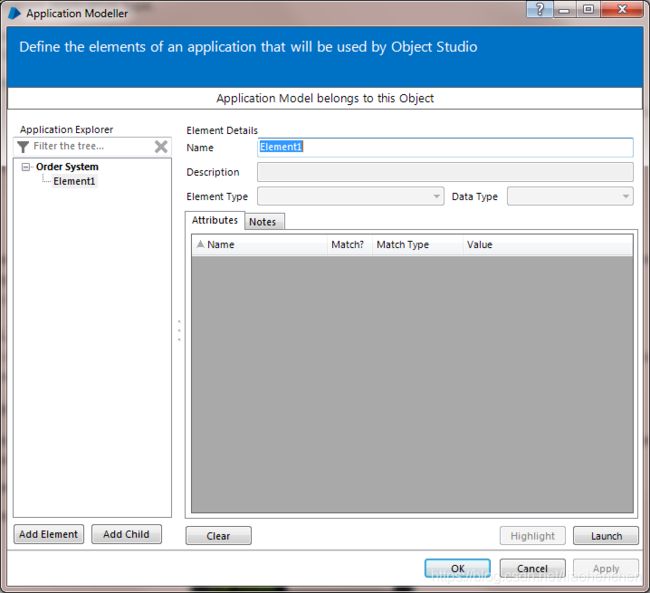
Figure 58: Application Modeler
The purpose of Application Modeler is to capture details of elements of the application user interface, things like fields, buttons, and windows. Once we have defined the elements we want to use, we can set about creating a diagram to interact with them
Exercise 6.2.2 Identify Elements
In order to select the application elements we want to use, we first have to launch the application. In this exercise, we will launch Order System and look at how Application Modeler finds elements on the application screen.
“OK” the Application Modeler to return to Object Studio.
Resize the Object Studio to about two-thirds the size of the desktop. Although not essential, having Object Studio slightly smaller than the desktop will help when we have multiple windows open.
Open Application Modeler again. Notice that this time the “initial setup” wizard does not appear.
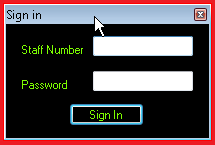
Press the Launch button and wait for the Order System Sign In window to appear.
Figure 59: Order System
Select “Element1” in the element tree on the left then press the Identify button (NB: the same button is used for “Launch” and “Identify”, and changes name once the application is launched).
Move the mouse over the Order System window. See that the individual elements of the window are being highlighted in red. Application Modeler is investigating the structure of the Order System window as the mouse moves over it. This is known as spying or spy mode.
Figure 60: Spying Order System
Before learning to identify elements, we will first cancel this spying operation. Hold down the CTRL key and right-click anywhere on the Order System application to cancel the highlighting and return to Application Modeler.
6.3. Spying Elements
Application Modeler spies elements as the mouse is moved over the application window. Details of an element can be captured by holding the CTRL key and clicking the left mouse button.
Exercise 6.3.1 Spying Elements
In this exercise, we will spy part of Order System and look at the details Application Manager captures.
Press the Identify Element button again and spy the Order System window. Move the mouse towards the top of the window so that the red highlighting surrounds the whole window.
Figure 61: Spying the Order System Window
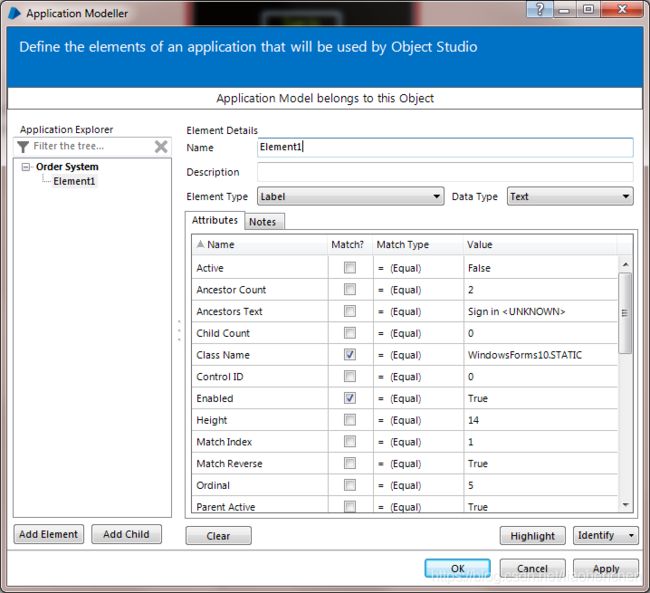
Hold down “CTRL” and left-click on an open area of the window. See that Application Modeler is now populated with details of the window.
Figure 62: Window Element Details
Key Points
Keep “CTRL” down until you’ve clicked the mouse.
To exit spy mode, it’s CTRL+right-click.
6.4. Attributes
Application details are drawn from the application as a list of attributes. These attributes are not data created by Blue Prism; attributes are characteristics of the element provided to Blue Prism by the application.
6.4. Attributes
Application details are drawn from the application as a list of attributes. These attributes are not data created by Blue Prism; attributes are characteristics of the element provided to Blue Prism by the application.
Once captured, this information can enable a Business Object to “remember” an element, and it does this by using a selection of attributes as the “fingerprint” of an element. This fingerprint is then used to identify and interact with the element from the Object Studio diagram.
Exercise 6.4.1 The Attribute List
Take a moment to scroll down the list of attributes.
Although some attributes may seem mysterious, you may recognize others, like “Window Text”.
Key Points
Attributes do not come from Blue Prism; the application provides these data to Application Modeler.
Application Modeler forms these attributes into elements.
Object Studio uses the elements to manipulate the application.
6.5. Attribute Selection
Application Modeler retrieves all available attributes from the application but typically only some of these are used to form the element fingerprint. The selected attributes are shown in the Match column, and can be checked or un-checked as required. The initial selection is a default choice made when the element is first spied, and although this first choice is often correct, it may well require manual adjustment to make a unique fingerprint.
There are many types of element (buttons, text boxes, etc.) used by many different kinds of applications (thick-client, thin-client, mainframe, etc.), each with a different set of attributes. Blue Prism cannot anticipate the construction of every kind of application it will ever encounter, and as such it is important to realize the initial selection of attributes made by Application Modeler is a suggestion and not an instruction.
Application Modeler cannot know for certain which combination of attributes will form a unique element fingerprint, but can posit a suggestion based on the type of element and type of application. The responsibility for finding the unique combination ultimately rests with you, the creator of the Business Object.
Key Points
Application Modeler suggests a selection of attributes when the element is spied.
The selection must uniquely identify the element and may require manual alteration.
In order to test whether Application Modeler has “remembered” the element correctly and that the element fingerprint is unique, we can ask it to try and “find” the element again.
Exercise 6.5.1 Highlighting Elements
In this exercise, we’ll check if the current selection of attributes enables Application Modeler with to “find” the element properly.
Press Highlight Element to instruct Application Modeler to find the element.
Notice how the Order System window is highlighted in red. This means Application Modeler can “see” the element and that the attribute selection is acceptable.
Highlight the element again - you can do this as often as you like.
Rename the element from “Element 1” to “Log In Window” and press “OK” to close Application Modeler (NB: you do not have to press “Apply” before “OK”).
We now have the beginnings of our model of Order System. Granted, the model only contains one element but it is enough for us to make a start in Object Studio. We will return to Application Modeler when we need more elements.
Key Point
The application model should not be created in one go but built up gradually. After spying a few elements, return to Object Studio to check their use from the diagram.
6.6. Launch
We have told Application Modeler how to start the application by giving it the path to the executable (.exe) file, and we have defined the details of the Log In window in our model so that we can use it in Object Studio. We now have enough information about Order System to create a page to launch it.
Exercise 6.6.1 Adding a New Page
In this exercise, we’ll make a page in the Order System Business Object that can launch the application.
Right-click on the Action 1 tab and rename it to Launch.
Notice how the menu is similar the one in Process Studio - new pages are added in a similar way.
Figure 63: Object Studio Page Menu
Best Practice
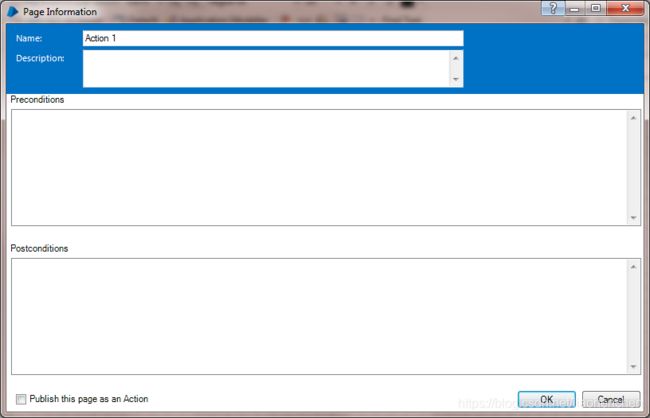
Figure 64: Page Information Stage
The application model should not be created in one go but built up gradually. After spying a few elements, return to Object Studio to check their use from the diagram.
Be descriptive when naming a Business Object page – use a verb to communicate the purpose of the page. For example, “Open Account History” or “Close Account History” is much better than just “Main Menu”.
Open the Page Information box and provide a description. As you become more proficient you should also document your pre- and post-conditions.
Figure 64: Page Information Stage
Exercise 6.6.2 Using a Navigate Stage
On your Launch page, add a Navigate stage and link it between the Start and End stages.
![]()
Figure 66: Navigate Toolbar Button
Figure 67: Navigate Stage
Open the Navigate properties and see that the element list from Application Modeler is displayed on the left.
Drag the very top (or root) element from the left-hand list into the Element column of the Actions list.
Select Launch in the Action drop-down list. Name the Navigate stage Launch to match.
Press “OK” to close the properties window and then link the Navigate stage between the start and End stages.
The Navigate stage is now ready to launch the Order System application.
Key Points
Just as in Process Studio, a Business Object must exist (i.e., be saved) in the Blue Prism database before it can run.
You don’t need to save every time, but you need to save before the very first run.
Exercise 6.6.3 Launching Order System
Manually close Order System and save the Business Object.
Run the page and see that Order System has been launched and the Log In window is displayed.
Close Order System yourself and then run the page again.
Is there anything we could check for to be sure the Launch action has worked correctly?
It may seem that Order System takes the same amount of time to start up every time. However, in a real-life situation where we would have no control over the response time of an application, and it is not unthinkable that performance could vary.
The Business Object needs to have patience be able to wait for a fickle application.
6.7. Wait
The Wait stage used to enable a Business Object to pause and wait for an application element. This allows a Business Object to deal with potentially erratic application performance. There are different element conditions to wait for but the most common is simply to wait for the element to exist.
Exercise 6.7.1 Waiting for Order System
Run the page and see that Order System has been launched and the Log In window is displayed.
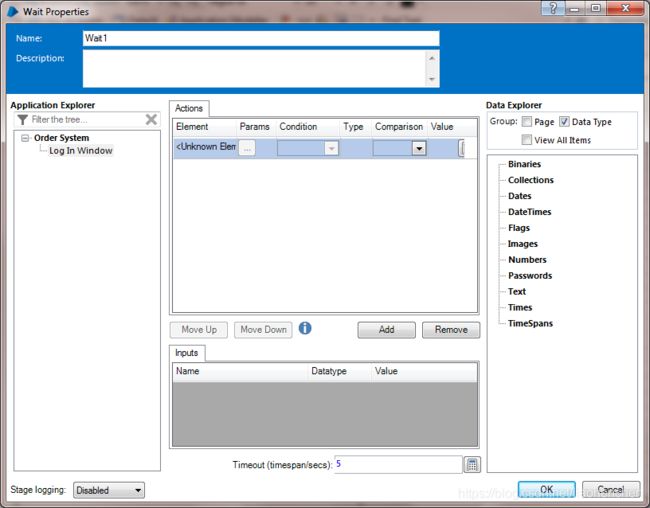
Add a Wait stage and connect the Navigate stage to the top of the Wait. The Wait properties window has three sections, a list of elements, a list of conditions, and a list of Data Items.
Figure 69: Incomplete Wait Properties
Drag the Log In Window element from the left-hand Application Explorer list and drop it into the Element column of the Conditions list.
Select the “Check Exists” option from the Condition column and leave the Comparison and Value fields with their default values of “Equals” and “True”.
Name the stage as you see fit (the name of the element, e.g., Log In Window can be used) and if necessary resize it to make things more readable.
Press “OK” to close the properties window.
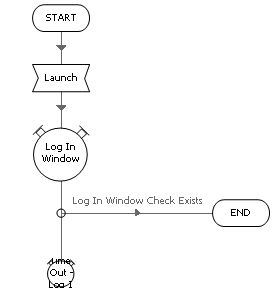
We now have a Wait stage capable of waiting for the Log In window to exist, but how should we position it on the page? Note that a new circular node has appeared in the middle of the Wait stage.
Exercise 6.7.2 Wait Conditions
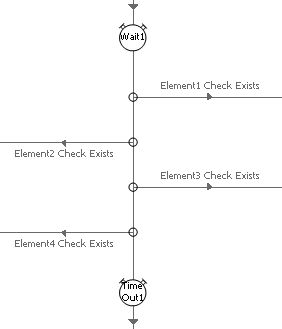
Link up the Wait stage as shown in the diagram. Notice that you can drag your Wait stage around to make it horizontal if you prefer to have the links vertical.
Close the Order System application, set the speed to maximum, press “Reset”, and then press “Go”.
Figure 70: The Check Exists Wait Condition
Although this configuration may seem trivial, it is central to the function of Object Studio and, without the Wait stage, we would have great difficulty creating a reliable application interface. Using the Wait stage, we give the Launch action a degree of flexibility in dealing with Order System.
Key Point
The Wait stage is absolutely vital to the creation of Business Objects.
Now let us imagine that Order System will not launch for some reason. Rather than let your Business Object wait for something that will never arrive, we will enable it to stop waiting.
Exercise 6.7.3 Wait Stage Timeout
Open the Wait stage properties and look at the Timeout field at the bottom of the window. Change the 5 to 0.1 and press “OK”.
Add an Exception and link to it from the Timeout end of the Wait stage as shown in the diagram.
Double click on the Exception and enter the Name and Exception Type as System Exception. For Exception Detail, enter the expression“Log in screen has not appeared” (remember to include the quotation marks). NB: we shall cover Exceptions in more detail later in the training.
Manually close the Order System application, press “Reset”, and then press “Go”.
Notice that the action flows to the Exception and does not take the original “Check Exists” path.
A Wait stage has a timeout value which defines the maximum time it is prepared to wait for a condition. If the condition does not occur within the given time, the Wait stage will direct the flow via the end point.
In the above exercise, we simulated a sluggish Order System by making the time out ungenerously small, giving the wait no chance to find the condition.
We will look at how to manage undesirable outcomes like a timeout later on in the course.
Exercise 6.7.4 Multiple Wait Conditions
Change the timeout value back to 5.
Go back and look at the properties of the Wait stage. Use the Add button to create a second wait condition and for now just populate it in the same way as you did the first row.
“OK” the properties window and look at the Wait stage, noticing how a second node has appeared.
Add a second End stage and link from the new wait condition to it as shown in the diagram. NB: this is an example only for illustration purposes; in reality the second identical wait condition is redundant.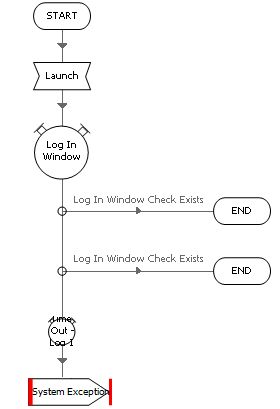
A Wait stage can be stretched out to accommodate lots of different conditions, providing separate paths to take according to each condition.
Figure 73: Multiple Wait Conditions
When multiple conditions are used, the Wait stage will check each condition in top-down order and opt for the first “true” condition it finds. If none are true by the time the specified time out period elapses, the end path will be taken.
Exercise 6.7.5 Using a Timeout as a Pause
Timeouts are not necessarily a negative event and can be useful for introducing pauses into a Business Object.
Add a new Wait stage to your diagram and give it a one-second timeout.
Link the Wait stage into your diagram (it doesn’t matter where) and re-run the page.
Notice how the page pauses on the Wait stage before continuing.
Tip: Run the page at maximum speed to see the effect more clearly.
By using a Wait stage without any condition, we can use the timeout as a positive outcome that simply delays the flow slightly. Pauses like this are often used to afford some “breathing space” to the target application, particularly if the application is better suited to a more “human-like” operating tempo.
Figure 74: Timeout Used as a Pause
Key Points
A Wait stage can wait for a single condition or several conditions.
A Wait stage will take the path of the first True condition or, if the timeout elapses, the action can proceed to carry out further actions or as noted previously to throw an Exception as something has not happened as expected.
An exception at the Timeout stage will alert the Process to an error that has happened.
A Wait stage can exist without any condition and the timeout can be used as a pause.
6.8. Timeouts
In the Wait stage used after launching Order System, we kept the default five-second timeout value. In most practical situations, it does not matter if you set this value much higher (e.g., to 30 seconds), because Blue Prism responds immediately once the expected condition is met – the timeout is merely the maximum amount of time that you are prepared to wait.
On the other hand, if you were to set the timeout to an unsuitably small value (e.g., 1 second), then you may experience unpredictable results. It is therefore better to overestimate rather than underestimate the length of time you need.
Best Practice
Be generous with timeouts - overestimate rather than underestimate.
Recall the timeout of five seconds which you applied to the wait stage above. In most practical situations, it does not matter if you set this value much higher (e.g., to 30 seconds), because Blue Prism responds immediately once the expected condition is met – the timeout is merely the maximum amount of time that you are prepared to wait.
On the other hand, if you were to set the timeout to an unsuitably small value (such as 1 second), then you would experience unpredictable results. It is therefore better to overestimate rather than underestimate the length of time you need.
Use Data Items to store timeout values. You should use Data Items to store timeout values so that you can modify multiple Wait stages with one easy change to a Data Item.
Business Objects should have global timeout period data items that are used in all wait stages in the object.
Using global data items to store timeout periods makes it easy to re-configure how long an application should wait for different types of system activity.
Exercise 6.8.1 Global Timeout Data Items
Visit the Initialize page of your Business Object. By convention, this is where global Data Items tend to be created. Create some global number Data Items like those below.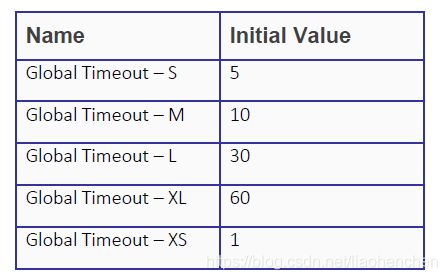
The initial values represent a number of seconds and we will use these Data Items instead of a fixed value when creating Wait stages.
Modify your Wait stage on the Launch page to use an appropriate timeout Data Item.
Typically a larger timeout would be used when waiting for a system to launch, navigate to a new page, update a record, or anything that may take considerable time to execute. Smaller values are more likely to be used for the more rapid movements of an application, such as waiting for a field to become enabled or a validation message to appear.
Exercise 6.8.2 Throttling
As mentioned above, a Wait stage without any wait condition can be used to create pause, and a Data Item can be used to control the length of the timeout.
Using this arrangement it is possible to create a “throttle” by placing Wait stages controlled by a global Data Item at key positions in a Business Object. Typically this could simply be done by starting every page with a “throttled” Wait stage.
The “Throttle” global Data Item can be used to manipulate the pace of a Business Object. To test its effect on a target application, a Business Object can be tested with a “tight” throttle that restricts it to the same pace as a human user. As testing progresses, the throttle can be released until an ideal speed is found. If the throttle is set to zero, the timeout will be instant and there will be no pause.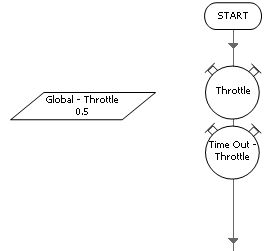
Figure 75: Throttling
6.9. Terminate
A Navigate stage can also be used to terminate or kill an application. As the name suggests, a termination is rather a severe way to close an application and often the application requires that the user (i.e., Blue Prism) should log out properly beforehand. Fortunately, Order System is robust enough to cope with being terminated.
Exercise 6.9.1 Terminating Order System
In this exercise, we’ll improve our Business Object so it can close down Order System.
Add a new page named Exit to the Order System Business Object.
Go back to the Launch page and copy the Navigate stage.
Return to the new page and paste in between the Start and End.
Edit the properties of the new Navigate stage so that it terminates Order System instead of launching it.
Tip: You cannot use a wait to check if Order System has closed because a wait can only work when the target application is running. Once the Navigate stage has terminated, the application any subsequent attempt to use an element from Application Modeler will cause an error.
Key Point
Using Terminate is similar to killing an application using Task Manager.
Although some applications are not adversely affected by being closed in this way, it is important to remember that some are and that a gentler, less severe Close method is required.
6.10. Write
Another Object Studio stage, named the Write stage, is used to send values to an application. The result of an expression is used to populate an application element defined in Application Modeler.
Exercise 6.10.1 Spying New Elements
Open Application Modeler and press Launch Application if Order System isn’t running.
Create a new element in the left-hand list and then spy the Staff Number field.
Tip: The Add Element and Add Child buttons will both add a new item to the list. They can be used to arrange elements in a tree structure.
Tip: List items can also be dragged to new positions and the mouse menu also has options to cut, copy, paste, and delete.
Key Point
Using Terminate is similar to killing an application using Task Manager.
You can organize your elements as you wish, although usually it makes sense to use a hierarchy that reflects the structure of the application.
Press Highlight Element to check everything is OK. What do you think is happening?
Application Modeler has found two elements and cannot distinguish one from the other. Each element must be uniquely identified by its attribute selection in order for Application Modeler to find it, but in this case a conflict has been found.
Figure 76: Highlight Element Warning
This is a deliberate error designed to illustrate what can happen in the development of a real-life Business Object, i.e., the selection of attributes suggested by Application Modeler does not uniquely identify the element and you need to make some adjustments.
Key Points
Application Modeler suggests a selection of attributes when the element is spied.
The selection must uniquely identify the element and may require manual alteration
Exercise 6.10.2 Finding Unique Attributes (Part I)
Look at the Attributes list to see which attributes are being used for Staff Number.
Find the Ordinal attribute and make a mental note of its value.
Check the Match column (ignore the Match Type column for now).
Press “Highlight Element” to check that the field has been uniquely identified.
Spy the Password field and adjust the selection of attributes in the same way. Compare the Ordinal value of the Password element with that of the Staff Number element.
The attribute selections initially suggested by Application Modeler did not work initially because the “fingerprints” of both elements were identical. By introducing Ordinal into the selection, we have made each fingerprint unique and enabled Application Modeler to “know” the difference between Staff Number and Password.
Key Points
Finding a winning combination of attributes is largely down to trial and error but as your experience grows, you will become more adept at making these adjustments.
Although Ordinal is a fairly common attribute and can, as in this example, make all the difference, it is not available in all application types.
Exercise 6.10.3 Using the Write Stage
Once you have successfully identified the two fields, create a new page named Log In and add two Data Items.
Name one Data Item My Staff Number, give it the Text data type and initial value “bp”.
Name the other Data Item My Password, give it the Password data type and the initial value password.
Add a Write Stage and open the properties.
As the name suggests, the Write stage is used to put values into elements and the properties form is laid out with a list of Data Items on the left and the elements on the right. The middle section is where we indicate which values want we want to go into which elements.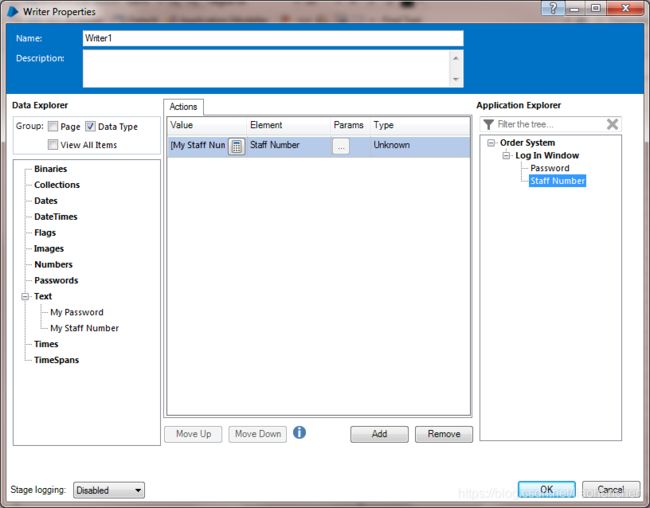
Find My Staff Number in the left-hand list of Data Items and drag it into the Value column.
Find Staff Number in the right-hand list of elements and drag it into the Elements column.
Name the stage Input User Credentials and click “OK”.
Link the up the Write stage and run. See that the value of the My Staff Number Data Item has been written into the field identified by the Staff Number element.
Exercise 6.10.4 Finding Unique Attributes (Part II)
So far, we’ve differentiated between Staff Number and Password and have spied both elements successfully. We also have a Write stage that has passed the value of a Data Item into the Staff Number field.
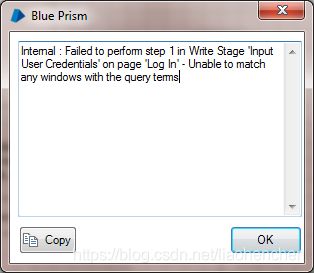
Reset and run the Log In page again. You should see an error message like this:
Figure 78: Unable to Match with Query Term
The “unable to match with query terms” message is Application Modeler’s way of telling you it cannot find the element. Essentially it is saying, “I can’t see the Staff Number element anymore.”
Again, this is a deliberate error designed to illustrate an important point. Elements change state as the application is being used, and sometimes that change in state is enough to disrupt Application Modeler and invalidate our attribute selection.
We know Staff Number used to work, but now it doesn’t. Think about what has changed with the Staff Number field since we first spied it.
The answer is that when we were in Application Modeler the field was blank, but after using the Write stage it is no longer blank. The content of the field is the only thing that has changed, and so this must be the reason Application Modeler is having difficulty.
Open Application Modeler and scroll to the bottom of the attributes of Staff Number.
Notice that the Window Text attribute is checked. This means it is included as part of the “fingerprint” of the Staff Number element. Notice also that the Value field is blank.
Commercial in Confidence Page 73 of 158
Again, this is a deliberate error designed to illustrate an important point. Elements change state as the application is being used, and sometimes that change in state is enough to disrupt Application Modeler and invalidate our attribute selection.
We know Staff Number used to work, but now it doesn’t. Think about what has changed with the Staff Number field since we first spied it.
The answer is that when we were in Application Modeler the field was blank, but after using the Write stage it is no longer blank. The content of the field is the only thing that has changed, and so this must be the reason Application Modeler is having difficulty.
Open Application Modeler and scroll to the bottom of the attributes of Staff Number.
Notice that the Window Text attribute is checked. This means it is included as part of the “fingerprint” of the Staff Number element. Notice also that the Value field is blank.
Figure 79: The Window Text Attribute
This effectively means that one of the conditions of the element fingerprint is “Window text = blank”, or in other words, “the field must be empty.” The Staff Number field used to be empty but it isn’t anymore. This is why Application Modeler can no longer “see” the field.
Exercise 6.10.5 Finding Unique Attributes (Part III)
Again, we need to make an adjustment to the choice of attributes we are using for Staff Number. In a similar way to how we added an attribute (Ordinal), we can also remove attributes from the selection.
Un-check Window Text to exclude the attribute from the Staff Number element definition.
Press Highlight to test that Application Modeler can “see” Staff Number again.
Manually remove the text from the Staff Number field and highlight again to confirm Application Modeler can find Staff Number, whether or not it is populated.
OK Application Modeler and re-run the Log In page.
Key Points
Using the application may invalidate elements in the application model.
The “unable to match with query terms” message is Application Modeler saying, “I can’t find that thing anymore.”
The selection of attributes can be reduced in order to make an element “correct”.
Exercise 6.10.6 Finding Unique Attributes (Part IV)
Modify the Log In page to write in the value of My Password as well.
Apply the same adjustments to make the page work, regardless of whether the fields are blank.
Tip: You can either create a second Write stage or modify the original Write stage by adding an extra row to the list of Actions.
Tip: In case you were wondering why the field values are overwritten and not appended, the Write stage doesn’t “type” into fields but “gives” the application a value to put into the field. This is also why the field can be populated even if Order System window is covered by another window.
6.11. Press
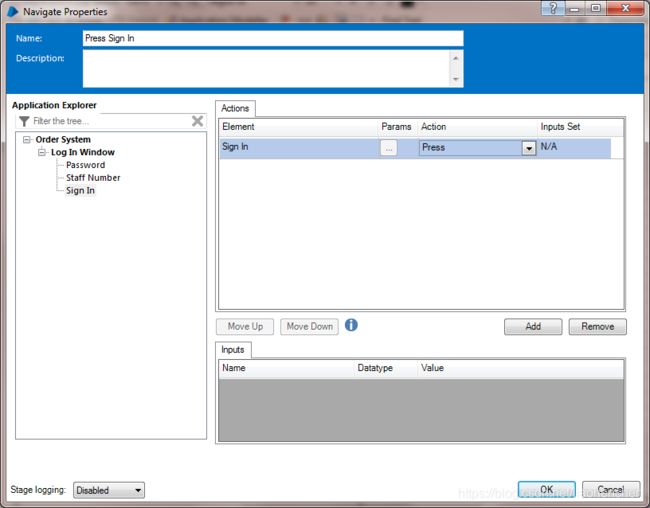
A Navigate stage can also be used to do things like press a button. The options made available in the Navigate properties form depend on the type of element being used.
Exercise 6.11.1 Pressing a Button
Open Application Modeler and press “Launch Application” if Order System isn’t running.
Create a new element in the left-hand list and then spy the Sign In button.
Use Highlight Element to check the button can be uniquely identified.
Key Point
You can use the mouse as normal when spying an application; holding the CTRL key prevents the mouse click from actually pressing the button.
Add a Navigate stage and link it between the Write stage and the End stage. Edit the navigate properties to press the button. Press “Reset” and “Go”.
Exercise 6.11.2 Waiting for Order System
Think back to the way in which we confirmed that the Launch page was successful and consider if we should add anything to the Log In page. Think of the state Order System should be in once we are logged in - which window will be displayed?
The answer is that after pressing the button, Order System should display its “Options” window
Figure 81: Order System Options Window
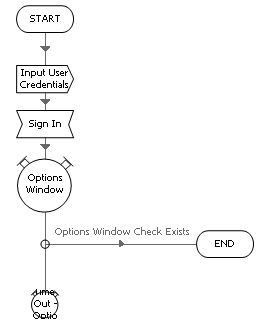
Once you have successfully logged in, spy the Options window of Order System and add a Wait stage after the Navigate stage. Your Log In page should look something like this:
Close Order System yourself and then run the Launch and Log In pages in succession.
Repeat until you are happy your Business Object is working correctly.
6.12. Attach and Detach
In some scenarios, the target application may already be running and we want to make use of that instance, rather than try to start another. Similarly, some systems require that the user first logs into a “parent” application that will then start the target application as a “child”.
In either case, we want don’t want Blue Prism to launch the target application, we want it to work with an instance that is already running.
We have already used a Navigate stage to launch Order System, and a Navigate stage can also be used to attach to or detach from a running application.
Exercise 6.12.1 Detaching from an Application
Start Order System by running your Launch page.
Press “Reset” and Press the Detach button on the toolbar.
![]()
Figure 82: The Detach Button
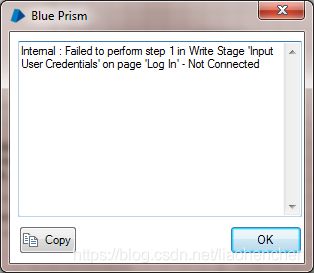
Then press “Reset”and run the Log In page. You should see the following error message:
Figure 83: Not Connected
The Detach button has “disconnected” the Business Object from Order System and as a result, the Write stage no longer works. Even though Order System is still there, the Business Object’s communication channel to the application has been severed and the Business Object is no longer “aware” that Order System is running.
Exercise 6.12.2 Attaching to an Application
Make a new page named Attach.
Go back to the Launch page and copy the Navigate stage.
Return to the new page and paste in between the Start and End.
Edit the properties of the new Navigate stage so that it attaches to Order System, instead of launching it. Before pressing “OK”, look at the list of input parameters at the bottom of the screen.
Figure 84: Attach Input Parameters
Press the Information button to see a description of Attach and its inputs.
![]()
Figure 85: The Information Button
For this exercise, we’ll use the Window Title parameter to indicate which window on the desktop belongs to Order System.
Tip: Look at the text at the top left of the Order System window.
Attach Inputs
In this exercise we’ll make the Attach page identify Order System by its Process name, rather than its window title. By “Process” we are not referring to a Blue Prism diagram, but the name of the executable that the target system is running.
Close Order System and run the launch page again.
Open Windows Task Manager (right-click on the taskbar or press CTRL+SHIFT+ESC).
Look at the list on the Applications tab of Task Manager and find the “Sign In” item.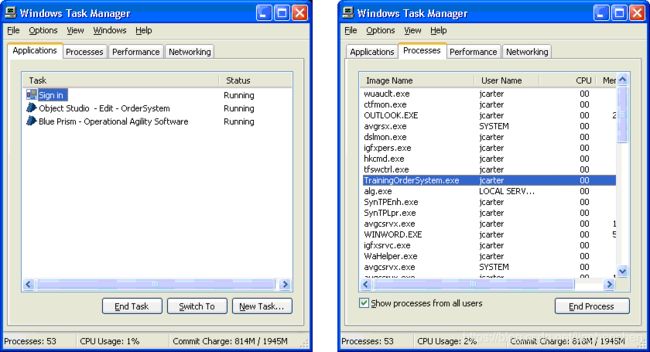
Figure 86: Task Manager
Right-click on “Sign In” and select the “Go to Process” option. Task Manager will then indicate the name of the Order System executable Process, i.e., TrainingOrderSystem.exe.
Go back to the Attach page.
Open the Navigate properties and take out the “Window Title” input value.
Enter the expression “TrainingOrderSystem” on the “Process Name” input below.
Tip: Remember the path to the executable file we first used in the Application Modeler wizard.
Tip: Do not include the “.exe” in the input value.
Exercise 6.12.4 Application Not Found
Recall that the purpose of Attach is to connect a Business Object to an application that is already running. If for some reason the application is not running, the Attach will fail.
Close Order System and run the Attach page again.
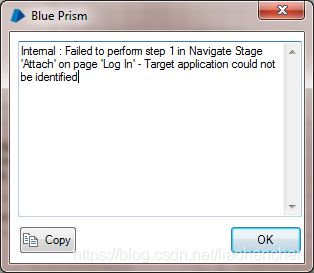
The Navigate stage should fail with the following message:
Figure 87: Application Not Identified
The Navigate stage has all it needs to attach but unfortunately the application is not running and so the Business Object cannot find it.
Exercise 6.12.5 Already Connected
Once a Business Object is attached to an application and further attempts to Attach will fail. For Attach to work, the Business Object must not be attached to the application already.
Run the Launch page again to start Order System.
Press the Detach button to sever the connection between the Business Object and the application.
![]()
Figure 88: The Detach Button
Run the Attach page to restore the connection.
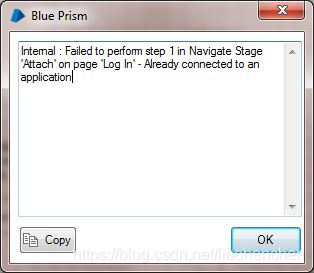
Run the Attach page again to see the following message:
Figure 89: Already Connected Message
Key Points
Attach is used to connect a Business Object to a running application.
Detach is used to disconnect a Business Object from an application.
Attach needs an input value to help it identify the application.
Attach will fail if the Business Object is already attached.
When a Business Object launches an application, it is attached automatically.
6.13. Read
As the name suggests, the Read stage is the opposite of the Write stage; it is used to read data from an application. A Write stage takes data (from the result of an expression) and puts it into an Application Modeler element, whereas the Read stage takes data from an element and stores them in a Data Item.
Exercise 6.13.1 Reading from the Application
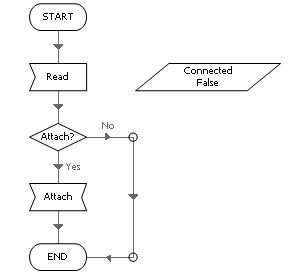
The most common use of the Read stage is to read data from fields, but we can also read from the application itself. In this example, we will use a Read and a Decision to check if the Business Object is attached to Order System.
Launch Order System from your Business Object and then look at the Attach page.
Recall that if we were to run the Attach page, we would get the “already connected” error message (because launching attaches the Business Object automatically).
Create a Data Item named Connected with data type Flag and default value False.
Add a Read stage in between the Start and the Navigate (you may need to make some space).
![]()
Figure 90: Read Stage Button
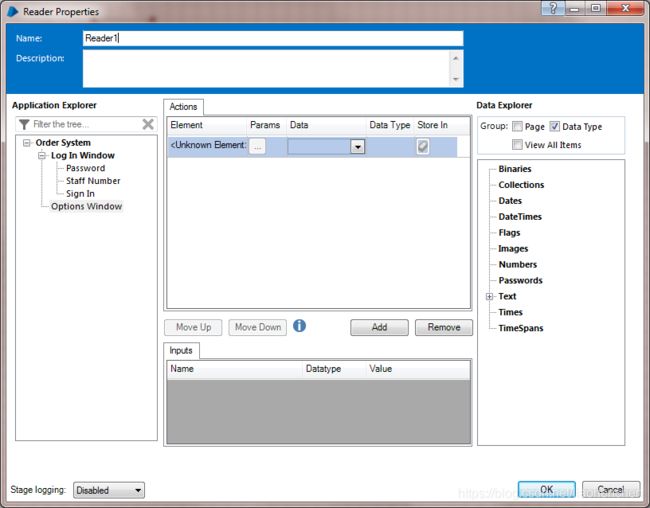
Open the Read stage properties and see that it is similar to the properties of a Write stage, but now the list of elements is on the left and the Data Items are on the right.
Figure 92: Read Properties
Drag the very top (or root) element from the left-hand list into the Element field near the center of the screen.
Select Is Connected from the Data drop-down list.
Drag the Data Item named Connected from the right into the Store In field (remember how a Calculation stage has a “Store In” field too).
Figure 93: Reading "Is Connected"
“OK” the properties window.
We now have enough information to decide whether to attach or not. If the Business Object is not connected, we can route the diagram to the Navigate stage to make the attachment. Otherwise, we should avoid the Navigate stage to avoid causing the “already attached” error.
Below the Read stage add in a Decision to check if the value of the flag Data Item. Use the expression [Connected]=False.
Link the “Yes” branch of the Decision to the Navigate stage and the “No” branch around it. Your Attach page will look something like this:
The Attach page is now able to detect whether it needs to make the attachment or not. This means we can now run the Attach page without worrying if we will cause the “already attached” error.
Experiment with the Attach page by running it after detaching from Order System.
Try closing Order System and then running the Attach page.
We will look at reading from fields later on in the course.
6.14. Actions
We now have a basic Business Object that can launch, log in, and close the Order System application. Remember a Business Object can only be used via a Process, so we need to return to Process Studio to continue testing.
An Action stage allows us to use a Business Object in a Process.
Exercise 6.14.1 Using the Business Object
Save and close Object Studio and close Order System if it is running.
Create a new Process named Order System Test Rig and add a new Action stage.![]() Figure 94: Action Toolbar Button
Figure 94: Action Toolbar Button
Open the Action properties window and select Order System in the first drop-down.
Now open the second drop-down list but see that it is empty.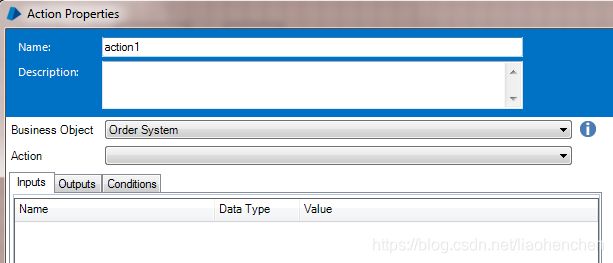
Figure 95: Action Stage Properties
We know the Order System Business Object has pages but for some reason they are not listed. Think back to when we first used Control Room but could not see our Circular Path Exercises Process initially.
Like a Process, Business Object pages must be published before they are exposed for use. This allows us to control what can and cannot be used.
Exercise 6.14.2 Publishing Business Object Pages
Reopen the Order System Business Object. You can do this by right-clicking on the Action stage and selecting View action in Object Studio.
Figure 96: Viewing Action in Object Studio
Publish the Business Object pages by right-clicking on the page tabs. Notice the icon on the page tab denoting a published page.
Figure 97: Publishing Business Object Pages
Save and close the Business Object.
Return to Process Studio and press the Refresh button to load the latest Business Object definition from the database.![]() Figure 98: Refresh Button
Figure 98: Refresh Button
Look again at the Action stage properties to see that the second drop-down list has now changed.
Figure 99: Published Pages in the Action List
Add two more Action stages to create a Process to launch, log in, and close Order System. It should look something like this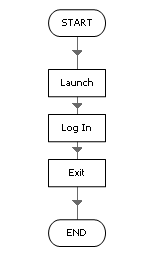
Run the Process to check everything works as expected. Remember that a Process must be saved at least once before it can run.
Publish, save, and close the Process, and then run it in Control Room. Notice how the Process runs much quicker in Control Room.
6.15. Action Inputs and Outputs
Earlier we looked at using inputs and outputs with pages and sub-Processes. In fact the most common usage for inputs and outputs is with Action stages.
Just as a Business Object provides a Process with the functionality, it needs to manipulate an application; it is the inputs and outputs of the Business Object’s pages that move data back and forth between the Business Object and the Process.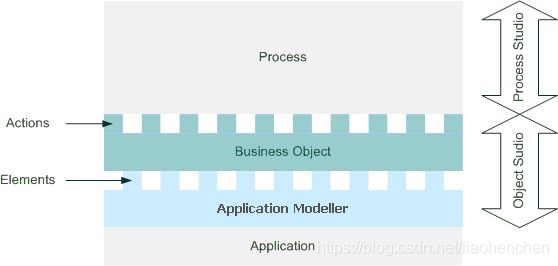
Figure 100: Published Pages in the Action List
Exercise 6.15.1 Adding Log In Inputs
Currently, our Order System Business Object will log in using the same staff number and password every time. This isn’t ideal, as in reality we’re likely to want to be able to log in using a variety of different user credentials.
In the Order System Business Object, add Staff Number and Password input parameters to the Start stage of the Log In page.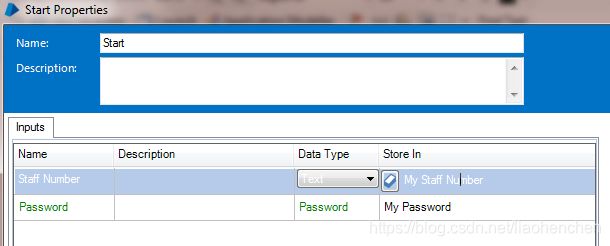
Figure 101: Input Parameters
Note down a note of the initial values of the two Data Items before changing them to blank.
Save the changes, open the Order System Test Rig Process, and look at the properties of the Log In action.
Previously, when the Log In page of the Business Object didn’t have any inputs, the properties of the Action stage in the “Test Rig” Process did not have any input either. Now, though, there are inputs and the Business Object is effectively asking the process to provide it with data. Essentially, the Business Object is saying to the Process, “What staff number and password do you want me to log into Order System with?”
Key Points
Inputs to a page in Object Studio provide the means for a Process to supply data to the Business Object.
In Process Studio these inputs are shown in the properties of the Action stage.
Refer back to your note and populate the new inputs, then test that they work. For now, don’t worry that you can see the password value in plain text.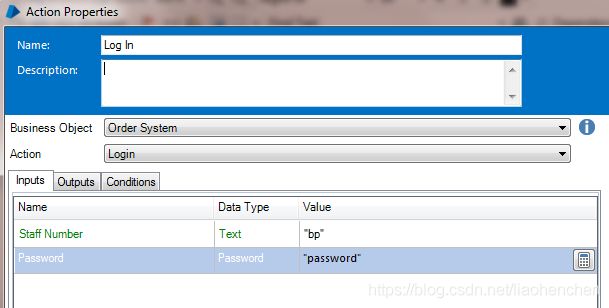
Figure 102: Input Values from Text Expressions
The Business Object no longer possesses staff number and password values because we have made its Data Items blank. The Process is now telling the Business Object what values to use via the inputs in the Action stage.
The inputs are used to set the current values of the Data Items on the Log In page of the Business Object, and in turn they are used by the Write stage to populate the fields on the application window.
6.16. Data Items as Inputs
Input values are supplied as the result of expressions. These expressions can be made complex if necessary but in reality they are usually made using the names of Data Items.
Exercise 6.16.1 Data Items as Inputs
The Order System Test Rig Process is now supplying the Order System business object with staff number and password values. The Business Object doesn’t contain any user credentials anymore and so cannot log in on its own – it must be provided with inputs.
The Process is currently supplying those inputs with the expressions “bp” and “password”. Let’s change those expressions to use Data Items rather than plain text.
Create a new Data Item named SN with data type Text and initial value bp.
Key Point
The initial and current values of a Data Item are not expressions, and as such text values do not need quotation marks.
Create a new Data Item named PW with data type Password and initial value password.
Amend the inputs in the Action stage properties so that the expressions use the new Data Items instead of text values.
Figure 103: Inputs
Run the Process again to check it works correctly. You should now see that the user credentials held in the Data Items in Process Studio are passed down into Object Studio and used to log into Order System.
Critically, we now don’t need to modify the Business Object to have it log in using different user credentials – we simply provide it with different input values.
6.17. Review
Application Modeler is used to spy application elements and capture their details as attributes.
A selection of attributes is used to uniquely identify an element.
Some adjustment of the attributes may be required to identify an element correctly.
A Navigate stage is used to perform an action on an element, such as launching the application or pressing a button.
A Business Object does not have to launch;business objects can also attach to applications that are already running.
A Write stage is used to send values to the application.
A Read stage is used to get values from the application.
A Wait stage is used to pause and wait for the application.
An Action stage is used to call a Business Object page from a Process.
Inputs transfer data from a Process to a Business Object.
Blue Prism Keywords
Application Modeler, Spy, Highlight, Element, Attribute, Navigate, Launch, Wait, Read, Write.
