Elastic日志系统-es快照备份指定索引
背景:
在3主机es集群上进行指定索引的备份。每天备份一次,保留指定天数的备份数据。
1. 准备工作
挂载共享目录
mount -t nfs 192.168.25.11:/home/es-backup /home/esbackup
注意:这个共享目录,最好是跟3主机都没关系的的存储主机
修改挂载目录权限
chown -R elasticsearch.elasticsearch /home/esbackup
注意:修改权限后,看一下三台主机权限是否一致。如果有elasticsearch用户,在不同主机上,uid,gid不同的情况,可能要修改uid,gid。
或者能保证elasticsearch用户有共享文件夹的读写权限也可以。
如果出现要修改uid,gid的情况,注意修改后,执行以下命令,否则es会启动异常
chown -R elasticsearch.elasticsearch /etc/sysconfig/elasticsearch
chown -R elasticsearch.elasticsearch /etc/elasticsearch
chown -R elasticsearch.elasticsearch /var/lib/elasticsearch
chown -R elasticsearch.elasticsearch /var/log/elasticsearch
修改配置文件
echo "" >> /etc/elasticsearch/elasticsearch.yml
echo "### backup index ###" >> /etc/elasticsearch/elasticsearch.yml
echo 'path.repo: ["/home/esbackup"]' >> /etc/elasticsearch/elasticsearch.yml
分别重启es服务
尽量在业务低峰期进行重启,以免配置出错,影响生产环境使用
systemctl restart elasticsearch && systemctl status elasticsearch

# 每台重启完成后注意观察集群状态

# 观察集群节点数,重启之后的节点是否重新加入了集群
curl -u elastic:changme http://192.168.25.12:9200/_cat/nodes

# master节点情况
curl -u elastic:changme http://192.168.25.12:9200/_cat/master

# 集群健康度,一定要在集群恢复green之后再重启另外一台
curl -u elastic:changme http://192.168.25.12:9200/_cat/health
集群重启完成之后,开始进行快照备份设置
2. 配置快照备份
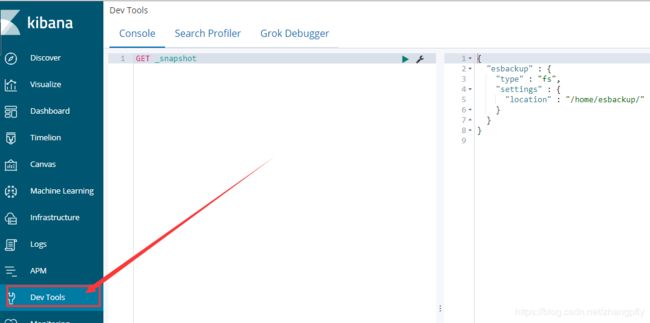
打开kibana的调试工具,下面的操作命令都是在调试工具中进行的

开始备份
# 查看所有仓库
GET _snapshot

# 查看所有索引
GET /_cat/indices

# 创建备份仓库
PUT _snapshot/esbackup
{
    "type": "fs",
    "settings": {
        "location": "/home/esbackup"
    }
}

# 备份指定索引
PUT _snapshot/esbackup/snapshot_20191202
{
    "indices": "test_index"
}

# 查看备份情况
GET _snapshot/esbackup/snapshot_20191202/_status
或者:
GET _snapshot/esbackup/snapshot_20191202
快照恢复
恢复快照的时候,记得要把原来的备份的指定索引删掉或关闭
DELETE /test_index # 删除
POST /test_index/_close # 关闭
利用快照,重建恢复索引
POST /_snapshot/esbackup/snapshot_20191202/_restore
还有附加的选项用来重命名索引。这个选项允许你通过模式匹配索引名称,然后通过恢复进程提供一个新名称。如果你想在不替换现有数据的前提下,恢复老数据来验证内容,或者做其他处理,这个选项很有用。让我们从快照里恢复单个索引并提供一个替换的名称:
# 例
POST /_snapshot/esbackup/snapshot_20191202/_restore
{
    "indices": "",
    "rename_pattern": "logstash-other-(.+)",
    "rename_replacement": "restored_index_$1"
}

POST /_snapshot/esbackup/snapshot_20191202/_restore
{
    "indices": "test-index",
    "rename_pattern": "test-index",
    "rename_replacement": "restored_index"
}
# 这样利用test-index快照snapshot_20191202恢复后的索引就是restored_index
查看快照恢复情况
GET _recovery
GET test_index/_recovery
删除指定快照
DELETE _snapshot/esbackup/snapshot_20191202
3. 备份与删除脚本
我们用脚本来每天定时进行快照备份和定期删除
#!/bin/bash

# 执行快照备份
time=$(date "+%Y%m%d")
logfile="/tmp/esbacklogs/"${time}".log"

curl -s -u elastic:changme -XPUT "http://192.168.25.12:9200/_snapshot/esbackup/snapshot_"${time} -H 'Content-Type: application/json' -d'
{
    "indices": "test_index, test_index2"
}'

# 快照备份需要一定时间,60s后检查备份情况
sleep 60

echo ""
curl -s -u elastic:changme -XGET "http://192.168.25.12:9200/_snapshot/esbackup/snapshot_"${time} | grep "SUCCESS" >> $logfile

if [ $? -eq 0 ]
then
  echo "backup elasticsearch success" >> $logfile
else
  echo "backup elasticsearch fail" >> $logfile
fi
echo ""

# 删除10天前的快照
delete_time=$(date "+%Y%m%d" -d " -10 day")
curl -s -u elastic:changme -XDELETE "http://192.168.25.12:9200/_snapshot/esbackup/snapshot_"${delete_time} >> $logfile
参考文章:
https://www.elastic.co/guide/cn/elasticsearch/guide/current/_restoring_from_a_snapshot.html
https://www.elastic.co/guide/cn/elasticsearch/guide/current/backing-up-your-cluster.html
https://www.elastic.co/guide/en/elasticsearch/reference/6.8/modules-snapshots.html#_shared_file_system_repository
https://www.jianshu.com/p/a06411eaad56