目录
- 布局管理器
- 1. 流式布局管理器
- 2. 边界布局管理器
- 3. 网格布局管理器
- 4. 网格包布局管理器
- 5. 卡片布局管理器
- 6. 自定义布局
布局管理器
- 在 java.awt 包中提供了 5 种布局管理器,分别是 FlowLayout( 流式布局管理器)、BorderLayout(边界布局管理器)、GridLayout(网格布局管理器)、GridBagLayout(网格包布局管理器)和 CardLayout(卡片布局管理器)。每个容器在创建时都会使用一种默认的布局管理器,在程序中可以通过调用容器对象的 setLayout() 方法设置布局管理器,通过布局管理器自动进行组件的布局管理;
- 例如, 把一个 Frame 窗体的布局管理器设置为 FlowLayout,代码如下:
Frame frame = new Frame();frame.setLayout(new FlowLayout());
1. 流式布局管理器
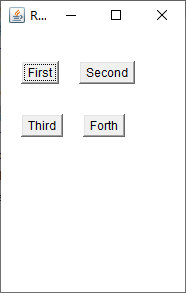
- 流式布局管理器(FlowLayout)是最简单的布局管理器,在这种布局下,容器会将组件按照添加顺序从左向右放置。当到达容器的边界时,会自动将组件放到下一行的开始位置。这些组件可以左对齐、居中对齐(默认方式)或右对齐的方式排列;
- java.awt.FlowLayout,详见:Class FlowLayout;
- 流式布局管理器 FlowLayout 的应用:
import java.awt.*;
public class Test {
public static void main(String[] args) {
Frame f = new Frame("Regino");
f.setLayout(new FlowLayout(FlowLayout.LEFT, 20, 30));
f.setSize(200, 300);
f.setLocation(300, 200);
f.setVisible(true);
f.add(new Button("First"));
f.add(new Button("Second"));
f.add(new Button("Third"));
f.add(new Button("Forth"));
}
}
- 效果图:
2. 边界布局管理器
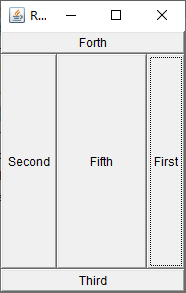
- BorderLayout(边界布局管理器)是一种较为复杂的布局方式,它将容器划分为5个区域,分别是东(EAST)、南(SOUTH)、西(WEST)、北(NORTH)、中(CENTER)。组件可以被放置在这 5 个区域中的任意一个;
- java.awt.BorderLayout,详见:Class BorderLayout;
- 边界布局管理器 BordLayout 的应用:
import java.awt.*;
public class Test {
public static void main(String[] args) {
Frame f = new Frame("Regino");
f.setLayout(new BorderLayout());
f.setSize(200, 300);
f.setLocation(300, 200);
f.setVisible(true);
f.add(new Button("First"), BorderLayout.EAST);
f.add(new Button("Second"), BorderLayout.WEST);
f.add(new Button("Third"), BorderLayout.SOUTH);
f.add(new Button("Forth"), BorderLayout.NORTH);
f.add(new Button("Fifth"), BorderLayout.CENTER);
}
}
- 效果图:
3. 网格布局管理器
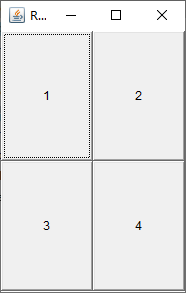
- GridLayout(网格布局管理器)使用纵横线将容器分成 n 行 m 列大小相等的网格,每个网格中放置一个组件。添加到容器中的组件首先放置在第1行第1列(左上角)的网格中, 然后在第1行的网格中从左向右依次放置其他组件,第1行满后,继续在下一行中从左到右放置组件。与 FlowLayout 不同的是,放置在 GridLayout 布局管理器中的组件将自动占据网格的整个区域;
- java.awt.GridLayout,详见:Class GridLayout;
- 网格布局管理器 GridLayout 的应用:
import java.awt.*;
public class Test {
public static void main(String[] args) {
Frame f = new Frame("Regino");
f.setLayout(new GridLayout(2,2));
f.setSize(200, 300);
f.setLocation(300, 200);
f.setVisible(true);
f.add(new Button("1"));
f.add(new Button("2"));
f.add(new Button("3"));
f.add(new Button("4"));
}
}
- 效果图:
4. 网格包布局管理器
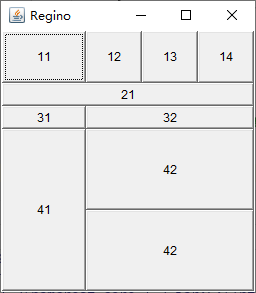
- GridBagLayout(网格包布局管理器)是最灵活、最复杂的布局管理器。它与 GridLayout 布局管理器类似,不同的是,它允许网格中的组件大小各不相同,而且允许一个组件跨越一个或者多个网格;
- java.awt.GridBagLayout,详见:Class GridBagLayout;
- 网格包布局管理器 GridBagLayout 的应用:
import java.awt.*;
class Layout extends Frame {
Layout(String title) {
GridBagLayout layout = new GridBagLayout();
GridBagConstraints c = new GridBagConstraints();
this.setLayout(layout);
c.fill = GridBagConstraints.BOTH;
c.weightx = 1;
c.weighty = 1;
this.addComponent("11", layout, c);
this.addComponent("12", layout, c);
this.addComponent("13", layout, c);
c.gridwidth = GridBagConstraints.REMAINDER;
this.addComponent("14", layout, c);
c.weightx = 0;
c.weighty = 0;
addComponent("21", layout, c);
c.gridwidth = 1;
this.addComponent("31", layout, c);
c.gridwidth = GridBagConstraints.REMAINDER;
this.addComponent("32", layout, c);
c.gridheight = 2;
c.gridwidth = 1;
c.weightx = 2;
c.weighty = 2;
this.addComponent("41", layout, c);
c.gridwidth = GridBagConstraints.REMAINDER;
c.gridheight = 1;
this.addComponent("42", layout, c);
this.addComponent("42", layout, c);
this.setTitle(title);
this.pack();
this.setVisible(true);
}
private void addComponent(String name, GridBagLayout layout, GridBagConstraints c) {
Button b = new Button(name);
layout.setConstraints(b, c);
this.add(b);
}
}
public class Test {
public static void main(String[] args) {
new Layout("Regino");
}
}
- 效果图:
5. 卡片布局管理器
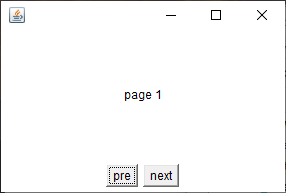
- 在操作程序时,经常会通过选项卡来切换程序中的界面,这些界面就相当于一张张卡片,而管理这些卡片的布局管理器就是卡片布局管理器(CardLayout)。卡片布局管理器将界面看作一系列卡片,在任何时候只有其中一张卡片是可见的,这张卡片占据容器的整个区域;
- java.awt.CardLayout,详见:Class CardLayout;
- 卡片布局管理器 CardLayout 的应用:
import java.awt.*;
import java.awt.event.ActionEvent;
import java.awt.event.ActionListener;
import java.awt.event.WindowAdapter;
import java.awt.event.WindowEvent;
class Cardlayout extends Frame implements ActionListener {
Panel cardPanel = new Panel();
Panel controlpaPanel = new Panel();
Button nextbutton, preButton;
CardLayout cardLayout = new CardLayout();
public Cardlayout() {
setSize(300, 200);
setVisible(true);
this.addWindowListener(new WindowAdapter() {
public void windowClosing(WindowEvent e) {
Cardlayout.this.dispose();
}
});
cardPanel.setLayout(cardLayout);
cardPanel.add(new Label("page 1", Label.CENTER));
cardPanel.add(new Label("page 2", Label.CENTER));
cardPanel.add(new Label("page 3", Label.CENTER));
nextbutton = new Button("next");
preButton = new Button("pre");
nextbutton.addActionListener(this);
preButton.addActionListener(this);
controlpaPanel.add(preButton);
controlpaPanel.add(nextbutton);
this.add(cardPanel, BorderLayout.CENTER);
this.add(controlpaPanel, BorderLayout.SOUTH);
}
public void actionPerformed(ActionEvent e) {
if (e.getSource() == nextbutton) {
cardLayout.next(cardPanel);
}
if (e.getSource() == preButton) {
cardLayout.previous(cardPanel);
}
}
}
public class Test {
public static void main(String[] args) {
Cardlayout cardlayout = new Cardlayout();
}
}
- 效果图:
6. 自定义布局
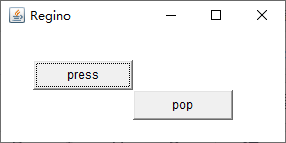
- 当一个容器被创建后,都会有一个默认的布局管理器。Window、Frame 和 Dialog 的默认布局管理器是 BorderLayout,Panel 的默认布局管理器是 FlowLayout。如果不希望通过布局管理器对容器进行布局,也可以调用容器的 setLayout(null) 方法,将布局管理器取消。在这种情况下,程序必须调用容器中每个组件的 setSize() 和 setLocation() 方法或者 setBounds() 方法( 这个方法接收 4 个参数,分别是左上角的 x、 y 坐标和组件的长、 宽),为这些组件在容器中定位;
- 应用自定义布局:
import java.awt.*;
public class Test {
public static void main(String[] args) {
Frame f = new Frame("Regino");
f.setLayout(null);
f.setSize(300, 150);
Button btn1 = new Button("press");
Button btn2 = new Button("pop");
btn1.setBounds(40, 60, 100, 30);
btn2.setBounds(140, 90, 100, 30);
f.add(btn1);
f.add(btn2);
f.setVisible(true);
}
}
- 效果图:
