阿里云服务器Centos7安装fastdfs文件服务器
阿里云服务器Centos7安装fastdfs文件服务器
- 准备
- 安装准备
- 安装libfastcommon-master
- 安装fastdfs-master
- 配置tracker.conf
- 配置storage.conf
- 启动
- 测试
- 安装fastdfs-nginx-module-master
- 配置nginx
- 打开要用的端口号
- 测试
- 借鉴学习
准备
阿里云服务器(公共ip,私密ip),假设我的公共ip是192.168.1.129
xshell 6,xftp 6,
nginx:
fastdfs:
相关下载地址:https://github.com/happyfish100
安装准备
安装相关依赖
yum -y install make cmake gcc gcc-c++ bison-devel ncurses-devel autoconf automake lrzsz zip unzip netstat-nat libevent.x86_64 libevent-devel.x86_64
yum -y install zlib zlib-devel openssl openssl-devel pcre-devel
将相关文件传输到 /usr/local/目录中,并全部解压。
安装libfastcommon-master
如果没有权限给权限:chmod -R 777 libfastcommon-master
打开解压文件目录:cd libfastcommon-master
编译:./make.sh
安装:./make.sh install
安装成功后
ln -s /usr/lib64/libfastcommon.so /usr/local/lib/libfastcommon.so
ln -s /usr/lib64/libfastcommon.so /usr/lib/libfastcommon.so     (经验正已安装)
ln -s /usr/lib64/libfdfsclient.so /usr/local/lib/libfdfsclient.so
ln -s /usr/lib64/libfdfsclient.so /usr/lib/libfdfsclient.so
安装fastdfs-master
打开文件夹:cd fastdfs-master
编译:./make.sh
安装:./make install
复制我们需要的配置文件
cd /etc/fdfs   文件下
cp client.conf.sample client.conf
cp storage.conf.sample storage.conf
cp tracker.conf.sample tracker.conf
创建相关目录
mkdir -p /home/fastdft/fastdfs_tracker_log    #tracker日志目录
mkdir –p /home/fastdft/fastdfs_storage_log      #storage日志目录
mkdir –p /home/fastdft/fastdfs_storage_1_log         #storage1日志目录
mkdir -p /home/fastdft/resource     #文件目录
mkdir -p /home/fastdft/images     #文件目录
chmod -R 777 /home/fastdft/
配置tracker.conf
打开目录:cd /etc/fdfs/
编辑tracker.conf:vi tracker.conf
disabled=false  #当前配置是否可用 false:可用 true:不可用
connect_timeout=30  #针对socket套接字函数connect的连接超时时间设置
network_timeout=60  #设置网络超时,单位秒,发送或接收数据时,如果在超时时间之后依然不能进行,则本次网络通讯失败
base_path= /home/fastdft/fastdfs_tracker_log  #日志文件 可根据需要修改
max_connections=256  #服务器支持的最大连接数
accept_threads=1  #工作线程数,通常设置为CPU数量
store_lookup=2  #上传组(卷)的方式:0轮询,1:指定,2:负载平衡(剩余空间最大选择)
store_group=group1#组名称很重要 如果上一参数选择1方式,即制定组名,当前参数用来设置指定的组,如果选择其他方式,当前参数无效
http.server_port=9090 #http端口,使用Nginx来访问则不需要这个
配置storage.conf
    打开目录:cd /etc/fdfs/
    编辑tracker.conf:vi storage.conf
    group_name=group1 #组名称很重要,如果tracker.conf配置为指定组名的话要和tracker.conf配置的相同
    base_path= /home/fastdft/fastdfs_storage_log  #storaged服务日志目录
    store_path0= /home/fastdft/resource #文件数据存放目录
    tracker_server=192.168.1.129:22122 #服务器IP:端口 ,IP根据本机IP来填写(阿里云服务器有两个ip地址,请使用公共ip,不要使用私密ip)
    http.server_port=9091 #http端口,使用Nginx来访问则不需要这个
启动
启动tracker:/usr/bin/fdfs_trackerd /etc/fdfs/tracker.conf start
启动storage:/usr/bin/fdfs_storaged /etc/fdfs/storage.conf start
添加开机自启
编辑vim /etc/rc.d/rc.local
添加一下命令
/usr/bin/fdfs_trackerd /etc/fdfs/tracker.conf start
/usr/bin/fdfs_storaged /etc/fdfs/storage.conf start
给/etc/rc.d/rc.local添加权限
chmod -R 777 /etc/rc.d/rc.local
查看是否启动成功:netstat -unltp | grep fdfs
说明成功了

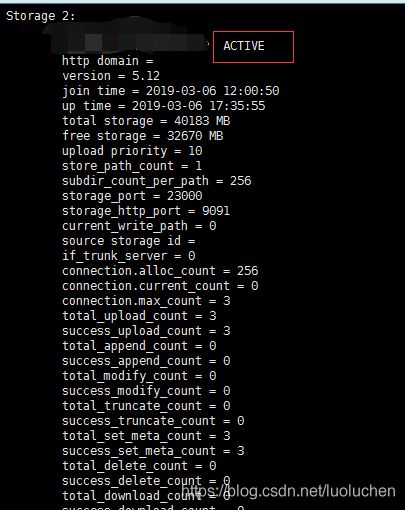
查看tracker上是否有相应的存储节点,即 tracker和storage是否连接起来了
/usr/bin/fdfs_monitor /etc/fdfs/storage.conf
测试
编辑client.conf:vim /etc/fdfs/client.conf
base_path=/home/fastdft/fastdfs_client_log #tracker服务器文件路径
tracker_server=192.168.1.129:22122#tracker服务器IP地址和端口号 (阿里云公共ip)
http.tracker_server_port=9090# tracker 服务器的 http 端口号,必须和tracker的设置对应
//使用自带的测试工具测试  /home/fastdfs/7.jpg  本机文件
fdfs_test /etc/fdfs/client.conf upload  /home/fastdfs/7.jpg
若出现路径则表示测试成功
![]()
安装fastdfs-nginx-module-master
打开:cd fastdfs-nginx-module-master/src
编辑:vim mod_fastdfs.conf
		tracker_server=192.168.1.129:22122
		group_name=group1
		url_have_group_name = true
		store_path0=/home/fastdft/resource
将相关配置拷贝到etc/fdfs下
cp mod_fastdfs.conf /etc/fdfs
cd fastdfs-master/conf/
cp anti-steal.jpg http.conf mime.types /etc/fdfs/
创建软连接
ln -s /home/fastdft/resource /home/fastdft/resource/data/M00
配置nginx
安装nginx
创建nginx安装目录

mkdir /usr/local/nginx

检查配置

 ./configure --prefix=/usr/local/nginx 或 ./configure
./configure --prefix=/usr/local/nginx --add-module=/home/download/fastdfs/fastdfs-nginx-module-master/src

 编译与安装

make && make instal
注意:如果已经安装过nginx需要重新编译安装,不然会报:unknown directive "ngx_fastdfs_module"的错误
检查:./configure --prefix=/usr/local/nginx --add-module=/home/download/fastdfs/fastdfs-nginx-module-master/src  --with-http_ssl_module
编译和安装:make&makeinstall
修改配置文件
server {
        listen       8080;(可改变端口号默认是80)
        server_name  192.168.1.129;(或者是域名)

        location / {
            root   html;
            index  index.html index.htm;
        }
        location /group1/M00 {
                alias /home/fastdft/resource/;
                ngx_fastdfs_module;
        }
        error_page   500 502 503 504  /50x.html;
        location = /50x.html {
            root   html;
        }
    }
启动
cd /usr/local/nginx/sbin     打开sbin目录
./nginx                      启动
./nginx -s reload            重新载入配置文件
./nginx -s reopen            重启 Nginx
./nginx -s stop              停止 Nginx
添加开机自启
  编辑vim /etc/rc.d/rc.local
    添加一下命令
    /usr/local/nginx/sbin/nginx
打开要用的端口号
firewall-cmd --zone=public --add-port=8080/tcp --permanent //开放nginx端口
firewall-cmd --zone=public --add-port=23000/tcp --permanent //开放storage端口
firewall-cmd --zone=public --add-port=22122tcp --permanent //开放tracker端口
firewall-cmd --reload
云服务器上添加安全组规则,开放指定端口号 8080 23000 22122
![]()

测试
输入http://192.168.1.129:8080访问成功

Java上传测试
//客户端配置文件
	public static String conf_filename = "E:\\eclipse\\fastdfsClient\\src\\cn\\itcast\\fastdfs\\cliennt\\fdfs_client.conf";
    //本地文件,要上传的文件
	public static String local_filename = "E:\\360Downloads\\306217.jpg";

  	public static void main(String[] args) {
    	testUpload();
	}
    //上传文件

    public static void testUpload() {

    	for(int i=0;i<1;i++){

        try {
            ClientGlobal.init(conf_filename);

            TrackerClient tracker = new TrackerClient();
            TrackerServer trackerServer = tracker.getConnection();
            StorageServer storageServer = null;

            StorageClient storageClient = new StorageClient(trackerServer,
                    storageServer);
            NameValuePair nvp [] = new NameValuePair[]{
                    new NameValuePair("item_id", "100010"),
                    new NameValuePair("width", "80"),
                    new NameValuePair("height", "90")
            };
            String fileIds[] = storageClient.upload_file(local_filename, null,
                    nvp);

            System.out.println(fileIds.length);
            System.out.println("组名:" + fileIds[0]);
            System.out.println("路径: " + fileIds[1]);

        } catch (FileNotFoundException e) {
            e.printStackTrace();
        } catch (IOException e) {
            e.printStackTrace();
        } catch (Exception e) {
			e.printStackTrace();
		}
    	}
    }
//fdfs_client.conf文件
tracker_server=192.168.1.129:22122
源码连接 [https://github.com/onellx/fastdfsClient]
借鉴学习
https://blog.csdn.net/lwcyd/article/details/80211146

