php+redis 实现订单超时未支付时取消订单
需要用到redis的订阅功能
vi /etc/redis/redis.confnotify-keyspace-events “Ex”。
#x 代表了过期事件。
重启redis服务
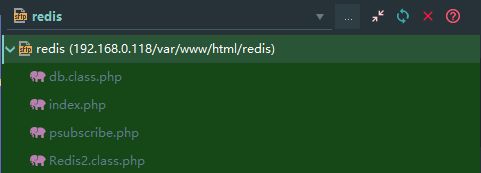
service redis restart创建四个文件
index.php 创建订单,发布消息,10s后查询订单状态并更新订单
lRange('order',0,9999999);

$mysql      = new \mysql();
$mysql->connect();

$data       = ['ordersn'=>'SN'.time().'T'.rand(10000000,99999999),'status'=>0,'createtime'=>date('Y-m-d H:i:s',time())];

$mysql->insert('order',$data);

$order_sn   = $data['ordersn'];

$redis2->setex($order_sn,10,$order_sn);
psubscribe.php
setOption();
$redis->psubscribe(array('__keyevent@0__:expired'), 'keyCallback');
// 回调函数,这里写处理逻辑
function keyCallback($redis, $pattern, $chan, $msg)
{
    $mysql = new \mysql();
    $mysql->connect();
    $where = "ordersn = '".$msg."'";
    $mysql->select('order','',$where);
    $finds=$mysql->fetchAll();

    if(isset($finds[0]['status']) && $finds[0]['status']==0){
        $data   = array('status' => 3,'updatetime'=>date('Y-m-d H:i:s',time()));
        $where  = "id = ".$finds[0]['id'];
        $mysql->update('order',$data,$where);
    }
}
Redis2.class.php
redis = new Redis();
        $this->redis->connect($host, $port);
        $this->redis->auth('123456');
    }

    public function setex($key, $time, $val)
    {
        return $this->redis->setex($key, $time, $val);
    }

    public function set($key, $val)
    {
        return $this->redis->set($key, $val);
    }

    public function get($key)
    {
        return $this->redis->get($key);
    }

    public function expire($key = null, $time = 0)
    {
        return $this->redis->expire($key, $time);
    }

    public function psubscribe($patterns = array(), $callback)
    {
        $this->redis->psubscribe($patterns, $callback);
    }

    public function setOption()
    {
        $this->redis->setOption(\Redis::OPT_READ_TIMEOUT, -1);
    }

    public function lRange($key,$start,$end)
    {
        return $this->redis->lRange($key,$start,$end);
    }

    public function lPush($key, $value1, $value2 = null, $valueN = null ){
        return $this->redis->lPush($key, $value1, $value2 = null, $valueN = null );
    }

    public function delete($key1, $key2 = null, $key3 = null)
    {
        return $this->redis->delete($key1, $key2 = null, $key3 = null);
    }

}
db.class.php
'127.0.0.1',
            'username'=>'root',
            'password'=>'123456qwerty',
            'database'=>'marhal',
            'port'=>3306,
            );

        $host = $config['host'];    //主机地址
        $username = $config['username'];//用户名
        $password = $config['password'];//密码
        $database = $config['database'];//数据库
        $port = $config['port'];    //端口号
        $this->mysqli = new mysqli($host, $username, $password, $database, $port);

    }
    /**
     * 数据查询
     * @param $table 数据表
     * @param null $field 字段
     * @param null $where 条件
     * @return mixed 查询结果数目
     */
    public function select($table, $field = null, $where = null)
    {
        $sql = "SELECT * FROM `{$table}`";
        //echo $sql;exit;
        if (!empty($field)) {
            $field = '`' . implode('`,`', $field) . '`';
            $sql = str_replace('*', $field, $sql);
        }
        if (!empty($where)) {
            $sql = $sql . ' WHERE ' . $where;
        }


        $this->result = $this->mysqli->query($sql);

        return $this->result;
    }
    /**
     * @return mixed 获取全部结果
     */
    public function fetchAll()
    {
        return $this->result->fetch_all(MYSQLI_ASSOC);
    }
    /**
     * 插入数据
     * @param $table 数据表
     * @param $data 数据数组
     * @return mixed 插入ID
     */
    public function insert($table, $data)
    {
        foreach ($data as $key => $value) {
            $data[$key] = $this->mysqli->real_escape_string($value);
        }
        $keys = '`' . implode('`,`', array_keys($data)) . '`';
        $values = '\'' . implode("','", array_values($data)) . '\'';
        $sql = "INSERT INTO `{$table}`( {$keys} )VALUES( {$values} )";
        $this->mysqli->query($sql);
        return $this->mysqli->insert_id;
    }
    /**
     * 更新数据
     * @param $table 数据表
     * @param $data 数据数组
     * @param $where 过滤条件
     * @return mixed 受影响记录
     */
    public function update($table, $data, $where)
    {
        foreach ($data as $key => $value) {
            $data[$key] = $this->mysqli->real_escape_string($value);
        }
        $sets = array();
        foreach ($data as $key => $value) {
            $kstr = '`' . $key . '`';
            $vstr = '\'' . $value . '\'';
            array_push($sets, $kstr . '=' . $vstr);
        }
        $kav = implode(',', $sets);
        $sql = "UPDATE `{$table}` SET {$kav} WHERE {$where}";

        $this->mysqli->query($sql);
        return $this->mysqli->affected_rows;
    }
    /**
     * 删除数据
     * @param $table 数据表
     * @param $where 过滤条件
     * @return mixed 受影响记录
     */
    public function delete($table, $where)
    {
        $sql = "DELETE FROM `{$table}` WHERE {$where}";
        $this->mysqli->query($sql);
        return $this->mysqli->affected_rows;
    }
}
在服务器监听
cd /var/www/html/redis
#即时监听,ctrl+c 退出监听  ctrl+z 暂停监听
php psubscribe.php

#后台监听
php psubscribe.php &
设置本地域名并访问 http://www.redis.local.com/index.php
此时,每访问一次index.php,就会创建一个订单,10s钟后,如果该订单依旧处于未支付状态,就设置订单失效。
亲测有效。
-----------------------------2018/10/22补充---------------------
后来发现,php的cli模式在服务器上运行之后,服务总是掉线,这让人很苦恼,因为这个方法我应用在购票系统上,订单超时这个问题不能延误,所以用了一个本办法解决。
1.编写shell脚本,定时检查进程是否存在,不存在的话就开启服务,并且将运行情况写入日志
cd /
mkdir mytask
cd mytask
touch phprunning.sh
vi phprunning.sh
脚本文件如下:
#!/bin/sh
PIDS=`pidof php`
if [ "$PIDS" != "" ]; then
echo "在运行"
echo -e $(date +%Y"."%m"."%d" "%k":"%M":"%S)" running....." >> /mytask/task.run.log
else
echo "不在运行,开始启动"
echo -e $(date +%Y"."%m"."%d" "%k":"%M":"%S)" start php start....." >> /mytask/task.start.log
cd /var/www/html/redis
php psubscribe.php &
echo -e $(date +%Y"."%m"."%d" "%k":"%M":"%S)" start php success....." >> /mytask/task.start.log
fi
然后在crontab任务里创建任务,我设定的是每5秒检查一次。
crontab -e
* * * * * sleep 5; sh /mytask/phprunning.sh >> /mytask/crontab.log
* * * * * sleep 10; sh /mytask/phprunning.sh >> /mytask/crontab.log
* * * * * sleep 15; sh /mytask/phprunning.sh >> /mytask/crontab.log
* * * * * sleep 20; sh /mytask/phprunning.sh >> /mytask/crontab.log
* * * * * sleep 25; sh /mytask/phprunning.sh >> /mytask/crontab.log
* * * * * sleep 30; sh /mytask/phprunning.sh >> /mytask/crontab.log
* * * * * sleep 35; sh /mytask/phprunning.sh >> /mytask/crontab.log
* * * * * sleep 40; sh /mytask/phprunning.sh >> /mytask/crontab.log
* * * * * sleep 45; sh /mytask/phprunning.sh >> /mytask/crontab.log
* * * * * sleep 50; sh /mytask/phprunning.sh >> /mytask/crontab.log
* * * * * sleep 55; sh /mytask/phprunning.sh >> /mytask/crontab.log
查看日志:
cat /mytask/task.run.log-e 2018.10.22 18:28:41 running.....
-e 2018.10.22 18:28:46 running.....
-e 2018.10.22 18:28:51 running.....
-e 2018.10.22 18:28:56 running.....
-e 2018.10.22 18:29:06 running.....
-e 2018.10.22 18:29:11 running.....
-e 2018.10.22 18:29:16 running.....
-e 2018.10.22 18:29:21 running.....
-e 2018.10.22 18:29:26 running.....
-e 2018.10.22 18:29:31 running.....
-e 2018.10.22 18:29:36 running.....
-e 2018.10.22 18:29:41 running.....
-e 2018.10.22 18:29:46 running.....
-e 2018.10.22 18:29:51 running.....
-e 2018.10.22 18:29:56 running.....
-e 2018.10.22 18:30:06 running.....
-e 2018.10.22 18:30:11 running.....
-e 2018.10.22 18:30:16 running.....
-e 2018.10.22 18:30:21 running.....
-e 2018.10.22 18:30:26 running.....
-e 2018.10.22 18:30:31 running.....
-e 2018.10.22 18:30:36 running.....
-e 2018.10.22 18:30:41 running.....
-e 2018.10.22 18:30:46 running.....
-e 2018.10.22 18:30:51 running.....
-e 2018.10.22 18:30:56 running.....
-e 2018.10.22 18:31:06 running.....
-e 2018.10.22 18:31:11 running.....
-e 2018.10.22 18:31:16 running.....
-e 2018.10.22 18:31:21 running.....
-e 2018.10.22 18:31:26 running.....
-e 2018.10.22 18:31:31 running.....
-e 2018.10.22 18:31:36 running.....
-e 2018.10.22 18:31:41 running.....
-e 2018.10.22 18:31:46 running.....
cat /mytask/task.start.log-e 2018.10.22 18:28:31 start php start.....
-e 2018.10.22 18:28:36 start php success.....
-----------------------2019.04.09补充---------------------------------
上述方法后来发现进程还是会掉。。。。
原因:
IGHUP会在以下3种情况下被发送给相应的进程:
1、终端关闭时,该信号被发送到session首进程以及作为job提交的进程(即用 & 符号提交的进程)
2、session首进程退出时,该信号被发送到该session中的前台进程组中的每一个进程
3、若父进程退出导致进程组成为孤儿进程组,且该进程组中有进程处于停止状态(收到SIGSTOP或SIGTSTP信号),该信号会被发送到该进程组中的每一个进程。不管是否以 & (job方式)启动的进程,关闭终端时都会收到 SIGHUP 信号 ,系统对SIGHUP信号的默认处理是终止收到该信号的进程。所以若程序中没有捕捉该信号,当收到该信号时,进程就会退出。
所以 ,找到一种新的方式,在执行监听的时候
在命令之前加上 nohup ,启动的进程将会忽略linux的挂起信号 (SIGHUP)
nohup php psubscribe.php &这时候,
所以当我们组合 nohup 和 & 两种方式时,启动的进程不会占用控制台,也不依赖控制台,控制台关闭之后进程被1号进程收养,成为孤儿进程,这就和守护进程的机制非常类似了,并且,nohup默认会把程序的输出重定向到当前目录下的nohup.out文件,如果没有可写权限,则写入 $homepath/nohup.out
OVER
