selinux的介绍
1.selinux
内核级加强型防火墙
1)针对文件,会对系统的每个文件添加安全上下文,针对进程,会对系统的每个进程添加安全上下文
2)会在系统的服务上设定sebool开关
3)当进程的安全上下文与文件的安全上下文不匹配的时候,进程无法访问该文件
4)sebool会限制服务的不安全功能,如果要开放此功能,需要调整bool值
2.selinux管理
[root@localhost Desktop]# vim /etc/sysconfig/selinux
SELINUX=enforcing                           #enforcing为强制级别
SELINUX=permissive                          #permissive为警告级别
SELINUX=disabled                            #disabled为关闭
[root@localhost Desktop]# getenforcing      #查看selinux的状态
Permissive                                  #警告级别
[root@localhost Desktop]# touch /mnt/file   #建立文件
[root@localhost Desktop]# mv /mnt/file /var/ftp/   #将文件移到/var/ftp中
[root@localhost Desktop]# ls /var/ftp/             #查看/var/ftp
file  pub                                          #有file文件
[root@localhost Desktop]# setenforce 1             #将selinux改为强制级别
[root@localhost Desktop]# lftp 172.25.254.252
lftp 172.25.254.252:~> ls
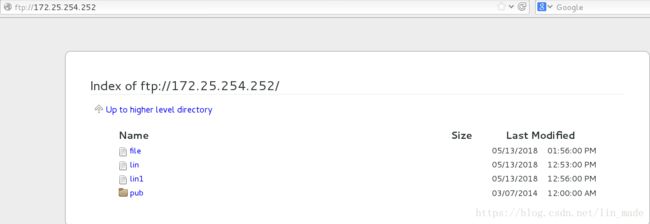
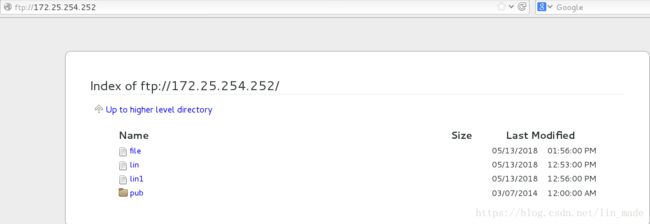
drwxr-xr-x    2 0        0               6 Mar 07  2014 pub    #强制级别不能看到file文件
[root@localhost Desktop]# setenforce 0             #将selinux改为警告级别
[root@localhost Desktop]# lftp 172.25.254.252
lftp 172.25.254.252:~> ls
-rw-r--r--    1 0        0               0 May 15 10:23 file   #警告级别可以看到文件
drwxr-xr-x    2 0        0               6 Mar 07  2014 pub
0为警告级别,1为强制级别

改为强制级别,不能看到file文件

改为警告级别,可以看到file文件

注意:警告和强制级别切换不需要重启,如果在从开到关或从关到开需要重启
3.selinux中安全上下文的设定
临时设定:
chcon
-R:递归处理所有的文件及子目录
-v:为处理的所有文件显示诊断信息
-u:设置指定用户的目标安全环境
-r:设置指定角色的目标安全环境
-t:设置指定类型的目标安全环境,后面接安全上下文的类型子段
关闭火墙,开启ftp服务
selinux改为Enforcing
[root@localhost ~]# touch /mnt/lin
[root@localhost ~]# mv /mnt/westos /var/ftp/   #移动为重命名,不改变原文件
[root@localhost ~]# ls /var/ftp/
pub lin
[root@localhost ~]# lftp 172.25.254.252
lftp 172.25.254.252:~> ls
drwxr-xr-x    2 0        0              6 Mar 07  2014 pub  #安全上下文不匹配,无法显示文件
[root@localhost ~]# cd /var/ftp/
[root@localhost ftp]# touch lin1
[root@localhost ~]# lftp 172.25.254.252
lftp 172.25.254.252:~> ls
-rw-r--r--    1 0        0               0 May 13 12:56 lin1  #直接在家目录建立的文件可以显示
drwxr-xr-x    2 0        0              6 Mar 07  2014 pub
[root@localhost ftp]# semanage fcontext -l | grep /var/ftp
/var/ftp(/.*)?                                     all files          system_u:object_r:public_content_t:s0
/var/ftp/bin(/.*)?                                 all files          system_u:object_r:bin_t:s0
/var/ftp/etc(/.*)?                                 all files          system_u:object_r:etc_t:s0
/var/ftp/lib(/.*)?                                 all files          system_u:object_r:lib_t:s0
/var/ftp/lib/ld[^/]*\.so(\.[^/]*)*                 regular file       system_u:object_r:ld_so_t:s0
[root@localhost ftp]# ls -Z
-rw-r--r--. root root unconfined_u:object_r:mnt_t:s0   lin
-rw-r--r--. root root unconfined_u:object_r:public_content_t:s0 lin1
drwxr-xr-x. root root system_u:object_r:public_content_t:s0 pub
[root@localhost ftp]# chcon -t public_content_t lin  #临时更改安全上下文,-a表示add添加,-t表示type类型
[root@localhost ftp]# ls -Z
-rw-r--r--. root root unconfined_u:object_r:public_content_t:s0 lin   #已更改
-rw-r--r--. root root unconfined_u:object_r:public_content_t:s0 lin1
drwxr-xr-x. root root system_u:object_r:public_content_t:s0 pub
[root@localhost ~]# lftp 172.25.254.252
lftp 172.25.254.252:~> ls
-rw-r--r--    1 0        0               0 May 13 12:53 lin   #安全上下文匹配可以看到文件
-rw-r--r--    1 0        0               0 May 13 12:56 lin1
drwxr-xr-x    2 0        0              6 Mar 07  2014 pub
实际操作

更改前:


更改后:


2)永久设定
semanage fcontext -{a|d|m}
-l 查询
-a添加
-m修改
-d删除
[root@localhost ftp]# mkdir /lin                    #建立目录
[root@localhost ftp]# touch /lin/file               #建立文件
[root@localhost ftp]# vim /etc/vsftpd/vsftpd.conf   #更改家目录
anon_root=/lin
[root@localhost ftp]# systemctl restart vsftpd      #重启服务
[root@localhost ~]# lftp 172.25.254.252
lftp 172.25.254.252:~> ls                           #没有文件
[root@localhost ftp]# setenforce 0                  #改为警告模式
lftp 172.25.254.240:/> ls
-rw-r--r--    1 0        0               0 May 13 13:15 file  #可看到文件
[root@localhost ftp]# ls -Zd /lin
drwxr-xr-x. root root unconfined_u:object_r:default_t:s0 /lin    #为default
[root@localhost ftp]# ls -Zd /var/ftp/
drwxr-xr-x. root root system_u:object_r:public_content_t:s0 /var/ftp/
[root@localhost ftp]# chcon -t public_content_t /lin             #临时更改为public
[root@localhost ftp]# ls -Zd /lin
drwxr-xr-x. root root unconfined_u:object_r:public_content_t:s0 /lin
[root@localhost ftp]# vim /etc/sysconfig/selinux                    #改为SELINUX=disabled
[root@localhost ftp]# reboot                                        #重启
[root@localhost ~]# vim /etc/sysconfig/selinux                      #改为SELNUX=enforcing
[root@localhost ~]# reboot                                          #重启
[root@localhost ~]# ls -Zd /lin
drwxr-xr-x. root root unconfined_u:object_r:default_t:s0 /lin    #变为最初状态
[root@localhost ~]# semanage fcontext -a -t public_content_t '/lin(/.*)?' #把/lin以及它后面出现的所有字符永久改为public,/lin(/.*)?==/lin/*,不加括号里面的表示只更改目录本身
[root@localhost ~]# semanage fcontext -l | grep /lin             #查看
/lin(/.*)?                                      all files          system_u:object_r:public_content_t:s0
[root@localhost ~]# restorecon -FvvR /lin/                       #刷新
restorecon reset /lin context unconfined_u:object_r:default_t:s0->system_u:object_r:public_content_t:s0
restorecon reset /lin/file context unconfined_u:object_r:default_t:s0->system_u:object_r:public_content_t:s0
关闭selinux再开启,查看
[root@localhost ~]# ls -Zd /westos
drwxr-xr-x. root root system_u:object_r:public_content_t:s0 /westos  #已被永久修改
实际操作

![]()


![]()
临时更改,查看:

关闭selinux,重启,再打开selinux,重启,查看:恢复原来的状态

永久更改:

刷新:

关闭selinux,重启,再打开selinux,重启,查看:已被永久修改
![]()
当selinux出问题:
touch /.autorelabel #初始化selinux
4.selinux的bool值设定
[root@localhost ~]# setenforce 1
[root@localhost ~]# getsebool -a | grep ftp
ftp_home_dir --> off                                     #selinux为关闭状态
[root@localhost ~]# lftp 172.25.254.252 -u student
Password:
lftp student@172.25.254.252:~> ls
lftp student@172.25.254.252:~> put /etc/passwd
put: Access failed: 553 Could not create file. (passwd)  #不能上传
[root@localhost ~]# setenforce 0                         #级别改为0
[root@localhost ~]# lftp 172.25.254.252 -u student
Password:
lftp student@172.25.254.252:~> put /etc/passwd
2176 bytes transferred                                   #可以上传
[root@localhost ~]# setenforce 1                         #级别改为1
[root@localhost ~]# setsebool -P ftp_home_dir on         #ftp_home_dir的bool值改为on,-P永久,把bool值记录在文件里
[root@localhost ~]# lftp 172.25.254.252 -u student
Password:
lftp student@172.25.254.252:~> put /etc/group
900 bytes transferred                                    #可以上传
实际操作:
selinux为强制级别:

本地用户登录:不能上传
![]()
selinux改为警告级别:本地用户可以上传

更改bool值

强制级别本地用户也可以上传

5.setroubleshoot软件
/var/log/audit/audit.log #只显示报错
/var/log/messages #显示报错及解决方法
只提供参考不具有安全性
安装了setoubleshoot软件才会提供解决方法
  [root@localhost ~]#touch /mnt/file
  [root@localhost ~]#vim /etc/vsftpd/vsftpd.conf
  [root@localhost ~]#systemctl restart vsftpd
  [root@localhost ~]#mv /mnt/file /var/ftp/
  访问ftp://172.25.254.240                -->没有file文件
  [root@localhost ~]#cat /var/log/audit/audit.log
  [root@localhost ~]#cat /var/log/messages
    restorecon -v '$FIX_TARGET_PATH'    #有提示解决方法
  [root@localhost ~]#restorecon -v /var/ftp/*
访问ftp://172.25.254.240                -->有file文件
  [root@localhost ~]#yum remove setroubleshoot-server.x86_64   #卸载setroubleshoot软件
  touch /mnt/file1
  mv /mnt/file /var/ftp/
  cat /var/log/audit/audit.log
  cat /var/log/messages                            #没有提示
访问ftp://172.25.254.240
  yum install setroubleshoot-server.x86_64         #安装setroubleshoot软件
  cat /var/log/audit/audit.log
  cat /var/log/messages
   restorecon -v '$FIX_TARGET_PATH'                #有提示
实际操作:

家目录改回到原来的/var/ftp/
![]()
访问测试:没有file文件


![]()
![]()
![]() 有提示解决方法
有提示解决方法

访问测试:可以看到file文件

卸载setroubleshoot
![]()

访问测试:


没有提示解决方法

安装setroubleshoot

![]()
![]()
有提示解决方法
![]()
6.selinux中端口的设定
端口:同一个ip提供不同服务,程序默认端口1-1024
linux端口是用套接字实现的
tcp安全,稳定
udp高效,不需要接收方确认
[root@localhost ftp]# yum install httpd            #安装apache
[root@localhost ~]# vim /etc/httpd/conf/httpd.conf
--->42行:Listen 666                                #更改端口
[root@localhost ~]# systemctl restart httpd
Job for httpd.service failed. See 'systemctl status httpd.service' and 'journalctl -xn' for details.                      #重启失败
[root@localhost ~]# setenforce 0                   #改为警告级别
[root@localhost ~]# systemctl restart httpd        -->重启成功
[root@localhost ~]# setenforce 1                   #改为强制级别
[root@localhost ~]# systemctl restart httpd
Job for httpd.service failed. See 'systemctl status httpd.service' and 'journalctl -xn' for details.                      #重启失败
[root@localhost ~]# semanage port -l | grep http   #查看端口
http_cache_port_t              tcp      8080, 8118, 8123, 10001-10010
http_cache_port_t              udp      3130
http_port_t                    tcp      80, 81, 443, 488, 8008, 8009, 8443, 9000     #selinux允许apache更改的端口
pegasus_http_port_t            tcp      5988
pegasus_https_port_t           tcp      5989
[root@localhost ~]# semanage port -a -t http_port_t -p tcp 666    #让selinux允许apache使用666端口
[root@localhost ~]# semanage port -l | grep http
http_cache_port_t              tcp      8080, 8118, 8123, 10001-10010
http_cache_port_t              udp      3130
http_port_t                    tcp      666, 80, 81, 443, 488, 8008, 8009, 8443, 9000    #666端口已经添加成功
pegasus_http_port_t            tcp      5988
pegasus_https_port_t           tcp      5989
[root@localhost ~]# systemctl restart httpd        -->重启成功
实际操作:
安装http
![]()

更改端口:
![]()
重启失败:

selinux级别改为0,重启成功
![]()
selinux级别改为1,重启失败

查看可以使用哪些端口

让selinux允许apache使用666端口,重启成功
