react学习总结——react-router库的使用
目录
1 概念
2 基本的使用
3路由传参
4 Switch
5 component与render
1 概念
- Router 路由器组件,用来包含各个路由组件,管理路由。Router 组件本身知识一个容器,真正的路由需要通过 Route 组件定义。现在典型的应用都使用
、 等,对于低级接口 需要指定history属性,而高级的 BrowserRouter 接口不需要指定 history - Route 路由组件,注册路由
- IndexRoute 默认路由,不需要指定路径 path
- history react-router 是建立在history的基础上的。 history 用来监听浏览器地址栏的变化, 并解析这个 URL 转化为 location对象,由 Router 使用它,当匹配到正确的路由地址时,就会渲染响应的组件
- Link 路由链接组件,生成a标签
问题1:history 下 browserHistory 与 hashHistory,
browserHistory 是使用react-router 的应用所推荐使用的history,它使用浏览器中的 History API 用于处理 URL,创建一个像example.com/some/path这样真实的 URL 。而 Hash history 使用 URL 中的 hash(#)部分去创建如 example.com/#/some/path 的路由。如果浏览器不支持 window.history 的API,那么任何跳转的应用都会导致 全页面刷新。具体见
问题2:关于history 库的作用?
转自 https://www.jb51.net/article/114509.htm
Router标签
细心的朋友肯定注意到了上面的例子中我import的Router是BrowserRouter,这是什么东西呢?如果你用过老版本的react-router,你一定知道history库。history库 是用来兼容不同浏览器或者环境下的历史记录管理的,当我跳转或者点击浏览器的后退按钮时,history就必须记录这些变化,而之前的react-router将history分为三类。
- hashHistory 老版本浏览器的history
- browserHistory h5的history
- memoryHistory node环境下的history,存储在memory中
4.0之前版本的react-router针对三者分别实现了createHashHistory、createBrowserHistory和create MemoryHistory三个方法来创建三种情况下的history,这里就不讨论他们不同的处理方式了,好奇的可以去了解一下~
到了4.0版本,在react-router-dom中直接将这三种history作了内置,于是我们看到了BrowserRouter、HashRouter、MemoryRouter这三种Router,当然,你依然可以使用React-router中的Router,然后自己通过createHistory来创建history来传入。
这也与前面所指出的现在版本的 react-route 不需要history 属性相符合,也就不需要使用 管理历史状态 的history库,借用官方文档的一句话。
The most common use-case for using the low-level
is to synchronize a custom history with a state management lib like Redux or Mobx. Note that this is not required to use state management libs alongside React Router, it’s only for deep integration.
意思说:对于低级的
2 基本的使用
-
Home
-
Accounts
-
Statements
其中:IndexRoute 是默认路由。
注意:
(1)如果不使用默认路由,且 注册路由与 “/” 平级,那么一般要指定 exact 的属性,表示严格匹配下才能跳转,否则会匹配多多个。

另外 strict 属性:

sensitive 属性:

(2) 的标签不能放在 Router 的路由器组件的外边,否则会报错。
(3)除了使用了 Link 标签指定path触发路由的切换,从而在浏览器不刷新的情况下实现注册路由组件的重新渲染。此外,有时有一些事件处理中跳转到不同的页面的需求,此时还可以通过 history.pushState 和 history.replaceState 来实现路由组件的切换(其实每次切换都是一次push保存或者replace替换),我习惯称前者为 html 方式,后者为 js 方式。
3路由传参
借助URL 中参数可以实现向 匹配的组件 传递参数,
要点: Route path属性要使用 占位符 :,路由匹配到的组件(component中指定的组件)可通过 属性的 match下params属性获取到value值。
-
Netflix
-
Zillow Group
-
Yahoo
-
Modus Create
import React, { Component, PropTypes } from 'react';
class MyComponent extends Component {
static propTypes = {
className: PropTypes.string,
};
constructor(props) {
super(props);
}
render() {
const {id} = this.props.match.params;
return (
id:{id}
);
}
}
export default MyComponent;注意:老版本的 参数是靠 this.props.params.paraName 获取,但是现在版本是通过 match属性下的params对象获取。除此之外,所有注册路由组件都能获得同样的三个路由属性:
- match
- location
- history,是react-router 除了react本身之外两个主要依赖项的另外一个。它会根据不同的环境,提供管理 session 的不同实现方式。包括:browser History、 hash History、memory History,具体解释:
- browser history” - A DOM-specific implementation, useful in web browsers that support the HTML5 history API(支持HTML5 history API的浏览器)
- “hash history” - A DOM-specific implementation for legacy web browsers(传统浏览器)
- “memory history” - An in-memory history implementation, useful in testing and non-DOM environments like React Native(在react Native中)
其中,三者的关系,
history
history是一个让你轻松管理所有Javascript运行的会话记录的Javascript库。history提供了简洁的API,让你可以管理history堆栈,跳转,确认跳转,以及保持会话之间的状态。 - 来自React 培训文档每个router组件创建了一个history对象,用来记录当前路径(
history.location),上一步路径也存储在堆栈中。当前路径改变时,视图会重新渲染,给你一种跳转的感觉。当前路径又是如何改变的呢?history对象有history.push()和history.replace()这些方法来实现。当你点击组件会触发history.push(),使用则会调用history.replace()。其他方法 - 例如history.goBack()和history.goForward()- 用来根据页面的后退和前进来跳转history堆栈。-------转自 原文发布于微信公众号 - 京程一灯(jingchengyideng)

另外,路由传参的方式也可以有query 和 state 实现。其中 query与state方法类似,知识state 传的参数是加密的,query 穿的参数是公开的,在地址栏。
//数据源
//HTML的方式

//js的方式
this.props.history.push({path: "/page1", query:{/*要传的参数以对象的键值对形式放在这里*/ name:"zsk"}});


//接受数据处 page页面下
this.props.location.query.name //即可访问到
4 Switch
作为与 Router 功能类似的存在。只是具有以下的特性:
Renders the first child
orthat matches the location.
只渲染 第一个 匹配路由的组件。也就是说, Switch 只会渲染一个路由,相反如果,对于 常规的Router ,每个与路径匹配的路由都会被渲染。
5 component与render
当使用 component 时,官网给出的解释,
When you use
component(instead ofrenderorchildren, below) the router usesReact.createElementto create a new React element from the given component. That means if you provide an inline function to thecomponentprop, you would create a new component every render. This results in the existing component unmounting and the new component mounting instead of just updating the existing component. When using an inline function for inline rendering, use therenderor thechildrenprop (below).
主要意思是:router 依据给出的component 创建一个 新的react元素,这意味着如果你给 component 提供一个内联函数的属性值,在每次渲染的时候都会创建一个新的组件,这导致存在的组件 卸载,新的组件重新 挂载,而不是简单的更新,因此,推荐如果使用内联函数作为属性值时,应该使用render或者children。
举个例子:
我在 Main 组件的周期函数 componentWillMount 下设置一个console.log()
componentWillMount = () => {
		console.log("componentDidMount", this.props.match.path.split('/').pop());
		const { methods: {changeNoShowing} } = this.props;

		changeNoShowing(this.props.match.path.split('/').pop());
	}
如下,当使用 render 作为属性时,
const activeTodos = todos.filter( (todo) => !todo.completed );
const completedTodos = todos.filter( (todo) => todo.completed );
// 可以给出另外一个容器组件,
const allMain = props => ;
const activeMain = props => ;
const completedMain = props => ;
const footer = ;
return (
);打印结果:在main 发生状态变化时,并没有触发 componentWillMount 周期函数,所以render 是不会引起组件的重新卸载与挂载。


如果将 render 改为 component 则会有一下结果:
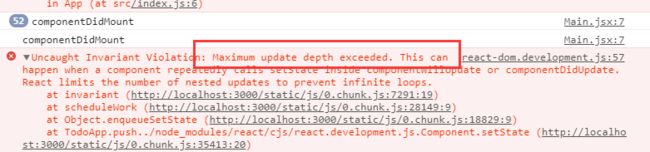
结果是直接是报错。超过了最大的更新深度。
总之,使用 component 时,每次执行 render 时或者更新 state 时,都会触发 componentDidMout 这些生命周期函数,而用 render 时,只有点击 Link 切换路由时,才会触发 componentDidMout。
问题:当使用内联函数(render = {function(){}})作为render 的属性值时,会影响路由传参的需要。这点可以通过向内联函数返回的组件中传入属性 并结合扩展运算符解决,如下:
const completedMain = props => ;
官方文档给出了封装性更好的写法:
const FadingRoute = ({componet:Component, ...rest}) => (
(
)
/*原来 Route 的地方就可以写*/