python网络爬虫(urllib,urllib,requests,bs4)
python网络爬虫
- 一、网络爬取的概述与分类
- 1、网络爬虫的概述
- 2、网络爬虫的分类
- 3、网络爬虫的基本原理
- 二、网络爬取的基本技术
- 1、网络的基本请求
- (1)、urllib模块
- (2)、urllib3模块
- (3)、requests模块
- 2、请求头部处和超时处理
- 3、代理服务
- 4、HTML解析之BeautifulSoup
一、网络爬取的概述与分类
1、网络爬虫的概述
网络爬虫是指按照指定的规则,自动流量或抓取互联网中的信息。
2、网络爬虫的分类
通用网络爬虫、聚焦网络爬虫、增量式网络爬虫、深层网络爬虫
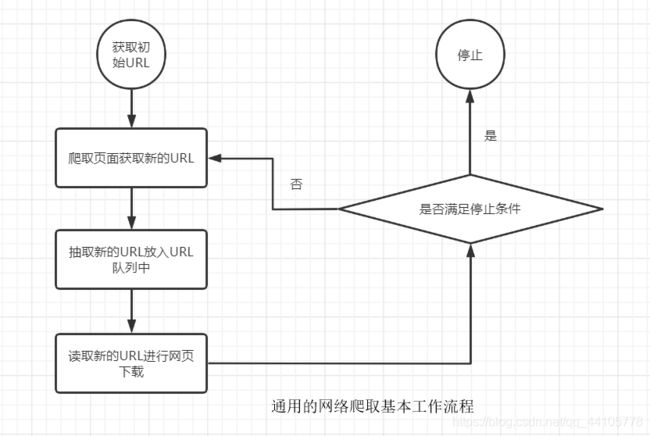
3、网络爬虫的基本原理
二、网络爬取的基本技术
1、网络的基本请求
(1)、urllib模块
该模块提供了一个urlopen()的方法,用于指定URL发送完了请求来回去数据。
下表是urllib的多个子模块介绍。
| 模块名称 | 描述 |
|---|---|
| urllib.request | 该模块介绍了URL(主要是HTTP)的方法和类,例如身份验证,cookie等 |
| urllib.error | 该模块主要包含了异常类,基本的异常类是URLError |
| urllib.parse | 该模块定义的功能分为2大类:URL解析和URL引用 |
| urllib.robotparser | 该模块用于解析robots.txt文件 |
简单的urllib.request操作实例get方式
import urllib.request

# 打开指定需要爬取的网页
response = urllib.request.urlopen("http://www.baidu.com")
html = response.read().decode('utf-8') # 读取网页代码
print(html)
注意操作实例post方式里面的网站为个人搭建的测试网站,后面的实例中也一样
import urllib.request
import urllib.parse

# 讲数据使用urlencode编码处理以后,再使用encoding设置为UTF-8编码
data = bytes(urllib.parse.urlencode({'word':'hello'}), encoding='utf8')
# 打开需要爬取的网页
response = urllib.request.urlopen("https://www.ahhh.com/post", data=data)
html = response.read()   # 读取网页代码
print(html)
(2)、urllib3模块
urllib3提供了很多python标准库里没有的重要特性
例如
线程安全、连接池、客户端SSL/TLS验证等等
通过urllib3模块实现网络请求的实例
get实例
import urllib3
# 创建PoolManger对象,用于处理与线程池的连接及线程安全的所有细节
http = urllib3.PoolManager()
# 对需要爬取的网页发送请求
response = http.request('GET', 'http://www.baidu.com/')
print(response.data.decode('UTF-8'))
post实例
import urllib3
# 创建PoolManger对象,用于处理与线程池的连接及线程安全的所有细节
http = urllib3.PoolManager()
# 对需要爬取的网页发送请求
response = http.request('POST', 'http://www.ahhh.com/post', fields={'word': 'hello'})
print(response.data.decode('UTF-8'))
(3)、requests模块
该模块实现http请求的时候比urllib简化了很多,操作更加人性化
get请求实例
import requests

response = requests.get('http://www.baidu.com')
response.encoding = response.apparent_encoding  # 编码处理,防止乱码
print(response.status_code)  # 打印状态码
print(response.url)  # 打印请求的URL
print(response.headers)   # 打印头部信息
print(response.cookies)   # 打印cookie信息
print(response.text)    # 以文本形式打印网页源码
print(response.content)  # 以字节流形式打印网页源码
如果get请求需要传参的话,且参数跟在?号后面
可以按一下方式传参
data = {'word': 'hello'}  # 参数
response = requests.get('http://www.ahhh.com/get', params=data)
post请求实例
import requests
data = {'word': 'hello'}  # 表单参数
response = requests.post('http://www.ahhh.com/post', data=data)
response.encoding = response.apparent_encoding  # 编码处理,防止乱码
print(response.text)    # 以文本形式打印网页源码
print(response.content)  # 以字节流形式打印网页源码
requests模块不仅提供了上面几种请求方式
还提供一些请求方式
requests.put('http://www.ahhh.com/post', data={'word': 'hello'})  # put请求
requests.delete('http://www.ahhh.com/delete')  # delete请求
requests.head('http://www.ahhh.com/get')  # head请求
requests.options('http://www.ahhh.com/get')  # option请求
2、请求头部处和超时处理
有些网站有反爬虫机制,可能会返回4开头的错误,这其实是服务器拒绝了你的请求。这时候我们需要伪装成浏览器,再来访问。这就需要头部的信息。
利用火狐浏览器控制台查看头部信息,(快捷键ctrl+shit+E),当然可以利用抓包工具抓取
如果访问一个网页,但是该网页长时间未响应,,利用timeout设置超时时间,单位为秒。时间到了自动判断未来超时
下面以requests模块举个例子
import requests


def get_html(url):
    try:
       # 创建头部信息
        headers ={
        'User-Agent': 'Mozilla/5.0 (Windows NT 10.0; Win64; x64; rv:78.0) Gecko/20100101 Firefox/78.0'
    }
    	# timeout=30设置超时时间为10秒
        r = requests.get(url, headers=headers, timeout=10)
        r.encoding = r.apparent_encoding
        return r.text
    except Exception as e:
        return e


if __name__=="__main__":
    url = 'http://www.baidu.com'
    print(get_html(url))
3、代理服务
有些时候我们的IP会被所爬取的网站所屏蔽,这时候就需要代理IP。
下面代码中的代理IP地址是免费的,不稳定,使用时间不固定
import requests


def get_html(url,proxy):
    try:
        r = requests.get(url, proxies=proxy, timeout=30)
        r.encoding = r.apparent_encoding
        return r.text
    except Exception as e:
        return e


if __name__=="__main__":
    url = 'http://www.baidu.com'
    proxy = {
        'http': '122.114.31.177:808',
        'http': '122.114.31.177:8080'
    }
    print(get_html(url,proxy))
4、HTML解析之BeautifulSoup
安装BeautifulSoup模块步骤(windows环境)
pip install bs4
使用实例
from bs4 import BeautifulSoup   # 导入BeautifulSoup库

# 创建模拟HTML代码的字符串
html_doc = """
 The Dorm

 The Dorm
 The Dormaaa
 Elsie

"""
# 创建一个BeautifulSoup对象,并知道解析器为lxml
soup = BeautifulSoup(html_doc, features="lxml")
print(soup)
如果将上面的html代码保存到html.html文件中。
soup = BeautifulSoup(open('htmt.html'), features="lxml")
print(soup.prettify)   # 打印格式化后的代码

