Fragment实现Android各个选项界面的切换
Fragment
- 一 :Fragment简介
- 二:实现效果
- 三:实现步骤
- 1.创建包含FragmentTabHost组件的布局文件
- 2.设置标签项布局文件
- 3.创建每个布局文件对应的java类
- 4.设置选项卡的布局文件
- 5.在MainActivity中将各个界面绑定在一起并设置监听事件
一 :Fragment简介
- FragmentTabHost是TabHostde替代品,因为TabHost已经不推荐使用了。
- FragmentTabHost可以实现android各个选项界面的快速切换以及数据互通。 Fragment是为了解决Android
- APP运行的设备大小不一而提出来的,我们可以把Fragment当成Activity界面的一个组成部分,一个Activity可以包含很多Fragment.
-Activity中可以动态的添加、替换和移除某个Fragment
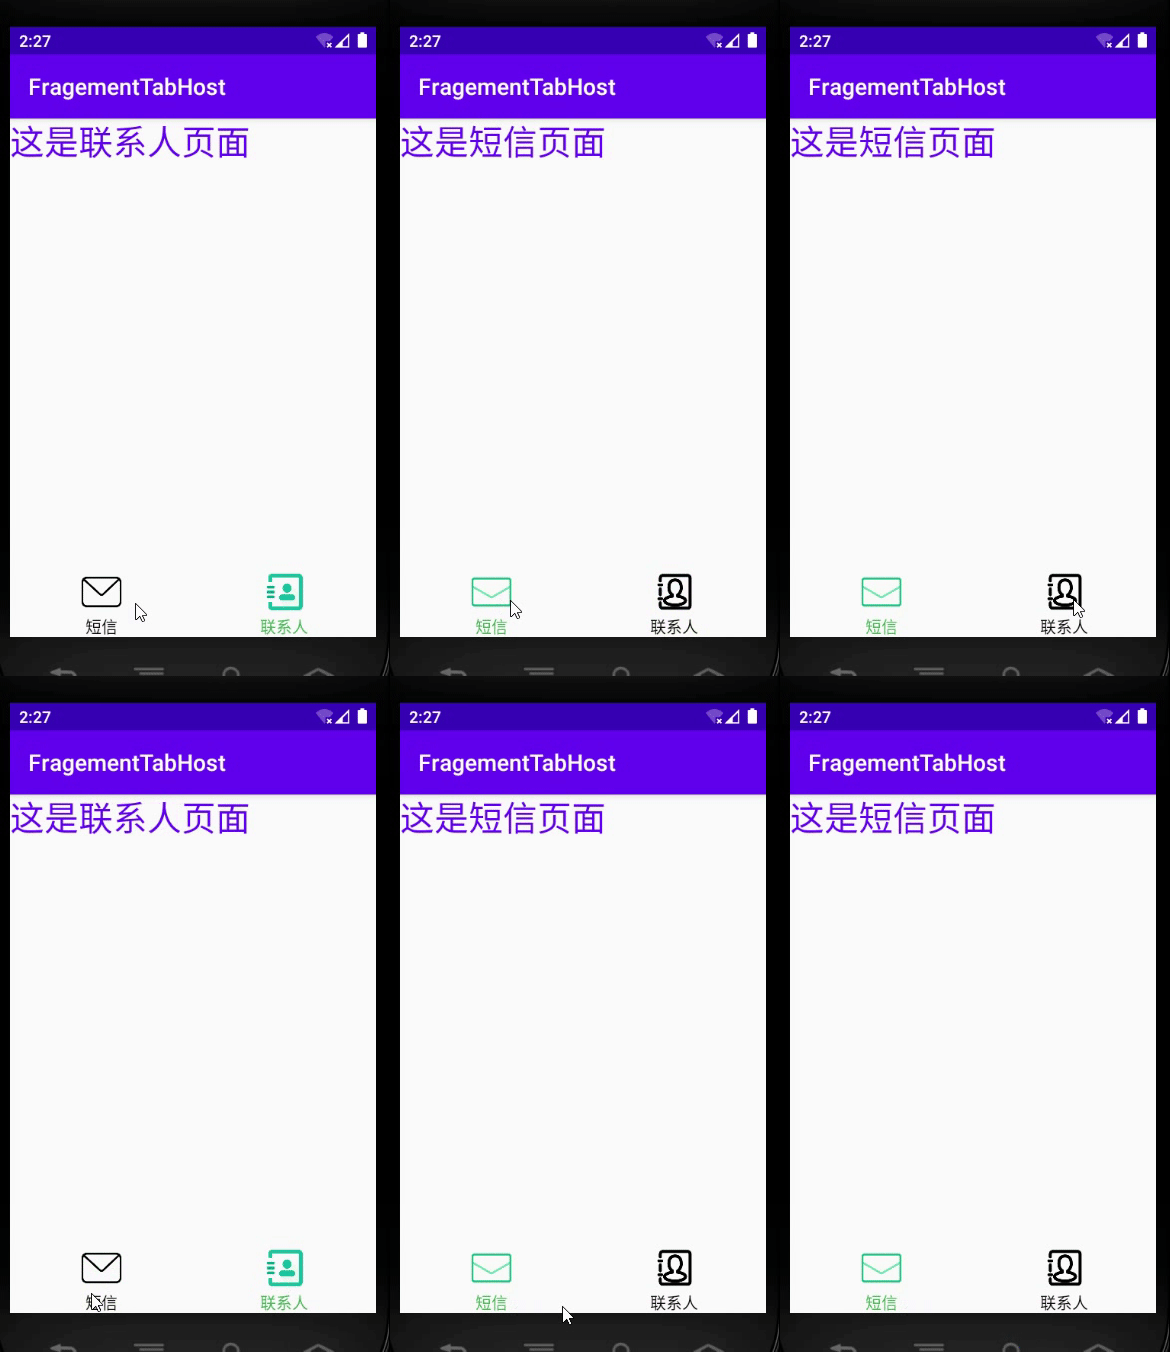
二:实现效果
效果图:

ps:该功能实现了手机两个选项页面的切换,以及选中之后图片颜色和文字颜色的变化
三:实现步骤
1.创建包含FragmentTabHost组件的布局文件
<?xml version="1.0" encoding="utf-8"?>
<androidx.fragment.app.FragmentTabHost android:layout_width="match_parent"
    android:id="@android:id/tabhost"
    android:layout_height="match_parent"
    xmlns:android="http://schemas.android.com/apk/res/android" >
    <RelativeLayout
        android:layout_width="match_parent"
        android:layout_height="match_parent">
        <TabWidget
            android:id="@android:id/tabs"
            android:layout_width="match_parent"
            android:layout_height="wrap_content"
            android:layout_alignParentBottom="true"/>
        <FrameLayout
            android:id="@android:id/tabcontent"
            android:layout_width="match_parent"
            android:layout_height="match_parent"
            android:layout_above="@android:id/tabs"/>
    </RelativeLayout>
</androidx.fragment.app.FragmentTabHost>
2.设置标签项布局文件
<?xml version="1.0" encoding="utf-8"?>
<!--选项页面内容的布局文件-->
<LinearLayout android:layout_width="match_parent"
    android:layout_height="match_parent"
    xmlns:android="http://schemas.android.com/apk/res/android">
    <TextView
        android:id="@+id/tv_content"
        android:layout_width="wrap_content"
        android:layout_height="wrap_content"
        android:textSize="30sp"
        android:textColor="@color/colorPrimary"/>
</LinearLayout>
3.创建每个布局文件对应的java类
import android.os.Bundle;
import android.view.LayoutInflater;
import android.view.View;
import android.view.ViewGroup;
import android.widget.TextView;

import androidx.annotation.NonNull;
import androidx.annotation.Nullable;
import androidx.fragment.app.Fragment;

import com.example.fragementtabhost.R;
//第一个内容页面对应的Fragment类
public class FirstFragment extends Fragment {
    @Nullable
    @Override
    public View onCreateView(@NonNull LayoutInflater inflater, @Nullable ViewGroup container, @Nullable Bundle savedInstanceState) {
        //加载内容页面的布局文件(将内容页面的XML布局文件转成View类型的对象)
        View view=inflater.inflate(R.layout.fragment_layout,//内容页面的布局文件
                container,//根视图对象
                false);//false表示需要手动调用addView方法将view添加到contain
                                     //true表示不需要手动调用addView方法
        //获取内容页面当中控件的引用
        TextView tvContent=view.findViewById(R.id.tv_content);
        tvContent.setText("这是短信页面");
       return view;
    }
}
import android.os.Bundle;
import android.view.LayoutInflater;
import android.view.View;
import android.view.ViewGroup;
import android.widget.TextView;

import androidx.annotation.NonNull;
import androidx.annotation.Nullable;
import androidx.fragment.app.Fragment;

import com.example.fragementtabhost.R;

//这是第二个Fragment类
public class SecondFragment extends Fragment {

    @Nullable
    @Override
    public View onCreateView(@NonNull LayoutInflater inflater, @Nullable ViewGroup container, @Nullable Bundle savedInstanceState) {
       View view=inflater.inflate(R.layout.fragment_layout,
               container,
               false);
       TextView tvContent=view.findViewById(R.id.tv_content);
       tvContent.setText("这是联系人页面");
       return view;
    }
}
4.设置选项卡的布局文件
<?xml version="1.0" encoding="utf-8"?>
<LinearLayout xmlns:android="http://schemas.android.com/apk/res/android"

    android:layout_width="match_parent"
    android:layout_height="match_parent"
    android:orientation="vertical"
    android:gravity="center"
    >

    <ImageView
        android:id="@+id/icon"
        android:layout_width="40dp"
        android:layout_height="40dp" />

    <TextView
        android:id="@+id/title"
        android:layout_width="wrap_content"
        android:layout_height="wrap_content" />
</LinearLayout>
5.在MainActivity中将各个界面绑定在一起并设置监听事件
import androidx.appcompat.app.AppCompatActivity;
import androidx.fragment.app.FragmentTabHost;


import android.os.Bundle;
import android.view.View;
import android.widget.ImageView;
import android.widget.TabHost;
import android.widget.TextView;

import java.util.HashMap;
import java.util.Map;

import fragment.FirstFragment;
import fragment.SecondFragment;

public class MainActivity extends AppCompatActivity {
    private Map<String ,ImageView> ImageViewMap=new HashMap<String,ImageView>();
    private Map<String,TextView>  TextViewMap=new HashMap<String,TextView>();
    @Override
    protected void onCreate(Bundle savedInstanceState) {
        super.onCreate(savedInstanceState);
        setContentView(R.layout.activity_main);
        //获取FragmentTabHost的引用
        FragmentTabHost fragmentTabHost=findViewById(android.R.id.tabhost);
        //初始化
        fragmentTabHost.setup(this,//环境上下文
                getSupportFragmentManager(),//管理多个Fragment对象的管理器
                android.R.id.tabcontent );//显示内容页面的控件的id
        //创建内容页面TabSpec对象
        TabHost.TabSpec tab1=fragmentTabHost.newTabSpec("first_tab").setIndicator(getTabSpecView("first_tab","短信",R.drawable.message1));
        //setIndicator("短信");
        //Class参数:类名.class,对象.getClass
        fragmentTabHost.addTab(tab1,
                FirstFragment.class,//Firstfragment类的class对象
                 null);//传递数据时使用,不需要传递数据直接传null
        TabHost.TabSpec tab2=fragmentTabHost.newTabSpec("second_tab").setIndicator(getTabSpecView("second_tab","联系人",R.drawable.people1));
                //setIndicator("联系人");
        //Class参数:类名.class,对象.getClass
        fragmentTabHost.addTab(tab2,
                SecondFragment.class,//Firstfragment类的class对象
                null);//传递数据时使用,不需要传递数据直接传null
        //设置FragmentTabHost页面切换时间
         fragmentTabHost.setOnTabChangedListener(new TabHost.OnTabChangeListener() {
             @Override
             public void onTabChanged(String tabId) {//点击标签的ID
                 switch(tabId){
                     case "first_tab"://选中了短信
                         ImageViewMap.get("first_tab").setImageResource(R.drawable.message2);
                         ImageViewMap.get("second_tab").setImageResource(R.drawable.people1);
                         TextViewMap.get("first_tab").setTextColor(getResources().getColor(R.color.mycolor1));
                         TextViewMap.get("second_tab").setTextColor(getResources().getColor(R.color.mycolor2));
                         break;
                     case "second_tab"://选中了联系人
                         ImageViewMap.get("first_tab").setImageResource(R.drawable.message1);
                         ImageViewMap.get("second_tab").setImageResource(R.drawable.people2);
                         TextViewMap.get("first_tab").setTextColor(getResources().getColor(R.color.mycolor2));
                         TextViewMap.get("second_tab").setTextColor(getResources().getColor(R.color.mycolor1));
                         break;
                 }
             }
         });
         //设置默认选中的标签页:参数是下标
        fragmentTabHost.setCurrentTab(0);
        ImageViewMap.get("first_tab").setImageResource(R.drawable.message2);
        TextViewMap.get("first_tab").setTextColor(getResources().getColor(R.color.mycolor1));

    }
    public View getTabSpecView(String tag,String title,int drawable){
        View view=getLayoutInflater().inflate(R.layout.tab_spec_layout,null);
        //获取布局中对应控件的引用
        ImageView img=view.findViewById(R.id.icon);
        img.setImageResource(drawable);
        //将imageView对象传到Map中
        ImageViewMap.put(tag,img);
        TextView title1=view.findViewById(R.id.title);
        title1.setText(title);
        TextViewMap.put(tag,title1);
        return view;
    }
}