Centos 7.4 部署 Jumpserver 1.5.2(堡垒机)
关于跳板机/堡垒机的介绍:
跳板机的定义:
跳板机就是一台服务器,开发或运维人员在维护过程中首先要统一登录到这台服务器,然后再登录到目标设备进行维护和操作;
跳板机缺点:
没有实现对运维人员操作行为的控制和审计,使用跳板机的过程中还是会出现误操作、远规
操作导致的事故,一旦出现操作事故很难快速定位到原因和责任人;堡垒机的定义:
堡垒机,即在一个特定的网络环境下,为了保障网络和数据丌受来自外部和内部用户的***和破坏,而运用各种技术手段实时收集和监控网络环境中每一个组成部分的系统状态、安全事件、网络活劢,以便集中报警、及时处理及审计定责。
总结:
堡垒机比跳板机多了实时收集、监控网络环境、集中报警等功能
Jumpserver 概述:
Jumpserver 是一款使用 Python, Django 开发的开源跳板机系统, 为亏联网企业提供了认证,授权,审计,自动化运维等功能。
Jumpserver的功能:
1、用户组/用户 :添加组方便迚行授权,用户是授权和登陆的主体.
2、资产组/资产/IDC : 主机信息简洁完整,用户自定义备注登录,支持自劢获取主页硬件信息.
3、Sudo/系统用户/授权规则 :支持 sudo 授权,系统用户用亍登陆客户端,授权是将用户、资产和系统用户关联起来.
4、在线/登录历叱/命令记录/上传下载 : 在线实时监控用户操作,统计和录像回放用户操作内容,阻断控制,详细记录上传下载.
5、上传/下载 : 支持文件上传下载,实现 rzsz 方式.
6、默认设置 : 默认管理用户 设置包括用户密码密钥,默认信息为了方便添加资产而设计.
组件说明
1、Jumpserver
现指 Jumpserver 管理后台,是核心组件(Core), 使用 Django Class Based View 风格开发,支持 Restful API。
2、Coco
实现了 SSH Server 和 Web Terminal Server 的组件,提供 SSH 和 WebSocket 接口, 使用 Paramiko 和 Flask 开发。
3、Luna
现在是 Web Terminal 前端,计划前端页面都由该项目提供,Jumpserver 只提供 API,不再负责后台渲染html等。
4、Guacamole
Apache 跳板机项目,Jumpserver 使用其组件实现 RDP 功能,Jumpserver 并没有修改其代码而是添加了额外的插件,支持 Jumpserver 调用。
5、Jumpserver-Python-SDK
Jumpserver API Python SDK,Coco 目前使用该 SDK 与 Jumpserver API 交互。
Yum源升级并安装依赖包
yum update -y
yum -y install wget gcc epel-release git vim
安装 Redis, Jumpserver 使用 Redis 做 cache 和 celery broke
yum -y install redis
systemctl enable redis
systemctl start redis
安装 MySQL(centos7下叫mariadb)
yum -y install mariadb mariadb-devel mariadb-server MariaDB-shared
systemctl enable mariadb
systemctl start mariadb
创建数据库 Jumpserver 并授权
mysql
create database jumpserver default charset 'utf8';
grant all on jumpserver.* to 'jumpserver'@'127.0.0.1' identified by '123456';
flush privileges;
配置Python环境
# 安装 Python3.6,最新的jumpserver版本需要Python3支持
yum -y install python36 python36-devel# 配置并载入 Python3 虚拟环境
cd /opt
python3.6 -m venv py3
source /opt/py3/bin/activate
# 看到下面的提示符代表成功, 以后运行 Jumpserver 都要先运行以上 source 命令, 载入环境后默认以下所有命令均在该虚拟环境中运行
(py3) [root@localhost py3]
跳出虚拟环境用:deactivate
只有安装jumpserver相关组件才需要虚拟Python3的环境
安装Jumpserver
# 下载 Jumpserver
cd /opt/
git clone --depth=1 https://github.com/jumpserver/jumpserver.git
#如果要指定安装版本就执行下面命令
#cd /opt/jumpserver
#git checkout -b 1.4.8
#后面步骤相同
# 安装依赖 RPM 包
yum -y install $(cat /opt/jumpserver/requirements/rpm_requirements.txt)# 安装 Python 库依赖
pip install --upgrade pip setuptools
下面要注意二选一(推荐方法二)
方法一、pip install -r /opt/jumpserver/requirements/requirements.txt(可能会报错,不推荐)
方法二、pip install -i  https://pypi.douban.com/simple -r requirements.txt(推荐)
下面是我执行上面1命令时遇到的报错
ERROR: elasticsearch 6.1.1 has requirement urllib3<1.23,>=1.21.1, but you'll have urllib3 1.25.2 which is incompatible.
ERROR: django-radius 1.3.3 has requirement future==0.16.0, but you'll have future 0.17.1 which is incompatible.
这个是网上搜到的解决方法,但是只能解决一个,所以我选择了上面推荐的2执行命令解决了
#pip install future==0.16.0
#查看安装的所有软件
pip freeze# 复制 Jumpserver 配置文件
cd /opt/jumpserver
cp config_example.yml config.yml
# 生成随机SECRET_KEY
加密秘钥 生产环境中请修改为随机字符串, 请勿外泄, PS: 纯数字不可以
SECRET_KEY=`cat /dev/urandom | tr -dc A-Za-z0-9 | head -c 50`
echo "SECRET_KEY=$SECRET_KEY" >> ~/.bashrc
# 生成随机BOOTSTRAP_TOKEN
预共享Token coco和guacamole用来注册服务账号, 不在使用原来的注册接受机制
BOOTSTRAP_TOKEN=`cat /dev/urandom | tr -dc A-Za-z0-9 | head -c 16`
echo "BOOTSTRAP_TOKEN=$BOOTSTRAP_TOKEN" >> ~/.bashrc
# 查看SECRET_KEY、BOOTSTRAP_TOKEN
cat ~/.bashrc
SECRET_KEY=NhWUR1jkp1sfD7qaAKAIVtokzS20S1RJoiEsdwhlNEVEUq17wX
BOOTSTRAP_TOKEN=jiWMrK7TPpiGC349# 修改配置文件
sed -i "s/SECRET_KEY:/SECRET_KEY: $SECRET_KEY/g" /opt/jumpserver/config.yml
sed -i "s/BOOTSTRAP_TOKEN:/BOOTSTRAP_TOKEN: $BOOTSTRAP_TOKEN/g" /opt/jumpserver/config.yml
sed -i "s/# DEBUG: true/DEBUG: false/g" /opt/jumpserver/config.yml
sed -i "s/# LOG_LEVEL: DEBUG/LOG_LEVEL: ERROR/g" /opt/jumpserver/config.yml
sed -i "s/# SESSION_EXPIRE_AT_BROWSER_CLOSE: false/SESSION_EXPIRE_AT_BROWSER_CLOSE: true/g" /opt/jumpserver/config.yml
sed -i "s/DB_PASSWORD: /DB_PASSWORD: $DB_PASSWORD/g" /opt/jumpserver/config.yml
# 查看完整 config.yml 配置文件
cat /opt/jumpserver/config.yml
# SECURITY WARNING: keep the secret key used in production secret!
# 加密秘钥 生产环境中请修改为随机字符串,请勿外泄, 可使用命令生成

# $ cat /dev/urandom | tr -dc A-Za-z0-9 | head -c 49;echo
SECRET_KEY: NhWUR1jkp1sfD7qaAKAIVtokzS20S1RJoiEsdwhlNEVEUq17wX

# SECURITY WARNING: keep the bootstrap token used in production secret!
# 预共享Token coco和guacamole用来注册服务账号,不在使用原来的注册接受机制
BOOTSTRAP_TOKEN: jiWMrK7TPpiGC349

# Development env open this, when error occur display the full process track, Production disable it

# DEBUG 模式 开启DEBUG后遇到错误时可以看到更多日志
DEBUG: false

# DEBUG, INFO, WARNING, ERROR, CRITICAL can set. See https://docs.djangoproject.com/en/1.10/topics/logging/# 日志级别
LOG_LEVEL: ERROR

# LOG_DIR:

# Session expiration setting, Default 24 hour, Also set expired on on browser close
# 浏览器Session过期时间,默认24小时, 也可以设置浏览器关闭则过期
# SESSION_COOKIE_AGE: 86400
SESSION_EXPIRE_AT_BROWSER_CLOSE: true

# Database setting, Support sqlite3, mysql, postgres ....
# 数据库设置
# See https://docs.djangoproject.com/en/1.10/ref/settings/#databases
# SQLite setting:
# 使用单文件sqlite数据库
# DB_ENGINE: sqlite3

# DB_NAME:
# MySQL or postgres setting like:
# 使用Mysql作为数据库
DB_ENGINE: mysql
DB_HOST: 127.0.0.1
DB_PORT: 3306
DB_USER: jumpserver
DB_PASSWORD: 123456
DB_NAME: jumpserver

# When Django start it will bind this host and port
# ./manage.py runserver 127.0.0.1:8080

# 运行时绑定端口
HTTP_BIND_HOST: 0.0.0.0
HTTP_LISTEN_PORT: 8080

# Use Redis as broker for celery and web socket
# Redis配置
REDIS_HOST: 127.0.0.1
REDIS_PORT: 6379
# REDIS_PASSWORD:
# REDIS_DB_CELERY: 3
# REDIS_DB_CACHE: 4

# Use OpenID authorization
# 使用OpenID 来进行认证设置
# BASE_SITE_URL: http://localhost:8080
# AUTH_OPENID: false  # True or False
# AUTH_OPENID_SERVER_URL: https://openid-auth-server.com/
# AUTH_OPENID_REALM_NAME: realm-name
# AUTH_OPENID_CLIENT_ID: client-id
# AUTH_OPENID_CLIENT_SECRET: client-secret

# Use Radius authorization
# 使用Radius来认证
# AUTH_RADIUS: false
# RADIUS_SERVER: localhost
# RADIUS_PORT: 1812
# RADIUS_SECRET:

# OTP settings
# OTP/MFA 配置
# OTP_VALID_WINDOW: 0
# OTP_ISSUER_NAME: Jumpserver
# 运行 Jumpserver
cd /opt/jumpserver
./jms start all -d
安装coco
cd /opt/
git clone https://github.com/jumpserver/coco.git
cd /opt/coco
yum -y install $(cat /opt/coco/requirements/rpm_requirements.txt)
pip install -r /opt/coco/requirements/requirements.txt
# 复制配置文件
cp config_example.yml config.yml# 配置文件完整配置
cat /opt/coco/config.yml
# 项目名称, 会用来向Jumpserver注册, 识别而已, 不能重复
# NAME: {{ Hostname }}

# Jumpserver项目的url, api请求注册会使用
CORE_HOST: http://127.0.0.1:8080

# Bootstrap Token, 预共享秘钥, 用来注册coco使用的service account和terminal
# 请和jumpserver 配置文件中保持一致,注册完成后可以删除
BOOTSTRAP_TOKEN: nfmBa3WkbQ8leRRb

# 启动时绑定的ip, 默认 0.0.0.0
# BIND_HOST: 0.0.0.0

# 监听的SSH端口号, 默认2222
# SSHD_PORT: 2222

# 监听的HTTP/WS端口号,默认5000
# HTTPD_PORT: 5000

# 项目使用的ACCESS KEY, 默认会注册,并保存到 ACCESS_KEY_STORE中,
# 如果有需求, 可以写到配置文件中, 格式 access_key_id:access_key_secret
# ACCESS_KEY: null

# ACCESS KEY 保存的地址, 默认注册后会保存到该文件中
# ACCESS_KEY_FILE: data/keys/.access_key

# 加密密钥
# SECRET_KEY: null

# 设置日志级别 [DEBUG, INFO, WARN, ERROR, FATAL, CRITICAL]
LOG_LEVEL: ERROR

# 日志存放的目录
# LOG_DIR: logs

# SSH白名单
# ALLOW_SSH_USER: all

# SSH黑名单, 如果用户同时在白名单和黑名单,黑名单优先生效
# BLOCK_SSH_USER:
#   -

# 和Jumpserver 保持心跳时间间隔
# HEARTBEAT_INTERVAL: 5

# Admin的名字,出问题会提示给用户
# ADMINS: ''

# SSH连接超时时间 (default 15 seconds)
# SSH_TIMEOUT: 15

# 语言 [en,zh]
# LANGUAGE_CODE: zh

# SFTP的根目录, 可选 /tmp, Home其他自定义目录
# SFTP_ROOT: /tmp

# SFTP是否显示隐藏文件
# SFTP_SHOW_HIDDEN_FILE: false

# 是否复用和用户后端资产已建立的连接(用户不会复用其他用户的连接)
# REUSE_CONNECTION: true
# 后台启动coco
/opt/coco/cocod start -d
下载Luna
# 安装 Web Terminal 前端: Luna 需要 Nginx 来运行访问 访问(https://github.com/jumpserver/luna/releases)下载对应版本的 release 包, 直接解压, 不需要编译
cd /opt
wget https://github.com/jumpserver/luna/releases/download/1.5.2/luna.tar.gz
tar xf luna.tar.gz
chown -R root:root luna
# 如果网络有问题导致下载无法完成可以使用下面地址
#wget https://demo.jumpserver.org/download/luna/1.5.0/luna.tar.gz
安装 Windows 支持组件(如果不需要管理 windows 资产,可以直接跳过这一步)
因为手动安装 guacamole 组件比较复杂,这里提供打包好的 docker 使用, 启动 guacamole
Docker安装
[root@localhost  ~]# yum remove docker-latest-logrotate docker-logrotate docker-selinux dockdocker-engine
[root@localhost  ~]# yum install -y yum-utils device-mapper-persistent-data lvm2

添加docker官方源
[root@localhost  ~]# yum-config-manager --add-repo https://download.docker.com/linux/centos/docker-ce.repo
[root@localhost  ~]# yum makecache fast
[root@localhost  ~]# yum -y install docker-ce

[root@localhost  ~]# systemctl enable docker
[root@localhost  ~]# systemctl start docker
启动 Guacamole
> 这里所需要注意的是 guacamole 暴露出来的端口是 8081,若与主机上其他端口冲突请自定义。
> 注意:这里需要修改下 http://<填写jumpserver的url地址> 例: http://192.168.135.132, 否则会出错(这里下载有点慢,需要等待一会儿)。
> 不能使用 127.0.0.1 ,可以更换 registry.jumpserver.org/public/guacamole:latest[root@localhost ~]# docker run --name jms_guacamole -d \ -p 8081:8080 -v /opt/guacamole/key:/config/guacamole/key \ -e JUMPSERVER_KEY_DIR=/config/guacamole/key \ -e JUMPSERVER_SERVER=http://192.168.135.132 \ jumpserver/guacamole:latest查看镜像启动状态
[root@localhost ~]# docker ps
安装Nginx
先跳出虚拟环境:deactivate
# 安装 Nginx, 用作代理服务器整合 Jumpserver 与各个组件
#vim /etc/yum.repos.d/nginx.repo(可省略)
[nginx]
name=nginx repo
baseurl=http://nginx.org/packages/centos/7/$basearch/
gpgcheck=0
enabled=1
yum -y install nginx准备配置文件
[root@localhost  ~]# cd /etc/nginx/
[root@localhost  nginx]# mv nginx.conf nginx.conf.bak
[root@localhost nginx]# vi nginx.conf(把源配置文件替换成下面内容,复杂粘贴就行)
# For more information on configuration, see:
#   * Official English Documentation: http://nginx.org/en/docs/
#   * Official Russian Documentation: http://nginx.org/ru/docs/

user nginx;
worker_processes auto;
error_log /var/log/nginx/error.log;
pid /run/nginx.pid;

# Load dynamic modules. See /usr/share/nginx/README.dynamic.
include /usr/share/nginx/modules/*.conf;

events {
    worker_connections 1024;
}

http {
    log_format  main  '$remote_addr - $remote_user [$time_local] "$request" '
                      '$status $body_bytes_sent "$http_referer" '
                      '"$http_user_agent" "$http_x_forwarded_for"';

    access_log  /var/log/nginx/access.log  main;

    sendfile            on;
    tcp_nopush          on;
    tcp_nodelay         on;
    keepalive_timeout   65;
    types_hash_max_size 2048;

    include             /etc/nginx/mime.types;
    default_type        application/octet-stream;

    # Load modular configuration files from the /etc/nginx/conf.d directory.
    # See http://nginx.org/en/docs/ngx_core_module.html#include
    # for more information.
    include /etc/nginx/conf.d/*.conf;
# Settings for a TLS enabled server.
#
#    server {
#        listen       443 ssl http2 default_server;
#        listen       [::]:443 ssl http2 default_server;
#        server_name  _;
#        root         /usr/share/nginx/html;
#
#        ssl_certificate "/etc/pki/nginx/server.crt";
#        ssl_certificate_key "/etc/pki/nginx/private/server.key";
#        ssl_session_cache shared:SSL:1m;
#        ssl_session_timeout  10m;
#        ssl_ciphers HIGH:!aNULL:!MD5;
#        ssl_prefer_server_ciphers on;
#
#        # Load configuration files for the default server block.
#        include /etc/nginx/default.d/*.conf;
#
#        location / {
#        }
#
#        error_page 404 /404.html;
#            location = /40x.html {
#        }
#
#        error_page 500 502 503 504 /50x.html;
#            location = /50x.html {
#        }
#    }

}
新增虚拟主机配置文件jumpserver.conf
[root@localhost nginx]# cd conf.d/
[root@localhost conf.d]# vim jumpserver.conf
server {
    listen 80;  # 代理端口,以后将通过此端口进行访问,不再通过8080端口
    server_name demo.jumpserver.com;  # 修改成你的域名

    client_max_body_size 100m;  # 录像及文件上传大小限制

    location /luna/ {
        try_files $uri / /index.html;
        alias /opt/luna/;  # luna 路径,如果修改安装目录,此处需要修改
    }

    location /media/ {
        add_header Content-Encoding gzip;
        root /opt/jumpserver/data/;  # 录像位置,如果修改安装目录,此处需要修改
    }

    location /static/ {
        root /opt/jumpserver/data/;  # 静态资源,如果修改安装目录,此处需要修改
    }

    location /socket.io/ {
        proxy_pass       http://192.168.135.135:5000/socket.io/;  # 如果coco安装在别的服务器,请填写它的ip
        proxy_buffering off;
        proxy_http_version 1.1;
        proxy_set_header Upgrade $http_upgrade;
        proxy_set_header Connection "upgrade";
        proxy_set_header X-Real-IP $remote_addr;
        proxy_set_header Host $host;
        proxy_set_header X-Forwarded-For $proxy_add_x_forwarded_for;
        access_log off;
    }

    location /coco/ {
        proxy_pass       http://192.168.135.135:5000/coco/;  # 如果coco安装在别的服务器,请填写它的ip
        proxy_set_header X-Real-IP $remote_addr;
        proxy_set_header Host $host;
        proxy_set_header X-Forwarded-For $proxy_add_x_forwarded_for;
        access_log off;
    }

    location /guacamole/ {
        proxy_pass       http://192.168.135.135:8081/;  # 如果guacamole安装在别的服务器,请填写它的ip
        proxy_buffering off;
        proxy_http_version 1.1;
        proxy_set_header Upgrade $http_upgrade;
        proxy_set_header Connection $http_connection;
        proxy_set_header X-Real-IP $remote_addr;
        proxy_set_header Host $host;
        proxy_set_header X-Forwarded-For $proxy_add_x_forwarded_for;
        access_log off;
    }

    location / {
        proxy_pass http://192.168.135.135:8080;  # 如果jumpserver安装在别的服务器,请填写它的ip
        proxy_set_header X-Real-IP $remote_addr;
        proxy_set_header Host $host;
        proxy_set_header X-Forwarded-For $proxy_add_x_forwarded_for;
    }
}
检查nginx配置文件是否配置正常
[root@localhost conf.d]# cd
[root@localhost ~]# nginx -t
nginx: the configuration file /etc/nginx/nginx.conf syntax is ok
nginx: configuration file /etc/nginx/nginx.conf test is successful
运行 Nginx
[root@localhost ~]# systemctl enable nginx
[root@localhost ~]# systemctl start nginx
开始使用 Jumpserver
检查应用是否已经正常运行
确定jumpserver已经运行,如果没有运行请重新启动jumpserver
[root@localhost  ~]# source /opt/py3/bin/activate
(py3) [root@localhost  ~]# cd /opt/jumpserver/
(py3) [root@localhost  jumpserver]# ./jms status
gunicorn is running: 44393
celery is running: 44394
beat is running: 44395
确定jumpserver已经运行,如果没有运行请重新启动coco
(py3) [root@localhost ~]# cd /opt/coco/ (py3) [root@localhost coco]# ./cocod status Failed register terminal localhost exist already#检查容器是否已经正常运行,如果没有运行请重新启动Guacamole
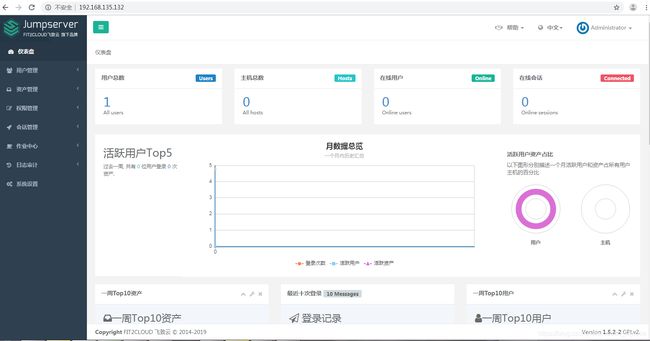
[root@localhost ~]# docker ps服务全部启动后,访问 http://192.168.135.132,访问nginx代理的端口,不要再通过8080端口访问
默认账号: admin 密码: admin
如果部署过程中没有接受应用的注册,需要到Jumpserver 会话管理-终端管理 接受 Coco Guacamole 等应用的注册。
端口说明
Jumpserver 默认端口为 8080/tcp 配置文件 jumpserver/config.yml
Coco 默认 SSH 端口为 2222/tcp, 默认 Web Terminal 端口为 5000/tcp 配置文件在 coco/config.yml
#Guacamole 默认端口为 8081/tcp, 配置文件 /config/tomcat8/conf/server.xml
Nginx 默认端口为 80/tcp
Redis 默认端口为 6379/tcp
Mysql 默认端口为 3306/tcpJumpserver开机自启
vim /usr/lib/systemd/system/jms.service
[Unit]
Description=jms
After=network.target mariadb.service redis.service
Wants=mariadb.service redis.service
[Service]
Type=forking
Environment="PATH=/opt/py3/bin:/usr/local/sbin:/usr/local/bin:/usr/sbin:/usr/bin:/root/bin"
ExecStart=/opt/jumpserver/jms start all -d
ExecReload=
ExecStop=/opt/jumpserver/jms stop
[Install]
WantedBy=multi-user.target
Coco开机自启
vim /usr/lib/systemd/system/coco.service
[Unit] Description=coco After=network.target jms.service [Service] Type=forking PIDFile=/opt/coco/coco.pid Environment="PATH=/opt/py3/bin" ExecStart=/opt/coco/cocod start -d ExecReload= ExecStop=/opt/coco/cocod stop [Install] WantedBy=multi-user.target附重新启动和开机自启命令
systemctl restart mariadb
systemctl restart redis
systemctl restart jms
systemctl restart coco
systemctl restart nginx
systemctl enable mariadb
systemctl enable redis
systemctl enable jms
systemctl enable coco
systemctl enable nginx
访问
# 访问 UI (注意 没有 :8080 通过 nginx 代理端口进行访问):
http://192.168.135.132
默认账号: admin 密码: admin 到会话管理-终端管理 接受 coco 等应用的注册测试连接
如果登录客户端是 macOS 或 Linux ,登录语法如下
$ ssh -p2222 [email protected]
$ sftp -P2222 [email protected]密码: admin

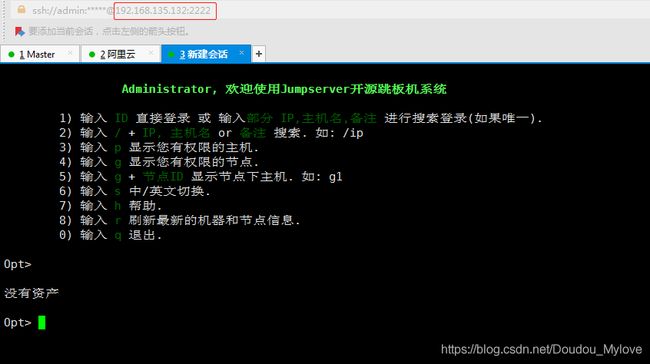
如果登录客户端是 Windows ,Xshell Terminal 登录语法如下
$ ssh [email protected] 2222
$ sftp [email protected] 2222
密码: admin
如果能登陆代表部署成功

# sftp默认上传的位置在资产的 /tmp 目录下
# windows拖拽上传的位置在资产的 Guacamole RDP上的 G 目录下
#下面是windows上的xshell客户端测试连接成功案例:
搞定。

