使用Spring Cloud Gateway构建微服务网关
使用Spring Cloud Gateway构建微服务网关
文章目录
- 使用Spring Cloud Gateway构建微服务网关
- Spring Cloud GateWay介绍
- 网关服务搭建
- 新建项目
- 引入依赖
- 配置路由
- Spring Cloud GateWay集成Nacos
- 通过API网关访问微服务
- 实现网关认证
- 代码仓库
Spring Cloud GateWay介绍
微服务架构中,前端(APP或Web端)需要同各个微服务进行交互,因实际部署时不同服务可能在不同机器各个服务甚至还有集群,这无形中增加了客户端调用微服务的复杂程度。如一个添加一样商品到购物车可能涉及到用户服务、商品服务、购物车服务等,如果直接由客户端去对应的服务地址去调用可能涉及到下面的问题:
- 客户端会多次请求不同的微服务,增加了客户端的复杂性。
- 存在跨域请求,在一定场景下处理相对复杂。
- 认证复杂,每个服务都需要独立认证。
- 难以重构,随着项目的迭代,可能需要重新划分微服务。例如,可能将多个服务合并成一个或者将一个服务拆分成多个。如果客户端直接与微服务通信,那么重构将会很难实施。
- 某些微服务可能使用了防火墙 / 浏览器不友好的协议,直接访问会有一定的困难
为了解决上述问题,API网关应运而生。所有的服务都经过网关进行路由,这样客户端对接API网关,API网关对请求进行路由即可访问对应的微服务。由于各个服务都由网关代理,认证、监控、鉴权、日志等都可以在网关上做,总的来说,使用API网关优点如下:
- 易于监控。可以在网关收集监控数据并将其推送到外部系统进行分析。
- 易于认证。可以在网关上进行认证,然后再将请求转发到后端的微服务,而无须在每个微服务中进行认证。
- 减少了客户端与各个微服务之间的交互次数。
目前网关产品有很多,如Zuul、Kong、Api Umbrella等。由于Netflix宣布闭源,Spring Cloud也推出了自己的网关SPring Cloud Gateway来代替Zuul,本文就以Spring Cloud Gateway为例,学习API网关的使用。
网关服务搭建
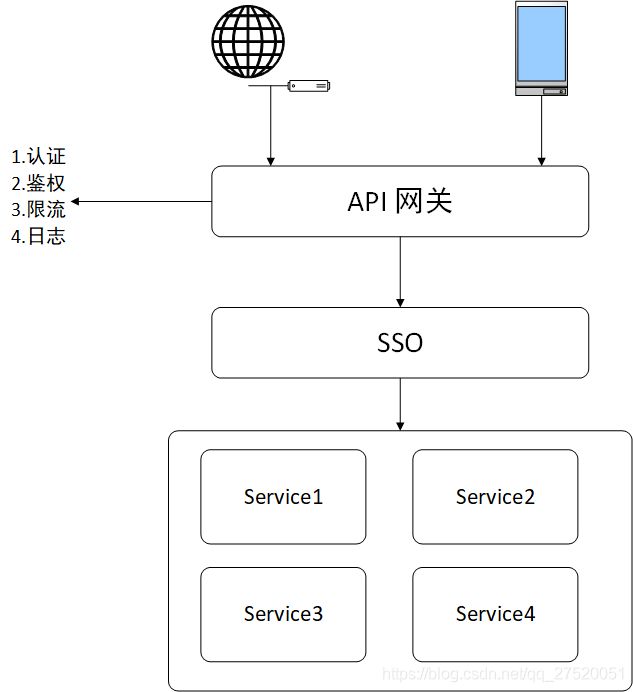
笔者的理解中API网关在系统中的架构如下所示:

API网关负责接收客户端的请求,在经过认证、鉴权、限流等功能后转发到对应的微服务。在API网关可以实现单点登录功能从而解决各个服务认证方式不同的问题。接下来搭建简单的网关服务加深理解
新建项目
谁用http://start.spring.io搭建项目。可参考使用IDEA创建SpringBoot项目
引入依赖
在build.gradle中添加下面依赖
 compile group: 'org.springframework.cloud', name: 'spring-cloud-starter-gateway'
    compile group: 'org.springframework.cloud', name: 'spring-cloud-starter-openfeign'
    compile group: 'org.springframework.cloud', name: 'spring-cloud-starter-netflix-hystrix'
    compile group: 'org.springframework.boot', name: 'spring-boot-starter-webflux'
//    compile group: 'org.springframework.boot', name: 'spring-boot-starter-data-redis-reactive'
    compile group: 'org.springframework.boot', name: 'spring-boot-autoconfigure'
    compile group: 'org.springframework.boot', name: 'spring-boot-starter-logging'
    compile group: 'org.springframework.boot', name: 'spring-boot-starter-aop'
    compile group: 'org.springframework.boot', name: 'spring-boot-starter-actuator'
    compile group: 'org.springframework.boot', name: 'spring-boot-devtools'
其他代码可以见最后的代码仓库,为了方便阅读这里不贴其他无用代码
配置路由
添加一个测试的路由,访问网关的/test,自动路由到百度
@Configuration
public class Router1Config {

    @Bean
    public RouteLocator customRouteLocator(RouteLocatorBuilder builder) {
        return builder.routes()
                //签发服务路由
                .route("license_route", r -> r.path("/test")
                        .uri("http://www.baidu.com"))
                .build();
    }
}
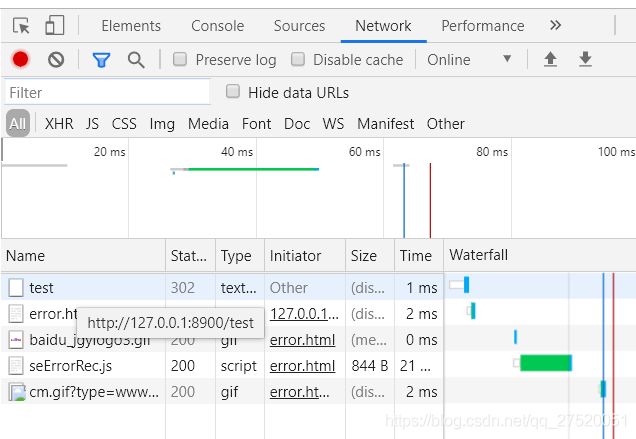
在浏览器访问http://127.0.0.1:8900/test,显示结果如下:

从浏览器的network可以看出,访问http://127.0.0.1:8900/test被重定向到了百度的页面。这里简单的网关功能已实现。接下来则实现集成Nacos并通过API网关访问微服务
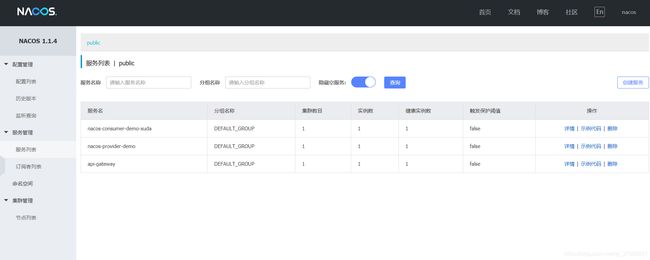
Spring Cloud GateWay集成Nacos
- 添加Nacos依赖
    //Spring Cloud Alibaba 基础框架
    //服务注册与发现
    implementation "com.alibaba.cloud:spring-cloud-starter-alibaba-nacos-discovery:${springCloudAlibabaVersion}"
    //分布式配置中心
    implementation "com.alibaba.cloud:spring-cloud-starter-alibaba-nacos-config:${springCloudAlibabaVersion}"
- 添加配置
在bootstrap.yml中添加配置
spring:
  application:
    name: api-gateway

  cloud:
    nacos:
      config:
        server-addr: 192.168.23.100:8848
        file-extension: yaml
        enabled: true
      discovery:
        server-addr: 192.168.23.100:8848
        enabled: true
通过API网关访问微服务
@Configuration
public class RouterConfig {

    @Bean
    public RouteLocator customRouteLocator(RouteLocatorBuilder builder) {
        return builder.routes()
                //服务路由,lb表示注册中心的服务
                .route("service_route", r -> r.path("/sayHi/*")
                        .uri("lb://nacos-provider-demo"))
                .build();
    }
}
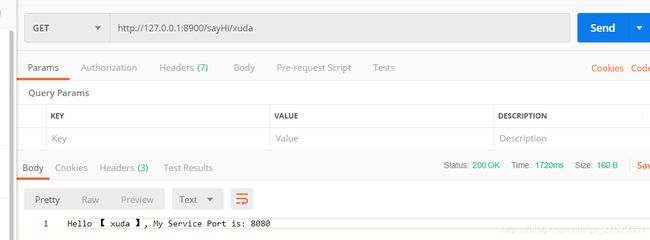
启动服务,网关服务,访问http://127.0.0.1:9000/sayHi/xuda结果如下,成功调用到了微服务的接口:

关于Spring Cloud Gateway的路由知识可参考Spring Cloud GateWay 路由转发规则介绍
实现网关认证
API网关的重要特性之一就是可以实现集中认证,这里实现要给简单的认证功能。如果请求的header中包含user_name字段即算作认证成功(这里只是一个示例,具体的认证过程由项目决定)。
这里需要用到过滤器,filter主要可分为两种,一种GlableFilter一种GateWayFilter。GlableFilter是全局filter对所有的路由都会经过这个过滤器,GateWayFilter粒度更细可以针对不同的路由做过滤。具体的过滤器区别可参考[外链图片转存失败,源站可能有防盗链机制,建议将图片保存下来直接上传(img-UOyTAsAi-1576386805878)(https://blog.csdn.net/forezp/article/details/85057268)]
接下来使用全局过滤器实现一个简单的认证功能。下面只是一部分代码,具体的代码可以见最后的仓库:
    @Override
    public Mono<Void> filter(ServerWebExchange exchange, GatewayFilterChain chain) {
        String path = exchange.getRequest().getURI().getPath();
        if (isSkip(path)) {
            return chain.filter(exchange);
        }
        ServerHttpResponse resp = exchange.getResponse();
        String username = exchange.getRequest().getHeaders().getFirst(TokenConstant.USER_NAME);
        LOGGER.info("进入认证步骤");
        if (StringUtils.isBlank(username)) {
            return unAuth(resp, "认证失败,缺少用户名", HttpStatus.UNAUTHORIZED);
        }

        return chain.filter(exchange);
    }
先使用不带请求头的模拟认证,结果如下:

再使用带请求头的模拟认证,结果如下:

请求成功,这样就实现了模拟认证的功能。
代码仓库
github链接

