图像处理-像素点分析
一张图片放大以后就会呈现一个个的点阵,每一个点就是一个像素点,通过我们对RGB的颜色配比就可以显示出不同的颜色效果了,所以说最终我们想对一个图像进行处理的话就是对一个个像素点进行处理。
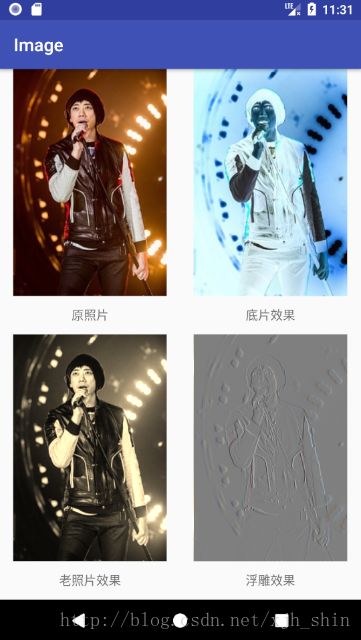
最著名的就是以下几种效果,我们分别在ImageHelper中加入了handleImageNegative方法,handleImagePixelsOldPhoto方法以及handleImagePixelsRelief方法,其实这三个方法没有什么区别只是对每一个像素点的RGBA的处理有所改变:
底片效果:其实说白了就是把每个点的RGB都让他被255减去(255-R,255-G,255-B),这样处理以后就可以得到底片效果了。
public static Bitmap handleImageNegative(Bitmap bm) {
    int width = bm.getWidth();
    int height = bm.getHeight();
    int color;//存取当前像素点的颜色
    int R, G, B, A;//存取当前像素点的RGBA
    Bitmap bmp = Bitmap.createBitmap(width, height, Bitmap.Config.ARGB_8888);
    int[] oldPx = new int[width * height];
    int[] newPx = new int[width * height];
    bm.getPixels(oldPx, 0, width, 0, 0, width, height);//存储像素点的数组,起点需要偏移的量,读取数组的行距,第一次读取像素点的坐标(x,y),读取的长度,读取的宽度
    for (int i = 0; i < width * height; i++) {
        color = oldPx[i];
        //分离出RGBA四个分量
        R = Color.red(color);
        G = Color.green(color);
        B = Color.blue(color);
        A = Color.alpha(color);
        R = 255 - R;
        G = 255 - G;
        B = 255 - B;
        if (R > 255) {
            R = 255;
        } else if (R < 0) {
            R = 0;
        }
        if (G > 255) {
            G = 255;
        } else if (G < 0) {
            G = 0;
        }
        if (B > 255) {
            B = 255;
        } else if (B < 0) {
            B = 0;
        }
        newPx[i] = Color.argb(A, R, G, B);
    }
    bmp.setPixels(newPx, 0, width, 0, 0, width, height);
    return bmp;
}
老照片效果(就是之前博客的那个效果):
newR = (int) (0.393 * r + 0.769 * g + 0.189 * b);
newG = (int) (0.349 * r + 0.686 * g + 0.168 * b);
newB = (int) (0.272 * r + 0.534 * g + 0.131 * b);
public static Bitmap handleImagePixelsOldPhoto(Bitmap bm) {
    Bitmap bmp = Bitmap.createBitmap(bm.getWidth(), bm.getHeight(),
            Bitmap.Config.ARGB_8888);
    int width = bm.getWidth();
    int height = bm.getHeight();
    int color = 0;
    int r, g, b, a, r1, g1, b1;

    int[] oldPx = new int[width * height];
    int[] newPx = new int[width * height];

    bm.getPixels(oldPx, 0, bm.getWidth(), 0, 0, width, height);
    for (int i = 0; i < width * height; i++) {
        color = oldPx[i];
        a = Color.alpha(color);
        r = Color.red(color);
        g = Color.green(color);
        b = Color.blue(color);

        r1 = (int) (0.393 * r + 0.769 * g + 0.189 * b);
        g1 = (int) (0.349 * r + 0.686 * g + 0.168 * b);
        b1 = (int) (0.272 * r + 0.534 * g + 0.131 * b);

        if (r1 > 255) {
            r1 = 255;
        }
        if (g1 > 255) {
            g1 = 255;
        }
        if (b1 > 255) {
            b1 = 255;
        }

        newPx[i] = Color.argb(a, r1, g1, b1);
    }
    bmp.setPixels(newPx, 0, width, 0, 0, width, height);
    return bmp;
}
浮雕效果:B.R=C.R-B.R+127;B.G=C.G-B.G+127;B.B=C.B-B.B+127;(C为前一个点的原RGBA的值)
public static Bitmap handleImagePixelsRelief(Bitmap bm) {
    Bitmap bmp = Bitmap.createBitmap(bm.getWidth(), bm.getHeight(),
            Bitmap.Config.ARGB_8888);
    int width = bm.getWidth();
    int height = bm.getHeight();
    int color = 0, colorBefore = 0;
    int a, r, g, b;
    int r1, g1, b1;

    int[] oldPx = new int[width * height];
    int[] newPx = new int[width * height];

    bm.getPixels(oldPx, 0, bm.getWidth(), 0, 0, width, height);
    for (int i = 1; i < width * height; i++) {
        colorBefore = oldPx[i - 1];
        a = Color.alpha(colorBefore);
        r = Color.red(colorBefore);
        g = Color.green(colorBefore);
        b = Color.blue(colorBefore);

        color = oldPx[i];
        r1 = Color.red(color);
        g1 = Color.green(color);
        b1 = Color.blue(color);

        r = (r - r1 + 127);
        g = (g - g1 + 127);
        b = (b - b1 + 127);
        if (r > 255) {
            r = 255;
        }
        if (g > 255) {
            g = 255;
        }
        if (b > 255) {
            b = 255;
        }
        newPx[i] = Color.argb(a, r, g, b);
    }
    bmp.setPixels(newPx, 0, width, 0, 0, width, height);
    return bmp;
}
然后就可以显现出来了,这部分因为颜色处理的算法是确定的所以把上面的看懂了就能搞懂了,我就把效果给大家看下吧,布局文件和活动的代码特别简洁就不贴上来了。

项目GitHub地址:传送门