vue中scss用法
我们这里用两个部分来说明吧。
1.如何学习Scss
2.如何使用Scss
1.如何学习Scss
学习Scss的第一步不是你要知道什么是Scss的概念啊什么的,而是找到一个合适的资源从头开始学习,我在这里推荐慕课网的资源Sass入门篇,还有Sass进阶篇,sass中文官网
大家学习完以后,基本上就什么会了。
这里我整理一下它的一些重要的概念。基本上如果你知道这些,基本的使用就可以了。
Sass是什么?
Sass并不是其他的什么,而是CSS预处理器,预处理器就是定义了一种新的语言,其基本思想是,用一种专门的编程语言,为CSS增加了一些编程的特性,将CSS作为目标生成文件,然后开发者就只要使用这些语言进行编码工作。
果然,概念就不是给人看的。用CSS预处理器可以让你的编码效率提高十倍。就是这样…
还有很多其他的CSS预处理器,比如
其中最优秀的技师Sass、LESS和Stylus,在这里,我们聊一下Sass.
Sass 和 SCSS 有什么区别?
其实这两货说的是一个东东,由于一开始Sass规定的语法格式是严格的缩进式语法,不带大括号和分号,所以造成程序员在写sass的时候有非常大的不习惯,虽然它是最早的预处理器,却没有人家LESS用的人多,所以又支持了使用大括号和分号,这就是SCSS.
1.文件扩展名不同,Sass 是以“.sass”后缀为扩展名,而 SCSS 是以“.scss”后缀为扩展名
2.语法书写方式不同,Sass 是以严格的缩进式语法规则来书写,不带大括号({})和分号(;),而 SCSS 的语法书写和我们的 CSS 语法书写方式非常类似。
看代码:Sass语法
-
$font-stack: Helvetica, sans-serif //定义变量 $primary-color: #333 //定义变量
-
-
body
-
font: 100% $font-stack color: $primary-color
-
Scss语法:
-
$font-stack: Helvetica, sans-serif;
- $primary-color:
#333;
-
-
body {
-
font: 100%
$font-stack;
- color: $primary-color;
-
}
SASS环境的安装
Mac版的安装
Windows版的安装
Sass的基本特性-基础
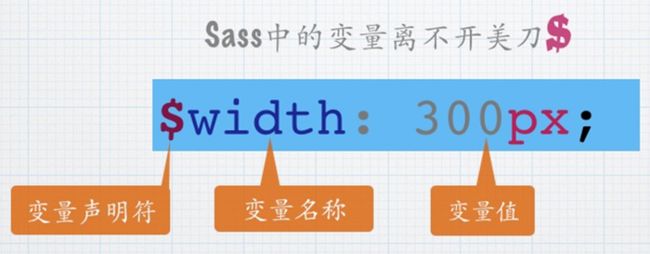
声明变量
上面的图告诉大家,Sass的变量包括了三个部分:
-
1. 声明变量的符号“$” 2.变量名称3.赋予变量的值
例如:
brand-primary : darken(#428bca, 6.5%) !default; // #337ab7$btn-primary-color : #fff !default;
-
$btn-primary-bg : $brand-primary !default;
-
$btn-primary-border : darken($btn-primary-bg, 5%) !default;
-
!default表示的是默认值。
普通变量与默认变量
上面我们知道,如果想要设置默认值,只需要!default在值的后面就可以了。
那么如果我们想要覆盖的时候怎么办呢,就是在前面申明一个就行。
-
$baseLineHeight: 2; $baseLineHeight: 1.5 !default;
-
body{
-
line-height: $baseLineHeight; }
编译后:
body{ line-height:2;}
嵌套-选择器嵌套
Sass 的嵌套分为三种:
- 选择器嵌套
- 属性嵌套
- 伪类嵌套
下面我们看选择器嵌套,例如我们有一段这样的结构:
- <header>
- <nav>
- <a href=“##”>Home</a>
- <a href=“##”>About</a>
- <a href=“##”>Blog</a>
- </nav>
- <header>
如果想要选中header中的a标签,在写CSS会这样写:
nav a { calor:red;} header nav a { color:green;}
在Sass中,就可以使用选择器嵌套来实现:
- nav {
- a {
- color:red;
-
- header & {
- color:green;
- }
- }
- }
嵌套-属性嵌套
Sass提供的属性嵌套主要是针对CSS有一些属性前缀相同,只是后缀不一样,比如border-top/border-right还有margin,padding,font等属性,假设你的样式中用到了:
.box{ border-top:1px solid red; border-bottom:1px solid green;}
在Sass中,我们可以这样写:
.box{ border:{ top:1px solid red; bottom:1px solid green; }}
嵌套-伪类嵌套
其实伪类嵌套和属性嵌套非常类似,只不过他需要借助&符号一起配合使用。我们就拿经典的“clearfix”为例吧:
.clearfix{&:before,&:after { content:""; display: table; }&:after { clear:both; overflow: hidden; }}
编译出来的CSS
clearfix:before, .clearfix:after { content: ""; display: table;}.clearfix:after { clear: both; overflow: hidden;}
避免选择器嵌套:
- 选择器嵌套最大的问题是将使最终的代码难以阅读。开发者需要花费巨大精力计算不同缩进级别下的选择器具体的表现效果。
- 选择器越具体则声明语句越冗长,而且对最近选择器的引用(&)也越频繁。在某些时候,出现混淆选择器路径和探索下一级选择器的错误率很高,这非常不值得。
混合宏-声明混合宏
混合宏的出现主要是为了解决当样式变得越来越多,越来越复杂的时候,需要重复使用大段样式时,而使用变量又无法达到我们的目的,这个时候就要用到了混合宏。
1.声明混合宏
我们通过@mixin来声明一个混合宏:
@mixin border-radius{ -webkit-border-radius:5px; border-radius:5px;}
其中@mixin是混合宏的关键词,类似于css中的@media,@font-face一样。border-radius是混合宏的名称。大括号里面是复用的样式代码。
2.带参数混合宏
我们可以定义混合宏时带有参数:
@mixin border-radius($radius:5px){
-
-webkit-border-radius: $radius; border-radius: $radius;
-
}
-
3.复杂的混合宏
我们可以在大括号里面写上逻辑关系
-
@mixin box-shadow($shadow...) { @if length($shadow) >= 1 { @include prefixer(box-shadow, $shadow); } @else{ $shadow:0 0 4px rgba(0,0,0,.3); @include prefixer(box-shadow, $shadow); }}
这个box-shadow的混合宏,带有多个参数,这个时候可以使用...来代替。
上面的意思是当$shadow的参数数值大于或等于1时,表示有多个阴影值,反之调用默认的参数值
混合宏的调用
我们通过关键词@include来调用声明好的混合宏,然后如果需要传参数,我们就传入参数;
-
@mixin border-radius{
-
-webkit-border-radius: 3px;
-
border-radius: 3px;
-
}
-
使用:
-
button {
-
@include border-radius;
-
}
-
混合宏的参数
1.传一个不带值的参数
我们在混合宏中,可以传一个不带任何值的参数:
-
@mixin border-radius($radius){ -webkit-border-radius: $radius; border-radius: $radius;}
我们定义了一个不带任何值的参数$radius,然后我们在调用的时候给这个参数传值:
-
.box {
-
@include border-radius(3px);
-
}
-
2.传一个带值的参数
-
@mixin border-radius($radius:5px){ -webkit-border-radius: $radius; border-radius: $radius;}
在混合宏声明的时候,我们给这个参数的添加了一个默认值。5px我们可以传参数,同样也可以不传。
.btn{ @include border-radus; }
3.混合宏传多个参数
混合宏可以传多个参数:例如:
@mixin center($width,$height){ width: $width; height: $height; position: absolute; top: 50%; left: 50%; margin-top: -($height) / 2; margin-left: -($width) / 2;}
使用的时候一样
.box-center{ @include center(500px,300px);}
这个混合宏和我们编程里的函数很像啊。
混合宏的不足
混合宏的不足的地方就是不能智能的合并相同的代码。它的缺点和它的优点一样重要,这样我们才能在合适的地方用合适的代码。
@mixin border-radius{ -webkit-border-radius: 3px; border-radius: 3px;} .box { @include border-radius; margin-bottom: 5px;} .btn { @include border-radius;}
在代码中,.box和.btn中都调用了定义好的border-radius混合宏,然后我们看一下编译出来的CSS
.box { -webkit-border-radius: 3px; border-radius: 3px; margin-bottom: 5px;} .btn { -webkit-border-radius: 3px; border-radius: 3px;}
上面的代码可以很明显的看出,Sass在调用相同的混合宏时,并不能智能的将相同的样式代码合并在一起。
Scss代码的继承
Scss代码的继承是通过关键字@extned来实现的。比如:
.btn{ border:1px solid #ccc; padding:6px 10px; font-size:14px;} .btn-primary{ background-color:#f36; color:#fff; @extend .btn;} .btn-second { background-color: orange; color: #fff; @extend .btn;}
就是这样继承的,编译出来后的CSS
.btn, .btn-primary, .btn-second { border: 1px solid #ccc; padding: 6px 10px; font-size: 14px;} .btn-primary { background-color: #f36; color: #fff;} .btn-second { background-clor: orange; color: #fff;}
占位符 % placeholder
Sass中的占位符%placeholder功能非常强大,它非常适合去做样式的基类。因为,如果我们不通过@extend调用的时候,不会产生任何代码。例如:
%mt5{ margin-top:5px;}%pt5{ padding-top:5px;}.btn{ @extend %mt5; @extend %pt5;} .block { @extend %mt5; span { @extend %pt5; }}
我们看编译后的代码:
.btn, .block { margin-top: 5px;} .btn, .block span { padding-top: 5px;}
我们可以看到,通过@extend调用的占位符,编译出来的代码将相同的代码合并在一起,这样让你的代码更加干净。
混合宏 VS 继承 VS 占位符
我们这里总结一下,看图就好:

插值#{}
通过 #{} 插值语句可以在选择器或属性名中使用变量:
$name:foo;
-
$attr:border; p.#{$name}{ #{$attr}-color:blue;}
编译为:
p.foo{ border-color:blue;}
#{}插值语句也可以在属性值中插入SassScript,大多数情况下,这样可能还不如使用变量方便,但是使用#{}可以避免Sass运行运算表达式,直接编译CSS.
- p {
- $font-size: 12px;
- $line-height: 30px;
- font: #{$font-size}/#{$line-height};
- }
编译为:
p { font:12px /30px;}
上面基础的Scss语法就介绍到这里.
2.如何使用Scss
首先,我们需要安装依赖包
//在项目下,运行下列命令行npm install --save-dev sass-loader//因为sass-loader依赖于node-sass,所以还要安装node-sassnpm install --save-dev node-sass
css-loader和style-loader也是必须的依赖包:
css-loader使你能够使用类似@import 和 url(…)的方法实现 require()的功能;style-loader将所有的计算后的样式加入页面中;
下面是webpack.config.js文件的部分配置:
var ExtractTextPlugin = require('extract-text-webpack-plugin');//css样式从js文件中分离出来,需要通过命令行安装 extract-text-webpack-plugin依赖包module.exports = { .... module: { loaders: [ //解析.css文件 { test: /\.css$/, loader: ExtractTextPlugin.extract("style", 'css') }, //解析.vue文件 { test: /\.vue$/, loader: 'vue' }, //解析.scss文件,对于用 import 或 require 引入的sass文件进行加载,以及<style lang="sass">...</style>声明的内部样式进行加载 { test: /\.scss$/, loader: ExtractTextPlugin.extract("style", 'css!sass') //这里用了样式分离出来的插件,如果不想分离出来,可以直接这样写 loader:'style!css!sass' } ] }, //.vue文件的配置,以下是为了在.vue文件中使用ES6语法(必须安装babel相关的依赖包),以及把使用css或sass语法的样式提取出来,如果不需要可以忽略 vue: { loaders: { js: 'babel', css: ExtractTextPlugin.extract("css"), sass: ExtractTextPlugin.extract("css!sass") }, }, plugins: [ new ExtractTextPlugin("style.css") //提取出来的样式放在style.css文件中 ] ....}
使用的时候直接import就可以了,引入外部样式,下面两种写法都可以用:
import '../../css/test.scss'require('../../css/test2.scss');
我们在react js中就可以这样写:
在.vue文件中使用:
- <style lang="sass">
- //sass语法样式
- </style>
这里的使用部分参考了:webpack配置sass模块的加载
这里分享一个我自己写的base_layout.Scss:
颜色和大小 base.scss
/** * 字体和颜色,基础布局的base文件 *///字体大小$remindTitleSize:20px;
-
$navigationSize:18px; $contentSize:17px;
-
$buttonSize:16px; $tabFontSize:15px;
-
$minorSize:14px; $smalltitleSize:13px;
-
$smallerSize:12px; $assistSize:11px;
-
-
//颜色
-
$white:#fff; $assistColor:#c1c1c1;
-
$minorColor:#8e8e8e; $contentColor:#5e5e5e;
-
$remindColor:#ee5765; $buttonColor:#7d9ef0;
-
$backgroundColor:#f0f0f0; $lineColor:#e8e8e8;
-
$headerTextColor:#5c5c5c; $titleColor:#333333;
-
$circleColor:#FFF9c6;
样式表:base_layout.scss:
//基础布局文件@import "base"; %flex{ flex: 1; -webkit-flex: 1;} .base { display: flex; display: -webkit-flex;} //横向布局.base_row { @extend .base; flex-direction: row; -webkit-flex-direction: row;} //竖向布局.base_column{ @extend .base; flex-direction: column; -webkit-flex-direction: column;} @mixin justify-content($layout:center){
-
justify-content: $layout; -webkit-justify-content: $layout;
-
}
-
-
@mixin align-items($layout:center){ align-items: $layout; -webkit-align-items: $layout;} @mixin get_font_size($fontSize:14px){
-
font-size: $fontSize; } //竖向居中对齐.base_column_justify_center { @extend .base_column; @include justify-content(center);} //横向居中对齐.base_row_justify_center { @extend .base_row; @include justify-content(center);} //竖向垂直居中齐.base_column_align_center { @extend .base_column; @include align-items(center);} //横向垂直居中对齐.base_row_align_center { @extend .base_row; @include align-items(center);} //居中.base_center { @extend .base; @include justify-content(center); @include align-items(center);} .base_row_justify_space-between{ @extend .base_row; @include justify-content(space-between);} .base_row_title_layout{ @extend .base_row_align_center; @include justify-content(space-between);} //页面container根布局.page_container { flex: 1; -webkit-flex: 1; flex-direction: column; -webkit-flex-direction: column; display: flex; display: -webkit-flex; background: $backgroundColor;
-
font-size: 15px;
-
}
-
-
.page_context {
-
@extend .base_column;
-
@extend %flex;
-
overflow: scroll;
-
overflow-scrolling: touch;
-
-webkit-overflow-scrolling: touch;
-
padding-bottom: 10px;
-
overflow-x: hidden;
-
}
-
-
//如果有需要,自己添加...
-
-
我们可以把一些常用个布局封装到base_layout.scss中,当使用的时候自己组装,使用,继承,扩展…
作者:雨飞飞雨
链接:https://www.jianshu.com/p/9631cef7ab1b
來源:简书
著作权归作者所有。商业转载请联系作者获得授权,非商业转载请注明出处。
