使用maven创建一个spring-boot项目-集成springmvc
以下是自己学习spring-boot的过程中整理的笔记。
一、spring-boot介绍
1、Spring-boot跟springframe的关系
spring framework就好比一个大型的电子元件生产公司,它生产的元件性能都很优秀,但是坊间使用它的元件的作坊,拿到手之后还得搞一些电焊,衔接,可能要花个10天半个月最后做成一个家电或者机器人(不管啥了,只是例子)。
有一天这个公司就宣布,我们现在提供了一些功能模块,比如摄像头传感器,扩音器传感器,压力传感器,它们都是统一的usb接口的,只需要插线连接就能使用了。这样是不是大大降低了坊间小作坊的人力物力各种力,5分钟就拼凑出一个机器人了有木有。
看出啥来了吗?各种电子元件就是springframe上面关于其他诸如mq,websocket,zookeeper,redis的整合代码包,没有springbootstarter我们还是得自己去调用各种不同的接线头,芯片端口去接线调试,还可能把芯片弄坏,弄烧了。。。
[摘]
2、SpringBoot诞生
spring4--->发布spring-boot1.3.* --->各个子项目,比如spring-boot-starter-web
3、spring-boot介绍
Spring Boot提供了一个强大的一键式Spring的集成开发环境,能够单独进行一个Spring应用的开发,其中:
(1)集中式配置(application.properties)+注解,大大简化了开发流程
(2)内嵌的Tomcat和Jetty容器,可直接打成jar包启动,无需提供Javawar包以及繁琐的Web配置
(3)提供了Spring各个插件的基于Maven的pom模板配置,开箱即用,便利无比
(4)可以在任何你想自动化配置的地方,实现可能
(5)提供更多的企业级开发特性,如何系统监控,健康诊断,权限控制
(6)无冗余代码生成和XML强制配置
(7)提供支持强大的Restfult风格的编码,非常简洁
总结:
springboot提供了基于spring的各种starter(传感器)的快速启动,搭建框架的便利;spring-boot-starter-xxx就是上面说的各种传感器,对各种芯片的封装,提供简单统一的调用,配置方式。你去学会发现只需要加入starter依赖,就能使用默认配置了快速把新功能加入到项目中了。
With Spring Bootyou can focus moreon business features and less on infrastructure.
二、spring-boot常用注解
1、@SpringBootApplication
该注解等价于以默认属性使用@Configuration,@EnableAutoConfiguration和@ComponentScan。
2、Configuration
相当于传统的xml配置文件,如果有些第三方库需要用到xml文件,建议仍然通过@Configuration类作为项目的配置主类——可以使用@ImportResource注解加载xml配置文件。
3、EnableAutoConfiguration
Spring Boot自动配置(auto-configuration):尝试根据你添加的jar依赖自动配置你的Spring应用。如果发现了你不想要的特定自动配置类,你可以使用排除属性来禁用它们。
4、ComponentScan
表示将该类自动发现(扫描)并注册为Bean,可以自动收集所有的Spring组件,包括@Configuration类。我们经常使用@ComponentScan注解搜索beans,并结合@Autowired注解导入。如果没有配置的话,SpringBoot会扫描启动类所在包下以及子包下的使用了@Service,@Repository等注解的类。
5、@RestController
@ResponseBody和@Controller的合集
6、@Import
用来导入其他配置类。
7、@ImportResource
用来加载xml配置文件。
8、@Bean
用@Bean标注方法等价于XML中配置的bean。
9、@Value
注入Springbootapplication.properties配置的属性的值。
10、@Inject
等价于默认的@Autowired,只是没有required属性;
11、其他
@ResponseBody、@Controller、@RequestMapping、@Autowired、@Service、@Repository
三、创建一个maven项目
1、创建一个maven项目
下一步,下一步,选择过滤条件:maven-archetype-webapp
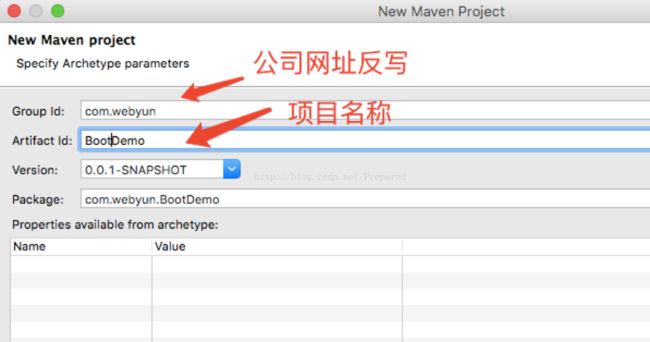
填写groupid(组织名),和 artifaceid(项目名)
点击 finish,完成项目创建。
2、编写pom.xml
           org.springframework.boot
           spring-boot-starter-web


       1.8


               org.springframework.boot
                spring-boot-maven-plugin


       org.springframework.boot
       spring-boot-starter-parent
       1.5.3.RELEASE
3、编写启动类Application.java
importorg.springframework.boot.SpringApplication;
importorg.springframework.boot.autoconfigure.SpringBootApplication;
/**
 * 启动类
 * @author zhongshibo
*/
@SpringBootApplication
public classApplication {

     public static void main(String[] args) {
         SpringApplication.run(Application.class,args);
     }

}4、创建controllerHelloWorldController.java
importorg.springframework.boot.SpringApplication;
importorg.springframework.boot.autoconfigure.SpringBootApplication;
/**
 * 启动类
 * @author zhongshibo
*/
@SpringBootApplication
public classApplication {

     public static void main(String[] args) {
         SpringApplication.run(Application.class,args);
     }

}5、连接mysql数据库
5.1 在pom.xml中添加依赖
          mysql
         mysql-connector-java


         org.springframework.boot
         spring-boot-starter-data-jpa
5.2 在src/main/java/resources下创建application.properties文件,在文件中添加数据库连接信息
spring.datasource.url=jdbc:mysql://127.0.0.1:3306/sys
spring.datasource.username=root
spring.datasource.password=root
spring.datasource.driver-class-name=com.mysql.jdbc.Driver
spring.jpa.properties.hibernate.hbm2ddl.auto=update
spring.jpa.properties.hibernate.dialect=org.hibernate.dialect.MySQL5InnoDBDialect
spring.jpa.show-sql=true6、编写实体类User、dao(UserRepository)、service(UserService)省略具体代码
7、编写相应的控制层代码(UserController)
@RestController
@RequestMapping("/user")
publicclassUserController {
  @Resource
  private UserService userService;
  @RequestMapping("/getUser")
  publicString getUser() {
  Useruser = userService.getUser(1);
 returnuser.getUserName()+","+user.getPasswd();

  }
}8、访问localhost:8080/user/getUser
9、使用模版thyme leaf
9.1 在pom.xml添加依赖
              org.springframework.boot
               spring-boot-starter-thymeleaf
9.2application.properties添加配置
spring.thymeleaf.prefix=classpath:/templates/
spring.thymeleaf.suffix=.html
spring.thymeleaf.mode=HTML5
spring.thymeleaf.encoding=UTF-8
spring.thymeleaf.content-type=text/html
9.3 创建模版controller
9.3 创建模版controller
importjava.util.Map;
importorg.springframework.stereotype.Controller;
importorg.springframework.web.bind.annotation.RequestMapping;

@Controller
public classTemplateController {
   /**
    *   返回html模板.
    */
   @RequestMapping("/helloHtml")
   public StringhelloHtml(Map map){
         map.put("hello","fromTemplateController.helloHtml");
          return "/helloHtml";
   }
}
10 给项目添加junit测试
10.1 在pom.xml添加依赖
    junit
    junit
    4.12
    test
参考:
[1] http://www.cnblogs.com/ityouknow/p/5662753.html
[2] http://www.cnblogs.com/larryzeal/p/5799195.html
[3] http://blog.csdn.net/xiaoyu411502/article/details/47864969


