大数据基础(一):Java NIO概述及简单示例
1. IO与NIO的区别:为什么需要NIO?
1.1 java IO中的socket连接
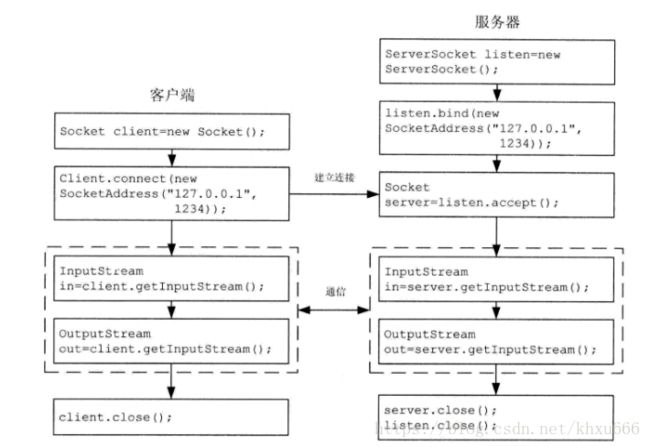
在最初的java版本中,对于接受socket连接的服务器,其基本的处理步骤是:
1、实例化一个ServerSocket对象;
2、将实例化后的Serversocket对象绑定到某个端口上;
3、使用accept( )方法监听通过此端口的socket连接,这是accept( )方法会一直阻塞直到有连接进入;
4、收到socket连接之后,accept( )方法返回一个Socket对象,与客户端建立连接进行通信;
5、等待客户端或者服务器断开连接,返回到第3步等待下一次的连接。
下图截自《Hadoop技术内幕:深入理解Hadoop Common和HDFS架构设计与实现原理》,表示最初的客户端与服务器端的连接。
在 java 最初的 IO 中,OutputStream和InputStream没有提供异步的的IO读写,并且服务器端的accept( ) 方法是阻塞的。这意味着在客户端中需要采用一个线程对应一个客户端连接的策略来保证服务器可以同时接受来自多个客户端的连接。这就会导致大量的系统开销和负担。这种阻塞的通信模式也正是NIO所要解决的主要问题!
1.2. NIO与IO的区别
| NIO | IO |
|---|---|
| 非阻塞 | 阻塞 |
| 面向缓冲(buffer) | 面向流(stream) |
| 有选择器 | 无选择器 |
2. NIO的三个主要组件
NIO实现的一个重要的功能就是非阻塞的通信,为此NIO引入了Selector(选择器)和Channel(通道)的概念,并且使用新的抽象结构:Buffer(缓冲区)来达到更高读写效率。
2.1 Buffer
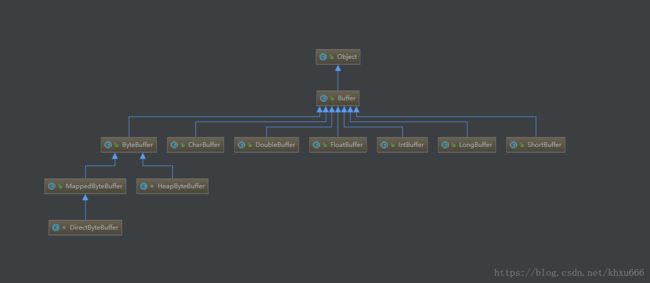
Buffer是一个有固定容量的容器,其本质是一块被包装成了java对象的内存,并且提供一些方法操纵和访问这块内存。Buffer有读模式和写模式两种模式。Buffer类及其子类的类实现关系如下;
2.1.1 Buffer的四个主要概念
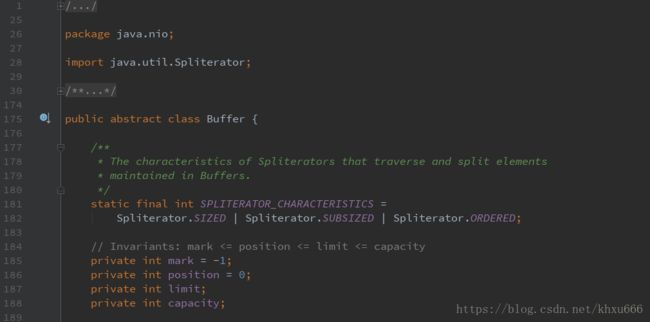
上图为jdk1.8 中java.nio.Buffer.java 中的部分源码,可以看到在Buffer源码的开始部分,定义了四个变量:
- capacity: buffer 的容量,一旦一个buffer被创建完成,它的capacity的值就不可被修改;
- limit: buffer区域中第一个不能被读取或者写入的位置,可以使用java.nio.Buffer中的public final Buffer limit(int newLimit)方法自定义limit的位置。在读模式下limit表示可以读取到多少的数据,在写模式下limit与capacity的值保持一致,当buffer由写模式切换到读模式的时候,limit值会由capacity的值切换为写模式下的position的值;
- position: buffer中下一个要被读取或者写入的位置。每当读取或者写入一个数据之后,position的值会自动向后移一位
- mark: 在buffer的某个位置设置的标记。
上述四个变量彼此之间必须遵守下面的大小关系:
mark <= position <= limit <= capacity
2.1.2 Buffer的基本使用方法
- Buffer分配
ByteBuffer buf = ByteBuffer.allocate(64);       //创建一个可以容纳64个字节的缓冲区
CharBuffer buf = CharBuffer.allocate(64);       //创建一个可以容纳64个char类型的缓冲区
IntBuffer buf = IntBuffer.allocate(64); //创建一个可以容纳64个Int类型的缓冲区- 从Buffer读取 / 写入数据
从Buffer中读取或者写入数据有两种方式:
- 从Channel 读取 / 写入到Buffer
- 通过Buffer的 put()方法写到Buffer里 / get()方法从Buffer中读取
int bytesRead = inChannel.read(buf);            //从Channel写入到Buffer
buf.put(127);                                   //put()方法写到Buffer中
int bytesWritten = inChannel.write(buf);        //从Channel读取到Buffer
byte aByte = buf.get(); //get()方法从Buffer中读取- Buffer读写模式的转换
buffer.flip();- Buffer重置
当一个buffer的读操作完成了,并且需要新的数据写入到这个buffer中时,需要对buffer进行重置,其中主要有两个方法:
buffer.clear();调用clear()方法,position将被设回0,limit被设置成 capacity的值。此时虽然Buffer中的数据在内存中并未清除,但是因为position的值被设置为0,所以后续的写入操作会覆盖掉原来的数据,因为会造成原来数据的丢失。当原来的数据不需要的时候,可以调用此方法。
buffer.compact();调用compact()方法,position值会被设置到最后一个未读元素的后面。limit属性依然像clear()方法一样,设置成capacity。所以后续的写操作并不会覆盖原来的数据。
2.2 Channel
2.2.1 channel与stream的区别
- channel是基于buffer的;stream是基于字节/字符的
- channel是双向的,既可以从buffer中读取数据,又可以向buffer中写入数据;stream是单向的,输入流只负责输入,输出流只负责输出
- channel可以异步的读写,stream不可以异步的读写
2.2.2 channel的基本用法
下面代码引用自 并发编程网 ,展示一个使用FileChannel读取数据到Buffer中的示例:
RandomAccessFile aFile = new RandomAccessFile("data/nio-data.txt", "rw");
FileChannel inChannel = aFile.getChannel();

ByteBuffer buf = ByteBuffer.allocate(48);

int bytesRead = inChannel.read(buf);
while (bytesRead != -1) {

System.out.println("Read " + bytesRead);
buf.flip();

while(buf.hasRemaining()){
System.out.print((char) buf.get());
}

buf.clear();
bytesRead = inChannel.read(buf);
}
aFile.close();
2.3 Selector
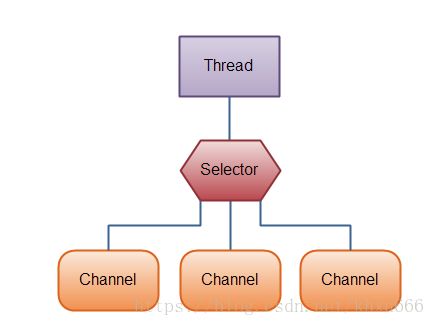
java最初的io存在的一个主要的问题是:一个线程只能处理一个socket请求。因此nio中引出了Selector选择器的概念,使一个线程可以同时处理多个socket连接请求。
2.3.1 selector的使用
想要使用Selector,首先创建一个selector实例,然后需要将创建好的Channel注册到这个selector上面,然后调用它的select()方法等待socket连接,一旦这个方法返回,线程就可以处理这些事件。
- selector创建
Selector selector = Selector.open();- 把channel注册到selector上
channel.configureBlocking(false);
SelectionKey key = channel.register(selector, Selectionkey.OP_READ);- 获取已选键集
Iterator iter = selector.selectedKeys().iterator(); - 获取信道
SelectionKey key = iter.next();
SocketChannel clientChannel = (SocketChannel) key.channel();
3. NIO简单实例:服务器回显
下面的代码是一个nio实现的server服务器以及io实现的client客户端。
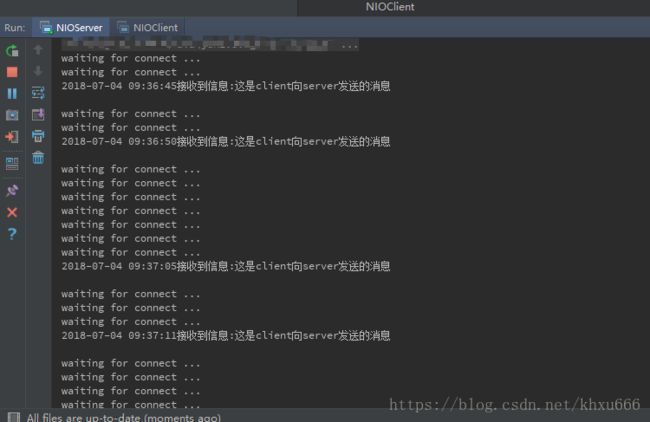
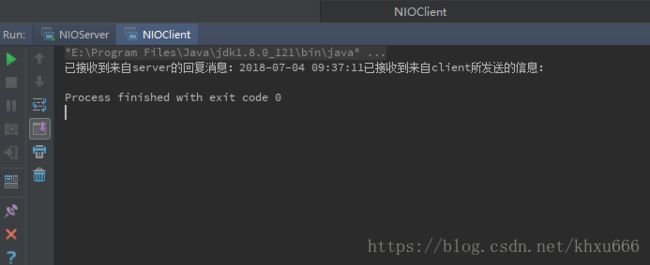
当服务器接收到client的连接请求后,会显示client的请求消息,client端会显示来自server端的回复消息。运行代码时要先运行server端代码,再运行client端代码,每运行一次client端代码会在两端的控制台中输出各自所接受到的消息。
server端:
import java.net.InetSocketAddress;
import java.nio.ByteBuffer;
import java.nio.channels.SelectionKey;
import java.nio.channels.Selector;
import java.nio.channels.ServerSocketChannel;
import java.nio.channels.SocketChannel;
import java.nio.charset.Charset;
import java.text.SimpleDateFormat;
import java.util.Iterator;

public class NIOServer {

    public static void main(String[] args) throws Exception {
        //创建一个Selector实例(选择器)
        Selector selector = Selector.open();
        //创建一个在监听指定端口的Socket信道
        ServerSocketChannel listenChannel = ServerSocketChannel.open();
        //配置为异步模式
        listenChannel.configureBlocking(false);
        //把channel绑定到指定的TCP端口上,因为ServerSocketChannel没有直接提供bind()方法,所以需要借助其内部的socket对象。
        listenChannel.socket().bind(new InetSocketAddress(8868));
        //把serverChannel注册到最开始创建的选择器上面
        listenChannel.register(selector, SelectionKey.OP_ACCEPT);

        while (true) {
            // 进入服务器循环,调用Selector.select()方法等待I/O事件
            if (selector.select(2000) == 0) {
                System.out.println("waiting for connect ...");
                continue;
            }
            // 当有新的I/O事件时,创建迭代器获取已选键集
            Iterator iter = selector.selectedKeys().iterator();

            // 遍历已选键集中的每个键进行处理
            while (iter.hasNext()) {
                SelectionKey key = iter.next();
                // SelectionKey.isAcceptable()方法用于测试键对应的channel是否准备好接受新的socket连接
                if (key.isAcceptable()) {
                    //当准备接受新的socket连接之后,就把这个channel注册到选择器上面
                    SocketChannel channel = listenChannel.accept();
                    channel.configureBlocking(false);
                    channel.register(selector, SelectionKey.OP_READ,
                            ByteBuffer.allocate(1024));
                }

                // SelectionKey.isReadable()方法用于测试键对应的channel是否可以进行 读 操作
                if (key.isReadable()) {
                    // 获得信道连接
                    SocketChannel clientChannel = (SocketChannel) key.channel();
                    // 重置buffer准备读取
                    ByteBuffer buffer = (ByteBuffer) key.attachment();
                    buffer.clear();
                    long bytesRead = clientChannel.read(buffer);
                    if (bytesRead == -1) {
                        // 没有读取到内容,则channel关闭
                        clientChannel.close();
                    } else {
                        // 已读取到内容,则将缓冲区转换为传出状态
                        buffer.flip();
                        String receivedString = Charset.forName("UTF-8").newDecoder().decode(buffer).toString();
                        // 在控制台输出接受到的信息
                        String currentTime = new SimpleDateFormat("yyyy-MM-dd HH:mm:ss").format(System.currentTimeMillis());
                        System.out.println(currentTime+"接收到信息:" + receivedString);
                        // 返回给client的信息
                        String sendString = currentTime+ "已接收到来自client所发送的信息:" ;
                        buffer = ByteBuffer.wrap(sendString.getBytes("UTF-8"));
                        clientChannel.write(buffer);
                        // 处理完成,准备下一次的处理
                        key.interestOps(SelectionKey.OP_READ | SelectionKey.OP_WRITE);
                    }
                }
                iter.remove();
            }
        }
    }
}
client端:
import java.io.InputStream;
import java.io.OutputStream;
import java.io.PrintWriter;
import java.net.Socket;
import java.util.Scanner;

public class NIOClient {

    public static void main(String[] args) throws Exception {
        Socket socket = new Socket("localhost", 8868);
        //创建输入流与输出流
        InputStream inputStream = socket.getInputStream();
        OutputStream outputStream = socket.getOutputStream();
        //包装输出流,向server发送消息
        PrintWriter out = new PrintWriter(outputStream, true);
        out.println("这是client向server发送的消息");
        out.flush();
        socket.shutdownOutput();
        //包装输入流,接收来自server的回复消息并输出
        Scanner in = new Scanner(inputStream);
        StringBuilder sb = new StringBuilder();
        while (in.hasNextLine()) {
            String line = in.nextLine();
            sb.append(line);
        }
        String response = sb.toString();
        System.out.println("已接收到来自server的回复消息:" + response);

    }
}
代码运行的结果如下:
