在Windows 10中源码编译Wireshark
一、前言
本教程完全按照Wireshark官方文档(https://www.wireshark.org/docs/wsdg_html_chunked/ChSetupWin32.html)按部就班地操作。
二、编译环境搭建
1、安装Chocolatey
Chocolatey是一个Windows的原生包管理器,在https://chocolatey.org/packages上列出了许多软件包。
安装方法参考https://chocolatey.org/install,在Windows 10上以管理员身份运行打开Windows PowerShell,执行如下命令:
Set-ExecutionPolicy Bypass -Scope Process -Force; [System.Net.ServicePointManager]::SecurityProtocol = [System.Net.ServicePointManager]::SecurityProtocol -bor 3072; iex ((New-Object System.Net.WebClient).DownloadString('https://chocolatey.org/install.ps1'))
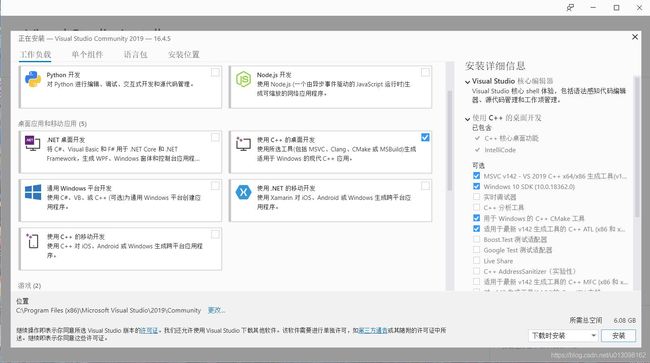
2、安装Microsoft Visual Studio
下载和安装Microsoft Visual Studio 2019 Community Edition。
在安装过程中,选择桌面应用Desktop development with C++,保留VC++ 2019、Windows 10 SDK、Visual C++ tools for CMake等组件。

3、安装Qt
有两种安装方式:
(1)在Qt下载页面,选择Go open source,注册下载qt-unified-windows-x86-3.2.1-2-online.exe;


(2)在Qt官方发布页面,选择相应版本,离线安装。
本文采用后者,下载qt-opensource-windows-x86-5.14.1.exe,但是在安装过程中需要使用提前注册的Qt Account登陆。
备注:选择默认安装,如果想展开那些项,该安装程序易出现未响应,关闭重新安装即可。

4、安装Python
在https://www.python.org/downloads/下载python-3.8.1.exe,默认安装即可,安装完毕后设置环境变量Path。
5、安装Perl
在http://strawberryperl.com/下载strawberry-perl-5.30.1.1-64bit.msi,默认安装即可,安装完毕后设置环境变量Path。
6、安装Git
在https://git-scm.com/download/win下载Git-2.25.0-64-bit.exe,默认安装即可,安装完毕后设置环境变量Path。
7、安装CMake
在https://cmake.org/download/下载cmake-3.16.4-win64-x64.msi,默认安装即可,安装完毕后设置环境变量Path。
8、安装Asciidoctor、Xsltproc、DocBook、HTML Help、Doxygen
在Windows 10上以管理员身份运行打开Windows PowerShell,执行如下命令:
choco install -y asciidoctorj xsltproc docbook-bundle html-help-workshop doxygen.install
9、安装winflexbison
在https://sourceforge.net/projects/winflexbison/下载win_flex_bison-latest.zip,默认安装即可,安装完毕后设置环境变量Path。
三、获取源码与编译
本文项目的work_dir为:C:\Users\xxx\Desktop\Project\wireshark
1、准备源码
在work_dir下,打开Git Bash,执行如下命令:
cd C:\Users\xxx\Desktop\Project\wireshark
git clone https://github.com/wireshark/wireshark.git
注:本文使用git checkout -b xxx命令创建xxx分支,在该分支上对源码进行修改和编译。
2、编译
(1)打开Visual Studio Command Prompt
在开始菜单Visual Studio 2019文件夹中,打开x64 Native Tools Command Prompt for VS 2019,执行如下命令:
cd C:\Users\xxx\Desktop\Project\wireshark\wsbuild64
(2)设置环境变量
执行env.bat,其内容为:
rem Let CMake determine the library download directory name under
rem WIRESHARK_BASE_DIR or set it explicitly by using WIRESHARK_LIB_DIR.
rem Set *one* of these.
set WIRESHARK_LIB_DIR=C:\Users\xxx\Desktop\Project\wireshark\wireshark-win64-libs
rem Set the Qt installation directory
set QT5_BASE_DIR=C:\Qt\Qt5.14.1
rem Append a custom string to the package version. Optional.
set WIRESHARK_VERSION_EXTRA=202002151238

(3)生成build files
执行config.bat,其内容为:
rem config
cmake -G "Visual Studio 16 2019" -A x64 ..\wireshark


注:在config的过程中,会自动下载依赖包,位于C:\Users\xxx\Desktop\Project\wireshark\wireshark-win64-libs目录。
(4)编译
执行build.bat,其内容为:
rem build
msbuild /m /p:Configuration=RelWithDebInfo Wireshark.sln

生成的可执行程序位于C:\Users\xxx\Desktop\Project\wireshark\wsbuild64\run\RelWithDebInfo目录,双击打开Wireshark.exe进行测试。
四、创建用户手册和开发手册(可选)
执行guide.bat,其内容为:
rem Create User's and Developer's Guide
msbuild /m /p:Configuration=RelWithDebInfo docbook\all_guides.vcxproj

生成的两种文档developer-guide和user-guide位于C:\Users\xxx\Desktop\Project\wireshark\wsbuild64\docbook目录。
五、创建Wireshark安装程序(可选)
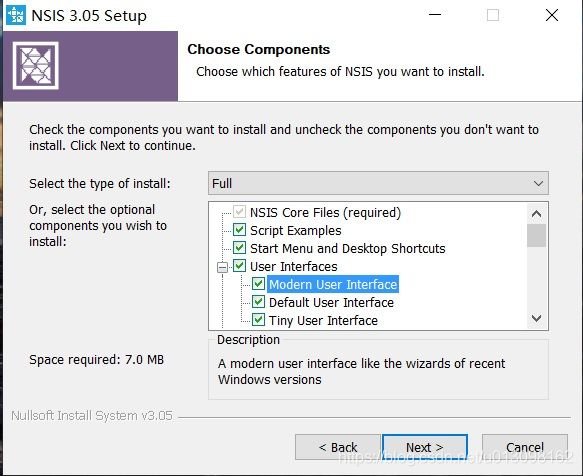
1、安装NSIS
在https://nsis.sourceforge.io/Main_Page下载nsis-3.05-setup.exe,默认安装即可,安装完毕后设置环境变量Path。
2、创建安装程序
分别执行package.bat中的两条语句,其内容为:
rem Create a Wireshark installer
rem msbuild /m /p:Configuration=RelWithDebInfo nsis_package_prep.vcxproj
rem Sign executables
rem msbuild /m /p:Configuration=RelWithDebInfo nsis_package.vcxproj


3、测试
生成的安装程序位于C:\Users\xxx\Desktop\Project\wireshark\wsbuild64\packaging\nsis目录,在其它机器上安装Wireshark-win64-3.3.0202002151238.exe进行测试。
六、问题与解决方案汇总
问题1:无法对参数“Destination”执行参数验证
C:\Users\xxx\Desktop\Project\wireshark\wireshark-3.2.1\tools\win-setup.ps1 : 无法对参数“Destination”执行参数验证。值为“C:\Users\xxx\Desktop\Project\wireshark\wireshark-win64-libs”的参数的“$_ -like "*\wireshark-*-libs-3.2"”验证脚本未返回 True 结果。请确定验证脚本失败的原因,然后重试该命令。
所在位置 行:1 字符: 95
原因:
见脚本wireshark\toolswin-setup.ps1,环境变量WIRESHARK_LIB_DIR传递错误。
解决方案:
set WIRESHARK_LIB_DIR=C:\Users\xxx\Desktop\Project\wireshark\wireshark-win64-libs-3.2
问题2:Could NOT find LEX (missing: LEX_EXECUTABLE)
CMake Error at C:/Program Files/CMake/share/cmake-3.16/Modules/FindPackageHandleStandardArgs.cmake:146 (message): Could NOT find LEX (missing: LEX_EXECUTABLE)
原因:
没有安装win_flex_bison。
解决方案:
手动安装后,并设置环境变量。
问题3:could not find: “MUI.nsh”
!include: could not find: "MUI.nsh"
Error in script "uninstall.nsi" on line 24 -- aborting creation process
原因:
NSIS未完整安装,缺失了Modern User Interface组件。
解决方案:
补充安装。
问题4:File: “user-guide.chm” -> no files found.
File: "C:\Users\xxx\Desktop\Project\wireshark\wsbuild64\docbook\user-guide.chm" -> no files found.
Usage: File [/nonfatal] [/a] ([/r] [/x filespec [...]] filespec [...] | /oname=outfile one_file_only)
Error in script "wireshark.nsi" on line 1173 -- aborting creation process
原因:
没有安装 HTML Help,导致没有生成 .chm 格式的文档。
解决方案:
安装 HTML Help Workshop,并重新生成文档。
七、参考资料
[1] Wireshark 安装指南
[2] Wireshark 依赖包
[3] Wireshark Q&A
[4] Wireshark 用户指南
[5] Wireshark 开发指南
[6] Chocolatey 官网
[7] Chocolatey 软件包列表
[8] Qt 官方发布版本
[9] Qt Project Git Repository Browser
[10] Qt wiki