常见的通信方式
首先,对OC中常见的通讯方式我们做一个对比(KVC与KVO不在讨论范围):
| 代理 | 通知 | Block | |
|---|---|---|---|
| 适用范围 | 一对一 | 一对多 | 一对一 |
| 使用方式 | 方法调用 | 通知名(字符串)监听 | 属性、方法参数、全局变量 |
| 是否允许返回值 | YES | NO | YES |
| 是否具有封闭性 | YES | NO | YES |
假如我们需要一种可以一对多,同时又需要有返回值(或者出于安全性考虑不希望公开)的情况,通知就不适用了,考虑下面的情形:
- 使用一个单例控制蓝牙连接断开等状态,但是有好几个类都需要监听蓝牙的状态?
- 希望App能够一键切换主题?
- 异步加载多种资源,想获取总的加载进度?
多播代理
C#中有一种委托形式称作多播委托,会顺序执行多个委托对象的对应函数。
OC中系统并没有提供类似的类型让我们使用,所以需要自己实现类似的功能。
多播代理相对于通知的优势
| 多播代理 | 通知 | |
|---|---|---|
| 接收范围 | 定点投放,只有已添加的代理可以接收到消息 | 全局都可接收,会暴露实现细节,广播出的参数中可能包含敏感信息 |
| 使用方式 | 方法调用,使用协议来约束代理者的方法实现 | 通知名(字符串)监听,容易出现问题,当项目中大量使用通知以后难以维护,极端情况会出现通知名重复的问题 |
| 是否允许返回值 | YES | NO |
| 是否具有封闭性 | YES | NO |
多播代理的实现思路
1.存储多个代理对象
OC中常规代理通常使用弱引用来避免循环引用,因此我们的多播代理中也需要使用能够存储弱引用对象的容器,这里有几种思路:
- 使用NSValue的
valueWithNonretainedObject:方法将对象打包,然后将打包后的NSValue对象添加到代理数组中。 - 创建一个新的类,在这个类中对代理对象进行弱引用(实质是对上一个思路的手动实现)。然后再将这个新类的实例添加到代理数组中。
- 使用NSHashTable存储代理对象,我们用到一个比较不常见的容器:NSHashTable
NSHashTable
iOS6以后,Foundation框架中新增了容器类:NSHashTable —— 它是可变的,没有一个不变的类与其对应。它的作用对应于NSMutableSet,但是它可以通过设置NSPointerFunctionsOptions参数来指定对象的引用类型:
NSHashTableStrongMemory:将容器内的对象引用计数+1一次(即strong)
NSHashTableCopyIn:将添加到容器的对象通过NSCopying中的方法,复制一个新的对象存入容器(即copy)
NSHashTableZeroingWeakMemory:使用weak存储对象,当对象被销毁的时候自动将其从集合中移除。(已弃用)
NSHashTableObjectPointerPersonality: 使用移位指针(shifted pointer)来做hash检测及确定两个对象是否相等(而不是使用NSObject中的hash方法)
NSHashTableWeakMemory:不会修改容器内对象元素的引用计数,并且对象释放后,会被自动移除(即weak)
ps NSHashTableWeakMemory的对象释放后,NSHashTable中其实是置空(NSHashTable可以保存空对象),但遍历时不会遍历到该对象,相对于移除了。
2.添加代理对象
基于上面的选择,我们使用 NSHashTable 来管理存储和遍历代理对象,因此需要公开一个添加代理的方法:
- (void)addDelegate:(id )newDelegate;
3.调用代理方法
调用常规代理时,通常需要写以下写法:
if ([delegate respondsToSelector:@selector(<#方法名#>:)]) {
    [delegate <#方法名#>:<#参数#>];
}
那么假如我们的代理协议中有多个方法,我们就需要对每个代理方法都写一次这样的代码,相当繁琐。
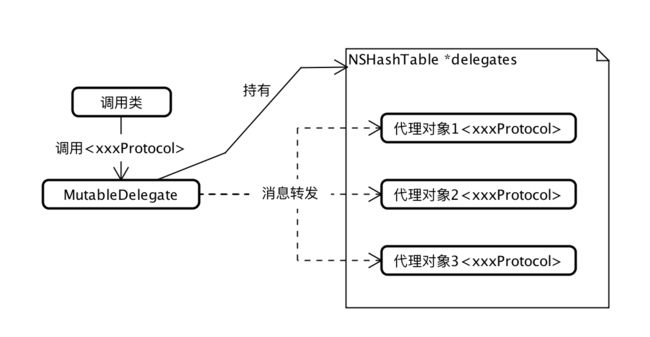
通常的简化方法是利用OC的消息转发机制,在方法转发过程中进行消息转发。
简单的多播代理流程
基于以上的思路,我们可以有一个大致的流程图:
改进方案
上面的方案实现了简单的多播代理,但是有一些缺陷:
- 如果该MutableDelegate类中有一个方法和代理协议中定义的方法同名,将导致消息转发的过程不会触发。
- 如果项目中需要用到多个多播代理,则需要实现多次上面的方法
- 多线程问题
1. 定义多代理转发类
这个类用来封装多代理实现,我们使用NSProxy子类来实现它:
@interface MulitiDelegate : NSProxy

/**
 创建
 @return MulitiDelegate对象
 */
+ (instancetype)new;

/**
 添加代理
 */
- (void)addDelegate:(id)delegate;

/**
 移除代理
 */
- (void)removeDelete:(id)delegate;

@end
2. 处理多线程同步问题
使用信号量解决多线程集合对象的同步问题:
//...
/// 信号量
@property ( nonatomic, strong ) dispatch_semaphore_t semaphore;
//...

/// 初始化
+ (id)alloc{
    MulitiDelegate *instance = [super alloc];
    if (instance) {
        instance.semaphore = dispatch_semaphore_create(1);
        instance.delegates = [NSHashTable weakObjectsHashTable];
    }
    return instance;
}

/// 添加代理
- (void)addDelegate:(id)delegate{
    dispatch_semaphore_wait(_semaphore, DISPATCH_TIME_FOREVER);
    [_delegates addObject:delegate];
    dispatch_semaphore_signal(_semaphore);
}

/// 移除代理
- (void)removeDelete:(id)delegate{
    dispatch_semaphore_wait(_semaphore, DISPATCH_TIME_FOREVER);
    [_delegates removeObject:delegate];
    dispatch_semaphore_signal(_semaphore);
}

#pragma mark - 消息转发部分
- (NSMethodSignature *)methodSignatureForSelector:(SEL)selector {
    dispatch_semaphore_wait(_semaphore, DISPATCH_TIME_FOREVER);
    NSMethodSignature *methodSignature;
    for (id delegate in _delegates) {
        if ([delegate respondsToSelector:selector]) {
            methodSignature = [delegate methodSignatureForSelector:selector];
            break;
        }
    }
    dispatch_semaphore_signal(_semaphore);
    if (methodSignature){
        return methodSignature;
    }
    // 未找到方法时,返回默认方法 "- (void)method",防止崩溃
    return [NSMethodSignature signatureWithObjCTypes:"v@:"];
}

- (void)forwardInvocation:(NSInvocation *)invocation {
    dispatch_semaphore_wait(_semaphore, DISPATCH_TIME_FOREVER);
    // 为了避免造成递归死锁,copy一份delegates而不是直接用信号量将for循环包裹
    NSHashTable *copyDelegates = [_delegates copy];
    dispatch_semaphore_signal(_semaphore);

    SEL selector = invocation.selector;
    for (id delegate in copyDelegates) {
        if ([delegate respondsToSelector:selector]) {
            // 异步调用时,拷贝一个Invocation,以免意外修改target导致crash
            NSInvocation *dupInvocation = [self copyInvocation:invocation];
            dupInvocation.target = delegate;
            // 异步调用多代理方法,以免响应不及时
            dispatch_async(dispatch_get_global_queue(0, 0), ^{
                [dupInvocation invoke];
            });
        }
    }
}

- (NSInvocation *)copyInvocation:(NSInvocation *)invocation {
    SEL selector = invocation.selector;
    NSMethodSignature *methodSignature = invocation.methodSignature;
    NSInvocation *copyInvocation = [NSInvocation invocationWithMethodSignature:methodSignature];
    copyInvocation.selector = selector;

    NSUInteger count = methodSignature.numberOfArguments;
    for (NSUInteger i = 2; i < count; i++) {
        void *value;
        [invocation getArgument:&value atIndex:i];
        [copyInvocation setArgument:&value atIndex:i];
    }
    [copyInvocation retainArguments];
    return copyInvocation;
}
使用方式
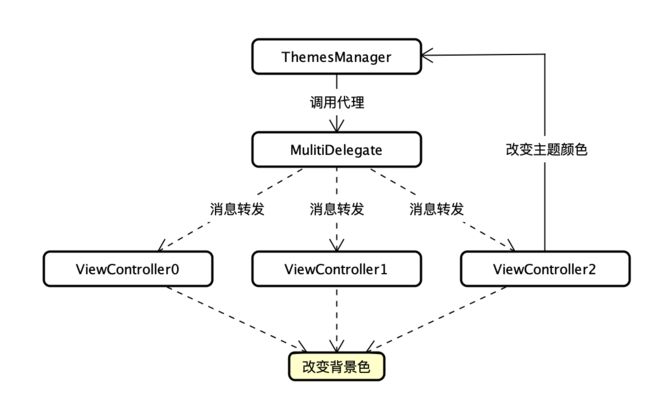
这里用一个简单的一键切换主题的例子来说明多播代理的使用方式:
主题管理器(ThemesManager)
创建一个单例主题管理器来管理我们的主题颜色,并能够添加和移除代理:
@protocol ThemesDelegate

/// 主题颜色改变
- (void)themesColorChanged:(UIColor *)themesColor;

@end

@interface ThemesManager : NSObject

/// 主题颜色
@property ( nonatomic, copy ) UIColor *themesColor;

/// 获取单例
+ (instancetype)sharedManager;

/// 添加、移除代理
- (void)addDelegate:(id)delegate;
- (void)removeDelegate:(id)delegate;

@end
在.m文件中需要实现单例(单例的代码建议定义成一个通用的宏定义,方便其他地方一起使用),然后使用之前定义的多播代理来进行“广播”:
#import "ThemesManager.h"
#import "MulitiDelegate.h"

@interface ThemesManager()

/// 多播代理
@property ( nonatomic, strong ) MulitiDelegate *delegateProxy;

@end

@implementation ThemesManager
@synthesize themesColor = _themesColor;

static ThemesManager *_manager = nil;

+ (instancetype)sharedManager{
    return [[self alloc]init];
}

+ (instancetype)allocWithZone:(struct _NSZone *)zone{
    static dispatch_once_t onceToken;
    dispatch_once(&onceToken, ^{
        if (_manager == nil) {
            _manager = [super allocWithZone:zone];
        }
    });
    return _manager;
}
- (nonnull id)copyWithZone:(nullable NSZone *)zone {
    return _manager;
}

- (nonnull id)mutableCopyWithZone:(nullable NSZone *)zone {
    return _manager;
}

- (MulitiDelegate *)delegateProxy{
    if (!_delegateProxy) {
        _delegateProxy = [MulitiDelegate new];
    }
    return _delegateProxy;
}

- (void)addDelegate:(id)delegate {
    [self.delegateProxy addDelegate:delegate];
}

- (void)removeDelegate:(id)delegate {
    [self.delegateProxy removeDelete:delegate];
}

- (void)setThemesColor:(UIColor *)themesColor{
    _themesColor = [themesColor copy];
    [(id)self.delegateProxy themesColorChanged:_themesColor];
}

- (UIColor *)themesColor{
    if (!_themesColor) {
        // 默认颜色
        _themesColor = [UIColor colorWithWhite:0.8f alpha:1.f];
    }
    return _themesColor;
}

@end
控制器们
通常我们会有一个专门的改变主题的界面和一些其他界面,这里就简单的使用同一个界面跳转和改变主题颜色:
#import "ThemesManager.h"

@interface ViewController ()

@end

@implementation ViewController

- (void)viewDidLoad {
    [super viewDidLoad];
    // Do any additional setup after loading the view, typically from a nib.

    self.title = [NSString stringWithFormat:@"%d",self.index];
    [[ThemesManager sharedManager]addDelegate:self];
    self.view.backgroundColor = [ThemesManager sharedManager].themesColor;
}

- (IBAction)changeThemes:(id)sender {
    [ThemesManager sharedManager].themesColor = [self randomColor];
}

- (UIColor *)randomColor {
    // 生成随机颜色
    CGFloat hue = arc4random() % 100 / 100.0; //色调:0.0 ~ 1.0
    CGFloat saturation = (arc4random() % 50 / 100) + 0.5; //饱和度:0.5 ~ 1.0
    CGFloat brightness = (arc4random() % 50 / 100) + 0.5; //亮度:0.5 ~ 1.0
    return [UIColor colorWithHue:hue saturation:saturation brightness:brightness alpha:1];
}

- (IBAction)nextVC:(id)sender {
    // 使用Storyboard创建VC
    UIStoryboard *story = [UIStoryboard storyboardWithName:@"Main" bundle:[NSBundle mainBundle]];
    ViewController *newVC = [story instantiateViewControllerWithIdentifier:@"ViewController"];
    newVC.index = self.index + 1;
    [self.navigationController pushViewController:newVC animated:YES];
}

#pragma mark - ThemesDelegate
- (void)themesColorChanged:(UIColor *)themesColor{
    // 需要注意的是这里是异步调用,改变颜色需要在主线程
    dispatch_async(dispatch_get_main_queue(), ^{
        self.view.backgroundColor = themesColor;
    });
}

@end
调用流程
运行效果
最后加上返回值的获取代码,主要就是如何存储和判断类型,这里就不赘述了。
目前已开源到GitHub上,并支持pods使用啦~


