LeakCanary 原理浅析
前言
提到Java语言的特点,无论是教科书还是程序员一般都会罗列出面向对象、可移植性及安全等特点。但如果你是一位刚从C/C++转到Java的程序员,对Java语言的特性除了面向对象之外,最外直接的应当是在Java虚拟机(JVM)在内存管理方面给我们变成带来的便利。JVM的这一大特性使Java程序员从繁琐的内存管理工作中得到了一定解放,但是JVM的这个特点的实现也是有代价的,并且它也并非万能。因此如果一个编程习惯不好的Java程序员如果完全将内存回收寄希望于JVM,那么OOM(Out Of Memory)就已经悄悄潜伏在了他的程序之中。
Android应用基于Java实现,因此它也将Java的优缺点继承了过来。相对来说,移动设备对于内存问题更为敏感,程序在申请一定的内存但又没有及时得到释放后就很容易发生OOM而导致crash。因此Android程序员开发过程中一般都会定时排查自己程序中可能出现的这些雷点,尽可能地避免因为crash问题而影响用户体验。
简介
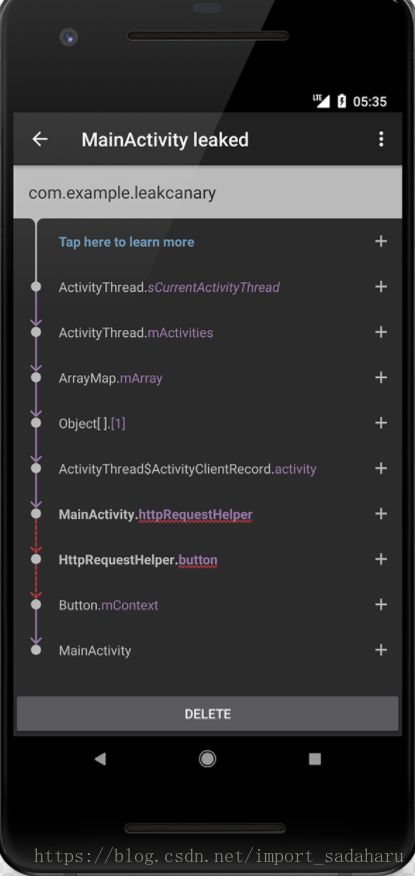
目前Java程序最常用的内存分析工具应该是MAT(Memory Analyzer Tool),它是一个Eclipse插件,同时也有单独的RCP客户端,也可以通过官网的SVN下载到它的源码并编译成jar包。LeakCanary本质上就是一个基于MAT进行Android应用程序内存泄漏自动化检测的的开源工具,通过集成这个工具代码到自己的Android工程当中就能够在程序调试开发过程中通过一个漂亮的界面(如下图)随时发现和定位内存泄漏问题,而不用每次在开发流程中都抽出专人来进行内存泄漏问题检测,极大地方便了Android应用程序的开发。源码地址
假如你现在想集成LeakCanary到自己的工程中,那么你只需要做以下工作:
在gradle文件中引入依赖:
dependencies {
  debugImplementation 'com.squareup.leakcanary:leakcanary-android:1.6.1'
  releaseImplementation 'com.squareup.leakcanary:leakcanary-android-no-op:1.6.1'
  // Optional, if you use support library fragments:
  debugImplementation 'com.squareup.leakcanary:leakcanary-support-fragment:1.6.1'

或
debugCompile 'com.squareup.leakcanary:leakcanary-android:1.6.1'
    releaseCompile 'com.squareup.leakcanary:leakcanary-android-no-op:1.6.1'
}
在项目的Application 类中添加
public class ExampleApplication extends Application {

  @Override public void onCreate() {
    super.onCreate();
    if (LeakCanary.isInAnalyzerProcess(this)) {
      // This process is dedicated to LeakCanary for heap analysis.
      // You should not init your app in this process.
      return;
    }
    LeakCanary.install(this);
    // Normal app init code...
  }
}
图解
此章先自顶向下,用图简化,不落代码陷阱,不入细节迷障。理清思路之后,我们再踏入源码的海洋,这样理解会更加清晰。
问:有没有一种简单直接且能有效定位内存泄漏位置的方法呢?
答:有,那就是 LeakCanary 。我们可以简单地人为:将一个 App 作为输入,通过 LeakCanary 检测后,就会得到内存泄漏位置结果(如果存在的话)。
知其然知其所以然,LeakCanary 如此强大实用,那么:LeakCanary 是怎么实现的?
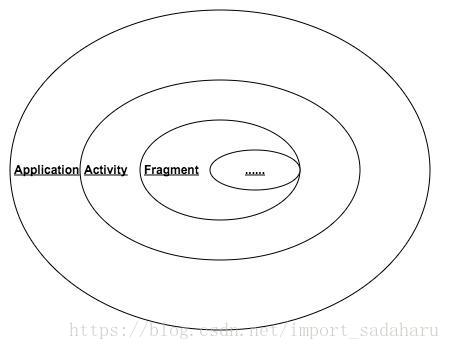
- Android 应用的整个生命周期由其组件的生命周期组成,如下图中所示。用户使用应用的过程中,在不同界面之间跳转,每个界面都经历着”生死“的转换,可在此建立检测点。Activity/Fragment 都有 onDestory() 回调方法, 进入此方法后,Activity/Fragment生命周期结束,应该被回收。
然后我们需要解决:如何得到未被回收的对象。ReferenceQueue+WeakReference+手动调用 GC可实现这个需求。
WeakReference 创建时,传入一个 ReferenceQueue 对象。
当被WeakReference 引用的对象的生命周期结束,一旦被 GC 检查到,GC 将会把该对象添加到 ReferenceQueue 中,待ReferenceQueue处理。
当 GC 过后对象一直不被加入 ReferenceQueue,它可能存在内存泄漏。
找到了未被回收的对象,如何确认是否真的内存泄漏?这里可以将问题转换为:未被回收的对象,是否被其他对象引用?找出其最短引用链。VMDebug + HAHA 完成需求。
VM 会有堆内各个对象的引用情况,并能以hprof文件导出。
HAHA 是一个由 square 开源的 Android 堆分析库,分析 hprof 文件生成Snapshot对象。Snapshot用以查询对象的最短引用链。
- 找到最短引用链后,定位问题,排查代码将会事半功倍。
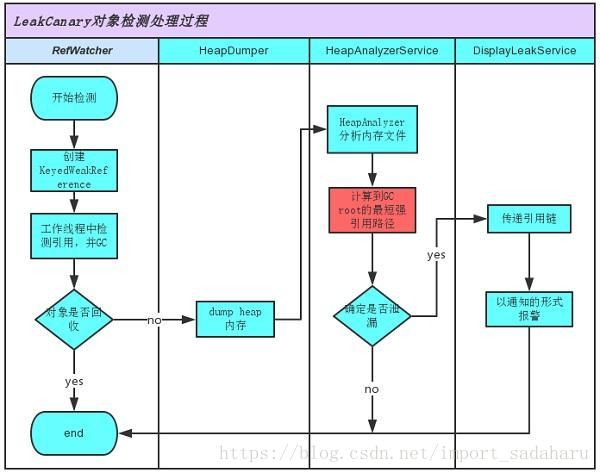
如下泳道图分析, LeakCanary 各个模块如何配合达到检测目的。
深入源码分析
检测原理
监听
在Android中,当一个Activity走完onDestroy生命周期后,说明该页面已经被销毁了,应该被系统GC回收。通过Application.registerActivityLifecycleCallbacks()方法注册Activity生命周期的监听,每当一个Activity页面销毁时候,获取到这个Activity去检测这个Activity是否真的被系统GC。
检测
当获取了待分析的对象后,需要确定这个对象是否产生了内存泄漏。
通过WeakReference + ReferenceQueue来判断对象是否被系统GC回收,WeakReference 创建时,可以传入一个 ReferenceQueue 对象。当被 WeakReference 引用的对象的生命周期结束,一旦被 GC 检查到,GC 将会把该对象添加到 ReferenceQueue 中,待ReferenceQueue处理。当 GC 过后对象一直不被加入 ReferenceQueue,它可能存在内存泄漏。
当我们初步确定待分析对象未被GC回收时候,手动触发GC,二次确认。
分析
分析这块使用了Square的另一个开源库haha,利用它获取当前内存中的heap堆信息的快照snapshot,然后通过待分析对象去snapshot里面去查找强引用关系。
源码
监听
直接从LeakCanary.install()方法开始看。
/**
 * Creates a {@link RefWatcher} that works out of the box, and starts watching activity
 * references (on ICS+).
 */
public static RefWatcher install(Application application) {
    return refWatcher(application).listenerServiceClass(DisplayLeakService.class)
      .excludedRefs(AndroidExcludedRefs.createAppDefaults().build())
      .buildAndInstall();
}

/**
 * Builder to create a customized {@link RefWatcher} with appropriate Android defaults.
 */
public static AndroidRefWatcherBuilder refWatcher(Context context) {
    return new AndroidRefWatcherBuilder(context);
}
install()方法中首先实例化了一个AndroidRefWatcherBuilder类。
然后使用listenerServiceClass()方法设置了DisplayLeakService类,这个类用于分析内存泄漏结果信息,然后发送通知给用户。
public final class AndroidRefWatcherBuilder extends RefWatcherBuilder<AndroidRefWatcherBuilder> {
    ...
    /**
    * Sets a custom {@link AbstractAnalysisResultService} to listen to analysis results. This
    * overrides any call to {@link #heapDumpListener(HeapDump.Listener)}.
    */
    public AndroidRefWatcherBuilder listenerServiceClass(
      Class listenerServiceClass) {
        return heapDumpListener(new ServiceHeapDumpListener(context, listenerServiceClass));
    }
    ...
}

public class RefWatcherBuilder<T extends RefWatcherBuilder<T>> {
    ...
    public final T heapDumpListener(HeapDump.Listener heapDumpListener) {
        this.heapDumpListener = heapDumpListener;
        return self();
    }
    ...
}
然后调用excludedRefs()方法设置添加一些白名单,通俗来讲就是不要误伤了友军。在AndroidExcludedRefs类中以枚举的形式定义了忽略列表信息,如果这些列表中的类发生了内存泄漏,并不会显示出来,同时HeapAnalyzer在计算到GC roots的强引用路径,也会忽略这些类。如果你想自己的某个类泄漏了,LeakCanary不提示,就加到这个类中。
public enum AndroidExcludedRefs {
    ACTIVITY_CLIENT_RECORD__NEXT_IDLE(VERSION.SDK_INT >= 19 && VERSION.SDK_INT <= 21) {
        void add(Builder excluded) {
            excluded.instanceField("android.app.ActivityThread$ActivityClientRecord", "nextIdle").reason("Android AOSP sometimes keeps a reference to a destroyed activity as a nextIdle client record in the android.app.ActivityThread.mActivities map. Not sure what\'s going on there, input welcome.");
        }
    },
    SPAN_CONTROLLER(VERSION.SDK_INT <= 19) {
        void add(Builder excluded) {
            String reason = "Editor inserts a special span, which has a reference to the EditText. That span is a NoCopySpan, which makes sure it gets dropped when creating a new SpannableStringBuilder from a given CharSequence. TextView.onSaveInstanceState() does a copy of its mText before saving it in the bundle. Prior to KitKat, that copy was done using the SpannableString constructor, instead of SpannableStringBuilder. The SpannableString constructor does not drop NoCopySpan spans. So we end up with a saved state that holds a reference to the textview and therefore the entire view hierarchy & activity context. Fix: https://github.com/android/platform_frameworks_base/commit/af7dcdf35a37d7a7dbaad7d9869c1c91bce2272b . To fix this, you could override TextView.onSaveInstanceState(), and then use reflection to access TextView.SavedState.mText and clear the NoCopySpan spans.";
            excluded.instanceField("android.widget.Editor$EasyEditSpanController", "this$0").reason(reason);
            excluded.instanceField("android.widget.Editor$SpanController", "this$0").reason(reason);
        }
    },
    ...
}
最后调用了buildAndInstall()方法,创建了一个RefWatcher对象并返回了,这个对象用于检测是否有对象未被回收导致内存泄漏,后续会详细讲解这块。
/**
* Creates a {@link RefWatcher} instance and starts watching activity references (on ICS+).
*/
public RefWatcher buildAndInstall() {
    RefWatcher refWatcher = build();
    if (refWatcher != DISABLED) {
        LeakCanary.enableDisplayLeakActivity(context);
        ActivityRefWatcher.install((Application) context, refWatcher);
    }
    return refWatcher;
}
因为分析泄漏信息是在另一个进程,如果判断出当前Application启动是在分析泄漏信息的进程中,就返回DISABLED,不去执行后续的初始化操作。在这里LeakCanary提供了一个很好的方式去区分启动是否在应用主进程,可以作为参考。
如果发现是在应用主进程中,就会进行一些初始化操作。
LeakCanary.enableDisplayLeakActivity(context);这个是调用PackageManager将DisplayLeakActivity设置为可用。
public static void enableDisplayLeakActivity(Context context) {
    setEnabled(context, DisplayLeakActivity.class, true);
}
从配置文件中可以看见LeakCanary的这几个服务都是在新的进程中运行的,DisplayLeakActivity默认是不可用android:enabled=”false”,这样才能在一开始未存在内存泄漏时候,隐藏LeakCanary图标的。
<application>
    <service
        android:name=".internal.HeapAnalyzerService"
        android:process=":leakcanary"
        android:enabled="false"/>
    <service
        android:name=".DisplayLeakService"
        android:process=":leakcanary"
        android:enabled="false"/>
    <activity
        android:theme="@style/leak_canary_LeakCanary.Base"
        android:name=".internal.DisplayLeakActivity"
        android:process=":leakcanary"
        android:enabled="false"
        android:label="@string/leak_canary_display_activity_label"
        android:icon="@drawable/leak_canary_icon"
        android:taskAffinity="com.squareup.leakcanary.${applicationId}">
      <intent-filter>
        <action android:name="android.intent.action.MAIN"/>
        <category android:name="android.intent.category.LAUNCHER"/>
      intent-filter>
    activity>
    <activity
        android:theme="@style/leak_canary_Theme.Transparent"
        android:name=".internal.RequestStoragePermissionActivity"
        android:process=":leakcanary"
        android:taskAffinity="com.squareup.leakcanary.${applicationId}"
        android:enabled="false"
        android:excludeFromRecents="true"
        android:icon="@drawable/leak_canary_icon"
        android:label="@string/leak_canary_storage_permission_activity_label"/>
application>
紧接着执行了ActivityRefWatcher.install((Application) context, refWatcher);,这里将实例化的RefWatcher当做入参传入,同时对Activity的生命周期进行了监听。
public static void install(Application application, RefWatcher refWatcher) {
    (new ActivityRefWatcher(application, refWatcher)).watchActivities();
}

public void watchActivities() {
    // Make sure you don't get installed twice.
    stopWatchingActivities();
    application.registerActivityLifecycleCallbacks(lifecycleCallbacks);
}

public void stopWatchingActivities() {
    application.unregisterActivityLifecycleCallbacks(lifecycleCallbacks);
}

void onActivityDestroyed(Activity activity) {
    this.refWatcher.watch(activity);
}

private final ActivityLifecycleCallbacks lifecycleCallbacks = new ActivityLifecycleCallbacks() {
    public void onActivityCreated(Activity activity, Bundle savedInstanceState) {
    }

    public void onActivityStarted(Activity activity) {
    }

    public void onActivityResumed(Activity activity) {
    }

    public void onActivityPaused(Activity activity) {
    }

    public void onActivityStopped(Activity activity) {
    }

    public void onActivitySaveInstanceState(Activity activity, Bundle outState) {
    }

    public void onActivityDestroyed(Activity activity) {
        ActivityRefWatcher.this.onActivityDestroyed(activity);
    }
};
可以看到为了保证不初始化两次监听,先移除了一次,然后再次添加了监听。每次当Activity执行完onDestroy生命周期,LeakCanary就会获取到这个Activity,然后对它进行分析,查看是否存在内存泄漏。
RefWatcher类中有一些成员变量,解释一下它们的作用。
- watchExecutor 确保分析任务操作是在主线程进行的,同时默认延迟5秒执行分析任务,留时间给系统GC
- debuggerControl debug控制中心
- gcTrigger 内部调用Runtime.getRuntime().gc(),手动触发系统GC
- heapDumper 用于创建.hprof文件,用于储存heap堆的快照,可以获知程序的哪些部分正在使用大部分的内存
- heapDumpListener 分析结果完成后,会告诉这个监听者
- excludedRefs 白名单,分析内存泄漏忽略的名单
public final class RefWatcher {
public static final RefWatcher DISABLED = (new RefWatcherBuilder()).build();
private final WatchExecutor watchExecutor;
private final DebuggerControl debuggerControl;
private final GcTrigger gcTrigger;
private final HeapDumper heapDumper;
private final Set retainedKeys;
private final ReferenceQueue 判断是否存在内存泄漏
从上面Activity生命周期监听回调可以看见,每次当Activity执行完onDestroy生命周期,会调用RefWatcher去分析是否存在内存泄漏。
/**
* Identical to {@link #watch(Object, String)} with an empty string reference name.
*
* @see #watch(Object, String)
*/
public void watch(Object watchedReference) {
    watch(watchedReference, "");
}

/**
* Watches the provided references and checks if it can be GCed. This method is non blocking,
* the check is done on the {@link WatchExecutor} this {@link RefWatcher} has been constructed
* with.
*
* @param referenceName An logical identifier for the watched object.
*/
public void watch(Object watchedReference, String referenceName) {
    if (this == DISABLED) {
      return;
    }
    checkNotNull(watchedReference, "watchedReference");
    checkNotNull(referenceName, "referenceName");
    final long watchStartNanoTime = System.nanoTime();
    String key = UUID.randomUUID().toString();
    retainedKeys.add(key);
    final KeyedWeakReference reference =
        new KeyedWeakReference(watchedReference, key, referenceName, queue);

    ensureGoneAsync(watchStartNanoTime, reference);
}
checkNotNull()方法可以不用管,用来判断对象是否为null。在这里声明了一个弱引用,将Activity放入,然后调用了ensureGoneAsync()方法。
private void ensureGoneAsync(final long watchStartNanoTime, final KeyedWeakReference reference) {
    watchExecutor.execute(new Retryable() {
        @Override
        public Retryable.Result run() {
            return ensureGone(reference, watchStartNanoTime);
        }
    });
}
先生成一个随机数用作key放在retainedKeys容器里面,用来区分待分析对象是否被回收,然后使用watchExecutor去调度分析任务,主要有两点,一保证分析是在主线程进行,二延迟五秒分析内存泄漏,给系统GC时间。这部分有兴趣可以深入去看一下,与分析的主流程关系不大,我们接下继续看。
Retryable.Result ensureGone(final KeyedWeakReference reference, final long watchStartNanoTime) {
    long gcStartNanoTime = System.nanoTime();
    long watchDurationMs = NANOSECONDS.toMillis(gcStartNanoTime - watchStartNanoTime);

    removeWeaklyReachableReferences();

    if (debuggerControl.isDebuggerAttached()) {
      // The debugger can create false leaks.
      return RETRY;
    }
    if (gone(reference)) {
      return DONE;
    }
    gcTrigger.runGc();
    removeWeaklyReachableReferences();
    if (!gone(reference)) {
        long startDumpHeap = System.nanoTime();
        long gcDurationMs = NANOSECONDS.toMillis(startDumpHeap - gcStartNanoTime);

        File heapDumpFile = heapDumper.dumpHeap();
        if (heapDumpFile == RETRY_LATER) {
            // Could not dump the heap.
            return RETRY;
        }
        long heapDumpDurationMs = NANOSECONDS.toMillis(System.nanoTime() - startDumpHeap);
        heapdumpListener.analyze(
            new HeapDump(heapDumpFile, reference.key, reference.name, excludedRefs, watchDurationMs,
            gcDurationMs, heapDumpDurationMs));
    }
    return DONE;
}

private void removeWeaklyReachableReferences() {
    // WeakReferences are enqueued as soon as the object to which they point to becomes weakly
    // reachable. This is before finalization or garbage collection has actually happened.
    KeyedWeakReference ref;
    while ((ref = (KeyedWeakReference) queue.poll()) != null) {
        retainedKeys.remove(ref.key);
    }
}

private boolean gone(KeyedWeakReference reference) {
    return !this.retainedKeys.contains(reference.key);
}
在这里首先执行removeWeaklyReachableReferences()尝试着从弱引用的队列中获取待分析对象,如果不为空,那么说明已经被系统回收了,就将retainedKeys中对应的key去掉。如果被系统回收了,直接就返回DONE;如果没有被系统回收,可能存在内存泄漏,为了保证结果的准确性,调用gcTrigger.runGc();,手动触发系统GC,然后再尝试移除待分析对象,如果还存在,说明存在内存泄漏。
public void runGc() {
    Runtime.getRuntime().gc();
    this.enqueueReferences();
    System.runFinalization();
}

private void enqueueReferences() {
    try {
        Thread.sleep(100L);
    } catch (InterruptedException var2) {
        throw new AssertionError();
    }
}
手动触发系统GC后,enqueueReference()方法通过沉睡100毫秒给系统GC时间,System.runFinalization()是强制调用已经失去引用的对象的finalize方法。
确定有内存泄漏后,调用heapDumper.dumpHeap()生成.hprof文件目录,然后回调heapdumpListener监听,这个监听者具体实现是ServiceHeapDumpListener类,会回调到analyze()方法。
public void analyze(HeapDump heapDump) {
    Preconditions.checkNotNull(heapDump, "heapDump");
    HeapAnalyzerService.runAnalysis(this.context, heapDump, this.listenerServiceClass);
}
HeapDump是个model类,里面用于储存一些分析类强引用路径的需要的信息。HeapAnalyzerService.runAnalysis方法是发送了一个Intent,启动了HeapAnalyzerService服务,这个服务是IntentService。
public static void runAnalysis(Context context, HeapDump heapDump, Class listenerServiceClass){
    Intent intent = new Intent(context, HeapAnalyzerService.class);
    intent.putExtra("listener_class_extra", listenerServiceClass.getName());
    intent.putExtra("heapdump_extra", heapDump);
    context.startService(intent);
}
启动Service后,会在onHandleIntent分析,找到内存泄漏对象的引用关系。
protected void onHandleIntent(Intent intent) {
    if(intent == null) {
        CanaryLog.d("HeapAnalyzerService received a null intent, ignoring.", new Object[0]);
    } else {
        String listenerClassName = intent.getStringExtra("listener_class_extra");
        HeapDump heapDump = (HeapDump)intent.getSerializableExtra("heapdump_extra");
        HeapAnalyzer heapAnalyzer = new HeapAnalyzer(heapDump.excludedRefs);
        AnalysisResult result = heapAnalyzer.checkForLeak(heapDump.heapDumpFile, heapDump.referenceKey);
        AbstractAnalysisResultService.sendResultToListener(this, listenerClassName, heapDump, result);
    }
}
找到引用关系
启动分析泄漏的服务后,会实例化一个HeapAnalyzer对象,然后调用它的checkForLeak()方法来分析最终得到结果。
public AnalysisResult checkForLeak(File heapDumpFile, String referenceKey) {
    long analysisStartNanoTime = System.nanoTime();
    if(!heapDumpFile.exists()) {
        IllegalArgumentException e1 = new IllegalArgumentException("File does not exist: " + heapDumpFile);
        return AnalysisResult.failure(e1, this.since(analysisStartNanoTime));
    } else {
        try {
            MemoryMappedFileBuffer e = new MemoryMappedFileBuffer(heapDumpFile);
            HprofParser parser = new HprofParser(e);
            Snapshot snapshot = parser.parse();
            this.deduplicateGcRoots(snapshot);
            Instance leakingRef = this.findLeakingReference(referenceKey, snapshot);
            return leakingRef == null?AnalysisResult.noLeak(this.since(analysisStartNanoTime)):this.findLeakTrace(analysisStartNanoTime, snapshot, leakingRef);
        } catch (Throwable var9) {
            return AnalysisResult.failure(var9, this.since(analysisStartNanoTime));
        }
    }
}
这里用到了Square的另一个库haha,哈哈哈哈哈,名字真的就是叫这个,开源地址
首先用HprofParser类获取到内存中的heap堆快照,然后对调用deduplicateGcRoots()对快照做了去重处理,去除一些重复的强引用关系。findLeakingReference()方法就是拿到待分析的类,去快照里面找引用关系,并将结果返回。
HeapAnalyzerService服务拿到分析结果后,调用了AbstractAnalysisResultService.sendResultToListener()方法,这个方法启动了另一个服务。
public static void sendResultToListener(Context context, String listenerServiceClassName, HeapDump heapDump, AnalysisResult result) {
    Class listenerServiceClass;
    try {
        listenerServiceClass = Class.forName(listenerServiceClassName);
    } catch (ClassNotFoundException var6) {
        throw new RuntimeException(var6);
    }

    Intent intent = new Intent(context, listenerServiceClass);
    intent.putExtra("heap_dump_extra", heapDump);
    intent.putExtra("result_extra", result);
    context.startService(intent);
}
listenerServiceClassName就是开始LeakCanary.install方法传入的DisplayLeakService类,它本身也是个IntentService服务。
protected final void onHandleIntent(Intent intent) {
    HeapDump heapDump = (HeapDump)intent.getSerializableExtra("heap_dump_extra");
    AnalysisResult result = (AnalysisResult)intent.getSerializableExtra("result_extra");

    try {
        this.onHeapAnalyzed(heapDump, result);
    } finally {
        heapDump.heapDumpFile.delete();
    }

}
服务启动后,会调用自身的onHeapAnalyzed方法
protected final void onHeapAnalyzed(HeapDump heapDump, AnalysisResult result) {
    String leakInfo = LeakCanary.leakInfo(this, heapDump, result, true);
    CanaryLog.d("%s", new Object[]{leakInfo});
    boolean resultSaved = false;
    boolean shouldSaveResult = result.leakFound || result.failure != null;
    if(shouldSaveResult) {
        heapDump = this.renameHeapdump(heapDump);
        resultSaved = this.saveResult(heapDump, result);
    }

    PendingIntent pendingIntent;
    String contentTitle;
    String contentText;

    // 设置消息通知的 pendingIntent/contentTitle/contentText
    ...

    int notificationId1 = (int)(SystemClock.uptimeMillis() / 1000L);
    LeakCanaryInternals.showNotification(this, contentTitle, contentText, pendingIntent, notificationId1);
    this.afterDefaultHandling(heapDump, result, leakInfo);
}
在这个方法中对判断是否需要将内存泄漏信息存到本地,如果需要就存到本地,然后设置消息通知的基本信息,通过LeakCanaryInternals.showNotification方法调用系统自身的通知栏通知,告诉用户应用有内存泄漏。来个图:
至此所有LeakCanary的检测过程通过源码的形式都梳理了一遍。
总结
它的基本工作原理如下:
- RefWatcher.watch() 创建一个 KeyedWeakReference 到要被监控的对象。
- 然后在后台线程检查引用是否被清除,如果没有,调用GC。
- 如果引用还是未被清除,把 heap 内存 dump 到 APP 对应的文件系统中的一个 .hprof 文件中。
- 在另外一个进程中的 HeapAnalyzerService 有一个 HeapAnalyzer 使用HAHA 解析这个文件。
- 得益于唯一的 reference key, HeapAnalyzer 找到 KeyedWeakReference,定位内存泄漏。
- HeapAnalyzer 计算 到 GC roots 的最短强引用路径,并确定是否是泄漏。如果是的话,建立导致泄漏的引用链。
- 引用链传递到 APP 进程中的 DisplayLeakService, 并以通知的形式展示出来。
总的来说,LeakCanary有如下几个明显优点:
- 针对Android Activity组件完全自动化的内存泄漏检查。
- 可定制一些行为(dump文件和leaktrace对象的数量、自定义例外、分析结果的自定义处理等)。
- 集成到自己工程并使用的成本很低。
- 友好的界面展示和通知。


