iOS 自动化测试(XCTest, UITests)
文章目录
- 前言
- 如何创建自动化测试
- 创建好的自动化测试在哪里?
- 如何使用自动化测试
- 生命周期(运行流程)
- 具体使用介绍
- 初始化 App
- 获取元素
- 根据类型取元素
- 根据 label 取元素
- 根据下标取元素
- 根据 identifier 取元素
- 对元素的操作
- 点击
- 双击
- 长按
- 滑动
- 捏合
- 旋转
- 实际用例
- 具体点击 UITableView 某一行
- 直接打开其他 App
- 系统桌面 App(springboard)
- 申请系统权限, 点击系统权限弹框(例如通知权限)
- Home键
- 系统音量按键
- Siri
- 设备转方向
- 项目地址
前言
最近正在学习 iOS 自动化测试(系统自带的 XCTest), 就总结一下自动化测试一些知识.
内容可能有点啰嗦, 如想直接看代码, 可直接跳到最后一栏, 去下载项目
如何创建自动化测试
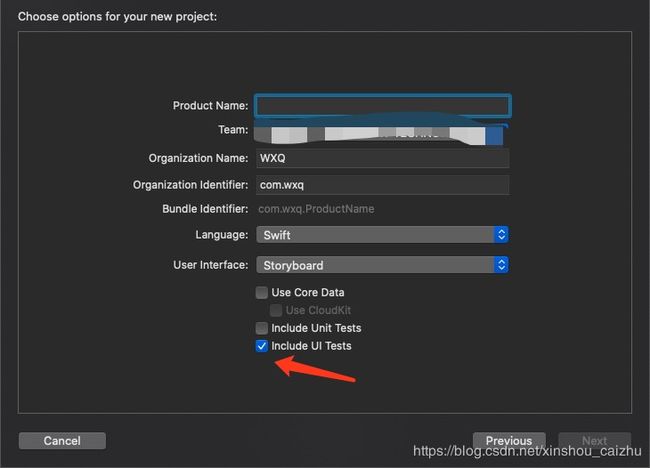
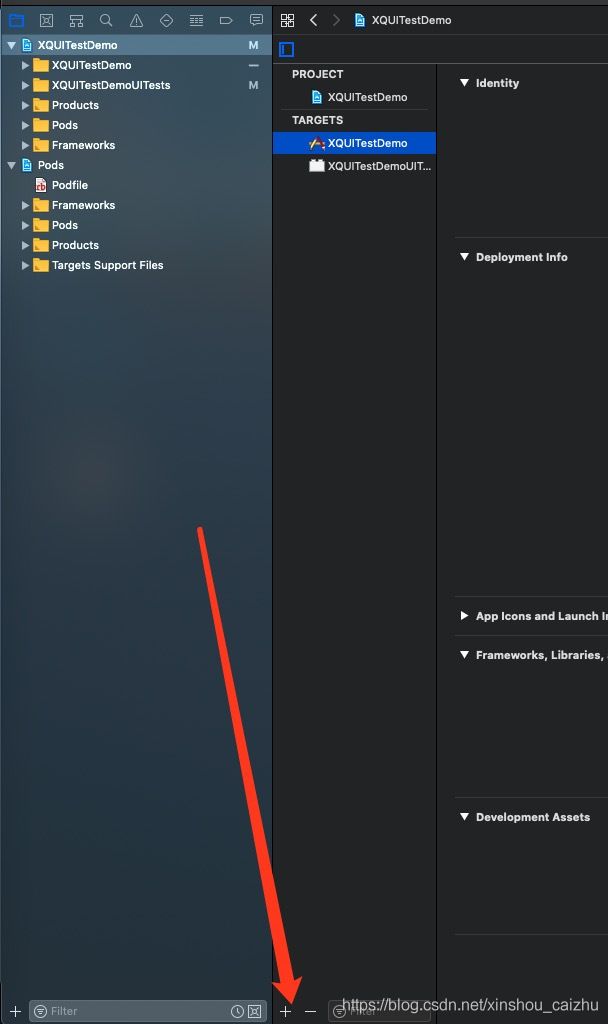
这里分两种创建情况
- 刚新建项目
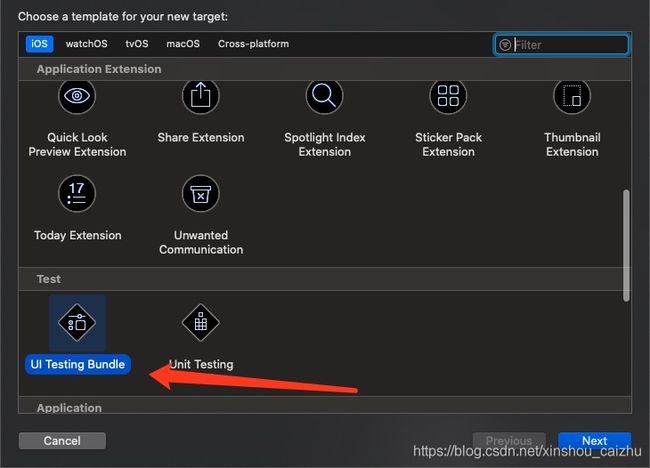
- 已有了项目,却没有自动化测试
选择 UI Testing Bundle
创建好的自动化测试在哪里?
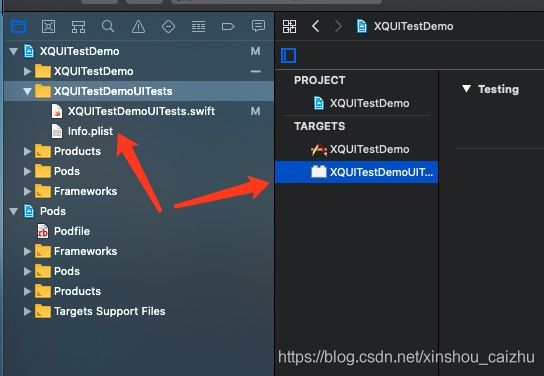
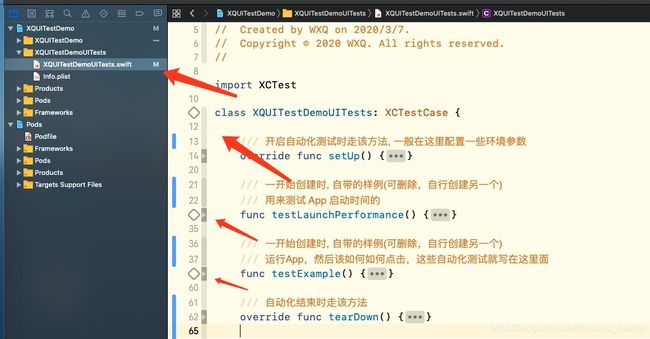
创建好之后, 是在该目录下(看图), 默认名称是 项目名 + UITests
看到这里, 写过 app extension 的老哥应该都明白了, 其实这个自动化测试就是一个 app extension 来的, 我们可以随意删除和创建, 甚至创建多个都是没问题的
如何使用自动化测试
这里一般有两种使用法
- 在 Show the Test Navigator 中使用
如图, 放鼠标到, 放在函数上, 例如 testExample()
这时我们就能看到右边有个播放的小箭头, 点击这个小箭头, 我们就开始运行这个 testExample() 函数了
如果运行大写 T(XQUITestDemoUITests), 就是运行这个测试模块中所有函数的意思
运行自动化测试, 和运行项目一样的, 可以先选择设备, 就是选择真机或者某个模拟器
刚创建时, 只有 testLaunchPerformance() 和 testExample() 两个函数
其他函数是我后面写的
- 在 UITest 模块的 .swift 文件里面选择运行
上面的 testExample() 这些函数, 其实就是关联这个文件里面的函数
我们点开 UITest 模块的 .swift 文件(如下图), 就一切明了了
代码行数那里的四边形, 点击效果和上面说的一样, 就是运行自动化测试
点击 class 旁边的运行, 是运行整个类里面所有函数的(和上面说的运行整个测试模块一样)
注意! 能单独执行的函数一定要 test 开头(就是旁边有四边形的函数)
就比如 testA() 这个就是可以的. methodA() 旁边就没有四边形.
生命周期(运行流程)
周期如下
- setUp()
- 自定义执行的函数
- tearDown()
这里有个点, 要注意一下, 比如你当前测试模块里面有 testA(), testB() 两个函数.
然后你直接点击运行整个测试模块, 他执行的顺序是.
- setUp()
- testA()
- tearDown()
然后再执行
- setUp()
- testB()
- tearDown()
就是你会看到APP启动和关闭了两次.
具体使用介绍
初始化 App
// 初始化 XCUIApplication
let app = XCUIApplication()
// 启动app
app.launch()

// 默认不填 bundleIdentifier, 就会初始化当前项目APP
// 如果是想搞其他APP, 可传入 bundleIdentifier 初始化, 就可获得其实例
let sefariApp = XCUIApplication.init(bundleIdentifier: "com.apple.mobilesafari")
注意, 以下文章出现 app 的代码, 都是指代 let app = XCUIApplication() 这个
获取元素
这里我就举例几种常用的就行, 其他的, 大家可自行研究
根据类型取元素
可直接查看系统 XCUIElementTypeQueryProvider
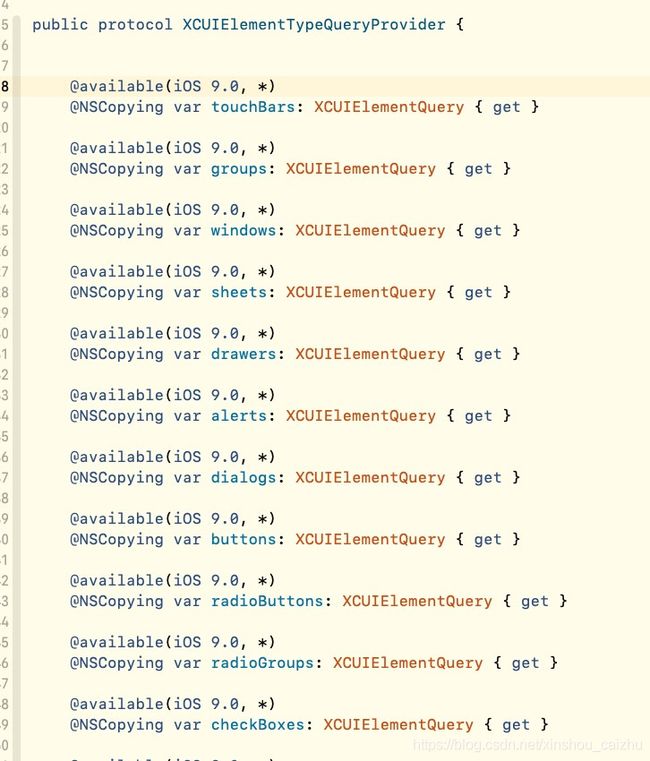
比如这样就能取得该 app 下面所有的 button
app.buttons
但取到 XCUIElementQuery, 还不能直接用
这个时候我们取到具体某个元素才行
为了比较好明白, 这里我举一个例子, UI是这样
以下是 print(app.debugDescription) 输出的数据
这里再啰嗦一下, debugDescription 属性对于获取元素层级来说挺舒服的, 我们要记得常用 debugDescription
 →Application, 0x2819e7720, pid: 4843, label: 'XQUITestDemo'
    Window (Main), 0x2819e78e0, {{0.0, 0.0}, {375.0, 667.0}}
      Other, 0x2819e79c0, {{0.0, 0.0}, {375.0, 667.0}}
        Other, 0x2819e7aa0, {{0.0, 0.0}, {375.0, 667.0}}
          Other, 0x2819e7b80, {{0.0, 0.0}, {375.0, 667.0}}
            Other, 0x2819e7c60, {{0.0, 0.0}, {375.0, 667.0}}
              Other, 0x2819e7d40, {{0.0, 0.0}, {375.0, 667.0}}
                Other, 0x2819e7e20, {{0.0, 0.0}, {375.0, 667.0}}
                  NavigationBar, 0x2819e7f00, {{0.0, 20.0}, {375.0, 44.0}}, identifier: '我的'
                    StaticText, 0x2819e8000, {{170.0, 32.0}, {35.0, 20.5}}, label: '我的'
                  Other, 0x2819e80e0, {{0.0, 0.0}, {375.0, 667.0}}
                    Other, 0x2819e81c0, {{0.0, 0.0}, {375.0, 667.0}}
                      Other, 0x2819e82a0, {{0.0, 64.0}, {375.0, 603.0}}
                        Button, 0x280c8eae0, {{30.0, 214.0}, {60.0, 60.0}}, identifier: 'touchMe', label: '点我'
                          StaticText, 0x2819e8460, {{41.5, 233.0}, {37.0, 22.0}}, label: '点我'
            TabBar, 0x2819e8540, {{0.0, 618.0}, {375.0, 49.0}}
              Button, 0x2819e8620, {{2.0, 619.0}, {184.0, 48.0}}, label: '首页'
              Button, 0x2819e1b20, {{190.0, 619.0}, {183.0, 48.0}}, label: '我的', Selected
      Other, 0x2819e1a40, {{0.0, 0.0}, {375.0, 667.0}}, Disabled
        Other, 0x2819e0b60, {{0.0, 0.0}, {375.0, 667.0}}, identifier: 'SVProgressHUD'
    Window, 0x2819e1ce0, {{0.0, 0.0}, {375.0, 667.0}}
      Other, 0x2819e1f80, {{0.0, 0.0}, {375.0, 667.0}}
        Other, 0x2819e2060, {{0.0, 0.0}, {375.0, 667.0}}
注意, Other 对应的是 UIView
我们现在要点击 tabbar 首页这个按钮, 跳转到首页
那么该怎么做呢? 很简单, 代码就两句
// 取元素
let homePageBtn = app.tabBars.buttons["首页"]
// 点击元素
homePageBtn.tap()
这里我解析一下第一句取元素
app.tabBars 取到的是以下数据
TabBar, 0x2835c3800, {{0.0, 618.0}, {375.0, 49.0}}
    Button, 0x2835c38e0, {{2.0, 619.0}, {184.0, 48.0}}, label: '首页'
    Button, 0x2835c39c0, {{190.0, 619.0}, {183.0, 48.0}}, label: '我的', Selected
然后 app.tabBars.buttons 取到的是
Button, 0x2835c38e0, {{2.0, 619.0}, {184.0, 48.0}}, label: '首页'
Button, 0x2835c39c0, {{190.0, 619.0}, {183.0, 48.0}}, label: '我的', Selected
这个时候, 我们根据类型取元素, 就已经取到最后了
想取首页按钮的话, 有几种方法, 请继续往下看
根据 label 取元素
根据 label 来获取 button
app.tabBars.buttons["首页"]
当然, 按照当前这个UI, 最简单就是 app.buttons[“首页”]
但是为了能够更准确的取到某个元素, 最好不要吝啬一点代码
根据下标取元素
因为打印的数据, 里面的元素是有序的. 那么我们也可以通过下标来获取元素
// 传入具体的下标, 取出按钮
app.tabBars.buttons.element(boundBy: 0)

// 当然, 也有类似数组一样取法, 取第一个
app.windows.tabBars.firstMatch
根据 identifier 取元素
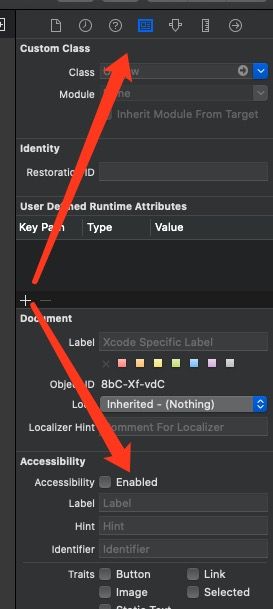
不过你要提前在项目的代码, 或者 xib 中设置好 identifier 才行
// 这里取的不是 tabbar 的 首页按钮, 是那个黄色按钮
app.tabBars.element(matching: .button, identifier: "touchMe")
- 在代码中设置
accessibilityIdentifier 就是设置自动化测试时的 identifier
let btn = UIButton()
btn.frame = CGRect.init(x: 30, y: 150, width: 60, height: 60)
btn.setTitle("点我", for: .normal)
btn.backgroundColor = UIColor.orange
btn.accessibilityIdentifier = "touchMe"
- xib 或者 storyboard 中设置
对元素的操作
以下 button 就代表是一个按钮元素( XCUIElement类 )
点击
button.tap()
双击
button.doubleTap()
长按
// 长按三秒
button.press(forDuration: 3)
滑动
// 上扫
button.swipeUp()

// 下扫
button.swipeDown()

// 左扫
button.swipeLeft()

// 右扫
button.swipeRight()
捏合
button.pinch(withScale: 1.5, velocity: 1)
旋转
button.rotate(0.5, withVelocity: 1)
实际用例
这里举例一些我学习的时候, 搜了挺久, 都没搜到的实际用例吧
这些用例我都放在了 项目 里面,有兴趣的,可直接去下载 项目 运行一下
具体点击 UITableView 某一行
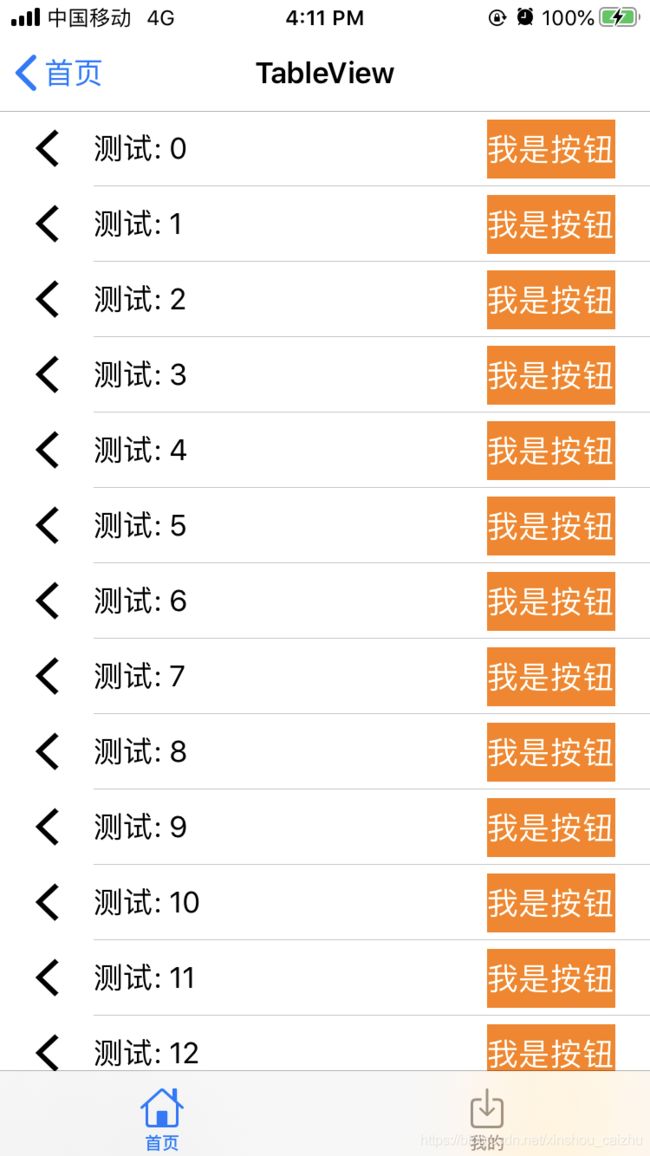
示例 UI 如下
打印 app.debugDescription 数据如下
 →Application, 0x2838da060, pid: 1007, label: 'XQUITestDemo'
    Window (Main), 0x2838db560, {{0.0, 0.0}, {375.0, 667.0}}
      Other, 0x2838db640, {{0.0, 0.0}, {375.0, 667.0}}
        Other, 0x2838db720, {{0.0, 0.0}, {375.0, 667.0}}
          Other, 0x2838db800, {{0.0, 0.0}, {375.0, 667.0}}
            Other, 0x2838db8e0, {{0.0, 0.0}, {375.0, 667.0}}
              Other, 0x2838db9c0, {{0.0, 0.0}, {375.0, 667.0}}
                Other, 0x2838dbaa0, {{0.0, 0.0}, {375.0, 667.0}}
                  NavigationBar, 0x2838dbb80, {{0.0, 20.0}, {375.0, 44.0}}, identifier: 'TableView'
                    Button, 0x2838dbc60, {{0.0, 20.0}, {62.0, 44.0}}, label: '首页'
                    StaticText, 0x2838dbd40, {{147.0, 32.0}, {81.0, 20.5}}, label: 'TableView'
                  Other, 0x2838dbe20, {{0.0, 0.0}, {375.0, 667.0}}
                    Other, 0x2838dbf00, {{0.0, 0.0}, {375.0, 667.0}}
                      Other, 0x2838de760, {{0.0, 64.0}, {375.0, 603.0}}
                        Table, 0x2838debc0, {{0.0, 64.0}, {375.0, 611.0}}
                          Cell, 0x2838dea00, {{0.0, 64.0}, {375.0, 43.5}}
                            Image, 0x2838d0000, {{15.0, 73.5}, {24.0, 24.0}}
                            StaticText, 0x2838d00e0, {{54.0, 64.0}, {306.0, 43.5}}, label: '测试: 0'
                            Other, 0x2838d01c0, {{54.0, 107.0}, {321.0, 0.5}}
                            Button, 0x2838d02a0, {{281.0, 69.0}, {74.0, 34.0}}, label: '我是按钮'
                              StaticText, 0x2838d0380, {{281.0, 75.0}, {74.0, 22.0}}, label: '我是按钮'
                          Cell, 0x2838d0460, {{0.0, 107.5}, {375.0, 43.5}}
                            Image, 0x2838d0540, {{15.0, 117.0}, {24.0, 24.0}}
                            StaticText, 0x2838d0620, {{54.0, 107.5}, {306.0, 43.5}}, label: '测试: 1'
                            Other, 0x2838d0700, {{54.0, 150.5}, {321.0, 0.5}}
                            Button, 0x2838d07e0, {{281.0, 112.5}, {74.0, 34.0}}, label: '我是按钮'
                              StaticText, 0x2838d08c0, {{281.0, 118.5}, {74.0, 22.0}}, label: '我是按钮'
                          ...后面 cell 就省略了, 都是一样的数据格式
            TabBar, 0x2838f0fc0, {{0.0, 618.0}, {375.0, 49.0}}
              Button, 0x2838f10a0, {{2.0, 619.0}, {184.0, 48.0}}, label: '首页', Selected
              Button, 0x2838f1180, {{190.0, 619.0}, {183.0, 48.0}}, label: '我的'
其实逻辑挺简单, 就是找出 cell, 然后并且点击而已
其实最关键的字段是 isHittable, 请看以下代码, 虽然有点长. 不过请耐心看完
class XQUITestDemoUITests: XCTestCase {

  /// 测试 tableView
  func testTableView() {

    // 初始化, 并打开APP
    let app = XCUIApplication()
    app.launch()

    // 读取 tableView 元素
    let tables = app.tables.firstMatch

    // 获取下标 30 的 cell
    let cell = tables.cells.element(boundBy: 30)
    // 调用封装的方法, 滚动到该 cell
    if tables.xq_scrollToElement(element: cell) {
      // 已经找到 cell, 点击 cell
      cell.tap()
    }

  }

}


/// 对于 tableview 的封装
extension XCUIElement {
    /// 滚动到某个元素
    /// 默认向下滚动
    /// 这里可以再封装一下的,比如可以向上滚动, 可以无限循环上下滚动等等...
    /// - Parameter element: UI元素
    /// - Parameter isAutoStop: true 滚动到最后一个, 自动停下来
    ///
    /// 返回 true 表示找到了传入的元素
    ///
    func xq_scrollToElement(element: XCUIElement, isAutoStop: Bool = true) -> Bool {

        // 判断是否是, tableView
        if self.elementType != .table {
            return false
        }

        // 一直滚动到某个元素可被点击为止
        while !element.isHittable {

            // 滚动到最后就停下来
            if isAutoStop {
              // 获取最后一个元素
                let lastElement = self.cells.element(boundBy: self.cells.count - 1)
                // 滚动到最后了, 那么就停下来
                if lastElement.isHittable {
                    return false
                }
            }

            self.swipeUp()
        }

        return true
    }
}
直接打开其他 App
这里举例打开 Safari.
// 传入 bundle id, 初始化某个 app
let safariApp = XCUIApplication.init(bundleIdentifier: "com.apple.mobilesafari")
safariApp.launch()
当然, 我们打开 Safari 之后, 也能取到 safari 上面的元素, 并且能操作
系统桌面 App(springboard)
如果我们想去获取当前状态栏上面的信息. 比如电量, 是否正常充电, 信号强度这些的
其实可以通过初始化桌面APP,来获取的
// 注意, 这里不用 launch() 了
let springboard = XCUIApplication.init(bundleIdentifier: "com.apple.springboard")
// 第一次获取桌面元素信息, 有时候会特别慢...所以这里并不是卡死了, 请耐心等待
// 不知道其中缘由,感觉有点玄学
// 反正我测的时候一般要等待 3 ~ 20 秒
print(safariApp.debugDescription)
当然,我们可以调用 Home 键, 回到桌面, 然后根据获取的信息, 去点击桌面APP,这样也可以行得通
这个 springboard 可以搞很多骚操作, 具体可看我项目, 里面有一些实际用例
申请系统权限, 点击系统权限弹框(例如通知权限)
代码如下
class XQUITestDemoUITests: XCTestCase {

    /// 测试系统按钮自动点击, 通知权限
    func testSystemAlertNotification() {

      // 初始化, 并打开APP
      let app = XCUIApplication()
      app.launch()

        // 点击 app 里面的 cell, 去申请通知权限
      let view = app.windows.cells.element(boundBy: 9)
      view.tap()

        // 调用封装好的方法, 点击下标 1 的系统 Alert 按钮
        // 下标 1, 就是右边同意按钮
      self.xq_tapSystemAlert(index: 1)

        // 等待一会
      let _ = app.wait(for: .notRunning, timeout: 3)
    }

}


extension XCTestCase {

    /// 点击系统弹框
    /// - Parameter index: 按钮的下标.
    /// 下标是从左边开始算起, 0为起始下标.   就比如通知权限, 要同意的话, 就传入 1
    func xq_tapSystemAlert(index: Int) {
        let springboard = XCUIApplication.init(bundleIdentifier: "com.apple.springboard")
        springboard.xq_tapAlert(index: index)
    }

}

extension XCUIApplication {

    ///
    /// 注意, actionSheet 的弹框是没办法调用这个点击的.
    /// 因为 actionSheet 是用两个 ScrollView 组成...并且系统不认为他是一个 alert...
    ///

    /// 点击弹框
    /// - Parameter index: 按钮的下标.
    /// 下标是从左边开始算起, 0为起始下标.
    func xq_tapAlert(index: Int) {
        let alerts = self.windows.alerts
        if alerts.count > 0 {
            let _ = self.wait(for: .notRunning, timeout: 1)
            alerts.buttons.element(boundBy: index).tap()
            let _ = self.wait(for: .notRunning, timeout: 1)
        }
    }

}
Home键
当前没有发现能双击 Home 键的方法, 有知道的老哥, 请留言告诉我
// 单击 Home 键
XCUIDevice.shared.press(.home)
系统音量按键
// 调节音量, +
XCUIDevice.shared.press(.volumeUp)

// 调节音量, -
XCUIDevice.shared.press(.volumeDown)
Siri
突然唤醒 Siri, 会说话很大声, 在公司玩耍的话, 建议先调小声
// 唤醒 Siri, 并输入语句
XCUIDevice.shared.siriService.activate(voiceRecognitionText: "我帅么?");
设备转方向
注意, 手机要先允许转向才行
// 调节方向
XCUIDevice.shared.orientation = .landscapeLeft
项目地址
不知不觉, 写了那么多…有点啰嗦了
这里给上 项目 地址, 想看代码的, 就去下载吧
