用python+tensorflow让电脑认识你的脸
引入
深度神经网络已经应用在很多方面,同时图像识别是神经网络最具潜力的应用领域。本文将以人脸识别的demo为例,介绍神经网络在图像识别中的应用。
1.程序用到的库
(1)tensorflow:它是一个极其强大的神经网络库,对python有较好的支持。
(2)dlib:它是一款C++的开源工具包,可以进行人脸检测。
(3)open-cv:机器视觉领域极其强大的库,可以进行图像的处理。
(4)numpy:python的科学计算库。
2.必要的程序及库安装
(1)python3.x:建议通过anaconda进行安装。
(2)tensorflow:pip install tensorflow
(3)numpy:pip install numpy
(4)dlib:下载dlib的whl文件之后进行安装 pip install dlib-*****.whl
3.程序的具体实现
本程序的部分图像处理内容参考了http://tumumu.cn/的博客内容。
程序的数据集采用马萨诸塞大学阿默斯特分校发起的lfw(点这里下载数据集)项目收集的数据集。
1.录入自己的脸,准备数据集
collect_my_face.py
#导入库
import cv2
import dlib
import os
import sys
import random

#output_dir用来存放录入的脸部图片
output_dir="./my_faces"
#size最后的图片尺寸为size*size
size=64

if not os.path.exists(output_dir):
    os.makedirs(output_dir)

def relight(img,light=1,bias=0):
    #随机改变图片亮度,增加图片的多样性
    w=img.shape[0]
    h=img.shape[1]
    for i in range(0,h):
        for j in range(w):
            for c in range(3):
                tmp=int(img[j,i,c]*light+bias)
                if tmp>255:
                    tmp=255
                elif tmp<0:
                    tmp=0
                img[j,i,c]=tmp
    return img
detector=dlib.get_frontal_face_detector()
camera=cv2.VideoCapture(0)

index=int(input("输入录入断点:"))
while True:
    if (index<=10000):
        #录入10000张照片
        print("Being processed picture %s"%index)
        success,img=camera.read()
        gray_img=cv2.cvtColor(img,cv2.COLOR_BGR2GRAY)
        dets=detector(gray_img,1)
        for i,d in enumerate(dets):
            #针对识别出来的面部进行剪裁,并把尺寸调整成size*size
            x1=d.top() if d.top() >0 else 0
            y1=d.bottom() if d.bottom()>0 else 0
            x2=d.left() if d.left()>0 else 0
            y2=d.right() if d.right()>0 else 0
            face=img[x1:y1,x2:y2]
            face=relight(face,random.uniform(0.5,1.5),random.randint(-50,50))
            face=cv2.resize(face,(size,size))
            cv2.imshow("image",face)
            cv2.imwrite(output_dir+"/"+str(index)+".jpg",face)
            index+=1
    key=cv2.waitKey(30)& 0xff
    if key==27:
        break
2.数据集转化为batch
input_images_prepare.py
import os
import numpy as np
import cv2

class Read_Batch():
    #定义Read_Batch类用以读取batch
    def __init__(self,path,myface_dir_list=[],other_dir_list=[],batch_list=[],label_list=[]):
        #类内参数初始化,myface_dir_list存放my_faces文件夹下的文件名
        self.myface_dir_list=os.listdir(path+"my_faces")
        self.other_dir_list=os.listdir(path+"other_faces")
        #batch_list存放读取的batch
        self.batch_list=batch_list
        #myface_readed_location指向已经读取到的文件位置,防止下次读取batch的时候重复读取之前读过的图片
        self.myface_readed_location=0
        self.other_face_readed_location=0
        self.path=path
        #label_list存放图片的label
        self.label_list=label_list
        self.myface_len=len(self.myface_dir_list)
        self.other_face_len=len(self.other_dir_list)

    def read_my_face(self,size):
        #读取my_faces文件夹下的图片,label信息为[1.0,0.0]
        #Need pictures of my face to be stored under my_faces directory
        for filename in self.myface_dir_list[self.myface_readed_location:]:
            if filename.endswith(".jpg"):
                img=cv2.imread(self.path+"my_faces"+"/"+filename)
                img=np.array(img)/255.0
                self.batch_list.append(img)
                self.label_list.append([1.0,0.0])
                size=size-1
                if size==0:
                    return
            if self.myface_readed_location1:
                self.myface_readed_location+=1
            else:
                self.myface_readed_location=0

    def read_other_face(self,size):
        #读取其他人的脸部图片,label信息为[0.0,1.0]
         for filename in self.other_dir_list[self.other_face_readed_location:]:
            if filename.endswith(".jpg"):
                img=cv2.imread(self.path+"other_faces"+"/"+filename)
                self.batch_list.append(np.array(img)/255.0)
                self.label_list.append([0.0,1.0])
                size=size-1
                if size==0:
                    return
            if self.other_face_readed_location1:
                self.other_face_readed_location+=1
            else:
                self.other_face_readed_location=0


    def next_batch(self,batch_size):
        #将batch_size的一半分给自己,一半分给他人
        self.read_my_face(batch_size/2)
        self.read_other_face(batch_size/2)
        batch_list=self.batch_list[:]
        label_list=self.label_list[:]
        self.batch_list=[]
        self.label_list=[]
        return batch_list,label_list
3.训练神经网络
import build_network
import input_images_prepare as iip
import tensorflow as tf
import numpy as np
import os

size=64
def weight_variable(shape,name):
    initial=tf.random_normal(shape,dtype=tf.float32,stddev=0.1)
    return tf.Variable(initial,name=name)

def bias_variable(shape,name):
    initial=tf.constant(0.0,tf.float32,shape)
    return tf.Variable(initial,name=name)

def train_network():

    xs=tf.placeholder(tf.float32,[None,size,size,3])
    y_=tf.placeholder(tf.float32,shape=[None,2],name="y_label")
    keep_prob_50=tf.placeholder(tf.float32)
    keep_prob_75=tf.placeholder(tf.float32)

    #First convolution layer
    with tf.name_scope("CNN1"):
        #定义卷积核,[2,2,3,32]表示卷积核的参数,第一个和第二个的2表示卷积的大小为2*2,之后的3表示通道,32表示卷积核的个数(其实这里的卷积核的大小应该是2*2*3)
        conv1_weight=weight_variable([2,2,3,32],name="conv1_weight")
        #定义卷积层的偏置
        conv1_bias=bias_variable([32],"conv1_bias")
        #第一层卷积,参数[1,1,1,1]表示卷积的步长,第一个1表示不跳过任何一个batch,第二第三个1表示不跳过任何一个像素点,第四个1表示不跳过任何一个通道。padding表示填充的方式,SAME表示卷积前后图像的大小不变
        conv1=tf.nn.relu(tf.nn.conv2d(xs,conv1_weight,[1,1,1,1],padding="SAME")+conv1_bias)
        maxpool1=tf.nn.max_pool(conv1,ksize=[1,2,2,1],strides=[1,2,2,1],padding="SAME")
        dropout1=tf.nn.dropout(maxpool1,keep_prob_50)

    #Second convolution layer
    with tf.name_scope("CNN2"):
        conv2_weight=weight_variable([2,2,32,32],"conv2_weight")
        conv2_bias=bias_variable([32],"conv2_bias")
        conv2=tf.nn.relu(tf.nn.conv2d(dropout1,conv2_weight,[1,1,1,1],padding="SAME")+conv2_bias)
        maxpool2=tf.nn.max_pool(conv2,ksize=[1,2,2,1],strides=[1,2,2,1],padding="SAME")
        dropout2=tf.nn.dropout(maxpool2,keep_prob_50)

    #Third convolution layer
    with tf.name_scope("CNN3"):
        conv3_weight=weight_variable([3,3,32,64],"conv3_weight")
        conv3_bias=bias_variable([64],"conv3_bias")
        conv3=tf.nn.relu(tf.nn.conv2d(dropout2,conv3_weight,strides=[1,1,1,1],padding="SAME")+conv3_bias)
        maxpool3=tf.nn.max_pool(conv3,ksize=[1,2,2,1],strides=[1,2,2,1],padding="SAME")
        dropout3=tf.nn.dropout(maxpool3,keep_prob_75)

    #Fully connectted layer
    with tf.name_scope("FCC"):
        fcc_weight=weight_variable([(size//8)*(size//8)*64,512],"fcc_weight")
        fcc_bias=bias_variable([512],"fcc_bias")
        dropout3_flat=tf.reshape(dropout3,[-1,(size//8)*(size//8)*64])
        dense=tf.nn.relu(tf.matmul(dropout3_flat,fcc_weight)+fcc_bias)
        dropout4=tf.nn.dropout(dense,keep_prob_75)

    #Output layer
    with tf.name_scope("OUTPUTLAYER"):
        out_weight=weight_variable([512,2],"out_weight")
        out_bias=bias_variable([2],"out_bias")
        before_softmax=tf.add(tf.matmul(dropout4,out_weight),out_bias)
        out=tf.nn.softmax(before_softmax,axis=1)


    if not os.path.exists("save"):
        os.makedirs("save")
    sess=tf.Session()
    writer = tf.summary.FileWriter("logs/", sess.graph)

    with tf.name_scope("loss"):
        #定义loss
        cross_entropy=tf.reduce_mean(-y_*tf.log(out))
        tf.summary.scalar("loss",cross_entropy)

    with tf.name_scope("accuracy"):
        #定义准确率
        accuray=tf.reduce_mean(tf.cast(tf.equal(tf.argmax(out,1),tf.argmax(y_,1)),tf.float32))
        tf.summary.scalar("accuracy",accuray)

    #学习率1e-5,使用Adam优化
    train_step=tf.train.AdamOptimizer(0.00001).minimize(cross_entropy)
    saver=tf.train.Saver()
    sess.run(tf.global_variables_initializer())

    get_batch=iip.Read_Batch("./")

    if os.path.exists("./save/checkpoint"):
        saver.restore(sess,"./save/model.ckpt")

    merged = tf.summary.merge_all()

    for epoch in range(1000):
        #训练网络
        x,ys=get_batch.next_batch(1000)
        if epoch%10 ==0:
            #print(sess.run(out,feed_dict={xs:x,y_:ys,keep_prob_50:1.0,keep_prob_75:1.0}))
            print(sess.run(accuray,feed_dict={xs:x,y_:ys,keep_prob_50:1.0,keep_prob_75:1.0}))
            saver.save(sess,"./save/model.ckpt")

        summary,_=sess.run([merged,train_step],feed_dict={xs:x,y_:ys,keep_prob_50:0.5,keep_prob_75:0.75})
        #tensorboard写入数据
        writer.add_summary(summary,epoch)
        print("step %d finished"%(epoch+1))

if __name__=="__main__":
    train_network()
4.识别
recognition.py
import os
import tensorflow as tf
import cv2
import dlib

size=64
def weight_variable(shape,name):
    initial=tf.random_normal(shape,dtype=tf.float32,stddev=0.1)
    return tf.Variable(initial,name=name)

def bias_variable(shape,name):
    initial=tf.constant(0.0,tf.float32,shape)
    return tf.Variable(initial,name=name)

def recognition():

    xs=tf.placeholder(tf.float32,[None,size,size,3])
    #y_=tf.placeholder(tf.float32,[None,2])
    keep_prob_50=tf.placeholder(tf.float32)
    keep_prob_75=tf.placeholder(tf.float32)

    #First convolution layer
    #网络定义
    with tf.name_scope("CNN1"):
        conv1_weight=weight_variable([2,2,3,32],name="conv1_weight")
        conv1_bias=bias_variable([32],"conv1_bias")
        conv1=tf.nn.relu(tf.nn.conv2d(xs,conv1_weight,[1,1,1,1],padding="SAME")+conv1_bias)
        maxpool1=tf.nn.max_pool(conv1,ksize=[1,2,2,1],strides=[1,2,2,1],padding="SAME")
        dropout1=tf.nn.dropout(maxpool1,keep_prob_50)

    #Second convolution layer
    with tf.name_scope("CNN2"):
        conv2_weight=weight_variable([2,2,32,32],"conv2_weight")
        conv2_bias=bias_variable([32],"conv2_bias")
        conv2=tf.nn.relu(tf.nn.conv2d(dropout1,conv2_weight,[1,1,1,1],padding="SAME")+conv2_bias)
        maxpool2=tf.nn.max_pool(conv2,ksize=[1,2,2,1],strides=[1,2,2,1],padding="SAME")
        dropout2=tf.nn.dropout(maxpool2,keep_prob_50)

    #Third convolution layer
    with tf.name_scope("CNN3"):
        conv3_weight=weight_variable([3,3,32,64],"conv3_weight")
        conv3_bias=bias_variable([64],"conv3_bias")
        conv3=tf.nn.relu(tf.nn.conv2d(dropout2,conv3_weight,strides=[1,1,1,1],padding="SAME")+conv3_bias)
        maxpool3=tf.nn.max_pool(conv3,ksize=[1,2,2,1],strides=[1,2,2,1],padding="SAME")
        dropout3=tf.nn.dropout(maxpool3,keep_prob_75)

    #Fully connectted layer
    with tf.name_scope("FCC"):
        fcc_weight=weight_variable([(size//8)*(size//8)*64,512],"fcc_weight")
        fcc_bias=bias_variable([512],"fcc_bias")
        dropout3_flat=tf.reshape(dropout3,[-1,(size//8)*(size//8)*64])
        dense=tf.nn.relu(tf.matmul(dropout3_flat,fcc_weight)+fcc_bias)
        dropout4=tf.nn.dropout(dense,keep_prob_75)

    #Output layer
    with tf.name_scope("OUTPUTLAYER"):
        out_weight=weight_variable([512,2],"out_weight")
        out_bias=bias_variable([2],"out_bias")
        before_softmax=tf.add(tf.matmul(dropout4,out_weight),out_bias)
        out=tf.nn.softmax(before_softmax,axis=1)
    #result表示网络输出中最大项的位置,由于前面设定自己脸图片的label为[1.0,0.0],因此这里如果result为[0](第一个数为最大项),表明图片是自己的脸
    result=tf.argmax(out,1)
    flag=0
    sess=tf.Session()
    saver=tf.train.Saver()
    #从文件中读取训练好的网络参数
    saver.restore(sess,"./save/model.ckpt")
    detector=dlib.get_frontal_face_detector()
    camera=cv2.VideoCapture(0)
    while True:
        #用摄像头读取人脸,并将形状规整为size*size
        success,img=camera.read()
        gray_img=cv2.cvtColor(img,cv2.COLOR_BGR2GRAY)
        dets=detector(gray_img,1)
        for i,d in enumerate(dets):
            x1=d.top() if d.top() >0 else 0
            y1=d.bottom() if d.bottom()>0 else 0
            x2=d.left() if d.left()>0 else 0
            y2=d.right() if d.right()>0 else 0
            face=img[x1:y1,x2:y2]
            face=cv2.resize(face,(size,size))
            cv2.imshow("image",face)
            cv2.imwrite("./"+"1.jpg",face)
            if sess.run(result,feed_dict={xs:[face/255.0],keep_prob_50:1.0,keep_prob_75:1.0})==[0]:
                print("验证通过")
            else:
                print("验证未通过")
            flag=1
        if flag ==1:
            break
        key=cv2.waitKey(30)& 0xff
        if key==27:
            break
if __name__=="__main__":
    recognition()
5.网络图
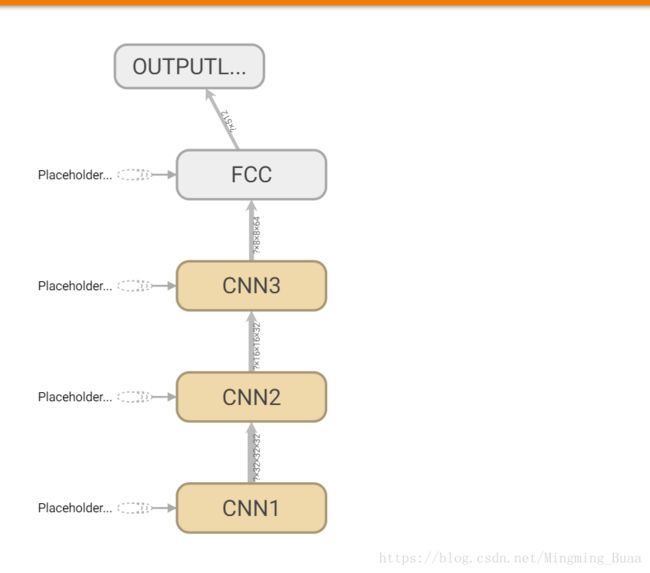
上面的图可以看出,本程序的网络图由四个部分组成:三个卷积层,一个全连接层。卷积层的卷积核参数可以参考程序。