视图控制器的种类
- UIViewController。用于自定义视图控制器的导航。例如,对于两个界面的跳转,我们可以用一个UIViewController来控制另外两个UIViewController。
- UINavigationController。导航控制器,它与UITableViewController结合使用,能够构建树形结构导航模式。
- UITabBarController。标签栏控制器,用于构建树标签导航模式。
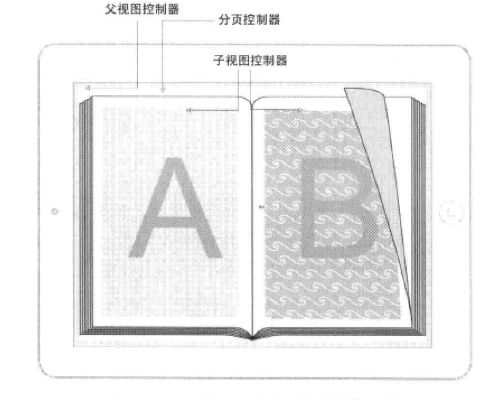
- UIPageViewController。呈现电子书导航风格的控制器
- UISplotViewController。可以把屏幕分割成几块的视图控制器,主要为iPad屏幕设计。
- UIPopoverController。呈现“气泡”风格视图的控制器,主要为iPad屏幕设计。
导航模式:
- 平铺导航模式:内容没有层次关系,展示的内容都放置在一个主屏幕上,采用分屏或分页控制器进行导航,可以左右或者上下滑动屏幕查看内容。iPad Touch中自带的天气预报应用,它采用分屏进行导航。
- 标签导航模式:内容被分成几个功能模块,每个功能模块之间没有什么关系。通过标签管理各个功能模块,点击标签可以切换功能模块。iPod Touch自导的时钟应用,它采用的就是标签导航模式。
- 树形结构导航模式:内容是有层次的,从上到下细分或者具有分类包含等关系,iPod Touch中自带的邮件应用,他采用的就是树形结构导航模式
模态视图:
在导航过程中,有时候需要放弃主要任务转而做其他次要任务,然后再返回到主要任务,这个“次要任务”就是在“模态视图”中完成的。默认情况下,模态视图是从屏幕下方滑出来的。当完成的时候需要关闭这个模态视图,如果不关闭,就不能做别的事情,这就是“模态”的含义,它具有必须响应处理的意思。因此,模态视图中一定会有“关闭”或“完成”按钮,其根本原因iOS只有一个Home键。Andrioid和Window Phone就不会遇到这些问题,因为在这两个系统中遇到上述情况时,可以通过Back键返回。
在UIViewController类中,主要有如下两个方法:
presentModalViewController: animated:呈现模态视图
dismissViewControllerAnimated: completion:关闭模态视图
模态视图的呈现和关闭:
- (IBAction)regonclick:(id)sender {
UIStoryboard *mainStoryBoard = [UIStoryboard storyboardWithName:@"Main" bundle:nil];
UIViewController *registerViewController = [mainStoryBoard instantiateViewControllerWithIdentifier:@"registerViewController"];
registerViewController.modalTransitionStyle = UIModalTransitionStyleCoverVertical;
[self presentViewController:registerViewController animated:YES completion:^{
NSLog(@"Present Modal View");
}];
}
modalTransitionStyle属性是UIViewController类提供的,用于设定模态视图呈现和关闭时的动画效果,他们是由UIModalTransitionStyle枚举中的常量定义的。
typedef NS_ENUM(NSInteger, UIModalTransitionStyle) {
UIModalTransitionStyleCoverVertical = 0,//呈现时沿垂直方向由底部向上推出,关闭时从左往右翻转回来
UIModalTransitionStyleFlipHorizontal,//水平翻转,呈现是从右往左翻转,关闭时候从左往右翻转回来
UIModalTransitionStyleCrossDissolve,//两个视图交叉淡入淡出
UIModalTransitionStylePartialCurl ,//呈现时模态视图卷起一个边角翻页,关闭时模态视图翻回来。
};
-(IBAction)done:(id)send{
[self dismissViewControllerAnimated:YES completion:^{
NSLog(@"Modal View done");
}];
}
平铺导航
扁平化信息是指这些信息之间没有从属的层次关系,如北京、上海和哈尔滨之间就没有从属关系,而哈尔滨市与黑龙江省之间就是从属的层次关系。应用场景:iPod Touch自带的天气应用程序、iPad中iBook电子书应用
1.分屏导航
基于分屏导航是平铺导航模式的主要实现方式,主要涉及的控件有分屏控制(UIPageControl)和滚动视图(scrollView),其中分屏控件是iOS标准控件。基于分屏导航的手势有两种,一个是点击小点的左边(上边)或右边(上边)实现翻屏,另一个是用手在屏幕上滑动实现翻屏。屏幕的总数应该限制在20个以内,超过20个的小点分屏控件就会溢出。事实上,当一个应用超过10屏时,使用基于分屏导航的平铺导航模式已经不是很方便了。
实例:
@interface ViewController : UIViewController
@property (strong,nonatomic) UIView *page1;
@property (strong,nonatomic) UIView *page2;
@property (strong,nonatomic) UIView *page3;
@property (weak, nonatomic) IBOutlet UIScrollView *scrollView;
@property (weak, nonatomic) IBOutlet UIPageControl *pageControl;
- (IBAction)changPage:(id)sender;
#import "ViewController.h"
@interface ViewController ()
@end
@implementation ViewController
- (void)viewDidLoad {
[super viewDidLoad];
// Do any additional setup after loading the view, typically from a nib.
self.scrollView.contentSize = CGSizeMake(self.view.frame.size.width*3, self.scrollView.frame.size.height);
self.scrollView.frame = self.view.frame;
UIStoryboard *mainStoryboard = [UIStoryboard storyboardWithName:@"Main" bundle:nil];
UIViewController *page1ViewController = [mainStoryboard instantiateViewControllerWithIdentifier:@"page1"];
self.page1 = page1ViewController.view;
self.page1.frame = CGRectMake(0.0f, 0.0f, 320.0f, 420.0f);
UIViewController *page2ViewController = [mainStoryboard instantiateViewControllerWithIdentifier:@"page2"];
self.page2 = page2ViewController.view;
self.page2.frame = CGRectMake(320.0f, 0.0f, 320.0f, 420.0f);
UIViewController *page3ViewController = [mainStoryboard instantiateViewControllerWithIdentifier:@"page3"];
self.page3 = page3ViewController.view;
self.page3.frame = CGRectMake(2*320.0f, 0.0f, 320.0f, 420.0f);
self.scrollView.delegate = self;
[self.scrollView addSubview:self.page1];
[self.scrollView addSubview:self.page2];
[self.scrollView addSubview:self.page3];
}
- (void)scrollViewDidScroll:(UIScrollView *)scrollView
{
CGPoint offset = scrollView.contentOffset;
self.pageControl.currentPage = offset.x/320;
}
- (IBAction)changPage:(id)sender {
[UIView animateWithDuration:0.3f animations:^{
int whichPage = self.pageControl.currentPage;
self.scrollView.contentOffset = CGPointMake(320.0f*whichPage, 0.0f);
}];
}
- (void)didReceiveMemoryWarning {
[super didReceiveMemoryWarning];
// Dispose of any resources that can be recreated.
}
@end
2.分页导航
分页视图控制器(UIPageViewController),构建类似于电子书效果的应用。
分页控制器需要放置在一个父视图控制器中,在分页控制器下面还要有子视图控制器,每个子视图控制器对应一个页面
需要用的类和协议有UIPageViewControllerDateSource协议,UIPageViewControllerDelegate协议和UIPageViewController类,其中UIPageViewController类没有对应的视图类。
@interface ViewController : UIViewController
{
int pageIndex;
}
@property(strong,nonatomic) UIPageViewController *pageViewController;
@end
#import "ViewController.h"
@interface ViewController ()
@end
@implementation ViewController
- (void)viewDidLoad {
[super viewDidLoad];
self.view.frame = CGRectMake(0.0f, 0.0f, 320.0f, 440.0f);
self.pageViewController = [[UIPageViewController alloc]initWithTransitionStyle:UIPageViewControllerTransitionStylePageCurl navigationOrientation:UIPageViewControllerNavigationOrientationHorizontal options:nil];
self.pageViewController.delegate = self;
self.pageViewController.dataSource = self;
UIStoryboard *mainStorybord = [UIStoryboard storyboardWithName:@"Main" bundle:nil];
UIViewController *page1ViewController = [mainStorybord instantiateViewControllerWithIdentifier:@"page1"];
NSArray *viewControllers = @[page1ViewController];
[self.pageViewController setViewControllers:viewControllers direction:UIPageViewControllerNavigationDirectionForward animated:YES completion:NULL];
[self.view addSubview:self.pageViewController.view];
pageIndex = 0;
}
/*
initWithTransitionStyle:navigationOrientation:options:构造方法用于创建UIPageViewController实例,initWithTransitionStyle用于设置页面翻转的样式:
UIPageViewControllerTransitionStylePageCurl---翻书效果样式
UIPageViewControllerTransitionStyleScroll----滑屏效果样式
navigationOrientation设定翻页方向
UIPageViewControllerNavigationOrientationHorizontal--水平方向
UIPageViewControllerNavigationOrientationVertical—-垂直方向
*/
- (void)didReceiveMemoryWarning {
[super didReceiveMemoryWarning];
// Dispose of any resources that can be recreated.
}
#pragma mark - UIPageViewControllerDataSource
//返回当前视图控制器之前的视图控制器,用于上一个页面的显示
- (UIViewController *)pageViewController:(UIPageViewController *)pageViewController viewControllerBeforeViewController:(UIViewController *)viewController
{
pageIndex--;
if (pageIndex < 0) {
pageIndex = 0;
return nil;
}
UIStoryboard *mainStorybord = [UIStoryboard storyboardWithName:@"Main" bundle:nil];
NSString *pageId = [NSString stringWithFormat:@"page%d",pageIndex+1];
UIViewController *pvController = [mainStorybord instantiateViewControllerWithIdentifier:pageId];
return pvController;
}
//返回当前视图控制器之后的视图控制器,用于下一个页面的显示
- (UIViewController *)pageViewController:(UIPageViewController *)pageViewController viewControllerAfterViewController:(UIViewController *)viewController
{
pageIndex++;
if (pageIndex > 2) {
pageIndex = 2;
return nil;
}
UIStoryboard *mainStorybord = [UIStoryboard storyboardWithName:@"Main" bundle:nil];
NSString *pageId = [NSString stringWithFormat:@"page%d",pageIndex+1];
UIViewController *pvController = [mainStorybord instantiateViewControllerWithIdentifier:pageId];
return pvController;
}
#pragma mark - UIPageViewControllerDelegate
/*
UIPageViewControllerDelegate委托协议中,最重要的方法是pageViewController:spineLocationForInterfaceOrientation:,它根据屏幕旋转方向设置书脊位置和初始化首页。UIPageViewController中,共有两个常用的属性:双面显示(doubleSided)和书脊位置(spineLocation)。书脊位置是只读属性,必须通过代理返回值设定
*/
- (UIPageViewControllerSpineLocation)pageViewController:(UIPageViewController *)pageViewController spineLocationForInterfaceOrientation:(UIInterfaceOrientation)orientation
{
UIStoryboard *mainStorybord = [UIStoryboard storyboardWithName:@"Main" bundle:nil];
UIViewController *page1ViewController = [mainStorybord instantiateViewControllerWithIdentifier:@"page1"];
UIViewController *page2ViewController = [mainStorybord instantiateViewControllerWithIdentifier:@"page2"];
if (orientation == UIInterfaceOrientationLandscapeLeft || orientation == UIInterfaceOrientationLandscapeRight) {
NSArray *viewControllers = @[page1ViewController,page2ViewController];
[self.pageViewController setViewControllers:viewControllers direction:UIPageViewControllerNavigationDirectionForward animated:YES completion:NULL];
self.pageViewController.doubleSided = NO;
return UIPageViewControllerSpineLocationMid;
}
NSArray *viewControllers = @[page1ViewController];
[self.pageViewController setViewControllers:viewControllers direction:UIPageViewControllerNavigationDirectionForward animated:YES completion:NULL];
self.pageViewController.doubleSided = NO;
return UIPageViewControllerSpineLocationMin;
}
/*
typedef NS_ENUM(NSInteger, UIPageViewControllerSpineLocation) {
UIPageViewControllerSpineLocationNone = 0,//
UIPageViewControllerSpineLocationMin = 1,//定义书脊的位置在书的最左边(或最上面),书从右向左翻(或从上向下翻)
UIPageViewControllerSpineLocationMid = 2,//定义书脊的位置在书的中间,一般在横屏下显示,屏幕分成两个页面。
UIPageViewControllerSpineLocationMax = 3 //定义书脊的位置在书的最右边(或最下面),书从左向右翻(或从下向上翻)
};
*/
@end

