在WebSphere Liberty集合中公开API
在当今瞬息万变的微服务世界中,开发人员需要在运行时部署方面变得灵活而敏捷。 传统的开发车间现在使用各种运行时环境。 最受欢迎的两个是Java和Node.js,有时在容器(Docker)中。
开发人员需要一种将这些多样化的业务资产公开为API的方法,以便可以被包括移动设备在内的各种客户端使用。 面临的挑战是,这些环境中的每一个都单独且略有不同地公开API,这使潜在的消费者(组织内部和外部)难以发现全套可用资产。
借助IBM®WebSphere®Application Server Liberty,您可以使用集合来组织服务器,以有效地向您的应用程序提供应用程序服务。 您可以将Liberty服务器组织到集合中,以支持集群,管理以及对多个Liberty服务器起作用的其他操作。
通过WebSphere Liberty 17.0.0.1中的增强功能,您可以创建Liberty集合环境来部署和管理混合工作负载。 Liberty 17.0.0.1支持Java,Node.js,Docker中的WebSphere Liberty和Docker中的Node.js,其框架始终将可用的API聚合到一个目录中。 现在,API的使用者可以在一个地方查看和调用Liberty集合中的所有业务资产,而不管它们的实现方式如何。 API开发人员可以自由修改实现,例如从Node.js切换到Java,而不会中断API客户端。
本教程演示了如何公开您和其他开发人员可以在浏览器中查看的这四个不同运行时环境的API,这些环境在WebSphere Liberty集体浏览器中列出。
您将学习如何使用Docker中的WebSphere Liberty,Node.js,Node.js和Docker成员中的WebSphere Liberty创建Liberty集合环境。 然后,您将学习在基于OpenAPI和Swagger的集体API资源管理器中公开这些API。
您可以使用WebSphere Liberty Admin Center或部署REST API来部署集合体的成员。 本教程重点介绍通过使用管理中心将Node.js和Docker成员部署到集合体。 接下来,它逐步介绍了公开API的步骤。
建立环境需要什么
注意:以下功能的版本基于WebSphere Liberty 17.0.0.1.。
- 熟悉WebSphere Liberty,Node.js和Docker。
- 具有REST API的Java应用程序可以在Docker成员中的WebSphere Liberty和WebSphere Liberty上安装。
- Websphere Liberty 17.0.0.1安装在用于集合体控制器的机器上,该服务器允许服务器成为管理集合体的控制器。 请参阅Liberty入门 。
控制器机器应安装以下功能:-
collectiveController-1.0(有关更多信息,请参见Collective Controller 。) -
adminCenter-1.0(有关更多信息,请参阅管理中心 。) -
apiDiscovery-1.0(有关更多信息,请参见API Discovery 1.0 。)
-
- 在另一台机器上为WebSphere Liberty成员安装了Websphere Liberty 17.0.0.1。 应该安装Java应用程序所需的所有功能,例如以下示例:
		collectiveMember-1.0
		clusterMember-1.0
		apiDiscovery-1.0
		localConnector-1.0
		ejbLite-3.2
		jsf-2.2
		jaxws-2.2
		websocket-1.1
		jdbc-4.1
		cdi-1.2
		jsp-2.3
		jpa-2.1
		jaxrs-2.0
		jndi-1.0
		beanValidation-1.1
		ldapRegistry-3.0
- 将Docker安装在针对Docker成员的计算机上。 请参阅获取适用于Red Hat Enterprise Linux的Docker 。 (注意:本教程中针对Node.js和Docker计算机的命令示例使用Red Hat Enterprise Linux7。)
- 在计算机上为Node.js成员安装的Node.js V4.7.3。
要安装Node.js V4.7.3,请完成以下步骤:
- 从
https://nodejs.org下载node-v4.7.3-linux-x64.tar.gz:# wget https://nodejs.org/dist/v4.7.3/node-v4.7.3-linux-x64.tar.gz - 使用以下命令将
node-v4.7.3-linux-x64.tar.gz文件node-v4.7.3-linux-x64.tar.gz压缩到/usr/local:# cd /usr/local # tar --strip-components 1 -xzf/node-v4.7.3-linux-x64.tar.gz - 使用以下命令安装
npm,node-gyp-installapiconnect-collective-membernode-gyp-install,apic和apiconnect-collective-member:# cd /root # npm install -g npm # npm install -g node-gyp-install # npm cache clear # npm install -g apiconnect-collective-member # npm install -g apiconnect - 使用以下命令检查
/usr/local/bin目录以查看node.js,npm和apiconnect-collective-member的安装:# ls -l /usr/local/bin total 24252 lrwxrwxrwx 1 root root 41 Feb 22 18:17 apic -> ../lib/node_modules/apiconnect/bin/cli.js -rwxrwxr-x 1 500 500 24830187 Jan 31 16:05 node lrwxrwxrwx 1 root root 43 Feb 22 18:11 node-gyp-install -> ../lib/node_modules/node-gyp-install/bin.js lrwxrwxrwx 1 root root 38 Feb 22 18:10 npm -> ../lib/node_modules/npm/bin/npm-cli.js lrwxrwxrwx 1 root root 60 Feb 22 18:13 wlpn -> ../lib/node_modules/apiconnect-collective-member/bin/wlpn.js lrwxrwxrwx 1 root root 71 Feb 22 18:13 wlpn-collective -> ../lib/node_modules/apiconnect-collective-member/bin/wlpn-collective.js lrwxrwxrwx 1 root root 67 Feb 22 18:13 wlpn-server -> ../lib/node_modules/apiconnect-collective-member/bin/wlpn-server.js - 使用以下命令检查Node.js和API Connect的版本:
# node -v v4.7.3 # apic -v API Connect: v5.0.6.1 (apiconnect: v2.5.17) - 使用以下命令检查
wlpn和wlpn-collective版本:# wlpn --ext-version wlpn: v2.2.1 (API Connect: v5.0.6.2) plugins 3.3.5 wlpn-cli-collective 2.3.2 (8f17e4aa6a04569d2048a5200ed0c0c7779577c4) wlpn-cli-server 2.7.4 (7d16e9a47682c921cadc45b07d7c18ad4d94f0b6) # wlpn-collective version apiconnect-collective-member: v1.5.1 (apiconnect-collective-member: v1.5.1)
配置自由集体
本节演示如何使用API Discovery 1.0功能设置Liberty集合并配置控制器以使用特定的标头,标题和描述为该集合定制WebSphere Liberty集合资源管理器,您和其他开发人员可以在其中查看公开的API。浏览器。 您可以在以下博客文章中了解有关这些功能的更多信息: Liberty的OpenAPI支持的新增强功能 。 有关设置Liberty集合的更多信息,请参阅“ 配置Liberty集合” 。
- 使用以下命令创建控制器:
# wlp/bin/server create myController - 创建密钥库以确保控制器与其成员之间的安全通信:
# wlp/bin/collective create myController –keystorePassword=controllerKSPassword - 遵循控制台上的指示信息,并将配置输出复制到控制器
server.xml文件中。 - 在
server.xml文件中启用以下功能,以启用集合,管理中心和API发现功能。collectiveController-1.0 adminCenter-1.0 apiDiscovery-1.0 - 在
- 在控制器
server.xml文件中添加以下该
swaggerDefinition参数指向扬鞭定义的位置.yaml或.json包含自定义标题,描述和横幅信息文件。 - 设置第6步引用的
swaggerDef.yaml文件:- 创建一个
wlp/usr/server/myController/custom目录。 - 将
swaggerDef.yaml放在自定义目录中。
请参见以下示例swaggerDef.yaml文件。 行"description":"List of available API",和"title":"Liberty REST APIs with Custom Banner",是自定义信息。{ "swagger":"2.0", "info":{ "description":"List of available API", "version":"1.0.0", "title":"Liberty REST APIs with Custom Banner", "x-ibm-css":"${server.config.dir}/css/custom-header.css", "termsOfService":"http://swagger.io/terms/", "contact":{ "email":"[email protected]" }, "license":{ "name":"Apache 2.0", "url":"http://www.apache.org/licenses/LICENSE-2.0.html" } } } - 创建一个
wlp/usr/server/myController/css目录。 - 将
custom-header.css文件放在css目录中。
请参阅以下示例custom-header.css文件:.swagger-section #header { background-image: url(images/custom-logo.png); background-repeat: no-repeat; background-position: 14px 5px; background-size: 150px 45px; background-color: #0C1F95; padding: 14px; }background-image具有custom-logo.png文件的位置,该文件是自定义徽标图像。 本教程使用SVT徽标,如步骤7的屏幕截图所示。 - 创建一个
wlp/usr/server/myController/css/images目录。 - 将
custom-logo.png文件放在images目录中。
- 创建一个
- 启动控制器:
# wlp/bin/server start myController –clean
您可以从GitHub上的tam512 / restapi4runtimes下载样本WebSphere Liberty控制器server.xml文件。
将Liberty成员部署到Liberty集体
本节演示如何将两个Liberty服务器部署到Liberty集合控制器。 在以下示例中,两个Liberty成员上都安装了一个名为SocialSphere的Java应用程序。
- 创建两个Liberty服务器:
# wlp/bin/server create server1 # wlp/bin/server create server2 - 将
server1加入Liberty集体:# wlp/bin/collective join server1 --host=controllerHostname --port=httpsPort --user=adminUser --password=adminPassword --keystorePassword=memberKSPassword - 将命令行的连接命令输出复制并粘贴到
server.xml文件中。 - 配置
server.xml文件以获取Java应用程序的所有信息。
(您可以从tam512 / restapi4runtimes从GitHub下载一个示例server.xml文件和一个相关的social.xml文件。) - 重复步骤2-4,将
server2加入Liberty集合并配置服务器。 - 如果需要,可以配置
server.xml文件,以便某些API是私有的。 在样本social.xml文件中,SocialSphere应用程序中的SocialSphereAllergyForecastAPI是私有的。 请参见以下示例: - 重新启动Liberty成员,然后在管理中心的
https://controllerHost:httpsPort/adminCenter查看它们。 单击浏览>服务器以查看Liberty集合中的所有服务器。 在本教程的示例中,两个Liberty成员与SocialSphere应用程序一起部署在名为SSCluster的Liberty服务器集群SSCluster。 以下屏幕截图显示了管理中心的外观: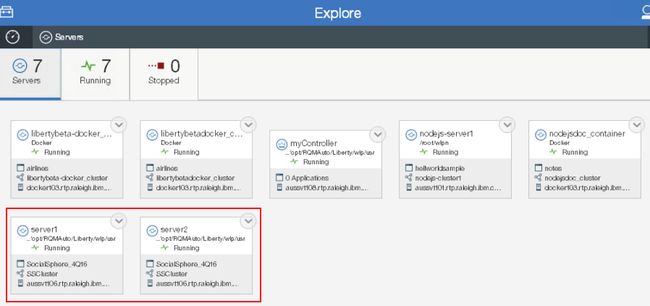
将Node.js服务器部署到Liberty集合体
在本节中,您将学习如何在Node.js机器上使用LoopBack(Node.js框架)创建示例应用程序。 然后,将Node.js服务器部署到Liberty集合体。
- 创建两个LoopBack应用程序:
helloworldsample和notes。 在Node.js服务器上部署helloworldsample应用程序。 如第4步所述,在Docker中使用Node.js部署notes应用程序。有关创建Node.js LoopBack应用程序的更多信息,请参见npm,Inc网站上的API Connect开发人员工具包示例代码 。- 如果机器上尚未安装API Connect Developer Toolkit,请使用命令
npm install -g apiconnect。 - 通过运行以下命令来创建helloworldsample LoopBack应用程序:
# apic loopback --name helloworldsample
输入helloworldsample作为应用程序名称。
输入helloworldsample作为包含项目的目录。
使用箭头键选择hello-world应用程序。 - 使用以下命令创建示例注释LoopBack应用程序:
# apic loopback --name notes
输入注释作为应用程序名称。
输入要包含项目的目录的注释。
使用箭头键选择注释应用程序。
创建两个环回示例应用程序之后,您将在运行apic loopback命令的目录中看到两个名为helloworldsample文件夹和notes,如以下屏幕截图所示:
在每个应用程序文件夹中,您会看到一个
package.json文件以及common,definitions,node_modules和server目录。 - 要将Node.js LoopBack应用程序部署到Liberty集合体,必须将该应用程序打包到一个扩展名为
.tgz的存档文件中。
在helloWorld和notes目录中运行以下命令,以创建hellworldsample-1.0.0.tgz和notes-1.0.0.tgz文件:# wlpn-server pack hellworldsample Finished packing to /opt/hellworldsample-1.0.0.tgz # wlpn-server pack notes Finished packing to /opt/notes-1.0.0.tgz
- 如果机器上尚未安装API Connect Developer Toolkit,请使用命令
- 在管理中心上,部署Node.js服务器:
- 通过在Node.js计算机上运行
wlpn-collective命令来运行registerHost或updateHost:# wlpn-collective registerHost targetHost --host=controllerHost --port=controllerHTTPSPort --user=adminUser --password=adminPassword --rpcUser=osUser --rpcUserPassword=osPassword --autoAcceptCertificatesrpcUser必须对目标部署位置具有操作系统权限。 - 如果
registerHost已经注册到Liberty集合,并且有一些信息需要更新,例如新的pcUserPassword,那么您需要运行updateHost命令。# wlpn-collective updateHost targetHost --host=controllerHost --port=controllerHTTPSPort --user=adminUser --password=adminPassword --rpcUser=osUser --rpcUserPassword=osPassword --autoAcceptCertificates - 将
hellworldsample-1.0.0.tgz应用程序放在您访问管理中心的同一台计算机上的目录中,例如C:\nodejsApps。 - 将以下信息添加到控制器server.xml文件:
配置
wlpn.appPort和wlpn.adminPort以避免在部署多个Node.js服务器时出现重复端口。 remoteFileAccess参数包含已部署到集合体的Node.js应用程序的位置。 - 使用
–clean选项重新启动控制器:# wlp/bin/server stop myController --clean - 登录到
http://controllerHost:httpsPort/adminCenter与在所述所定义的用户ID和密码quickStartSecurity控制器的部分server.xml文件: - 在工具箱中,点击部署 。
- 在Deploy页面上,选择Node.js ,然后单击Next 。
- 选择“ 应用程序包” ,然后单击“ 下一步” 。
- 在下一页上,单击确认 。
- 从控制器
server.xml文件中remoteFileAccess中指定的位置浏览到helloworldsample-1.0.0.tgz应用程序。 “应用程序目录”和“服务器软件包文件”的“部署参数”信息将自动填写。 如果需要,您可以手动更改“群集名称”和“服务器名称”字段。 - 选择已注册到Liberty控制器的Node.js主机。
- 输入密钥库密码以保护新生成的文件。
- 点击部署 。
在“您的部署完成”屏幕上,单击“ 查看成功部署的服务器”,以在浏览器的新选项卡上查看已部署的成员。
以下屏幕截图显示了WebSphere Liberty集合体中已部署的node.js-server1服务器: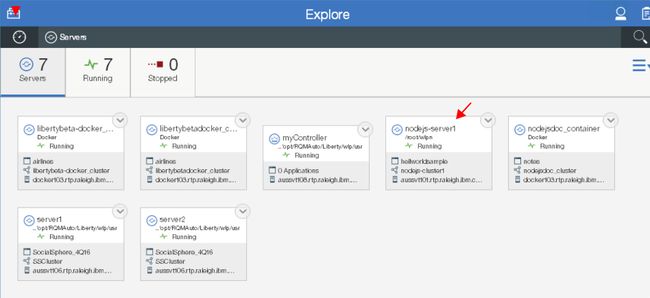
- 在Node.js机器上,验证在部署之后是否已创建Node.js服务器:
# wlpn-server list The following servers are defined relative to the user directory /root/wlpn nodejs-server1 - 使用
wlpn-server命令或WebSphere Liberty管理中心启动Node.js服务器。- 在Node.js机器上运行以下命令:
# wlpn-server start nodejs-server1 - 在管理中心的服务器视图中,点击服务器右上方的向下箭头,然后选择开始 。
- 在Node.js机器上运行以下命令:
- 通过查看Node.js机器上的
/root/wlpn/nodejs-server1/log/server.log文件,检查Node.js成员日志。 - 要将API从Node.js应用程序推送到Liberty集合,请在
join.json文件publishSwagger标志设置为true。 部署Node.js服务器后,将在/root/wlpn/nodejs-server1目录中创建join.json文件。 该文件应类似于以下示例:{ "hostName": "aussvt101.rtp.raleigh.ibm.com", "userDir": "/root/wlpn", "serverName": "nodejs-server1", "keystorePassword": "{xor}Lz4sLCgwLTs=", "controllerList": [ "https://aussvt108.rtp.raleigh.ibm.com:9445" ], "clusterName": "nodejs-cluster1", "appPort": "9091", "adminPort": "9454", "publishSwagger" : "true" } - 重新启动Node.js服务器。
- 通过在Node.js计算机上运行
在Docker映像中创建Node.js服务器并将其部署到Liberty集合
本节演示了如何使用notes环回应用程序在Docker映像中创建Node.js服务器并将其部署到Liberty集合。
- 验证Docker计算机上是否已正确安装Docker:
# docker run hello-world您应该看到以下消息:
Hello from Docker! This message shows that your installation appears to be working correctly. To generate this message, Docker took the following steps: 1. The Docker client contacted the Docker daemon. 2. The Docker daemon pulled the "hello-world" image from the Docker Hub. 3. The Docker daemon created a new container from that image which runs the executable that produces the output you are currently reading. 4. The Docker daemon streamed that output to the Docker client, which sent it to your terminal. To try something more ambitious, you can run an Ubuntu container with: $ docker run -it ubuntu bash Share images, automate workflows, and more with a free Docker ID: https://cloud.docker.com/ For more examples and ideas, visit: https://docs.docker.com/engine/userguide/ - 运行以下命令以列出Docker映像,您将看到hello-world映像。
# docker images REPOSITORY TAG IMAGE ID CREATED SIZE hello-world latest 48b5124b2768 6 weeks ago 1.84 kB - 从https://hub.docker.com/_/node/下载Node.js v4.7.3映像:
# docker pull node:4.7.3 - 列出Docker映像以确保节点4.7.3已下载到Docker机器:
# docker images REPOSITORY TAG IMAGE ID CREATED SIZE node 4.7.3 66a83b6db17d 2 weeks ago 653 MB hello-world latest 48b5124b2768 6 weeks ago 1.84 kB - 使用Dockerfile示例构建新的Node.js映像。
- 创建一个目录,例如
/opt/Nodejs_Docker。 然后将以下文件放在目录中:在步骤3中在Node.js机器上创建的Dockerfile和notes-1.0.0.tgz应用程序。将Node.js服务器部署到Liberty集合中,并将joinMember和removeMember脚本部署到。 有关WebSphere Liberty文档中的Node.js成员映像 ,请参阅示例Dockerfile 。 - 在构建Node.js映像之前,请在
/opt/Nodejs_Docker目录中列出文件,以确保所有必需的文件均可用:# ls /opt/Nodejs_Docker Dockerfile removeMember joinMember notes-1.0.0.tgz - 在以下样本Dockerfile中,您可以看到它基于
node:4.7.3映像构建了Node.js映像。 它将joinMember和removeMember脚本添加到容器中,安装API Connect,并使用notes-1.0.0.tgz应用程序创建默认服务器。# Dockerfile to create a Node.js image # # This Dockerfile makes the following assumptions: # - The collectives enabling scripts (joinMember, removeMember) will be placed in # /opt/ibm/docker in the Docker container # - Node.js servers are created at /root/wlpn # - The Node.js server will be "defaultServer" (for example, /root/wlpn/defaultServer) # - The application to install will already have its dependencies resolved by "npm install" # - The Docker container will be run using --net=host, so that no ports are explicitly exported in this file FROM node:4.7.3 # # Auto-start the Node.js server with the container # ENTRYPOINT ["/usr/local/bin/wlpn-server", "run", "defaultServer"] # Add collectives enabling scripts # ADD joinMember /opt/ibm/docker/ RUN chmod +x /opt/ibm/docker/joinMember ADD removeMember /opt/ibm/docker/ RUN chmod +x /opt/ibm/docker/removeMember # # Update the OS and JRE # RUN apt-get update # # Install APIConnect collective member # RUN npm install -g apiconnect-collective-member # # Use the code below to install an application for use onto the Docker image # COPY notes-1.0.0.tgz /root/wlpn/ RUN wlpn-server unpack defaultServer /root/wlpn/notes-1.0.0.tgz - 使用以下语法运行build命令:
docker build -t ${imageName} ${Dockerfile location}。 在/opt/Nodejs_Docker目录中运行以下命令以创建nodejsapi153映像:# docker build -t nodejsapi153 .
(该.在命令的结束指定Dockerfile的位置。) - 列出图像以查看您创建的
nodejsapi153图像:# docker images REPOSITORY TAG IMAGE ID CREATED SIZE nodejsapi153 latest 7419eda396a8 2 days ago 1.05 GB node 4.7.3 66a83b6db17d 2 weeks ago 653 MB hello-world latest 48b5124b2768 6 weeks ago 1.84 kB
- 创建一个目录,例如
- 使用管理中心将Docker计算机上的本地
nodejsapi153映像部署到Liberty集合体。- 从控制器机器运行
registerHost,将Docker主机注册到Liberty控制器。# wlp/bin/collective registerHost dockerHost --host=controllerHost --port=controllerHTTPSPort --user=adminUser --password=adminPassword --rpcUser=osUser --rpcUserPassword=osUserPassword --autoAcceptCertificates - 登录到管理中心,网址为http:// controllerHost : httpsPort / adminCenter,单击Deploy并选择用于部署Node.js服务器和Docker容器的选项。 点击确认 。
- 在“部署参数”下,键入您在Docker计算机中构建的正确的Node.js Docker映像名称,在上一示例中为
nodejsapi153。 “集群名称”和“容器名称”字段是自动填写的,但是您可以将其更改为例如nodejsdoc_cluster和nodejsdoc_container。 - 选择注册到集合体的Docker主机,如以下屏幕截图所示:

- 输入密钥库的密码,然后单击Deploy 。
- 查看管理中心服务器,然后看到
nodejsdoc_container是成员,如以下屏幕截图所示: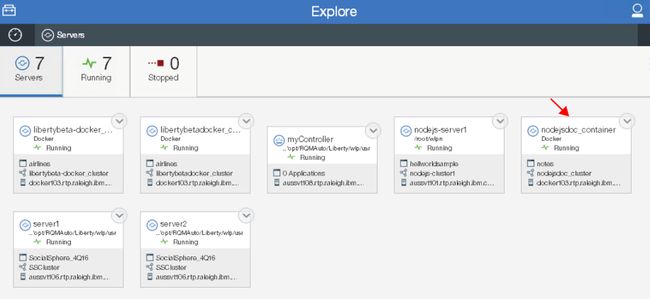
- 从控制器机器运行
- 在管理中心中,启动
nodejsdoc_container成员。 - 转到Docker机器以查看在部署过程中创建的新
Node.js Docker容器:# docker ps -a CONTAINER ID IMAGE COMMAND CREATED STATUS PORTS NAMES 7a4a954c6792 nodejsapi153 "/usr/local/bin/wl..." 2 days ago Up 24 hours nodejsdoc_container 13fb833cc324 hello-world "/hello" 57 minutes ago Exited (0) 57 minutes ago wonderful_bose - 与您对Node.js成员所做的类似,在
join.json文件publishSwagger标志设置为true,这会将notesLoopBack应用程序中的API推送到Liberty集合。join.json文件在加入nodejsdoc_container在/root/wlpn/defaultServer的nodejsdoc_container内部创建。- 将
join.json文件从nodejsdoc_container复制到本地计算机:nodejsdoc_container# docker cpnodejsdoc_container:/root/wlpn/defaultServer/join.json。 - 编辑
join.json文件以添加"publishSwagger" : "true"将API推送到集合体,如以下示例所示:{ "hostName": "docker103.rtp.raleigh.ibm.com", "userDir": "Docker", "serverName": "nodejsdoc_container", "keystorePassword": "{xor}Lz4sLCgwLTs=", "controllerList": [ "https://aussvt108.rtp.raleigh.ibm.com:9445" ], "clusterName": "nodejsdoc_cluster", "appPort": "9115", "adminPort": "9478", "publishSwagger" : "true" } - 将具有
"publishSwagger" : "true"标志的join.json文件复制回nodejsdoc_container。# docker cp join.json nodejsdoc_container:/root/wlpn/defaultServer/
- 将
- 重新启动
nodejsdoc_container无论从管理中心或与构件docker的多克尔机器上命令。# docker stop nodejsdoc_container # docker start nodejsdoc_container- 要查看docker日志,请使用以下命令:
# docker logs - 要尾随日志的末尾,请使用以下命令:
# docker logs --tail=all –f - 在Red Hat Linux机器中,Docker容器日志位于
/var/lib/docker/containers目录中。 要列出所有Docker容器日志,请运行以下命令:# ls -l /var/lib/docker/containers/*/*-json.log
- 要查看docker日志,请使用以下命令:
在Docker映像中创建Liberty服务器并将其部署到Liberty集合
本节演示如何使用示例Airline Java应用程序在Docker映像中创建Liberty服务器并将其部署到Liberty集合体。
在步骤4中在Docker映像中创建Node.js服务器的同一台计算机上,在Docker映像中创建Liberty。在Docker映像中创建Node.js服务器,并将其部署到Liberty集合中。
- 使用以下命令从Docker Hub websphere-liberty存储库 y下拉beta版本的
webSphere-liberty映像:# docker pull websphere-liberty:beta - 使用Dockerfile在Docker映像中构建新的Liberty:
- 创建一个新目录,例如
/opt/Liberty_Docker,将以下文件放入目录:Dockerfile,airlines.war,server.xml,joinMember和removeMember脚本。 有关Liberty Network Deployment映像,请参见示例Dockerfile 。 - 为了确保在构建Liberty Docker映像之前所有必需的文件都可用,请在
/opt/Liberty_Docker目录中列出文件:# ls /opt/Liberty_Docker airlines.war Dockerfile joinMember removeMember server.xml - 在以下示例Dockerfile中,该文件从
websphere-liberty:beta映像构建Liberty映像。 它将joinMember和removeMember脚本添加到容器中,安装所需的Liberty功能,将Libertyserver.xml添加到容器中的defaultServer,然后将airlines.war添加到dropins目录中。# Dockerfile to create a Liberty Network Deployment image # # This Dockerfile assumes: # - The collective enabling scripts (joinMember, removeMember) will be placed in # /opt/ibm/docker in the Docker container # - WebSphere Liberty will be installed at /opt/ibm/wlp # - The WebSphere Liberty server will be "defaultServer" # (for example, /opt/ibm/wlp/usr/servers/defaultServer) # - The Docker container runs using --net=host so that no ports are explicitly # exported in this file FROM websphere-liberty:beta # # Auto-start the Liberty server with the container # ENTRYPOINT ["/opt/ibm/wlp/bin/server", "run", "defaultServer", "--clean"] # # Add collective enabling scripts # ADD joinMember /opt/ibm/docker/ RUN chmod +x /opt/ibm/docker/joinMember ADD removeMember /opt/ibm/docker/ RUN chmod +x /opt/ibm/docker/removeMember # # Update the operating system # RUN apt-get update # # Add the additional required features # RUN installUtility install --acceptLicense scalingMember-1.0 clusterMember-1.0 collectiveMember-1.0 apiDiscovery-1.0 ADD server.xml /opt/ibm/wlp/usr/servers/defaultServer/ # # Insert your application file name. This statement copies the application # onto the Docker image. # ADD airlines.war /opt/ibm/wlp/usr/servers/defaultServer/dropins/ - 下面的Liberty
server.xml文件示例具有示例航空公司应用程序所需的功能。 此server.xml文件中的httpPort和httpsPort具有变量${memberHttpPort}和${memberHttpsPort}。 在控制器server.xml文件中定义变量,以避免在Docker容器中部署多个Liberty服务器时发生端口冲突。localConnector-1.0 apiDiscovery-1.0 jsp-2.3 jsonp-1.0 jaxrs-2.0 - 通过在
/opt/Liberty_Docker目录中运行以下命令来构建libertybeta-docker映像:-t libertybeta-docker .# docker build-t libertybeta-docker .(该.在命令的结束指定Dockerfile的位置。) - 列出
libertybeta-docker映像以查看新的libertybeta-docker映像:# docker images REPOSITORY TAG IMAGE ID CREATED SIZE libertybeta-docker latest 4d932b4c51b3 40 seconds ago 454 MB websphere-liberty beta 0e90e2108d31 44 hours ago 402 MB nodejsapi153 latest 7419eda396a8 2 days ago 1.05 GB node 4.7.3 66a83b6db17d 2 weeks ago 653 MB hello-world latest 48b5124b2768 6 weeks ago 1.84 kB
- 创建一个新目录,例如
- 使用管理中心将Docker机器上的本地
libertybeta-docker映像部署到Liberty集合体。 如果要部署Docker Hub注册表中的Docker映像,请参阅步骤6。将Docker Hub注册表中的Docker映像部署到Liberty集合。- 如果对Docker容器中的Node.js服务器使用同一台Docker计算机,则无需再次运行
registerHost。 如果使用新计算机,则需要在部署之前从控制器计算机运行registerHost,以将新计算机注册到集合体。 - 将以下信息添加到控制器
server.xml文件,然后重新启动控制器。如果在控制器
server.xml文件中已经配置了collectiveController,则不要再次添加它。 定义memberHttpPort和memberHttpsPort值是为了避免端口冲突,如前所述。 - 通过
http://controllerHost: httpsPort /adminCenter登录到管理中心,然后选择Deploy 。 选择部署Liberty Server和Docker Container,然后单击Confirm 。 - 输入在上一个示例中构建的正确的Liberty Docker映像名称
libertybeta-docker。 集群名称和容器名称会自动填写,但是您可以更改它们,例如libertybeta-docker_cluster和libertybeta-docker_container,如以下屏幕截图所示:
- 向下滚动并选择注册的Docker主机,如以下屏幕截图所示:

- 输入密钥库的密码,然后单击Deploy 。 然后使用管理中心查看Docker容器中已部署的Liberty服务器,如以下屏幕截图所示:

- 如果对Docker容器中的Node.js服务器使用同一台Docker计算机,则无需再次运行
将Docker Hub注册表中的Docker映像部署到Liberty集体
在本节中,您将从Docker Hub获得根证书,将本地Docker映像推送到Docker Hub注册表,然后将映像从注册表部署到Liberty集合。 本节使用在步骤5中创建的libertybeta-docker映像。您在Docker映像中创建Liberty服务器,并将其部署到Liberty集合体。
要从注册表中部署Docker映像,必须将Liberty控制器配置为有权访问注册表。
- 将根证书导入到Liberty集体密钥库中:
- 从https://hub.docker.com/导出GeoTrust Global CA根证书
例如,在Firefox浏览器中,完成以下步骤:- 单击URL旁边的锁定符号,选择hub.docker.com>更多信息>查看证书>详细信息> GeoTrust Global CA>导出(到DER文件) 。
- 单击锁定图标,如以下屏幕截图所示:

- 单击hub.docker.com旁边的向右箭头,然后单击更多信息 。
- 在网站标识下,点击查看证书 。
- 在证书查看器中,单击详细信息 。
- 在“证书层次结构”下,选择“ GeoTrust Global CA” ,然后单击“ 导出” 。
- 将证书文件另存为
GeoTrustGlobalCA.der。
- 如果控制器正在运行,请停止它。
- 将
GeoTrustGlobalCA.der证书文件复制到控制器计算机。 - 使用以下keytool命令将证书导入到集合密钥库中,并回答
yes以信任此证书。# keytool -import -file certFile -keystore path_to_controller_collectiveTrust.jks -storepass controller_keystore_password -alias any_unique_value例如:
# /Liberty/java/bin/keytool -import -file /tmp/GeoTrustGlobalCA.der -keystore /Liberty/wlp/usr/servers/myController/resources/collective/collectiveTrust.jks -storepass controllerkspasswd -alias dockerhubCertOwner: CN=GeoTrust Global CA, O=GeoTrust Inc., C=US Issuer: CN=GeoTrust Global CA, O=GeoTrust Inc., C=US ……………………..... ……………………….. Trust this certificate? [no]: yes Certificate was added to keystore - 将您在步骤5中创建的
libertybeta-docker本地Docker映像推libertybeta-dockerDocker Hub注册表。- 确保您具有Docker Hub帐户。 从Docker网站创建一个Docker ID。
- 查找本地
libertybeta-docker映像ID:# docker images REPOSITORY TAG IMAGE ID CREATED SIZE libertybeta-docker latest 4d932b4c51b3 2 hours ago 454 MB
- 标记
libertybeta-docker映像ID,如以下命令示例所示:tamdocker/libertybeta-docker:demodocker tag4d932b4c51b3tamdocker/libertybeta-docker:demo,其中tamdocker是您的Docker Hub帐户名,demo是一个标签名。 - 列出Docker映像以查看标记的映像:
# docker images REPOSITORY TAG IMAGE ID CREATED SIZE libertybeta-docker latest 4d932b4c51b3 2 hours ago 454 MB tamdocker/libertybeta-docker demo 4d932b4c51b3 2 hours ago 454 MB - 登录到您的Docker帐户:
# docker login Login with your Docker ID to push and pull images from Docker Hub. If you don't have a Docker ID, head over to https://hub.docker.com to create one. Username: tamdocker Password: xxxxxxxx Login Succeeded - 将标记的图像推送到Docker Hub:
# docker push tamdocker/libertybeta-docker:demo The push refers to a repository [docker.io/tamdocker/libertybeta-docker] 77a69c4adc38: Pushed ……….…………… demo: digest: sha256:472209032316b233e8ad8034593fd5b6a64abf57815788fac390e5ca9ca33eb1 size: 4082 - 通过在Docker Hub中查看注册表来验证该映像是否已推送到Docker Hub,其外观应类似于以下屏幕截图:

- 从https://hub.docker.com/导出GeoTrust Global CA根证书
- 将Liberty Controller配置为有权访问Docker注册表。
- 将以下信息放入控制器
server.xml文件中。 更改值以与您的码头工人信息相匹配: - 使用
--clean选项重新启动控制器。 - 从注册表将
tamdocker/libertybeta-docker:demo部署到Liberty集合体。- 遵循相同的步骤,使用管理中心在Docker容器中部署Liberty。 在部署参数处,您将看到
tamdocker/libertybeta-docker映像的demo标签。 - 选择
demo,它将自动填写“映像名称”,“群集名称”和“容器名称”字段,如以下屏幕截图所示:
- 如前几节所述,完成部署此映像。 然后,如下面的屏幕截图所示,在管理中心中查看已部署的映像:

- 遵循相同的步骤,使用管理中心在Docker容器中部署Liberty。 在部署参数处,您将看到
在Liberty集合中公开应用程序中的所有API
如上一个屏幕截图所示,自由联盟现在有六个成员。 确保所有成员都在运行,因此您可以通过WebSphere Liberty集合浏览器在这些成员上公开应用程序中的所有API。 如果一个应用程序安装在多个成员上,则该应用程序的API仅显示一次。 在本教程中, SocialSphere应用程序安装在两个Liberty成员上,而Airline应用程序安装在demo-container和libertybeta-docker_container成员上。
- 查看集合中的公共API:
- 如果在控制器
server.xml文件中配置了http://controlerHost:httpPort/myPublicAPI/collective/explorer. - 如果未配置
publicURL,则默认的公共API URL为http://controlerHost:httpPort/api/collective/explorer。 - 在浏览器中,输入
http://controlerHost:httpPort/myPublicAPI/collective/explorer。 在以下所有公共API的屏幕截图中,蓝色背景横幅上的SVT徽标是自定义横幅。 (默认横幅是黑色背景上的IBM徽标。)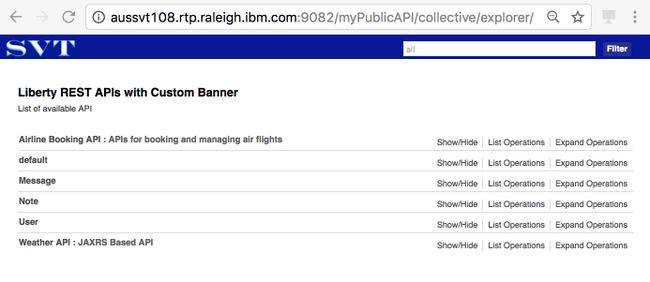
具有“自定义标题”标题的Liberty REST API和可用API描述列表是在步骤1中的
swaggerDef.yaml文件中定义的自定义信息。配置Liberty集合。 它显示所有可用公共API的列表。- 航空公司应用程序中的API显示为“航空公司预订API”,如以下屏幕截图所示:

- SocialSphere应用程序中的API是默认的,Weather API和AllergyForecast,但是未显示AllergyForecast,因为它已配置为私有API。 即使已将其安装在两个Liberty成员上,该应用程序中的API也仅显示一次。 以下两个屏幕截图显示了SocialSphere应用程序中的Defaul API和Weather API:


-
hello-worldLoopBack应用程序中的API,如以下屏幕截图所示:
-
notesLoopBack应用程序中的API,如以下屏幕截图所示: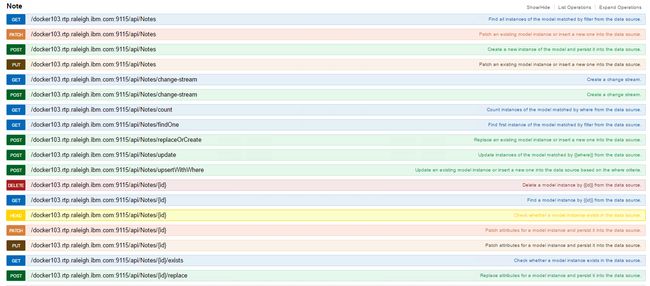
- 如果在控制器
- 查看集合中的所有API(公共API和私有API):
- 在浏览器中,输入
https://controllerHost: httpsPort /ibm/api/collective/explorer。 - 使用
quickStartSecurity用户名和密码登录。
您将看到列出的所有API,如以下屏幕截图所示:
- 在SocialSphere应用程序中查看私有的AllergyForecast API,如以下屏幕截图所示:

- 在浏览器中,输入
结论
在本教程中,您学习了如何将四个运行时环境部署到WebSphere Liberty集合体:Java,Node.js,Docker中的Nodejs和Docker中的Liberty。
您还学习了如何在本地计算机上部署Docker映像,以及如何从Docker Hub注册表中部署Docker映像。
最后,您了解了如何使用WebSphere Liberty在四个运行时环境中公开应用程序中的所有API。
现在,您知道了如何在一个地方使所有来自WebSphere Liberty集合的API都可用,您和其他开发人员可以在其中查看和调用所有应用程序API。 在您自己的环境中尝试它,并使用WebSphere Liberty中的API Discovery 1.0功能。
致谢
作者要感谢Arthur De Magalhaes的所有技术支持和评论,并感谢Mei Mei-siang Chang的评论和非常有帮助的评论。
翻译自: https://www.ibm.com/developerworks/library/mw-1704-dinh/1704-dinh.html