为什么80%的码农都做不了架构师?>>> 
Proxmox 服务器的自签名证书的SSL设定
在使用Proxmox服务器时,会使用SSL访问它的WEB管理平台。
由于默认的安装中SSL证书没有签署,所以浏览器老是会弹出证书错误,是否继续之类的错误信息,很是碍眼。
为了在一定程度上避免这种现象,本文使用自签名的证书来配置Promox的HTTPS。

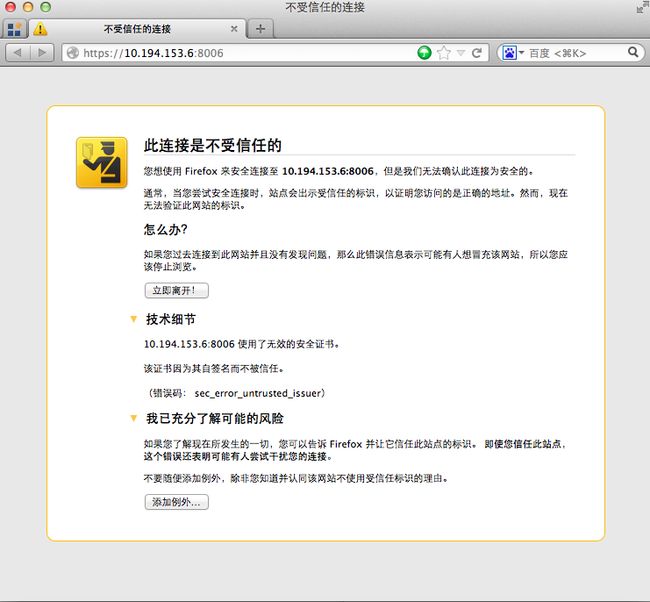
即使点了“仍然继续”,https前面还是会出现下面的小红叉叉,难看的很:

概念
关于自签名的证书,啰嗦几句。
常规的证书(那些NB的CA机构颁发的证书),允许使用该证书的服务器向用户说:
你应该信任我,因为你信任的机构(NB的CA机构)是这么说的
而自签名的证书就比较无耻了,它允许使用该证书的服务器对用户说:
你应该信任我,因为这是我说的
我们访问各种网银是,必须都是HTTPS(如果你不是,那你悲剧了),而他们的证书都是常规的证书。
而我天朝的12306,好像是使用自签名的证书(个中原因,you know…)。
前提
首先已经安装好了Proxmox,而且网络,IP都已经配置好了。
假设,Proxmox服务器的IP是: 10.194.153.6
为了简单起见,Proxmox服务器没有绑定域名,总是以IP访问。
1 生成证书
本例中的证书是自我签署的证书。在默认的状态下,自我签署的证书在浏览器里会弹出警告,
而不是讨人厌的错误提示。
如果吧自我签署的证书事前安装好的话,就可以正常的使用了。
因此,如果只是(公司,实验室,局域网)内部使用的话,使用自我签署的证书是没有问题的。
如果需要开放给外部访问,最好还是到CA认证机构去购买和申请正规的证书吧(不过据说很贵)。
闲话少叙,开始干活
1.1 生成私钥
~# cd /etc/ssl/certs
/etc/ssl/certs# openssl genrsa -des3 -out server.key 1024
Generating RSA private key, 1024 bit long modulus
.....................................................................++++++
.......++++++
e is 65537 (0x10001)
Enter pass phrase for server.key:                 # 输入pass phrase
Verifying - Enter pass phrase for server.key:	# 再次输入
1.2 从私钥中删除pass phrase
/etc/ssl/certs# openssl rsa -in server.key -out server.key
Enter pass phrase for server.key:# 输入刚才输入的pass phrase
writing RSA key
1.3 生成证书
/etc/ssl/certs# openssl req -new -days 3650 -key server.key -out server.csr
You are about to be asked to enter information that will be incorporated
into your certificate request.
What you are about to enter is what is called a Distinguished Name or a DN.
There are quite a few fields but you can leave some blank
For some fields there will be a default value,
If you enter '.', the field will be left blank.
-----
Country Name (2 letter code) [AU]:CN	 #国家代码
State or Province Name (full name) [Some-State]:LN   #区域代码,也就是我们所谓的省
Locality Name (eg, city) []:DL	 #城市
Organization Name (eg, company) [Internet Widgits Pty Ltd]: TESTWork   #公司名称,随便填
Organizational Unit Name (eg, section) []:VM Manager   #部门名称,随便写
Common Name (eg, YOUR name) []:10.193.153.6
       #服务器全名(FQDN),本例中因为都使用的是IP,所以直接把IP写上了。
       #这是证书生成过程中最重要的一步,这里填写的Common Name必须要保证与apache中配置的Server name一致,
       #否则生成后的证书还是不好用。
       #如果你使用的Proxmox已经在DNS服务器里面绑定了域名,比如:proxmox.abc.com
       #而且在apache配置中,虚拟主机的Server Name也是:proxmox.abc.com
       #那末,这一步,就必须填写:proxmox.abc.com,这样生成的证书才好使。

Email Address []:[email protected]	 #管理员邮件地址,随便填。
Please enter the following 'extra' attributes
to be sent with your certificate request
A challenge password []:  #这里不输入也可以,直接回车
An optional company name []: #这里不输入也可以,直接回车
1.4 创建自签署证书
/etc/ssl/certs# openssl x509 -in server.csr -out server.crt -req -signkey server.key -days 3650
Signature ok
subject=/C=CN/ST=LN/L=DL/O=PSDCD/OU=10.194.153.6/CN=10.194.153.6
Getting Private key
1.5 修改证书和密钥的权限
/etc/ssl/certs# chmod 400 server.*2 SSL设置
Promox的apache配置在下面的位置:
/etc/apache2/sites-enabled/pve.conf
/etc/apache2/sites-enabled/pve-redirect.conf
修改这两个个文件:
2.1 确认Server Name是否和刚次生成证书是输入的Common Name一致:
不一致的情况下,有两条道:重新生成证书并签署,或者修改此处
ServerName 10.194.153.62.2 配置刚才生成的证书和公钥到apache中
    SSLEngine on
    SSLProtocol all -SSLv2
    # 为了保险起见,先注释掉默认的SSL配置
    #SSLCertificateFile /etc/pve/local/pve-ssl.pem	#这是默认的配置
    #SSLCertificateKeyFile /etc/pve/local/pve-ssl.key  #这是默认的配置

    # 加入新的配置
    SSLCertificateFile /etc/ssl/certs/server.crt #这是新的配置
    SSLCertificateKeyFile /etc/ssl/certs/server.key #这是新的配置
    … 此处省略N个字…
2.3 重启apache
/etc/apache2/sites-enabled# apache2ctl restart3 测试(IE这货就不测了,Proxmox不支持IE,赞)
【Firefox】
打开promox的WEB管理平台,给出了警告。点击“添加例外”。
点击确认“安全例外”:

终于看到了久违的登陆画面,注意,地址栏里面的https前不再会显示大红叉,而是正常的一个锁的样子了,说明自签名证书成功了。

【Chrome的结果】
