大话-那些年常被问的java题
背景:面试时,有些问题经常被问。现在来一探究竟。。。。
一、== 和 equals
默认情况,对于基本数据类型,==比较的是两个变量的值。对于引用对象,==比较的是两个对象的地址
Object 类
	public native int hashCode();

	public boolean equals(Object obj) {
        return (this == obj);
    }

 String 类 重写equals,hashcode
	public boolean equals(Object anObject) {
        if (this == anObject) {
            return true;
        }
        if (anObject instanceof String) {
            String anotherString = (String)anObject;
            int n = value.length;
            if (n == anotherString.value.length) {
                char v1[] = value;
                char v2[] = anotherString.value;
                int i = 0;
                while (n-- != 0) {
                    if (v1[i] != v2[i])
                        return false;
                    i++;
                }
                return true;
            }
        }
        return false;
    }

   //value -拆字符串,累加 hash
	public int hashCode() {
        int h = hash;
        if (h == 0 && value.length > 0) {
            char val[] = value;

            for (int i = 0; i < value.length; i++) {
                h = 31 * h + val[i];
            }
            hash = h;
        }
        return h;
    }

 HashMap
		// key-value 取hash, Objects.hashCode(key)->object.hashCode();
		public final int hashCode() {
            return Objects.hashCode(key) ^ Objects.hashCode(value);
        }
		// 重写hashcode方法为了将数据存入HashSet/HashMap/Hashtable 类时进行比较
		public final boolean equals(Object o) {
            if (o == this)
                return true;
            if (o instanceof Map.Entry) {
                Map.Entry<?,?> e = (Map.Entry<?,?>)o;
                if (Objects.equals(key, e.getKey()) &&
                    Objects.equals(value, e.getValue()))
                    return true;
            }
            return false;
        }
分析可发现:
1、object 中,对于基本数据类型,==比较的是两个变量的值。对于引用对象,==比较的是两个对象的地址 ,equals比较的是对象地址
2、string重写后,string类型equals 比较的是值
二、一旦重写了equals方法,就一定要重写hashCode方法。为什么?
首先认识下啥是hashcode,
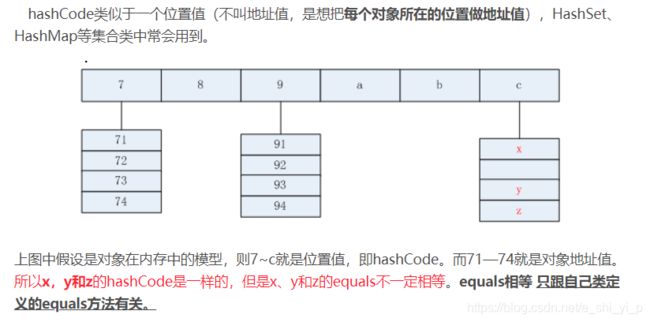
hashcode就是通过hash函数得来的,通俗的说,就是通过某一种算法得到的,hashcode就是在hash表中有对应的位置
对象的内部地址(也就是物理地址)转换成一个整数,然后该整数通过hash函数的算法就得到了hashcode
HashCode的存在主要是为了查找的快捷性、hashcode代表对象就是在hash表中的位置
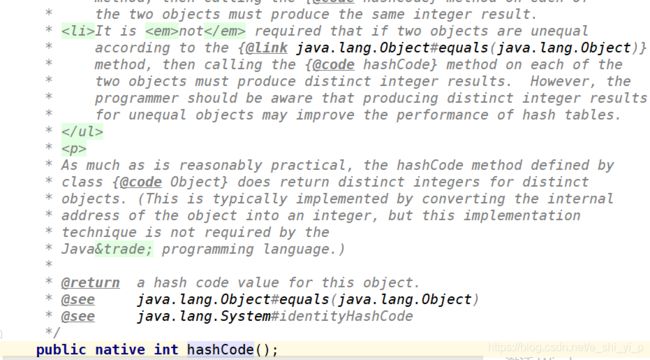
JDK API中关于Object类的equals和hashCode方法中扯了这么多
总结起来就是两句话:equals相等的两个对象的hashCode也一定相等,但hashCode相等的两个对象不一定equals相等。
为啥要重写,原因一、官方建议
接着我们通过代码证明,为啥要重写
public class Person {
    private String name;
    private int age;
    private String sex;

    Person(String name,int age,String sex){
        this.name = name;
        this.age = age;
        this.sex = sex;
    }
    @Override
    public boolean equals(Object obj)
    {
        if(obj instanceof Person){
            Person person = (Person)obj;
            return name.equals(person.name);
        }
        return super.equals(obj);
    }
    @Override
    public int hashCode()
    {
        return name.hashCode();
    }

    public static void test(){
        HashMap<Person, Integer> map = new HashMap<Person, Integer>();

        Person p = new Person("jack",22,"男");
        Person p1 = new Person("jack",22,"男");

        System.out.println("p的hashCode:"+p.hashCode());
        System.out.println("p1的hashCode:"+p1.hashCode());
        System.out.println(p.equals(p1));
        System.out.println(p == p1);

        map.put(p,888);
        map.put(p1,888);
        map.forEach((key,val)->{
            System.out.println(key);
            System.out.println(val);
        });
    }

    public static void main(String[] args) {
        test();
    }
}
// 不重写hashcode运行结果:
p的hashCode:1205044462
p1的hashCode:761960786
true
false
com.gz.springboot_simple.Person@2d6a9952
888
com.gz.springboot_simple.Person@47d384ee
888
// 重写hashcode运行结果:
p的hashCode:3254239
p1的hashCode:3254239
true
false
com.gz.springboot_simple.Person@31a7df
888
分析发现:
1、不重写hashcode,map存2个对象、重写了存1个对象
2、我们重写equal 就是为了满足name相同,两个对象就是相同。很显然不重写hashcode出现了错误的预期
3、当我们用于存放在Hash相关的集合类中时,在重写equals时,需要重写hashCode,不然会出现与预期不符的结果
4、不重写取的都是object的hashcode,存在数组不同位置–会出现2个对象
为啥hash集合类就的重写hashcode,这得益于存储的数据结构—hash表
一个最简单的hash结构-
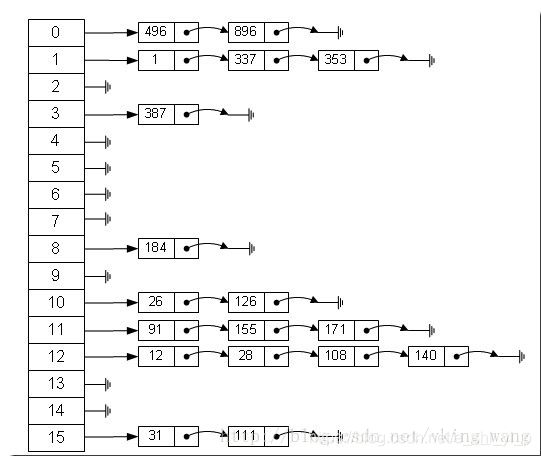
从上图我们可以发现哈希表是由数组+链表组成的,一个长度为16的数组中,每个元素存储的是一个链表的头结点。那么这些元素是按照什么样的规则存储到数组中呢。一般情况是通过hash(key)%len获得,也就是元素的key的哈希值对数组长度取模得到。比如上述哈希表中,12%16=12,28%16=12,108%16=12,140%16=12。所以12、28、108以及140都存储在数组下标为12的位置。
public V put(K key, V value) {
	return putVal(hash(key), key, value, false, true);
}

final V putVal(int hash, K key, V value, boolean onlyIfAbsent, boolean evict) {
	Node<K, V>[] tab;
	Node<K, V> p;
	int n, i;
	if ((tab = table) == null || (n = tab.length) == 0)
		n = (tab = resize()).length; // 当数组table为null时, 调用resize生成数组table, 并令tab指向数组table
	if ((p = tab[i = (n - 1) & hash]) == null) // 如果新存放的hash值没有冲突
		tab[i] = newNode(hash, key, value, null); // 则只需要生成新的Node节点并存放到table数组中即可
	else { // 否则就是产生了hash冲突
		Node<K, V> e;
		K k;
		if (p.hash == hash && ((k = p.key) == key || (key != null && key.equals(k))))
			e = p; // 如果hash值相等且key值相等, 则令e指向冲突的头节点
		else if (p instanceof TreeNode) // 如果头节点的key值与新插入的key值不等, 并且头结点是TreeNode类型,说明该hash值冲突是采用红黑树进行处理.
			e = ((TreeNode<K, V>) p).putTreeVal(this, tab, hash, key, value); // 向红黑树中插入新的Node节点
		else { // 否则就是采用链表处理hash值冲突
			for (int binCount = 0;; ++binCount) { // 遍历冲突链表, binCount记录hash值冲突链表中节点个数
				if ((e = p.next) == null) { // 当遍历到冲突链表的尾部时
					p.next = newNode(hash, key, value, null); // 生成新节点添加到链表末尾
					if (binCount >= TREEIFY_THRESHOLD - 1) // 如果binCount即冲突节点的个数大于等于 (TREEIFY_THRESHOLD(=8) - 1),便将冲突链表改为红黑树结构, 对冲突进行管理,
															// 否则不需要改为红黑树结构
						treeifyBin(tab, hash);
					break;
				}
				if (e.hash == hash && ((k = e.key) == key || (key != null && key.equals(k)))) // 如果在冲突链表中找到相同key值的节点, 则直接用新的value覆盖原来的value值即可
					break;
				p = e;
			}
		}
		if (e != null) { // 说明原来已经存在相同key的键值对
			V oldValue = e.value;
			if (!onlyIfAbsent || oldValue == null) // onlyIfAbsent为true表示仅当<key,value>不存在时进行插入, 为false表示强制覆盖;
				e.value = value;
			afterNodeAccess(e);
			return oldValue;
		}
	}
	++modCount; // 修改次数自增
	if (++size > threshold) // 当键值对数量size达到临界值threhold后, 需要进行扩容操作.
		resize();
	afterNodeInsertion(evict);
	return null;
}
分析可得:
1、hash表其实是一个数组,transient Node
2、数据结构中有数组和链表来实现对数据的存储,但数组存储区间是连续的,占用内存严重,故空间复杂的很大。但数组的二分查找时间复杂度小,为O(1);数组的特点是:寻址容易,插入和删除困难。
链表存储区间离散,占用内存比较宽松,故空间复杂度很小,但时间复杂度很大,达O(N)。链表的特点是:寻址困难,插入和删除容易。
3、哈希–综合两者的特性。如上图所示:
4、i = (n - 1) & hash 发现 hash & 位运算后,i 确定了数组下标
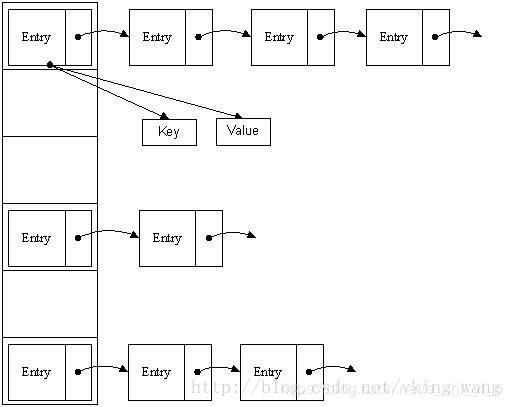
哈希表有多种不同的实现方法,最常用的一种方法—— 拉链法,我们可以理解为“链表的数组”
三、String,StringBuffer与StringBuilder
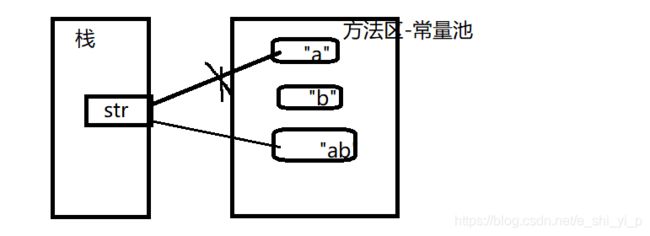
分析:
1、string—为final,是不可变对象,每次对String类型进行操作都等同于产生了一个新的String对象,然后指向新的String对象。所以尽量不在对String进行大量的拼接操作,否则会产生很多临时对象,导致GC开始工作,影响系统性能。
// StringBuffer
@Override
    public synchronized StringBuffer append(String str) {
        toStringCache = null;
        super.append(str);
        return this;
    }

// StringBuilder
	@Override
    public StringBuilder append(String str) {
        super.append(str);
        return this;
    }

	public AbstractStringBuilder append(String str) {
        if (str == null)
            return appendNull();
        int len = str.length();
        //增加容量-
        ensureCapacityInternal(count + len);
        //修改内容
        str.getChars(0, len, value, count);
        count += len;
        return this;
    }
	// char[] value;
	void expandCapacity(int minimumCapacity) {
        int newCapacity = value.length * 2 + 2;
        if (newCapacity - minimumCapacity < 0)
            newCapacity = minimumCapacity;
        if (newCapacity < 0) {
            if (minimumCapacity < 0) // overflow
                throw new OutOfMemoryError();
            newCapacity = Integer.MAX_VALUE;
        }
        value = Arrays.copyOf(value, newCapacity);
    }
分析
1、StringBuffer是对对象本身操作,而不是产生新的对象,因此在有大量拼接的情况下,2、StringBuffer是线程安全的可变字符串,其内部实现是可变数组。StringBuilder是jdk 1.5新增的,其功能和StringBuffer类似,但是非线程安全。因此,在没有多线程问题的前提下,使用StringBuilder会取得更好的性能。
四、throw、Exception,throws
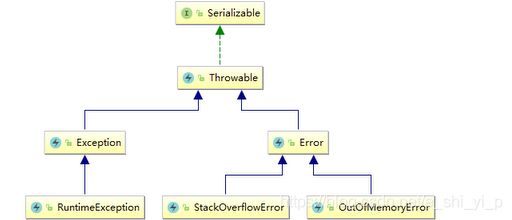
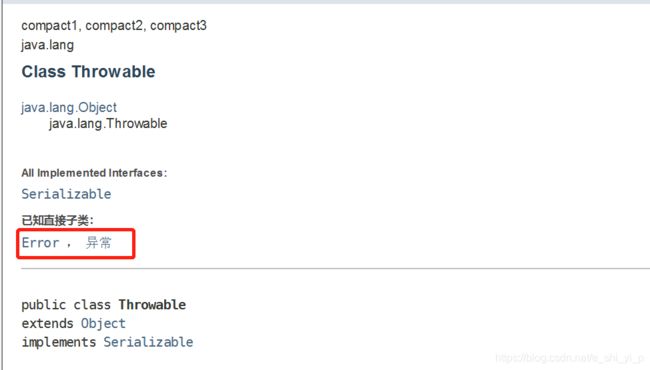
针对error-
1、StackOverflowError
 public static void main(String[] args) {
        test();
    }
    public static void test(){
        test();
    }
   // 运行结果:
   Exception in thread "main" java.lang.StackOverflowError
   分析:jvm 默认 -XX:ThreadStackSize=1024k 方法递归反复出入栈导致
2、OutOfMemoryError
设置jvm  -Xms10m -Xmx10m -XX:+PrintGCDetails
	public static void main(String[] args) {
        byte[] bytes=new byte[50*1024*1024];
    }
    //运行结果:
    Exception in thread "main" java.lang.OutOfMemoryError: Java heap space
    [GC (Allocation Failure) [PSYoungGen: 2048K->498K(2560K)] 2048K->1039K(9728K), 0.0401426 secs] [Times: user=0.00 sys=0.00, real=0.05 secs]
[GC (Allocation Failure) [PSYoungGen: 2546K->498K(2560K)] 3087K->1556K(9728K), 0.0011030 secs] [Times: user=0.00 sys=0.00, real=0.00 secs]
[GC (Allocation Failure) [PSYoungGen: 1582K->506K(2560K)] 2640K->1740K(9728K), 0.0009234 secs] [Times: user=0.03 sys=0.00, real=0.00 secs]
[GC (Allocation Failure) [PSYoungGen: 506K->474K(2560K)] 1740K->1708K(9728K), 0.0007213 secs] [Times: user=0.00 sys=0.00, real=0.00 secs]
[Full GC (Allocation Failure) [PSYoungGen: 474K->0K(2560K)] [ParOldGen: 1234K->1495K(7168K)] 1708K->1495K(9728K), [Metaspace: 3251K->3251K(1056768K)], 0.0113977 secs] [Times: user=0.00 sys=0.00, real=0.01 secs]
[GC (Allocation Failure) [PSYoungGen: 0K->0K(2560K)] 1495K->1495K(9728K), 0.0006521 secs] [Times: user=0.00 sys=0.00, real=0.00 secs]
[Full GC (Allocation Failure) [PSYoungGen: 0K->0K(2560K)] [ParOldGen: 1495K->1469K(7168K)] 1495K->1469K(9728K), [Metaspace: 3251K->3251K(1056768K)], 0.0106635 secs] [Times: user=0.01 sys=0.00, real=0.01 secs]
throw用于主动抛出java.lang.Throwable 类的一个实例化对象,意思是说你可以通过关键字 throw 抛出一个 Error 或者 一个Exception,如:throw new IllegalArgumentException(“size must be multiple of 2″),
而throws 的作用是作为方法声明和签名的一部分,方法被抛出相应的异常以便调用者能处理。Java 中,任何未处理的受检查异常强制在 throws 子句中声明。
static void a() throws HighLevelException {
         try {
             b();
         } catch(MidLevelException e) {
             throw new HighLevelException(e);
         }
     }
五、拦截器 HandlerInterceptor, springboot集成-
HandlerExceptionResolver
@Slf4j
@Configuration
public class HandlerConfig extends WebMvcConfigurerAdapter  {
    @Resource
    private AuthSignInterceptor authSignInterceptor;
    @Override
    public void addInterceptors(InterceptorRegistry registry) {
        log.info("初始化拦截器 ok....");
        //自定义拦截器,添加拦截路径和排除拦截路径
        registry.addInterceptor(authSignInterceptor).addPathPatterns("/**").excludePathPatterns("api/login"); ;
    }
}

@Slf4j
@Component
public class AuthSignInterceptor implements HandlerInterceptor {
    @Override
    public boolean preHandle(HttpServletRequest request, HttpServletResponse response, Object o) throws Exception {
        log.info("进入 controller 之前,我来过。。。");
        log.info("请求地址:"+request.getRequestURI());
        // 1、重复提交 2、toekn过期校验 3、签名校验
        //preHandle() 方法:该方法会在控制器方法前执行,其返回值表示是否中断后操作。当其返回值为true时,表示继续向下执行;当其返回值为false时,会中断后续的所有操作(包括调用下一个拦截器和控制器类中的方法执行等)。
        return true;
    }

    @Override
    public void postHandle(HttpServletRequest httpServletRequest, HttpServletResponse httpServletResponse, Object o, ModelAndView modelAndView) throws Exception {
        log.info("走过了 controller view渲染之前,我来了");
        // postHandle()方法:该方法会在控制器方法调用之后,且解析视图之前执行。可以通过此方法对请求域中的模型和视图做出进一步的修改。
    }

    @Override
    public void afterCompletion(HttpServletRequest httpServletRequest, HttpServletResponse httpServletResponse, Object o, Exception e) throws Exception {
        log.info("view渲染之后,我去了");
        // afterCompletion()方法:该方法会在整个请求完成,即视图渲染结束之后执行。可以通过此方法实现一些资源清理、记录日志信息等工作。
    }
}
六、事务使用-transactionManager
<?xml version="1.0" encoding="UTF-8"?>
	<beans xmlns="http://www.springframework.org/schema/beans"
	xmlns:xsi="http://www.w3.org/2001/XMLSchema-instance" xmlns:p="http://www.springframework.org/schema/p"
	xmlns:aop="http://www.springframework.org/schema/aop" xmlns:tx="http://www.springframework.org/schema/tx"
	xsi:schemaLocation="http://www.springframework.org/schema/beans
	                    http://www.springframework.org/schema/beans/spring-beans-3.2.xsd
	                    http://www.springframework.org/schema/aop
                        http://www.springframework.org/schema/aop/spring-aop-3.2.xsd
                        http://www.springframework.org/schema/tx
                        http://www.springframework.org/schema/tx/spring-tx-3.2.xsd">

	<!-- Mybatis配置信息 分页拦截器 -->
	<bean id="sqlSessionFactory" class="org.mybatis.spring.SqlSessionFactoryBean">
	    <!--configLocation属性指定mybatis的核心配置文件-->
		<property name="dataSource" ref="mysqlDataSource" />
		<property name="configLocation" value="classpath:config/MyBatisConfiguration.xml" />
	</bean>

	<!-- 扫描basePackage下所有以@MyBatisRepository标识的 接口   创建MapperFactoryBean对象-->
	<bean class="org.mybatis.spring.mapper.MapperScannerConfigurer">
		<property name="basePackage" value="com" />
		<property name="annotationClass" value="com.common.service.annotation.MyBatisRepository"/>
		<property name="sqlSessionFactoryBeanName" value="sqlSessionFactory" />
	</bean>

	 <!-- 事务配置   spring管理mybatis的事务 -->
	 <bean name="transactionManager" class="org.springframework.jdbc.datasource.DataSourceTransactionManager">
          <property name="dataSource" ref="mysqlDataSource"></property>
    </bean>

	<!-- 配置事务切面Bean,指定事务管理器 -->
	<tx:advice id="txAdvice" transaction-manager="transactionManager">
		<!-- 用于配置详细的事务语义 -->
		<tx:attributes>
			<!-- 所有以'save','del','update','add'开头的方法是write的 -->
			<tx:method name="save*" propagation="REQUIRED" rollback-for="Exception" />
			<tx:method name="del*" propagation="REQUIRED" rollback-for="Exception" />
			<tx:method name="update*" propagation="REQUIRED" rollback-for="Exception" />
			<tx:method name="add*" propagation="REQUIRED" rollback-for="Exception" />
			<!-- 所有以'get','find','search','query'开头的方法是read-only的 -->
			<tx:method name="find*" propagation="SUPPORTS" />
			<tx:method name="get*" propagation="SUPPORTS" />
			<tx:method name="search*" propagation="SUPPORTS" />
			<tx:method name="query*" propagation="SUPPORTS" />
			<!-- 其他方法使用默认的事务设置 -->
			<tx:method name="*" />
			<!-- <tx:method name="*" propagation="REQUIRED" read-only="true"/> -->
		</tx:attributes>
	</tx:advice>

	<aop:config>
		<aop:pointcut id="serviceMethod"
			expression="(execution(* com.manage.web.service..*.*(..))) or (execution(* com.common.service..*.*(..)))" />
		<!-- 指定在serviceMethod切入点应用txAdvice事务切面 -->
		<aop:advisor pointcut-ref="serviceMethod" advice-ref="txAdvice" />
	</aop:config>


	<!-- 强制使用CGLIB代理 默认false为JDK动态代理-->
	<aop:aspectj-autoproxy />
</beans>

	//自定义注解
	@Retention(RetentionPolicy.RUNTIME)
	@Target({ElementType.TYPE})
	public @interface MyBatisRepository {}
分析:使用 @Service 、@MyBatisRepository 注解即可
<bean id="dataSource" class="org.apache.commons.dbcp.BasicDataSource"
        destroy-method="close">
        <property name="driverClassName" value="${driver}" />
        <property name="url" value="${url}" />
        <property name="username" value="${username}" />
        <property name="password" value="${password}" />
        <!-- 初始化连接大小 -->
        <property name="initialSize" value="${initialSize}"></property>
        <!-- 连接池最大数量 -->
        <property name="maxActive" value="${maxActive}"></property>
        <!-- 连接池最大空闲 -->
        <property name="maxIdle" value="${maxIdle}"></property>
        <!-- 连接池最小空闲 -->
        <property name="minIdle" value="${minIdle}"></property>
        <!-- 获取连接最大等待时间 -->
        <property name="maxWait" value="${maxWait}"></property>
        <property name="timeBetweenEvictionRunsMillis" value="60000" />
        <property name="numTestsPerEvictionRun" value="10" />
        <property name="minEvictableIdleTimeMillis" value="120000" />
    </bean>

    <!-- MyBatis -->
    <bean id="sqlSessionFactory" class="org.mybatis.spring.SqlSessionFactoryBean">
        <property name="dataSource" ref="dataSource" />
        <!-- 自动扫描mapping.xml文件 -->
        <property name="mapperLocations" value="classpath:**/*Mapper.xml" />
        <property name="configLocation" value="classpath:mybatis-config.xml"></property>
        <property name="plugins">
            <array>
                <bean class="com.github.pagehelper.PageInterceptor">
                    <property name="properties">
                        <value>
                            helperDialect=mysql
                        </value>
                    </property>
                </bean>
            </array>
        </property>
    </bean>


    <!-- DAO接口所在包名,Spring会自动查找其下的类 -->
    <bean class="org.mybatis.spring.mapper.MapperScannerConfigurer">
        <property name="basePackage" value="com.fsp.dao" />
        <property name="sqlSessionFactoryBeanName" value="sqlSessionFactory"></property>
    </bean>


    <!-- (事务管理)transaction manager, use JtaTransactionManager for global tx -->
    <bean id="transactionManager"
        class="org.springframework.jdbc.datasource.DataSourceTransactionManager">
        <property name="dataSource" ref="dataSource" />
    </bean>
    <tx:annotation-driven />


 mybatis插件配置:
	<?xml version="1.0" encoding="UTF-8"?>
	<!DOCTYPE configuration
    PUBLIC "-//mybatis.org//DTD Config 3.0//EN"
    "http://mybatis.org/dtd/mybatis-3-config.dtd">
	<configuration>
		<settings>
			<!--<setting name="logImpl" value="LOG4J" />-->
			<setting name="callSettersOnNulls" value="true"/>
		</settings>
		<typeAliases>
			<typeAlias alias="sqlScript" type="com.fsp.vo.Sql"/>
		</typeAliases>
		<plugins>
			<plugin interceptor="cn.com.common.sdk.interceptor.SdkInterceptor"/>
		</plugins>
	</configuration>
分析: 使用:
@Service
@Transactional