LVM卷扩容
1.简介
LVM是Logical Volume Manager(逻辑卷管理)的缩写,是Linux环境下对磁盘分区进行管理的一种机制。
LVM逻辑卷三种状态:
- PV: Physical Volume 物理卷
- VG: Volume Group 卷组
- LV: Logical Volume 逻辑卷
创建顺序:
文章目录
- 1.简介
- 2.问题介绍
- 3.扩展逻辑卷所在分区空间的方法
- 3.1 新建磁盘分区添加到PV中
- 3.1.1 未扩展前PV状态以及文件系统状态
- 3.1.2 新建分区
- 3.1.3 对新分区创建PV
- 3.1.4 扩展该PV到VG
- 3.1.5 扩展LV
- 3.2 通过扩展物理分区来扩展LVM卷
- 3.2.1 未扩展前PV状态以及文件系统状态
- 3.2.2 卸载目录,并扩展分区大小
- 3.2.3 扩展PV
- 4. 总结
- 5. 欢迎交流关注,谢谢
2.问题介绍
通过df查看,/home所在目录空间即将用尽,

而且通过lsblk查看磁盘空间,发现可以分配给此LVM卷的空间只剩余100G。如何增加此逻辑卷的容量呢?

此时,可以选择直接扩展磁盘剩余的100G空间给该逻辑卷,本为未对此做介绍,但是已经包含了执行方法,本文介绍是整个该逻辑卷所在的磁盘分区空间用尽时,如何增加逻辑卷的空间。
3.扩展逻辑卷所在分区空间的方法
两种方法:
- 既然逻辑卷所在的分区空间用尽,那么通过新建一个磁盘分区,在该磁盘创建PV,添加到逻辑磁盘所在的VG中,即可以实现逻辑卷的
free PE扩展 - 通过先卸载此逻辑卷的挂载,通过磁盘管理工具修改该逻辑卷所在分区的大小,然后通过PV扩展添加到逻辑卷中。
3.1 新建磁盘分区添加到PV中
3.1.1 未扩展前PV状态以及文件系统状态
PV状态
文件系统状态
3.1.2 新建分区
可以通过fdisk,parted,gpart等工具新建磁盘分区,本文通过fdisk新建分区
[root@localhost 7:0:0:0]# fdisk /dev/sdb
WARNING: fdisk GPT support is currently new, and therefore in an experimental phase. Use at your own discretion.
Welcome to fdisk (util-linux 2.23.2).Changes will remain in memory only, until you decide to write them.
Be careful before using the write command.Command (m for help): p
Disk /dev/sdb: 40002.3 GB, 40002251653120 bytes, 78129397760 sectors
Units = sectors of 1 * 512 = 512 bytes
Sector size (logical/physical): 512 bytes / 4096 bytes
I/O size (minimum/optimal): 4096 bytes / 4096 bytes
Disk label type: gpt
Disk identifier: C15EE16D-E5C8-41A4-8CC2-F4702CF772F3# Start End Size Type Name
1 2048 1048578047 500G Linux LVM#新建分区,此处我将磁盘剩余容量都分配给新分区
Command (m for help): n
Partition number (2-128, default 2):
First sector (34-78129397726, default 1048578048):
Last sector, +sectors or +size{K,M,G,T,P} (1048578048-78129397726, default 78129397726):
Created partition 2Command (m for help): p
#查看分区创建成功
Disk /dev/sdb: 40002.3 GB, 40002251653120 bytes, 78129397760 sectors
Units = sectors of 1 * 512 = 512 bytes
Sector size (logical/physical): 512 bytes / 4096 bytes
I/O size (minimum/optimal): 4096 bytes / 4096 bytes
Disk label type: gpt
Disk identifier: C15EE16D-E5C8-41A4-8CC2-F4702CF772F3# Start End Size Type Name
1 2048 1048578047 500G Linux LVM
2 1048578048 78129397726 35.9T Linux filesyste>
#设定分区类型为Linux LVM,编号为31
Command (m for help): t
Partition number (1,2, default 2):
Partition type (type L to list all types): 31
Changed type of partition ‘Linux filesystem’ to ‘Linux LVM’Command (m for help): p
#查看分区类型
Disk /dev/sdb: 40002.3 GB, 40002251653120 bytes, 78129397760 sectors
Units = sectors of 1 * 512 = 512 bytes
Sector size (logical/physical): 512 bytes / 4096 bytes
I/O size (minimum/optimal): 4096 bytes / 4096 bytes
Disk label type: gpt
Disk identifier: C15EE16D-E5C8-41A4-8CC2-F4702CF772F3# Start End Size Type Name
1 2048 1048578047 500G Linux LVM
2 1048578048 78129397726 35.9T Linux LVM
#写入分区表,并退出
Command (m for help): w
The partition table has been altered!Calling ioctl() to re-read partition table.
WARNING: Re-reading the partition table failed with error 16: Device or resource busy.
The kernel still uses the old table. The new table will be used at
the next reboot or after you run partprobe(8) or kpartx(8)
Syncing disks.
#根据提示执行partprobe,实现分区同步
[root@localhost 7:0:0:0]# partprobe
3.1.3 对新分区创建PV
pvcreate /dev/sdb2 对新分区创建PV
[外链图片转存失败,源站可能有防盗链机制,建议将图片保存下来直接上传(img-g8g1RNWu-1585218480450)(https://i.loli.net/2020/03/26/8mIHJxinZWztKDL.png)]
3.1.4 扩展该PV到VG
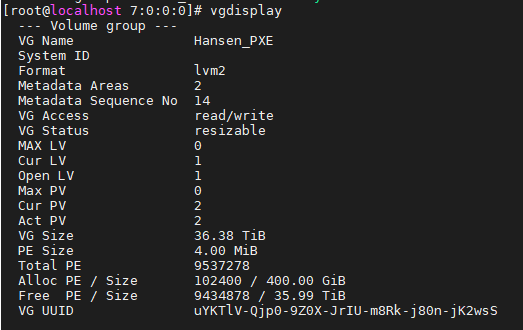
扩展后查看VG
3.1.5 扩展LV
这里选择扩展1TB容量到LV, 注意命令中的参数-r可以直接resizefs,如果不加此参数,文件系统看到的卷大小还是原来的大小,需要额外使用resize2fs或者xfs_growfs来调整文件系统大小。
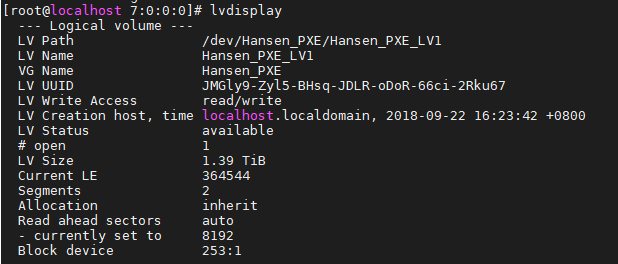
扩展后查看LV
此时执行partprobe同步文件系统,df查看,可以看到该LVM卷已经扩展
[外链图片转存失败,源站可能有防盗链机制,建议将图片保存下来直接上传(img-MlJdKzwM-1585218480465)(https://i.loli.net/2020/03/26/t3R2gOayP8JbKNx.png)]
3.2 通过扩展物理分区来扩展LVM卷
此方法只适用于物理分区为最后一个,如下图中分区3,分区1和分区2无法扩展容量,除非压缩其他分区大小,可能会造成文件丢失,且磁盘有足够剩余空间。
3.2.1 未扩展前PV状态以及文件系统状态
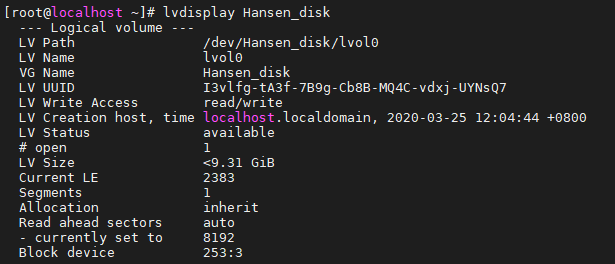
LV状态如下
文件系统状态
**磁盘状态
3.2.2 卸载目录,并扩展分区大小
扩展分区大小前,需要先卸载挂载的逻辑卷,使用parted工具扩展分区大小。但是fdisk工具没有直接扩展分区的功能,需要先删除分区,然后新建分区,新建分区的开始位置必须和原来一样,结束位置大于原分区位置,这个操作有风险,可能会丢失数据。
以下以fdisk实例删除分区后重新创建分区。
#先卸载目录
[root@localhost ~]# umount /mnt/
[root@localhost ~]# fdisk /dev/sdb
WARNING: fdisk GPT support is currently new, and therefore in an experimental phase. Use at your own discretion.
Welcome to fdisk (util-linux 2.23.2).Changes will remain in memory only, until you decide to write them.
Be careful before using the write command.#删除原分区
Command (m for help): d
Selected partition 1
Partition 1 is deleted
#新建分区,开始位置必须和原来一样的。
Command (m for help): n
Partition number (1-128, default 1):
First sector (2048-3750748814, default 2048):
Last sector, +sectors or +size{K,M,G,T,P} (2048-3750748814, default 3750748814): +20G
Created partition 1Command (m for help): p
Disk /dev/sdb: 1920.4 GB, 1920383410176 bytes, 3750748848 sectors
Units = sectors of 1 * 512 = 512 bytes
Sector size (logical/physical): 512 bytes / 4096 bytes
I/O size (minimum/optimal): 4096 bytes / 4096 bytes
Disk label type: gpt
Disk identifier: 6290401B-C5C6-45C1-8286-50684ED971F8# Start End Size Type Name
1 2048 41945087 20G Linux filesyste
#设定分区类型为LVM
Command (m for help): t
Selected partition 1
Partition type (type L to list all types): 31
Changed type of partition ‘Linux filesystem’ to ‘Linux LVM’Command (m for help): p
Disk /dev/sdb: 1920.4 GB, 1920383410176 bytes, 3750748848 sectors
Units = sectors of 1 * 512 = 512 bytes
Sector size (logical/physical): 512 bytes / 4096 bytes
I/O size (minimum/optimal): 4096 bytes / 4096 bytes
Disk label type: gpt
Disk identifier: 6290401B-C5C6-45C1-8286-50684ED971F8# Start End Size Type Name
1 2048 41945087 20G Linux LVMCommand (m for help): w
The partition table has been altered!Calling ioctl() to re-read partition table.
WARNING: Re-reading the partition table failed with error 16: Device or resource busy.
The kernel still uses the old table. The new table will be used at
the next reboot or after you run partprobe(8) or kpartx(8)
Syncing disks.
#此时如下图,分区大小还没有变,需要执行partprobe同步分区表
[root@localhost ~]# lsblk
NAME MAJ:MIN RM SIZE RO TYPE MOUNTPOINT
sdb 8:16 0 1.8T 0 disk
└─sdb1 8:17 0 9.3G 0 part
└─Hansen_disk-lvol0 253:3 0 9.3G 0 lvm
#再次查看,分区已经扩展
[root@localhost ~]# partprobe
[root@localhost ~]# lsblk /dev/sdb
NAME MAJ:MIN RM SIZE RO TYPE MOUNTPOINT
sdb 8:16 0 1.8T 0 disk
└─sdb1 8:17 0 20G 0 part
└─Hansen_disk-lvol0 253:3 0 9.3G 0 lvm
3.2.3 扩展PV
使用pvresize命令扩展PV
[root@localhost ~]# pvresize /dev/sdb1
Physical volume “/dev/sdb1” changed
1 physical volume(s) resized or updated / 0 physical volume(s) not resized
然后查看PV
[root@localhost ~]# pvdisplay /dev/sdb1
— Physical volume —
PV Name /dev/sdb1
VG Name Hansen_disk
PV Size <20.00 GiB / not usable 3.00 MiB
Allocatable yes
PE Size 4.00 MiB
Total PE 5119
Free PE 2736
Allocated PE 2383
PV UUID hxwwoL-uHu1-nxII-B5rr-780P-4ODl-A18afG
可以看到PV已经扩展了,剩余的工作和上文类似,扩展VG,然后扩展LV卷即可,请参考上一个方法。此方法使用lvextend扩展的时候需要注意扩展大小,应为分区表不对应,需要比Free PE少一点才能扩展成功
[root@localhost ~]# lvextend -L +704M -r /dev/Hansen_disk/lvol0
…
Logical volume Hansen_disk/lvol0 successfully resized.
meta-data=/dev/mapper/Hansen_disk-lvol0 isize=512 agcount=10, agsize=262144 blks
= sectsz=4096 attr=2, projid32bit=1
= crc=1 finobt=0 spinodes=0
data = bsize=4096 blocks=2440192, imaxpct=25
= sunit=0 swidth=0 blks
naming =version 2 bsize=4096 ascii-ci=0 ftype=1
log =internal bsize=4096 blocks=2560, version=2
= sectsz=4096 sunit=1 blks, lazy-count=1
realtime =none extsz=4096 blocks=0, rtextents=0
data blocks changed from 2440192 to 5061632
[root@localhost ~]# lvdisplay Hansen_disk
— Logical volume —
LV Path /dev/Hansen_disk/lvol0
LV Name lvol0
VG Name Hansen_disk
LV UUID I3vlfg-tA3f-7B9g-Cb8B-MQ4C-vdxj-UYNsQ7
LV Write Access read/write
LV Creation host, time localhost.localdomain, 2020-03-25 12:04:44 +0800
LV Status available
# open 0
LV Size <20.00 GiB
Current LE 5119
Segments 1
Allocation inherit
Read ahead sectors auto
- currently set to 8192
Block device 253:3
4. 总结
在分区空间不足,分区所在硬盘空间充足的情况下,可以看到以上两种方法都可以实现LVM卷扩容,而且更重要的是保持原分区卷的数据。相对来说两种方法各有利弊。
| 方法 | 优点 | 缺点 |
|---|---|---|
| 方法1 | 通过新建分区扩展LVM卷,不需要卸载愿有分区,数据更加安全 | 磁盘需要有剩余空间新建分区 |
| 方法2 | 通过扩展原物理分区实现扩展LVM卷,不需要新建一个分区,在原有分区上操作即可 | 需要卸载分区,有风险损坏分区数据,扩展分区需要有可扩展空间 |


