spring boot 应用
spring boot 应用
文章目录
- spring boot 应用
- spring boot简介
- spring boot的特点
- spring boot项目搭建
- 环境搭建
- 集成Mybatis
- 事务处理
- 异常处理
- 静态资源
- 模板引擎
- swagger2
- 日志的集成
2018年毕业时用的ssm框架,也是慢慢的2019年下半年开始接触spring boot,spring boot也是那时候开始慢慢兴起,相比SSM框架来说,spring boot更自动化,开发更快捷,项目粒度变小,符合现行业微服务化的趋势。
传统ssm的缺点
- 依赖太多。并且存在版本问题,每次搭建项目,都得重新一个个的依赖添加。
- 配置太多且每次都不一样。大部分工程配置每次都是一样的,创建项目工程就是从一个地方拷贝到另一个地方
- 部署太麻烦。需要部署tomcat,项目结构也需要按照java EE的目录结构来写。
spring boot简介
推出spring boot的初衷就是为了简化spring的配置,使得开发中集成新功能时更快,简化或减少相关的配置
spring boot 使得更加简单的创建一个生产级别的应用程序。spring boot集成spring平台和第三方包,使得我们在开发中避免了许多问题,并大大减少了对应用的配置。
spring boot还能够创建一个只需要java -jar就能运行的应用程序或是传统的war包来进行部署。
spring boot的特点
- 创建独立的spring应用程序
- 嵌入的tomcat,无需部署war文件
- 简化maven配置
- 自动配置spring
- 提供生产就绪型功能,如指标,健康检查和外部配置
- 绝对没有代码生成和对xml没有要求配置
spring boot项目搭建
这里从最初的maven开始一步步搭建spring boot项目,也希望小白能够看得懂。
环境搭建
- maven 3.6.0
- idea 2018.2
- windows 10
- jdk 1.8
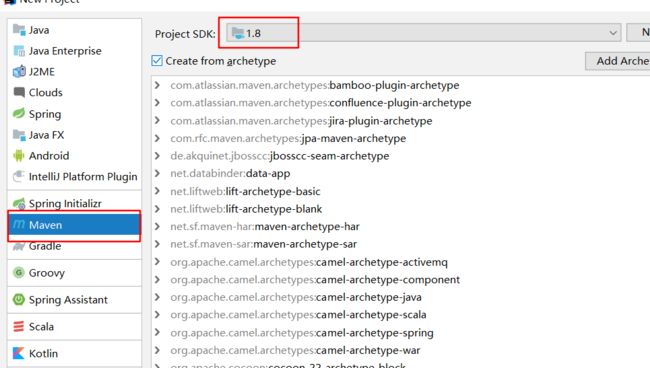
下载安装完以上的环境后,点击idea中的File->New->Project
选择好maven->jdk版本,点击Next下一步
填写maven项目中的唯一标识GroupId和ArtifacteId,点击Next下一步,最后选择项目路径。
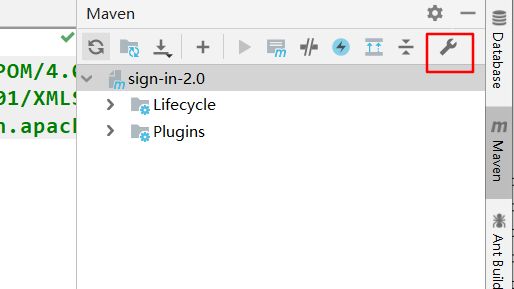
这里需要注意的是,新建的maven项目,idea会默认的配置maven路径,这里需要我们自己指定一下,否则maven导入依赖包的时候会报错。
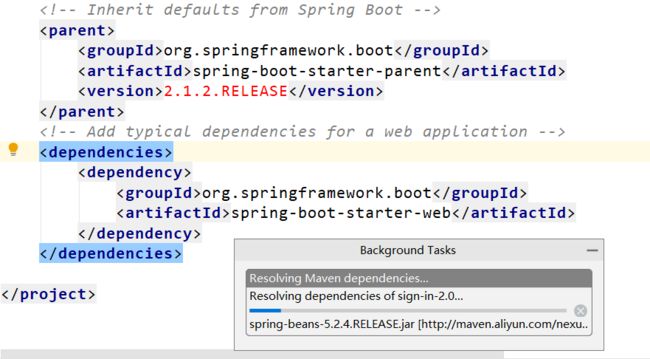
maven项目搭建好后,idea右下角会出现Maven projects need to imported的提示框,这里选择自动导入依赖就好了,Enabl Auto import。
之后,spring boot的一些配置可以在他们的官网文档中能详细的查阅,具体地址在这。本次搭建的spring boot版本是2.1.2,并没有使用官网中的最新版本。
pom.xml中依赖spring boot的jar包
    <parent>
        <groupId>org.springframework.bootgroupId>
        <artifactId>spring-boot-starter-parentartifactId>
        <version>2.1.2.RELEASEversion>
    parent>

    <dependencies>
        <dependency>
            <groupId>org.springframework.bootgroupId>
            <artifactId>spring-boot-starter-webartifactId>
        dependency>
    dependencies>
在导入spring boot的依赖jar包时,我们可以先自行创建好项目的入口类。Maven项目默认编译的目录是src/main/java,所以我们需要先在src/main/java中创建一个文件夹,然后创建入口类
package info.mufeng;

import org.springframework.boot.SpringApplication;
import org.springframework.boot.autoconfigure.EnableAutoConfiguration;

/**
 * SignInApplication
 *
 * @author liurui
 * @Description:
 * @date 2020/3/7
 */
@SpringBootApplication
public class SignInApplication {
    public static void main(String[] args) {
        SpringApplication.run(SignInApplication.class);
    }
}
虽然这个类没有太多的代码,但是这里边已经运行了很多东西。之后这里就能直接的运行,其中spring boot内部已经集成Tomvat,并监听的是8080端口,运行后在浏览器中输入http://localhost:8080/,能看到项目运行成功。
如果有些spring boot 基础的开发者,可以看看spring boot中到底集成了些什么组件,从而更有利于之后spring框架的学习
集成Mybatis
在ssm框架中,需要自行配置mybatis 和mysql,其配置过程繁琐,并且每次新项目创建都会做大量重复的工作,而spring boot就能直接引入依赖,在application.yml文件直接添加配置项,无需过多额外配置。
<dependency>
    <groupId>org.mybatis.spring.bootgroupId>
    <artifactId>mybatis-spring-boot-starterartifactId>
    <version>1.3.2version>
dependency>
<dependency>
    <groupId>mysqlgroupId>
    <artifactId>mysql-connector-javaartifactId>
dependency>

<build>
    <plugins>
        <plugin>
            <groupId>org.mybatis.generatorgroupId>
            <artifactId>mybatis-generator-maven-pluginartifactId>
            <version>1.3.2version>
            <configuration>
                <verbose>trueverbose>
                <overwrite>trueoverwrite>
            configuration>
        plugin>
    plugins>
build>
引入mybatis和mysql的jar包后,需要在项目中进行配置。在resource中添加application.yml或application.properties文件(spring boot或spring cloud推荐使用yml配置格式),并添加数据库的配置项。
spring:
  datasource:
    password: root
    driver-class-name: com.mysql.cj.jdbc.Driver
    username: root
    url: jdbc:mysql://localhost:3306/sign-in?serverTimezone=GMT%2B8

#mybatis
mybatis:
  mapper-locations: classpath:mapping/*.xml
这里需要注意的两点
- 数据库驱动,现在使用的是com.mysql.cj.jdbc.Driver,如果使用com.mysql.jdbc.Driver,在启动项目的时候,会看到过期的提示。
- url必须要指定时区,否者启动项目会报错
之后就是mybatis自动生成实体类、dao和mapper文件。先在mysql数据库中创建库和表,之后在resource中添加generatorConfig.xml文件,用于配置生成代码的规则。
<generatorConfiguration>

    <classPathEntry
            location="C:\Users\tea_e\.IntelliJIdea2018.3\config\jdbc-drivers\MySQL Connector\J\5.1.47\mysql-connector-java-5.1.47.jar"/>
    <context id="DB2Tables" targetRuntime="MyBatis3">
        <commentGenerator>
            <property name="suppressDate" value="true"/>

            <property name="suppressAllComments" value="true"/>
        commentGenerator>

        <jdbcConnection driverClass="com.mysql.jdbc.Driver" connectionURL="jdbc:mysql://localhost:3306/sign-in"
                        userId="root" password="root">
        jdbcConnection>
        <javaTypeResolver>
            <property name="forceBigDecimals" value="false"/>
        javaTypeResolver>

        <javaModelGenerator targetPackage="info.mufeng.model" targetProject="src/main/java">
            <property name="enableSubPackages" value="true"/>
            <property name="trimStrings" value="true"/>
        javaModelGenerator>

        <sqlMapGenerator targetPackage="mapping" targetProject="src/main/resources">
            <property name="enableSubPackages" value="true"/>
        sqlMapGenerator>

        <javaClientGenerator type="XMLMAPPER" targetPackage="info.mufeng.dao" targetProject="src/main/java">
            <property name="enableSubPackages" value="true"/>
        javaClientGenerator>

        <table tableName="user" domainObjectName="User" enableCountByExample="false" enableUpdateByExample="false"
               enableDeleteByExample="false" enableSelectByExample="false" selectByExampleQueryId="false">table>
        <table tableName="sign_in_log" domainObjectName="SignInLog" enableCountByExample="false"
               enableUpdateByExample="false" enableDeleteByExample="false" enableSelectByExample="false"
               selectByExampleQueryId="false">table>
        <table tableName="operation_log" domainObjectName="OperationUser" enableCountByExample="false"
               enableUpdateByExample="false" enableDeleteByExample="false" enableSelectByExample="false"
               selectByExampleQueryId="false">table>
        <table tableName="task" domainObjectName="Task" enableCountByExample="false" enableUpdateByExample="false"
               enableDeleteByExample="false" enableSelectByExample="false" selectByExampleQueryId="false">table>
    context>
generatorConfiguration>
- classPathEntry:连接数据库所需要的jar包
- jdbcConnection:驱动类,数据库账号和密码,连接地址的配置
- targetPackage:生成代码的路径
- table:需要生成代码的表
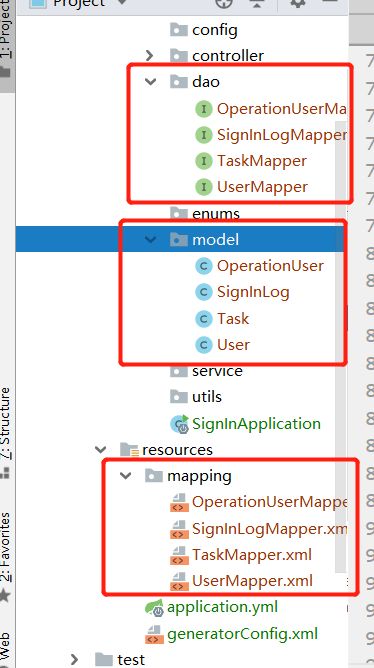
这些生成文件的目录需要提前创建
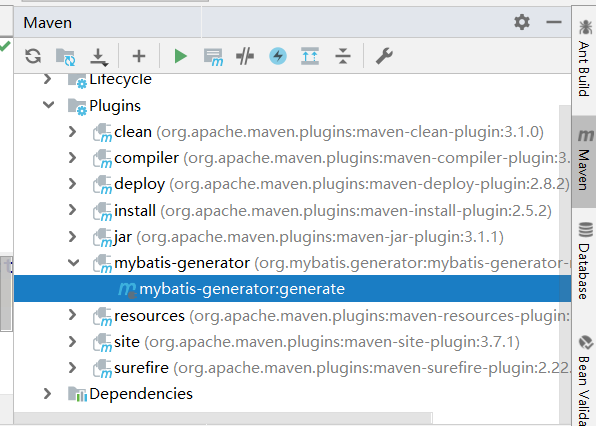
之后点击idea右边Maven中的插件,找到mybatis-generator:generate,双击运行即可。
生成后的文件目录结构
开发过程中经常会需要用到单元测试,spring boot也已经集成了单元测试的组件,只需要在pom.xml中添加依赖,然后在test/java目录中添加测试类 UserMapperTest,java
<dependency>
    <groupId>org.springframework.bootgroupId>
    <artifactId>spring-boot-starter-testartifactId>
dependency>
@SpringBootTest(classes = SignInApplication.class)
@RunWith(SpringRunner.class)
public class UserMapperTest {
    @Resource
    private UserMapper userMapper;

    @Test
    public void testAdd(){
        User user = new User();
        user.setId(1);
        user.setName("liurui");
        user.setEmail("[email protected]");
        userMapper.insert(user);
    }
}
如果测试运行过程中出现 userMapper 不可用,说明Mapper类没有被spring boot扫描到,需要在SignInApplication中添加@MapperScan(“info.mufeng.dao”)的注解或在类上添加 @Mapper。
异常提示:
No qualifying bean of type ‘info.mufeng.dao.UserMapper’ available
到这里基本的spring boot就已经搭建完成,并能够在这基础上进行开发,接下来是对项目的完善,添加事务、日志和接口管理等三方组件。这里简单的说明一下配置,如果感兴趣可以自行百度研究。
事务处理
可以在需要事务的方法上添加@Transactional注解就好了
异常处理
在项目中开发,难免会出现考虑不周全导致程序包运行时异常,这些异常会抛出到前端显示,给人一种不友好的展示,这里可以通过统一异常捕获并处理传到前端页面。首先添加全局异常捕获工具类
/**
 * GlobalExceptionHandler
 *
 * @author liurui
 * @Description: 全局异常处理
 * @date 2020/3/7
 */
@ControllerAdvice
public class GlobalExceptionHandler {

    @ExceptionHandler(value = RuntimeException.class)
    @ResponseBody
    public Object defaultErrorHandler(HttpServletRequest request,
                                      Exception e) {
        e.printStackTrace();
        return "我是个异常类";
    }

        // http 异常 状态码 处理
    @Bean
    public WebServerFactoryCustomizer<ConfigurableWebServerFactory> webServerFactoryWebServerFactoryCustomizer() {
        return (factory -> {
            ErrorPage error404Page = new ErrorPage(HttpStatus.NOT_FOUND, "/404.do");
            factory.addErrorPages(error404Page);
        });
    }
}
可以根据http的状态码,来返回不同的页面。
静态资源
有些应用程序需要存储一些静态资源,例如:图片,文档或压缩包等,这些文件可以放在指定的文件夹,用户可以通过url路径来进行访问,spring boot静态资源默认放在resource/static,resource/public文件夹中。
模板引擎
过去使用的前端页面是jsp,但现在大多数是前后端分离,spring boot对模块引用也有很好的支持,例如:thymeleaf。引入依赖:
<dependency>
    <groupId>org.springframework.bootgroupId>
    <artifactId>spring-boot-starter-thymeleafartifactId>
dependency>
配置application.yml
spring:
  thymeleaf:
    prefix: classpath:/templates/
    suffix: .html
    encoding: UTF-8
    mode: HTML
swagger2
大多数公司对api接口的管理都是使用Excel或word,或者是自行搭建api接口管理平台,例如Yapi,但是对于后端开发者来说,这些文档或平台都需要进行维护和管理,而且还需要即使同步更新,需要耗费大量人力资源。spring boot中就集成了一个组件–swagger2,只需开发者在编写代码的时候多些几行注解,就能完成接口文档中的添加,swagger2还能够进行接口测试,相当于postman的角色,大大提升了开发的效率。pom.xml添加依赖
<dependency>
    <groupId>io.springfoxgroupId>
    <artifactId>springfox-swagger2artifactId>
    <version>2.9.2version>
dependency>
<dependency>
    <groupId>io.springfoxgroupId>
    <artifactId>springfox-swagger-uiartifactId>
    <version>2.8.0version>
dependency>
添加swagger2配置类
package info.mufeng.config;

import io.swagger.annotations.Api;
import org.springframework.context.annotation.Bean;
import org.springframework.context.annotation.Configuration;
import org.springframework.web.servlet.config.annotation.ResourceHandlerRegistry;
import org.springframework.web.servlet.config.annotation.WebMvcConfigurer;
import springfox.documentation.builders.ApiInfoBuilder;
import springfox.documentation.builders.ParameterBuilder;
import springfox.documentation.builders.PathSelectors;
import springfox.documentation.builders.RequestHandlerSelectors;
import springfox.documentation.schema.ModelRef;
import springfox.documentation.service.ApiInfo;
import springfox.documentation.service.Contact;
import springfox.documentation.service.Parameter;
import springfox.documentation.spi.DocumentationType;
import springfox.documentation.spring.web.plugins.Docket;
import springfox.documentation.swagger2.annotations.EnableSwagger2;

import java.util.ArrayList;
import java.util.List;

@Configuration
@EnableSwagger2
public class Swagger2Configuration implements WebMvcConfigurer {

    @Bean
    public Docket createRestApi() {
        // 参数配置
        List<Parameter> pars = new ArrayList<>();
        ParameterBuilder tokenPar = new ParameterBuilder();
        tokenPar.name("Authorization").description("user token")
                .modelRef(new ModelRef("string")).parameterType("header")
                .required(false); //header中的Authorization参数非必填,传空也可以
        pars.add(tokenPar.build());

        return new Docket(DocumentationType.SWAGGER_2)
                .apiInfo(apiInfo())
                .enable(true) // 是否开启
                .select()
                .apis(RequestHandlerSelectors.withClassAnnotation(Api.class))
                .paths(PathSelectors.any())
                .build()
                .globalOperationParameters(pars);// 参数配置
    }

    private ApiInfo apiInfo() {
        Contact contact = new Contact("mufeng", "https://blog.mufeng.info",
                "[email protected]");

        return new ApiInfoBuilder()
                .title("自动打卡接口文档")
                .description("自动打卡相关接口文档")
                .contact(contact)
                .version("1.0")
                .build();
    }

    @Override
    public void addResourceHandlers(ResourceHandlerRegistry registry) {
        registry.addResourceHandler("/**")
                .addResourceLocations("classpath:/static/");
        registry.addResourceHandler("swagger-ui.html")
                .addResourceLocations("classpath:/META-INF/resources/");
        registry.addResourceHandler("/webjars")
                .addResourceLocations("classpath:/META-INF/resources/webjars/");
    }
}
日志的集成
spring boot 已经内置集成lockback,无需maven再引用其他依赖。
简单配置
logging:
  level:
    root: info
    info.mufeng.controller: debug
  file: F:\IdeaProject\sign-in-2.0\logs\sign-in.log
aop日志打印
@Aspect
@Component
public class WebLogAspect {

    private static final Logger logger = LoggerFactory.getLogger(WebLogAspect.class);

    @Pointcut("execution(public * info.mufeng.controller.*.*(..))")
    public void webLog() {
    }

    @Before("webLog()")
    public void doBefore(JoinPoint joinPoint) throws Throwable {
        // 接收到请求,记录请求内容
        ServletRequestAttributes attributes = (ServletRequestAttributes) RequestContextHolder.getRequestAttributes();
        HttpServletRequest request = attributes.getRequest();
        // 记录下请求内容
        logger.info("URL : " + request.getRequestURL().toString());
        logger.info("HTTP_METHOD : " + request.getMethod());
        logger.info("IP : " + request.getRemoteAddr());
        Enumeration<String> enu = request.getParameterNames();
        while (enu.hasMoreElements()) {
            String name = (String) enu.nextElement();
            logger.info("name:{},value:{ }", name, request.getParameter(name));
        }
    }

    @AfterReturning(returning = "ret", pointcut = "webLog()")
    public void doAfterReturning(Object ret) throws Throwable {
        // 处理完请求,返回内容
        logger.info("RESPONSE : " + ret);
    }
}


