参考:
forum.ubuntu.com.cn/viewtopic.php?f=161&t=134333&sid=55794fb361a69f92a1f7656ed77659fd
不修改initrd和kernel image的情况;
) 取出iso内容
do mkdir oldiso
sudo mount ubuntu-14.04-desktop-amd64.iso oldiso -o loop
sudo cp oldiso/ newiso -rp
sudo cp oldiso/.disk newiso/ -rp # 原文缺少这行
sudo umount oldiso
*)解压缩filesystem.squashfs,要花点时间
sudo unsquashfs newiso/casper/filesystem.squashfs
*)解压之后,可以用git记录下改动(未充分测试)
git init .
sudo git add -A
sudo git commit -m "init save"
*)开始定制系统, 需要挂载squashfs-root缺少的目录,比如/proc
所以要求定制的iso版本必须要主机安装的版本一致;
sudo cp /etc/resolv.conf squashfs-root/etc
sudo chroot squashfs-root
mount none /proc -t proc
//可能需要mount devpts, 待测
)删除无用的软件:
apt-get purge libreoffice
......
apt-get clean
autoremove ##删除旧版本包
)安装软件包
*.) 更换源,要用cn源,否则很慢;
exit // 退出chroot模式
sudo cp squashfs-root/etc/apt/sources.list squashfs-root/etc/apt/sources.list_backup
sudo cp /etc/apt/sources.list squashfs-root/etc/apt/sources.list
或者手工编辑:
sudo chroot squashfs-root
sudo cp /etc/apt/sources.list /etc/apt/sources.list_backup
sudo vi /etc/apt/sources.list
.)
sudo chroot squashfs-root //如果刚才推出了
apt-get update
apt-get upgrade //可选
apt-get install vim //换源之后应该可以找到大部分package
apt-get install lightdm-gtk-greeter
apt-get install docky // optional, if u want to change replace Unity
*)修改默认的lightdm greeter
// 背景资料 http://www.freedesktop.org/wiki/Software/LightDM/
vim /usr/share/lightdm/lightdm.conf.d/50-unity-greeter.conf
删除 greeter-session=unity-greeter
添加 greeter-session=lightdm-gtk-greeter //有点dirty,后面再改;
*) 安装cairo-docky
apt-get install cairo-docky
*)[补充]添加单独的启动session,以docky为例;
modify xsession, switch to a empty desktop with docky only.
https://wiki.ubuntu.com/CustomXSession
http://www.cnblogs.com/xiangzi888/archive/2012/03/06/2382803.html
http://www.ubuntuask.com/q/answers-221281-150487.html
Create a new file /usr/share/xsessions/spacecarrier.desktop with:
[Desktop Entry]
Name=spacecarrier
Exec=docky // need check, not sure if should be [Exec=/etc/X11/Xsession]
You should now have a new session option during login, Xsession will load the user's ~/.xsession file
create a new file /usr/share/lightdm/lightdm.conf.d/60-spacecarrier.conf
[SeatDefaults]
user-session=spacecarrier
let docky auto-start, currently in a dirty way:
vim /etc/rc.local
docky ### seems not functional this way, need set in spacecarrier.desktop
*) 让cairo-dock自动启动
http://glx-dock.org/ww_page.php?p=First%20Steps&lang=en#0-Cairo-Dock%202%20with%20OpenGL%20support
这种方法是在~/.config/autostart/下面添加了一个cairo-dock.desktop文件;并不适合制作iso,因为安装之前还没有用户目录存在; 有一个方法就是修改/etc/skel/,这个是新建用户时使用的"骨架"目录.
比如修改.bashrc, 把两个小w都变成大写,默认在shell下面仅显示当前目录,而不是长长的绝对路径:
if [ "$color_prompt " = yes ]; then
PS1 ='${debian_chroot:+($debian_chroot)}[\033[01;32m]\u@\h[\033[00m]:[\033[01;34m]加粗文字\W [\033[00m]\$ '
else
PS1 ='${debian_chroot:+($debian_chroot)}\u@\h:\W \$ '
*)隐藏unity's left dock
在ubuntu 12.04上,可以使用unity-2d-panel + cairo-dock组合出来的gnome session; 但是在14.04上,默认已经不安装unity-2d了。如果让unity top panel 与 cairo-dock共存 同时让左侧的unity dock消失,目前就找到这一个方法;但是在登录的瞬间,会发现left dock还是会出现,然后慢慢缩回去;把autohid animation 改成Fade会稍微改善一点;
http://glx-dock.org/ww_page.php?p=Cairo-Dock%20and%20Unity&lang=en
Remove the left Unity dock/bar
If you want to only use the top panel of Unity and remove the dock on the left, you can not remove it... but you can hide it!
Open ccsm (see the introduction) or Unity Tweak Tool.
Enter the Unity plug-in, set the "Hide launcher" to "Autohide" and the "Reveal trigger" to "Top left corner".
Now go to the 3rd tab ("Experimental") and set the "Launcher reveal edge responsiveness" to the minimum (0.2).
autohide-animation 改成 Slide only
shortcut-overlay 改成false
[可选]show-launcher 里面删除 按键Super
You should probably not be annoyed by the left bar again
但是在terminal下面怎么改呢? 我发现有两个配置文件跟这个有关:
usr/share/glib-2.0/schemas/org.compiz.unityshell.gschema.xml
usr/share/compiz/unityshell.xml
必须编译之后才能生效:
glib-compile-schemas /usr/share/glib-2.0/schemas/
*)
rm /etc/resolv.conf
umount /proc // 如果不卸载,下面的压缩会很慢;
搞定之后,按ctrl+d 退出系统!!!
*)生成安装软件列表
sudo chroot squashfs-root dpkg-query -W --showformat='${Package} ${Version}\n' | sudo tee newiso/casper/filesystem.manifest
sudo cp -v newiso/casper/filesystem.manifest{,-desktop}
*)删除定义不安装的软件
REMOVE='ubiquity casper live-initramfs user-setup discover1 xresprobe os-prober libdebian-installer4'
for i in $REMOVE ; do sudo sed -i "/${i}/d" newiso/casper/filesystem.manifest-desktop; done
*) 重新压缩
sudo mksquashfs squashfs-root newiso/casper/filesystem.squashfs ## if first ttime
sudo mksquashfs squashfs-root newiso/casper/filesystem.squashfs -noappend ## override existing files
*) 编辑diskdefines,这里定义一些版本信息。
vim newiso/README.diskdefines
*) 生成各个文件的md5值.
sudo -s
(cd newiso && find . -type f -print0 | xargs -0 md5sum > md5sum.txt)
exit
*) 重新制作iso
cd newiso
sudo mkisofs -r -V "my ubuntu" -cache-inodes -J -l -b isolinux/isolinux.bin -c isolinux/boot.cat -no-emul-boot -boot-load-size 4 -boot-info-table -o "../myubuntu-1404-livecd-iso" .
cd ../
*) 使用kvm测试
rm MyUbuntu.img // if exist, it will boot from harddisk but not CDROM
qemu-img create -f qcow2 MyUbuntu.img 10G //如果要测试安装,就必须准备一个硬盘
sudo kvm -cdrom myubuntu-1404-livecd-iso -localtime -m 1024 -drive file=MyUbuntu.img //1024是分配的内存
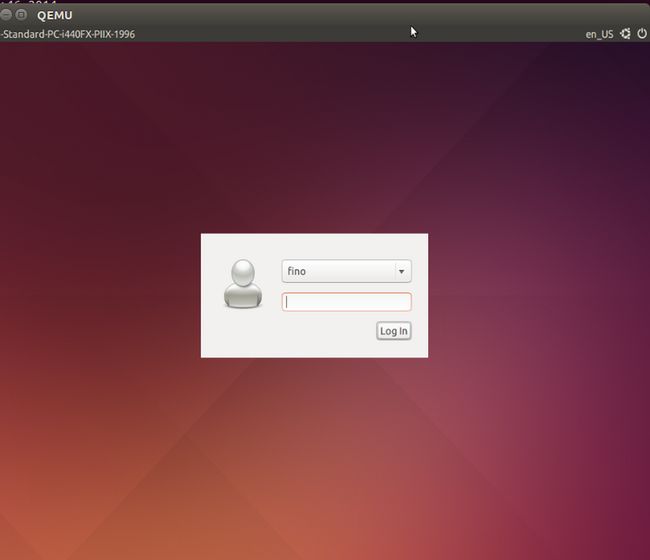
安装之后, 会发现unity-greeter已经被替换成了lightdm-gtk-greeter;
登陆之后,will not lunch Unity, but just a empty desktop, with dokcy.
