Android基础知识整合篇——Service知识点
继续完成连载博客,上次介绍的是Broadcast相关的基础知识,这次为大家带来Service的相关解释和说明。希望博客能给诸位一点小小的帮助!
四大组件——service
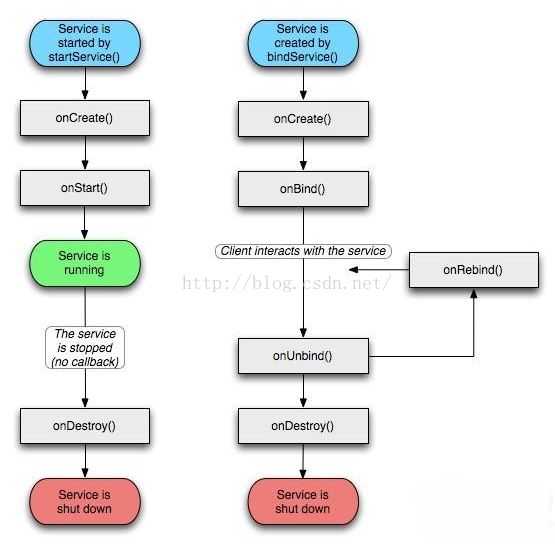
服务:service是安卓中实现程序后台运行的解决方案,它非常适合执行那些不需要和用户交互而且还要求长期运行的任务。需要注意:服务不是独立运行在进程中的,依赖于服务创建的应用程序进程,当其被杀死时,服务也会被终结。
定义一个服务:
public class Myservice extends Service{
	@Override
	public IBinder onBind(Intent intent){
		return null;
	}
	@Override
	public int onStartCommand(Intent intent,int flags,int startId){
		return super.onStartCommand(intent,flags,startId);
	}
	@Override
	public void onDestroy(){
		super.onDestroy();
	}
}
Intent startIntent=new Intent(this,Myservice.class);
startService(startIntent);//启动服务
Intent stopIntent=new Intent(this,Myservice.class);
stopService(stopIntent);//停止服务上面Myservice类里有个onBind()方法我们还没有解释,其实它的作用就是用于活动和服务的通信。
具体方法:
public class Myservice extends Service{

	private DownloadBinder mBinder=new DownloadBinder();

	class DownloadBinder extends Binder{
		public void startDownload(){
			Log.d("Myservice","start");
		}
		public int getProgress(){
			Log.d("Myservice","getProgress");
			return 0;
		}
	}
	@Override
	public IBinder onBind(Intent intent){
		return mBinder;
	}
}
private ServiceConnection connection=new ServiceConnection(){
	@Override
	public void onServiceDisconnected(ComponentName name){

	}
	@Override
	public void onServiceConnected(ComponentName name,IBinder service){
		downloadBinder=(Myservice.DownloadBinder)service;
		downloadBinder.startDownload();
		downloadBinder.getProgress();
	}
}
case R.id.bind_service:
Intent bindIntent=new Intent(this,Myservice.class);
bindService(bindIntent,connection,BIND_AUTO_CREATE);//绑定服务
break;
case R.id.unbind_service:
unbindService(connection);//解绑服务
break;服务的更多技巧
由于郭霖大神的建议,为了更好的程序性能和优化用户体验我们应当:节制地使用Service
如果应用程序当中需要使用Service来执行后台任务的话,请一定要注意只有当任务正在执行的时候才应该让Service运行起来。另外,当任务执行完之后去停止Service的时候,要小心Service停止失败导致内存泄漏的情况。
当我们启动一个Service时,系统会倾向于将这个Service所依赖的进程进行保留,这样就会导致这个进程变得非常消耗内存。并且,系统可以在LRU cache当中缓存的进程数量也会减少,导致切换应用程序的时候耗费更多性能。严重的话,甚至有可能会导致崩溃,因为系统在内存非常吃紧的时候可能已无法维护所有正在运行的Service所依赖的进程了。为了能够控制Service的生命周期,Android官方推荐的最佳解决方案就是使用IntentService,这种Service的最大特点就是当后台任务执行结束后会自动停止,从而极大程度上避免了Service内存泄漏的可能性。
详情请见:http://blog.csdn.net/guolin_blog/article/details/42238627
使用IntentService例子 :
public class MyIntentService extends IntentService{
	public MyIntentService(){
		super("MyIntentService");//调用父类的有参构造函数
	}
	@Override
	protected void onHandleIntent(Intent intent){
		Log.d("MyIntentService","Thread id is "+Thread.currentThread().getId());
	}
	@Override
	public void onDestroy(){
		super.onDestroy();
		Log.d("MyIntentService","onDestroy excuted");
	}
}IntentService的优势:它能够启动线程和停止,任务后台结束后会自动停止,大大方便了使用。

----------------------------------------------------------------------------------------------------------------------------------------------------------