人脸检测 Retinaface - FPN部分(Feature Pyramid Network)
人脸检测 Retinaface - FPN部分(Feature Pyramid Network)
flyfish
解决什么问题
特征金字塔网络(FPN、Feature Pyramid Network) 主要解决的是物体检测中的多尺度问题,通过简单的网络连接改变,在基本不增加原有模型计算量情况下,大幅度提升了小物体检测的性能。
论文地址
Feature Pyramid Networks for Object Detection
SSD是从单一输入尺寸上计算出来的特征进行识别,而FPN可以得到不同尺寸的特征图

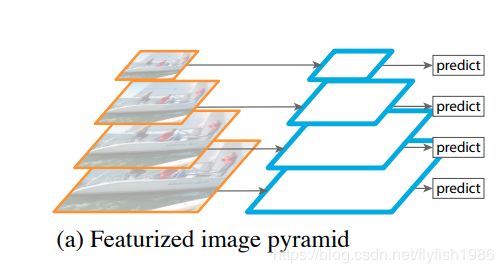
(a)使用图像金字塔来构建特征金字塔。特征是在每个图像尺度上独立计算的,很慢的。
(a) Using an image pyramid to build a feature pyramid.Features are computed on each of the image scales independently,which is slow.

(b)只使用单一尺度的特征,以加快检测速度。如Faster R-CNN
(b) Recent detection systems have opted to use only single scale features for faster detection.

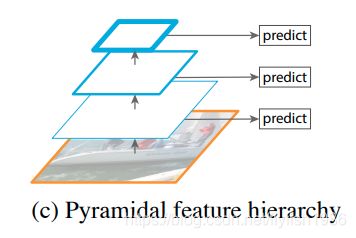
(c ) 重复使用由ConvNet计算的金字塔特征层次结构,就好像它是特征化的图像金字塔一样。如SSD
(c ) An alternative is to reuse the pyramidal feature hierarchy computed by a ConvNet as if it were a featurized image pyramid.

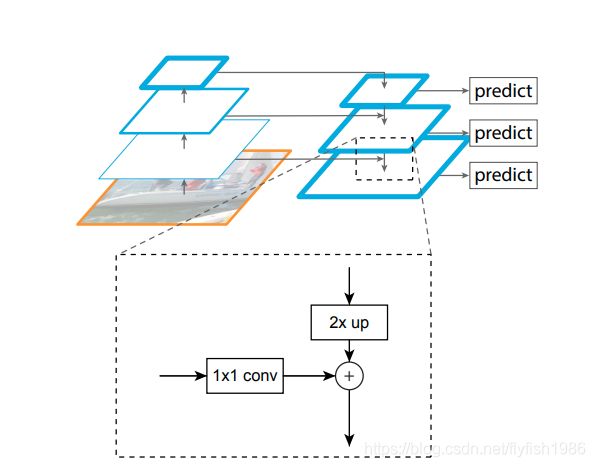
(d)特征金字塔网络(FPN)与b和c一样快速,但更准确。
(d) Our proposed Feature Pyramid Network (FPN) is fast like b and c, but more accurate.

根据箭头的走向看
左侧模型叫bottom-up,右侧模型叫top-down,横向的箭头叫横向连接lateral connection
代码
class FPN(nn.Module):
    def __init__(self,in_channels_list,out_channels):
        super(FPN,self).__init__()
        leaky = 0
        if (out_channels <= 64):
            leaky = 0.1
        self.output1 = conv_bn1X1(in_channels_list[0], out_channels, stride = 1, leaky = leaky)
        self.output2 = conv_bn1X1(in_channels_list[1], out_channels, stride = 1, leaky = leaky)
        self.output3 = conv_bn1X1(in_channels_list[2], out_channels, stride = 1, leaky = leaky)

        self.merge1 = conv_bn(out_channels, out_channels, leaky = leaky)
        self.merge2 = conv_bn(out_channels, out_channels, leaky = leaky)

    def forward(self, input):
        # names = list(input.keys())
        input = list(input.values())

        output1 = self.output1(input[0])#output1.shape:torch.Size([32, 64, 80, 80])
        output2 = self.output2(input[1])#output2.shape: torch.Size([32, 64, 40, 40])
        output3 = self.output3(input[2])#output3.shape: torch.Size([32, 64, 20, 20])
        up3 = F.interpolate(output3, size=[output2.size(2), output2.size(3)], mode="nearest")
        #up3: torch.Size([32, 64, 40, 40])

        output2 = output2 + up3
        output2 = self.merge2(output2)

        up2 = F.interpolate(output2, size=[output1.size(2), output1.size(3)], mode="nearest")
        #up2: torch.Size([32, 64, 80, 80])

        output1 = output1 + up2
        output1 = self.merge1(output1)

        out = [output1, output2, output3]

        # torch.Size([32, 64, 80, 80])
        # torch.Size([32, 64, 40, 40])
        # torch.Size([32, 64, 20, 20])
        return out
配置
配置输入通道是32,输出通道是64
‘in_channel’: 32,
‘out_channel’: 64
输入:64,128,256
输出:64
相当于
输入64 输出64
输入128 输出64
输入256 输出64
in_channels_stage2 = cfg['in_channel']
in_channels_list = [
        in_channels_stage2 * 2,
        in_channels_stage2 * 4,
        in_channels_stage2 * 8,
    ]
out_channels = cfg['out_channel']
self.fpn = FPN(in_channels_list,out_channels)
输出架构
(output1): Sequential(
      (0): Conv2d(64, 64, kernel_size=(1, 1), stride=(1, 1), bias=False)
      (1): BatchNorm2d(64, eps=1e-05, momentum=0.1, affine=True, track_running_stats=True)
      (2): LeakyReLU(negative_slope=0.1, inplace=True)
    )
(output2): Sequential(
      (0): Conv2d(128, 64, kernel_size=(1, 1), stride=(1, 1), bias=False)
      (1): BatchNorm2d(64, eps=1e-05, momentum=0.1, affine=True, track_running_stats=True)
      (2): LeakyReLU(negative_slope=0.1, inplace=True)
    )
(output3): Sequential(
      (0): Conv2d(256, 64, kernel_size=(1, 1), stride=(1, 1), bias=False)
      (1): BatchNorm2d(64, eps=1e-05, momentum=0.1, affine=True, track_running_stats=True)
      (2): LeakyReLU(negative_slope=0.1, inplace=True)
    )
(merge1): Sequential(
  (0): Conv2d(64, 64, kernel_size=(3, 3), stride=(1, 1), padding=(1, 1), bias=False)
  (1): BatchNorm2d(64, eps=1e-05, momentum=0.1, affine=True, track_running_stats=True)
  (2): LeakyReLU(negative_slope=0.1, inplace=True)
)
(merge2): Sequential(
  (0): Conv2d(64, 64, kernel_size=(3, 3), stride=(1, 1), padding=(1, 1), bias=False)
  (1): BatchNorm2d(64, eps=1e-05, momentum=0.1, affine=True, track_running_stats=True)
  (2): LeakyReLU(negative_slope=0.1, inplace=True)
)
代码解释
首先看各个tensor的形状
output1.shape:torch.Size([32, 64, 80, 80])
output2.shape: torch.Size([32, 64, 40, 40])
output3.shape: torch.Size([32, 64, 20, 20])
output1要与output2结合,作为output1的输出,过程是将output2上采样与output1相同的形状,输出的形状是output1
output2要与output3结合,作为output2的输出,过程是将output3上采样与output2相同的形状,输出的形状是output2
最后输出的形状是
# torch.Size([32, 64, 80, 80])
# torch.Size([32, 64, 40, 40])
# torch.Size([32, 64, 20, 20])
整个采样过程靠的是Torch.nn.functional.interpolate
torch.nn.functional.interpolate函数的作用
根据给定的size或scale_factor参数来对输入进行下采样或者上采样
torch.nn.functional.interpolate(input, size=None, scale_factor=None, mode=‘nearest’, align_corners=None, recompute_scale_factor=None)
参数很多
函数的参数怎么理解
通常使用input,size,mode
看参数input 是一个tensor类型,PyTorch通常4维的(NCHW),batchisze大小,通道,高度,宽度
当前支持的temporal(1D), spatial(2D)和volumetric(3D)类型,是什么意思呢?
参数input与size关系如下
原文是这样
input (Tensor) – the input tensor
size (int or Tuple[int] or Tuple[int, int] or Tuple[int, int, int]) – output spatial size.
理解起来是这样
假设input的维度是(N,C,W), size就是int,输出改变的是W (temporal)
假设input的维度是(N,C,H,W), size就是[int, int] , 输出改变的是H,W(spatial)
假设input的维度是(N,C,D,H,W), size就是[int, int,int] , 输出改变的是D,H,W(volumetric)
整个过程N和C是不变的
反过来说就是
size是一维的temporal,期待input是3D张量,即batchsize × channels × width
size是二维的spatial,期待input是4D张量,即batchsize × channels× height × width
size是三维的volumetric,期待input是5D张量,即batchsize × channels × depth × height ×width
我们当前使用的是
input是4D张量,即minibatch × channels× height × width size是二维的spatial,改的 height × width
如果换成给定的是scale_factor
输出则是
H ×scale_factor
W×scale_factor
mode是上采样算法 包括’nearest’ | ‘linear’ | ‘bilinear’ | ‘bicubic’ | ‘trilinear’ | ‘area’. 默认是 ‘nearest’
函数官方解释