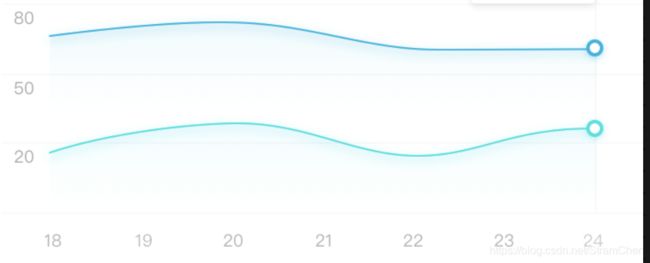
MPAndroidChart实现曲线阴影效果
MPAndroidChart实现曲线阴影效果
背景:最近公司项目UI出现一个填充+阴影效果的曲线。效果如图所示。但是发现MPAndroidChart只能实现填充,无法实现阴影的效果。所以fork下来源码阅读了一下,并新增了一个drawShadowColor()方法。
使用方式:
dataSet.setDrawShadow(true);
dataSet.setShadowColor(color);
主要实现方式如下:
1.在 ILineRadarDataSet接口类下新增isDrawShawdowEnabled,getShawdowColor方法:
    /**
     * Returns true if shadow drawing is enabled, false if not
     *
     * @return
     */
    boolean isDrawShawdowEnabled();
    /**
     * Returns the color that is used for shadow.
     * @return
     */
    int getShawdowColor();
2.LineRadarDataSet类下新增两个成员变量 mShadowColor,mDrawShadow以及它们的get,set方法
    /**
     * the color that is used for filling the line shadow
     */
    private int mShadowColor = Color.rgb(0,223,222);

  	/**
     * if true, the data will also be drawn shadow
     */
    private boolean mDrawShadow = false;
    /**
     * Sets the color that is used for filling line shadow.
     *
     * @param color
     */
    public void setShadowColor(int color) {
        mShadowColor = color;
    }

    @Override
    public int getShawdowColor() {
        return mShadowColor;
    }

    @Override
    public boolean isDrawShawdowEnabled() {
        return mDrawShadow;
    }

    public void setDrawShadow(boolean mDrawShadow) {
        this.mDrawShadow = mDrawShadow;
    }
3.在LineChartRenderer下的 画圆滑贝塞尔曲线方法 drawCubicBezier 增加一个判断,判断是否需要增加阴影效果,和一个drawShadow方法。
	//新增画圆滑曲线
        if (dataSet.isDrawShawdowEnabled()) {
            cubicFillPath.reset();
            cubicFillPath.addPath(cubicPath);
            drawShadow(mBitmapCanvas,dataSet,cubicFillPath);
        }
插入如下位置:
protected void drawCubicBezier(ILineDataSet dataSet) {

        float phaseY = mAnimator.getPhaseY();

        Transformer trans = mChart.getTransformer(dataSet.getAxisDependency());

        mXBounds.set(mChart, dataSet);

        float intensity = dataSet.getCubicIntensity();

        cubicPath.reset();

        if (mXBounds.range >= 1) {

            float prevDx = 0f;
            float prevDy = 0f;
            float curDx = 0f;
            float curDy = 0f;

            // Take an extra point from the left, and an extra from the right.
            // That's because we need 4 points for a cubic bezier (cubic=4), otherwise we get lines moving and doing weird stuff on the edges of the chart.
            // So in the starting `prev` and `cur`, go -2, -1
            // And in the `lastIndex`, add +1

            final int firstIndex = mXBounds.min + 1;
            final int lastIndex = mXBounds.min + mXBounds.range;

            Entry prevPrev;
            Entry prev = dataSet.getEntryForIndex(Math.max(firstIndex - 2, 0));
            Entry cur = dataSet.getEntryForIndex(Math.max(firstIndex - 1, 0));
            Entry next = cur;
            int nextIndex = -1;

            if (cur == null) return;

            // let the spline start
            cubicPath.moveTo(cur.getX(), cur.getY() * phaseY);

            for (int j = mXBounds.min + 1; j <= mXBounds.range + mXBounds.min; j++) {

                prevPrev = prev;
                prev = cur;
                cur = nextIndex == j ? next : dataSet.getEntryForIndex(j);

                nextIndex = j + 1 < dataSet.getEntryCount() ? j + 1 : j;
                next = dataSet.getEntryForIndex(nextIndex);

                prevDx = (cur.getX() - prevPrev.getX()) * intensity;
                prevDy = (cur.getY() - prevPrev.getY()) * intensity;
                curDx = (next.getX() - prev.getX()) * intensity;
                curDy = (next.getY() - prev.getY()) * intensity;

                cubicPath.cubicTo(prev.getX() + prevDx, (prev.getY() + prevDy) * phaseY,
                        cur.getX() - curDx,
                        (cur.getY() - curDy) * phaseY, cur.getX(), cur.getY() * phaseY);
            }
        }

        // if filled is enabled, close the path
        if (dataSet.isDrawFilledEnabled()) {

            cubicFillPath.reset();
            cubicFillPath.addPath(cubicPath);

            drawCubicFill(mBitmapCanvas, dataSet, cubicFillPath, trans, mXBounds);
        }

		//新增画圆滑曲线
        if (dataSet.isDrawShawdowEnabled()) {
            cubicFillPath.reset();
            cubicFillPath.addPath(cubicPath);
            drawShadow(mBitmapCanvas,dataSet,cubicFillPath);
        }

        mRenderPaint.setColor(dataSet.getColor());

        mRenderPaint.setStyle(Paint.Style.STROKE);

        trans.pathValueToPixel(cubicPath);

        mBitmapCanvas.drawPath(cubicPath, mRenderPaint);

        mRenderPaint.setPathEffect(null);
    }
增加的drawShadow方法:
    protected void drawShadow(Canvas c, ILineDataSet dataSet, Path spline) {
        int color = dataSet.getShawdowColor();
        mRenderPaint.setShadowLayer(10, 0, 3, color);
        c.drawPath(spline, mRenderPaint);
         mRenderPaint.setShadowLayer(0, 0, 0, 0);
    }
4.至此大功告成。如果要实现填充效果这里就不再赘述。相信大家根据MPAndroidChart提供的demo就能很好的实现。
改动的源码已经上传到github:https://github.com/stramChen/MPAndroidChart-Bezier-shadow
2020.3.19更新:
近期有很多小伙伴联系我,说实现不了上述效果,现在已经将demo上传到github,望能帮助各位小伙伴.
如有疑问请联系邮箱:[email protected]
