Shiro安全框架的使用
Shiro安全框架
1.介绍
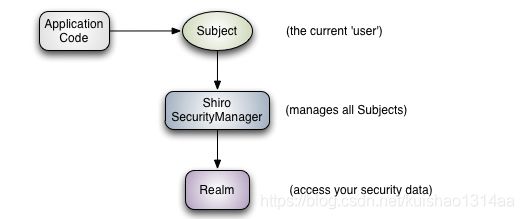
Shiro有三个核心的概念:Subject、SecurityManager和Realms。
Subject(主体): subject本质上是当前正在执行的用户的特定于安全的“view”。它也可以表示第三方服务、守护进程帐户、cron作业或任何类似的东西——基本上是当前与软件交互的任何东西。
SecurityManager(安全管理器): SecurityManager是Shiro架构的核心,它充当一种“伞形”对象,协调其内部安全组件,这些组件一起构成一个对象图,一旦为应用程序配置了SecurityManager及其内部对象图,通常就不需要再管它了,应用程序开发人员几乎将所有时间都花在Subject API上
Realms(领域): realm充当Shiro和应用程序的安全数据之间的“桥梁”或“连接器”。 当需要与与安全相关的数据(如用户帐户)进行实际交互以执行身份验证(登录)和授权(访问控制)时,Shiro会从一个或多个为应用程序配置的Realms中查找这些内容.类似于SpringMVC的DAO层
2.导入架包
在pom.xml中导入架包,使用SpringBoot来使用Shiro,采用的版本是
      org.apache.shiro
      shiro-core
      ${shiro.version}


      org.apache.shiro
      shiro-spring
      ${shiro.version}


      org.apache.shiro
      shiro-ehcache
      ${shiro.version}
3.编写Shiro配置文件
package com.example.demo.config;
import org.apache.shiro.authc.credential.HashedCredentialsMatcher;
import org.apache.shiro.cache.ehcache.EhCacheManager;
import org.apache.shiro.mgt.SecurityManager;
import org.apache.shiro.spring.LifecycleBeanPostProcessor;
import org.apache.shiro.spring.web.ShiroFilterFactoryBean;
import org.apache.shiro.web.filter.authc.LogoutFilter;
import org.apache.shiro.web.mgt.DefaultWebSecurityManager;
import org.springframework.context.annotation.Bean;
import org.springframework.context.annotation.Configuration;
import java.util.LinkedHashMap;
import java.util.Map;


@Configuration
public class ShiroConfiguration {

/**管理Shiro的生命周期*/
@Bean(name = "lifecycleBeanPostProcessor")
public static LifecycleBeanPostProcessor getLifecycleBeanPostProcessor(){
return new LifecycleBeanPostProcessor();

}


/**处理拦截请求,需要注入securityManager*/
@Bean(name = "shiroFilter")
public ShiroFilterFactoryBean shiroFilter(SecurityManager securityManager){
System.out.println("处理拦截请求");
ShiroFilterFactoryBean shiroFilterFactoryBean=new ShiroFilterFactoryBean();
/*用工厂*/
shiroFilterFactoryBean.setSecurityManager(securityManager);
/*默认跳转界面*/
shiroFilterFactoryBean.setLoginUrl("/login.html");
/*登录成功后跳转界面*/
shiroFilterFactoryBean.setSuccessUrl("/index.html");
/*跳转到未授权界面*/
shiroFilterFactoryBean.setUnauthorizedUrl("/test.html");
/*自定义拦截器,拦截动作次序与编写时顺序有关,确保最后进行'/**'的验证操作,否则他之后的会拦截失效*/
Map filterChainDefinitionMap = new LinkedHashMap();
//设置不需要访问权限的界面,Resource和Controller访问目录为'/'
filterChainDefinitionMap.put("/login", "anon");
filterChainDefinitionMap.put("/demo/test", "anon");
filterChainDefinitionMap.put("/js/**", "anon");
filterChainDefinitionMap.put("/css/**", "anon");
//对所有的用户进行认证,'authc'代表需要登录,当所有的认证都通过的时候才可以访问路径,
filterChainDefinitionMap.put("/**", "authc");
//退出拦截器,并对退出动作进行重定向
filterChainDefinitionMap.put("/logout", "logout");
LogoutFilter logoutFilter = new LogoutFilter();
logoutFilter.setRedirectUrl("/login.html");
//将自定义拦截器放入'shiroFilter'拦截器中
shiroFilterFactoryBean.getFilters().put("logout", logoutFilter);
shiroFilterFactoryBean.setFilterChainDefinitionMap(filterChainDefinitionMap);
return shiroFilterFactoryBean;
}


@Bean(name = "securityManager")
public SecurityManager securityManager(EhCacheManager cacheManager) {
DefaultWebSecurityManager securityManager = new DefaultWebSecurityManager();
//设置自己编写的Realm,进行认证和授权操作
securityManager.setRealm(myShiroRealm());
securityManager.setCacheManager(cacheManager);
return securityManager;
}

/**设置自己编写的Realm,进行认证和授权操作,'MyShiroRealm'要另外编写,

* 进行认证和授权时会自动调用realm中的方法*/
@Bean
public MyShiroRealm myShiroRealm() {
MyShiroRealm myShiroRealm = new MyShiroRealm();
myShiroRealm.setCredentialsMatcher(hashedCredentialsMatcher());
return myShiroRealm;
}


/**
* 凭证匹配器 (由于我们的密码校验交给Shiro的SimpleAuthenticationInfo进行处理了
* 进行的加密操作
*/
@Bean
public HashedCredentialsMatcher hashedCredentialsMatcher() {
HashedCredentialsMatcher hashedCredentialsMatcher = new HashedCredentialsMatcher();
hashedCredentialsMatcher.setHashAlgorithmName("md5");// 散列算法:这里使用MD5算法;
hashedCredentialsMatcher.setHashIterations(2);// 散列的次数,比如散列两次,相当于
// md5(md5(""));
return hashedCredentialsMatcher;
}

/**配置缓存*/
@Bean
public EhCacheManager getCacheManager(){
EhCacheManager ehCacheManager = new EhCacheManager();
ehCacheManager.setCacheManagerConfigFile("classpath:ehcache.xml");
return ehCacheManager;
}
}
4.缓存配置
5.自定义Realm
在Shiro中,进行的授权和认证就是由它来操作的,认证操作时在登录时通过Subject的login方法,将用户名密码传入这里面,与数据里面进行交互,判断是否存在此用户或者密码是否正确,存在则认证成功,主要有两个方法
package com.example.demo.config;

import com.example.demo.pojo.User;
import com.example.demo.service.UserService;
import com.example.demo.utils.UserUtils;
import org.apache.shiro.authc.*;
import org.apache.shiro.authz.AuthorizationInfo;
import org.apache.shiro.authz.SimpleAuthorizationInfo;
import org.apache.shiro.realm.AuthorizingRealm;
import org.apache.shiro.subject.PrincipalCollection;
import org.apache.shiro.subject.SimplePrincipalCollection;
import org.apache.shiro.util.ByteSource;
import org.slf4j.Logger;
import org.slf4j.LoggerFactory;
import org.springframework.beans.factory.annotation.Autowired;
import org.springframework.context.annotation.Configuration;
import org.springframework.util.StringUtils;
import javax.annotation.Resource;
import java.util.HashSet;
import java.util.List;
import java.util.Set;
import java.util.stream.Collectors;

@Configuration
public class MyShiroRealm extends AuthorizingRealm {
    @Autowired
    private UserService userService;
    /*只有需要验证权限时才会调用, 授权查询回调函数, 进行鉴权但缓存中无用户的授权信息时调用.在配有*缓存的情况下加载.
     * 如果需要动态权限,但是又不想每次去数据库校验,可以存在ehcache中.自行完善*/
    @Override
    protected AuthorizationInfo doGetAuthorizationInfo(PrincipalCollection principalCollection) {
        log.debug("权限配置");
        SimpleAuthorizationInfo authorizationInfo = new SimpleAuthorizationInfo();
        //获取当前用户
        User user = UserUtils.getCurrentUser();
        System.out.println(user.toString());
        //设置权限
        Set roles = new HashSet<>();
        roles.add(String.valueOf(user.getRoleId()));
        authorizationInfo.setRoles(roles);
        return authorizationInfo;
    }
    /* * 认证回调函数,调用Subject的login()方法时访问到这一层
     * 首先根据传入的用户名获取User信息;然后如果user为空,那么抛出没找到帐号异常UnknownAccountException;
     * 如果不匹配将抛出密码错误异常UnknownAccountException;
     * 在组装SimpleAuthenticationInfo信息时, 需要传入:身份信息(用户名)、凭据(密文密码)、盐(username+salt),
     * CredentialsMatcher使用盐加密传入的明文密码和此处的密文密码进行匹配。
    * */
    @Override
    protected AuthenticationInfo doGetAuthenticationInfo(AuthenticationToken authenticationToken) throws AuthenticationException {
        UsernamePasswordToken token = (UsernamePasswordToken) authenticationToken;
        String name=token.getUsername();
        System.out.println("name:"+name);
        User user = userService.getUserByname(token.getUsername());
        /*加密后的密码*/
        String encoderPassword=userService.EncoderPassword(new String(token.getPassword()),user.getSalt());
        System.out.println(user.getName()+" "+encoderPassword);
        if (user == null) {
            throw new UnknownAccountException("用户名不存在");
        }
        if (userService.getUser(user.getName(),encoderPassword)==null)
        {
            throw new UnknownAccountException("密码不正确");
        }
        /*通过验证条件*/
        SimpleAuthenticationInfo authenticationInfo = new SimpleAuthenticationInfo(user, user.getPassword(),
                ByteSource.Util.bytes(user.getSalt()), getName());
        /*设置当前用户的session*/
        UserUtils.setUserSession(user);
        return authenticationInfo;
    }
    /**
     * 重写缓存key,否则集群下session共享时,会重复执行doGetAuthorizationInfo权限配置
     */
    @Override
    protected Object getAuthorizationCacheKey(PrincipalCollection principals) {
        SimplePrincipalCollection principalCollection = (SimplePrincipalCollection) principals;
        Object object = principalCollection.getPrimaryPrincipal();
        if(object instanceof User){
            User user = (User) object;
            return "authorization:cache:key:users:" + user.getId();
        }
        return super.getAuthorizationCacheKey(principals);
    }
}
编写一个工具类,来获取当前的user或者session
package com.example.demo.utils;
import com.example.demo.pojo.User;
import org.apache.shiro.SecurityUtils;
import org.apache.shiro.session.Session;
import org.apache.shiro.subject.Subject;
public class UserUtils {
    private static String login_user="login_user";
    public static void setUserSession(User user) {
        getSession().setAttribute(login_user, user);
    }
    public static Session getSession() {
        Subject currentUser = SecurityUtils.getSubject();
        Session session = currentUser.getSession();
        return session;
    }
    public static User getCurrentUser() {
        User user = (User) getSession().getAttribute(login_user);
        return user;
    }
}
6.加密算法和获取Session的方法
加密算法在Shiro配置文件中使用的是MD5,加密两次,相应的login认证操作调用EncoderPassword() 方法时,两者也应该一样
在Service中编写登录认证的加密算法,这样登录认证时的加密后的密码和数据库中对应的一致
@Override
public String EncoderPassword(String password, String salt) {
    //采取MD5算法进行加密,加密2次
    Object object = new SimpleHash("MD5", password, salt, 2);
    return object.toString();
}
7.登录操作
获取到前端的用户名和密码,封装在一个token里面,然后获取当前的subject,调用它的login方法,参数传入,然后它会调用到自定义realm中的认证操作,认证成功后返回数据
@RestController
@RequestMapping(value = "/demo")
public class DemoController {
    @RequestMapping("/test")
    public User index(User user) {
            //用于存取用户名和密码
            UsernamePasswordToken usernamePasswordToken = new UsernamePasswordToken(user.getName(), user.getPassword());
            //设置一个subject
            Subject subject =SecurityUtils.getSubject();
            /*对这个subject对应的用户名和密码进行认证操作,若自己自定义了realm,会用自定义的realm记性*/
            subject.login(usernamePasswordToken);
            User user2=UserUtils.getCurrentUser();
            System.out.println(UserUtils.getCurrentUser().toString());
        return user2;
    }
}
8.授权操作
在realm中doGetAuthorizationInfo()中编写,为认证后的用户添加角色控制,在controller中或其他地方设置访问权限,只有拥有权限的用户方可进行相关操作,如下所示:
数据库中角色定位2,那么只有
@RequestMapping("/role")
//@RequiresAuthentication:只要授权就能就能进行访问
@RequiresRoles(value = {"2","user"},logical = Logical.OR) //只要其中一个角色进行了进行了认证就行
public String Role(){
    Sysem.out.println("测试角色");
    return "regist.html";
}
9.测试结果
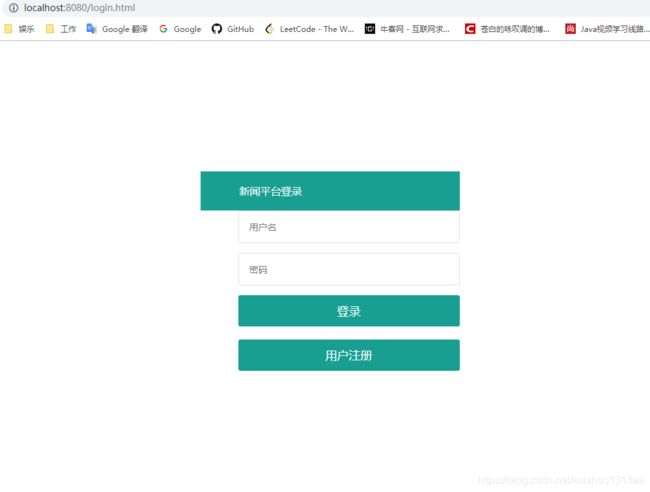
登录界面,默认跳转界面
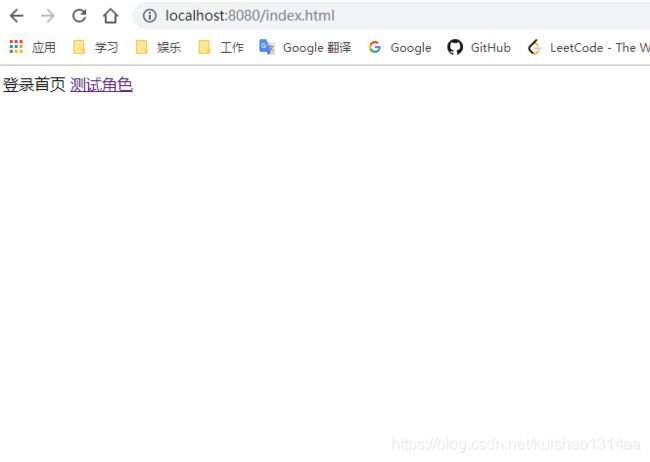
认证成功
点击测试角色,动作为"/role"


