命令模式下启动uiautomator测试类
默认情况下,用as创建完项目后,会有这3部分组成

同时app目录下的build.gradle文件多了这些东西
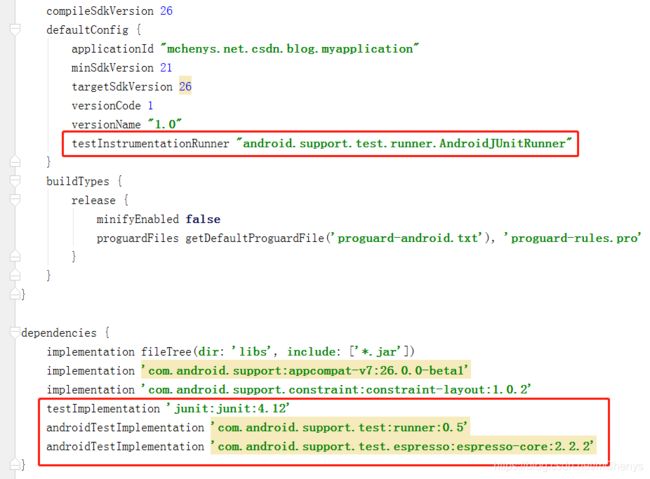
今天介绍的uiautomator是属于自动化测试部分的,uiautomator可以实现跨应用间的UI自动化操作(例如点击,滑动,输入内容等等)关于自动化代码的编写,这里不详细介绍.
要使用uiautomator,还需要引入依赖包
androidTestCompile 'com.android.support.test.uiautomator:uiautomator-v18:2.1.1';
下面编写一个自动刷新微信朋友圈的测试代码,注意代码必须要写在自动化测试目录下,即androidTest目录下
package mchenys.net.csdn.blog.myapplication;

import android.content.Context;
import android.content.Intent;
import android.support.test.InstrumentationRegistry;
import android.support.test.runner.AndroidJUnit4;
import android.support.test.uiautomator.By;
import android.support.test.uiautomator.UiDevice;
import android.support.test.uiautomator.UiObject;
import android.support.test.uiautomator.UiScrollable;
import android.support.test.uiautomator.UiSelector;
import android.support.test.uiautomator.Until;
import android.widget.ListView;

import org.junit.Test;
import org.junit.runner.RunWith;

/**
 * 自动刷新朋友圈
 * Created by mChenys on 2019/1/30.
 */
@RunWith(AndroidJUnit4.class)
public class AutoRefreshWechatCircle {

    @Test
    public void autoRefresh() throws Exception {
        //获取上下文对象
        Context context = InstrumentationRegistry.getContext();
        //获取操作设备相关的对象
        UiDevice uiDevice = UiDevice.getInstance(InstrumentationRegistry.getInstrumentation());

        //循环操作
        while (true) {

            //启动微信
            Intent intent = context.getPackageManager().getLaunchIntentForPackage("com.tencent.mm");
            intent.addFlags(Intent.FLAG_ACTIVITY_CLEAR_TASK);
            context.startActivity(intent);
            //等待启动
            uiDevice.wait(Until.hasObject(By.pkg("com.tencent.mm").depth(0)), 5000);
            //定位到发现页tab
            UiObject find = uiDevice.findObject(new UiSelector().resourceId("com.tencent.mm:id/cw3").text("发现"));
            if (null != find && find.exists() && find.click()) {
                //点击朋友圈
                boolean open = uiDevice.findObject(new UiSelector().resourceId("android:id/title").text("朋友圈")).click();
                if (open) {
                    //查找朋友圈列表
                    UiScrollable listView = new UiScrollable(new UiSelector().resourceId("com.tencent.mm:id/e2s").className(ListView.class));
                    if (listView.exists()) {
                        //获取屏幕宽度
                        int w = uiDevice.getDisplayWidth() / 2;
                        //steps:是指分多少次完成这次动作。每次移动花费的时间是固定的,都为5ms。
                        if (uiDevice.drag(w, w, 0, 1000, 10)) {
                            uiDevice.wait(Until.hasObject(By.pkg("com.tencent.mm").depth(0)), 1000);
                            uiDevice.pressBack();//返回上一页
                        }
                    }
                }
            }

            try {
                //间隔3秒运行一次
                Thread.sleep(3000);
            } catch (InterruptedException e) {
                e.printStackTrace();
            }
        }
    }
}
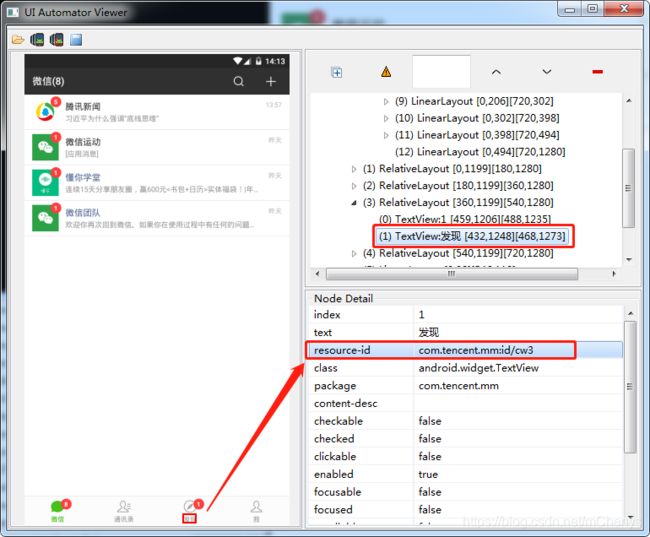
上面的控件id怎么获取的呢? 我是使用Android sdk下tools目录中的uiautomatorviewer.bat工具获取的,运行后,连接你的手机,貌似只有root后的手机才可以,我这里用的是模拟器,例如抓取微信发现tab的id可以这样操作
测试类编写完成后,怎么运行测试类呢,如下所示,点击界面上的绿色运行按钮中的任何一个

接着在弹出的选择框中选择你的测试类

运行完后,会在控制台中发现执行的命令如下:

完整命令如下:
adb shell am instrument -w -r -e debug false -e class mchenys.net.csdn.blog.myapplication.AutoRefreshWechatCircle#autoRefresh mchenys.net.csdn.blog.myapplication.test/android.support.test.runner.AndroidJUnitRunner
其中分段处是空格
mchenys.net.csdn.blog.myapplication.AutoRefreshWechatCircle#autoRefresh 是测试类完整类名#测试方法(#测试方法可以省略)
mchenys.net.csdn.blog.myapplication.test/android.support.test.runner.AndroidJUnitRunner 中以/为分界限,前半部分是测试类包名+.test,后半部分是AndroidJUnitRunner的完整类名
这些命令正是我今天要用到的,有了这些命令我们就可以脱离As的调试,单独运行测试类了.
通过命令启动uiautomator测试类
试想以下,如果我们可以通过安装app的方式,将测试脚本通过App的操作来控制其执行和停止不是更加方便吗? 对的,今天就是要来实现这样的操作.
在当前项目,或者新建项目中创建一个Activity,我就以MainActivity为例,布局中就放置2个按钮,用于控制测试脚本的执行和停止
<LinearLayout
    android:orientation="vertical"
    xmlns:android="http://schemas.android.com/apk/res/android"
    xmlns:app="http://schemas.android.com/apk/res-auto"
    xmlns:tools="http://schemas.android.com/tools"
    android:layout_width="match_parent"
    android:layout_height="match_parent"
    tools:context="mchenys.net.csdn.blog.myapplication.MainActivity">

  <Button
      android:text="开启"
      android:onClick="startTest"
      android:layout_width="wrap_content"
      android:layout_height="wrap_content"/>

    <Button
        android:text="关闭"
        android:onClick="stopTest"
        android:layout_width="wrap_content"
        android:layout_height="wrap_content"/>
LinearLayout>
说到脚本的执行,这里我需要用到一个执行命令的工具类-CmdUtils,具体源码可以移步到这里[这里],(https://blog.csdn.net/mChenys/article/details/86701272)
MainActivity代码如下:
package mchenys.net.csdn.blog.myapplication;

import android.support.v7.app.AppCompatActivity;
import android.os.Bundle;
import android.view.View;

public class MainActivity extends AppCompatActivity {

    @Override
    protected void onCreate(Bundle savedInstanceState) {
        super.onCreate(savedInstanceState);
        setContentView(R.layout.activity_main);
    }

    //执行测试脚本
    public void startTest(View view) {
        new Thread(new Runnable() {
            @Override
            public void run() {
                String packageName = "mchenys.net.csdn.blog.myapplication";
                String className = "mchenys.net.csdn.blog.myapplication.AutoRefreshWechatCircle";
                String methodName = "#autoRefresh";
                StringBuilder cmd = new StringBuilder();
                cmd.append("am instrument -w -r   -e debug false -e class ")
                        .append(className)
                        .append(methodName) //方法可以省略
                        .append(" ")
                        .append(packageName)
                        .append(".test/android.support.test.runner.AndroidJUnitRunner");
                CmdUtils.execRootCmdSilent(cmd.toString());
            }
        }).start();
    }

    //关闭测试脚本
    public void stopTest(View view) {
        new Thread(new Runnable() {
            @Override
            public void run() {
                String packageName = "mchenys.net.csdn.blog.myapplication";
                CmdUtils.execRootCmdSilent("am force-stop " + packageName);
            }
        }).start();
    }
}
效果图如下:
