Android中View.setPressed是怎么出现按压效果的
前面我们研究了Android视图绘制的内容,本篇接着介绍视图绘制中常见但是心中总是有疑问的一个地方,按压等动作时,View的效果是怎么出现(绘制)出来的。本文所有代码均是精简过程,完整部分请自行查看源码。
1、常见的几种视图状态
- enabled
表示当前视图是否可用。不可用的视图是无法响应onTouch事件的。 - selected
表示当前视图是否处于选中状态。一个界面当中可以有多个视图处于选中状态,调用setSelected()方法能够 改变视图的选中状态,传入true表示选中,传入false表示未选中。一般是代码实现。 pressed
表示当前视图是否处于按下状态。传入true表示按下,传入false表示未按下。通常情况下这个状态都是由系统自动赋值的,但开发者也可以自己调用这个方法来进行改变。
…
比如我们经常用到pressed的时候的写法。drawable文件夹中,btn_bg_selector.xml。<selector xmlns:android="http://schemas.android.com/apk/res/android"> <item android:drawable="@drawable/compose_pressed" android:state_pressed="true">item> <item android:drawable="@drawable/compose_pressed" android:state_focused="true">item> <item android:drawable="@drawable/compose_normal">item> selector>如果在xml文件中的button,将android:background=”@drawable/btn_bg_selector”,当点击button时就会出现上面android:state_pressed中的android:drawable背景。
2、android:state_pressed是怎么生效的
如果像上述情况,是用android:background=“”设置的。布局中设置
public class View implements Drawable.Callback, KeyEvent.Callback,
        AccessibilityEventSource {
    ...
    public View(Context context, @Nullable AttributeSet attrs, int defStyleAttr, int defStyleRes) {
        Drawable background = null;
        for (int i = 0; i < N; i++) {
            int attr = a.getIndex(i);
            switch (attr) {
                case com.android.internal.R.styleable.View_background:
                    background = a.getDrawable(attr);
                    break
            }
        }
        if (background != null) {
            setBackground(background);
        }
    }
    public void setBackground(Drawable background) {
        setBackgroundDrawable(background);
    }
}
代码中设置
    @RemotableViewMethod
    public void setBackgroundResource(@DrawableRes int resid) {
        if (resid != 0 && resid == mBackgroundResource) {
            return;
        }

        Drawable d = null;
        if (resid != 0) {
            d = mContext.getDrawable(resid);
        }
        setBackground(d);

        mBackgroundResource = resid;
    }
当在布局中设置被初始化时,或当setPressed、setEnabled、setSelected使视图状态发生变化时,最终都会走到drawableStateChanged
protected void drawableStateChanged() {
    final int[] state = getDrawableState();
    boolean changed = false;

    final Drawable bg = mBackground;
    if (bg != null && bg.isStateful()) {
        changed |= bg.setState(state);
    }

    if (changed) {
        invalidate();
    }
}第2 行getDrawableState,获取当前状态。
第7 行bg.setState,由于我们前面是用的selector文件,所以此时的bg是StateListDrawable。进入Drawable中。
    public boolean setState(@NonNull final int[] stateSet) {
        if (!Arrays.equals(mStateSet, stateSet)) {
            mStateSet = stateSet;
            return onStateChange(stateSet);
        }
        return false;
    }
其中的Arrays.equals判断当前状态的标识是否跟以前一样(是否发生变化)。此时我们点击进入onStateChange会发现是一个空方法。就去StateListDrawable查看。
protected boolean onStateChange(int[] stateSet) {
    final boolean changed = super.onStateChange(stateSet);
    int idx = mStateListState.indexOfStateSet(stateSet);
    if (DEBUG) android.util.Log.i(TAG, "onStateChange " + this + " states "
            + Arrays.toString(stateSet) + " found " + idx);
    if (idx < 0) {
        idx = mStateListState.indexOfStateSet(StateSet.WILD_CARD);
    }

    return selectDrawable(idx) || changed;
}
其中mStateListState.indexOfStateSet获取当前状态。那么我们就会来到selectDrawable(idx)执行真正的重绘功能。
3、视图重绘
不论视图是Activity加载完整后执行的,还是在我们执行了某些动作后执行的。不论是setPressed、setEnable、setSelected也都执行了视图重绘,仔细研究你会发现,内部都执行了invalidate类似的方法。我们先分析一个通用的,invalidate
View中
void invalidate(boolean invalidateCache) {
    invalidateInternal(0, 0, mRight - mLeft, mBottom - mTop, invalidateCache, true);
}
void invalidateInternal(int l, int t, int r, int b, boolean invalidateCache,
boolean fullInvalidate) {
if (skipInvalidate()) {
return;
}
// Propagate the damage rectangle to the parent view.
final AttachInfo ai = mAttachInfo;
final ViewParent p = mParent;
if (p != null && ai != null && l < r && t < b) {
final Rect damage = ai.mTmpInvalRect;
damage.set(l, t, r, b);
p.invalidateChild(this, damage);
}
}
}1、skipInvalidate判断是否跳过invalidate,比如不可见、且当前没有要执行的动画等。
    private boolean skipInvalidate() {
        return (mViewFlags & VISIBILITY_MASK) != VISIBLE && mCurrentAnimation == null &&
                (!(mParent instanceof ViewGroup) ||
                        !((ViewGroup) mParent).isViewTransitioning(this));
    }
2、p.invalidateChild(this, damage),p标识ViewParent 也是父视图ViewGroup。
public final void invalidateChild(View child, final Rect dirty) {
    ViewParent parent = this;
        do {
            View view = null;
            if (parent instanceof View) {
                view = (View) parent;
            }
            parent = parent.invalidateChildInParent(location, dirty);
        } while (parent != null);
    }
}
里面有个循环,直到parent = null。parent = parent.invalidateChildInParent(location, dirty);是计算需要重绘的rect区域,并返回the parent of this ViewParent。一直往上循环,最后到ViewRootImpl。
ViewRootyImpl.java

@Override
public void invalidateChild(View child, Rect dirty) {
    invalidateChildInParent(null, dirty);
}

@Override
public ViewParent invalidateChildInParent(int[] location, Rect dirty) {
    checkThread();
    if (DEBUG_DRAW) Log.v(mTag, "Invalidate child: " + dirty);

    if (dirty == null) {
        invalidate();
        return null;
    } else if (dirty.isEmpty() && !mIsAnimating) {
        return null;
    }

    invalidateRectOnScreen(dirty);

    return null;
}

void invalidate() {
    mDirty.set(0, 0, mWidth, mHeight);
    if (!mWillDrawSoon) {
        scheduleTraversals();
    }
}
private void invalidateRectOnScreen(Rect dirty) {
    if (!mWillDrawSoon && (intersected || mIsAnimating)) {
        scheduleTraversals();
    }
}
void scheduleTraversals() {
    if (!mTraversalScheduled) {
        mChoreographer.postCallback(
                Choreographer.CALLBACK_TRAVERSAL, mTraversalRunnable, null);

    }
}

final class TraversalRunnable implements Runnable {
    @Override
    public void run() {
        doTraversal();
    }
}
final TraversalRunnable mTraversalRunnable = new TraversalRunnable();

void doTraversal() {
    if (mTraversalScheduled) {
        performTraversals();
    }
}
哇哈哈,看到了performTraversals(),开始执行了经典视图重绘过程。忘了的罚站Android视图绘制
这时我们回过头来看selectDrawable(idx)。
StateListDrawable.java
public boolean selectDrawable(int index) {
    if (index == mCurIndex) {
        return false;
    }

    if (mEnterAnimationEnd != 0 || mExitAnimationEnd != 0) {
        if (mAnimationRunnable == null) {
            mAnimationRunnable = new Runnable() {
                @Override public void run() {
                    animate(true);
                    invalidateSelf();
                }
            };
        } else {
            unscheduleSelf(mAnimationRunnable);
        }
        // Compute first frame and schedule next animation.
        animate(true);
    }

    invalidateSelf();

    return true;
}


Drawable.java
public void invalidateSelf() {
    final Callback callback = getCallback();
    if (callback != null) {
        callback.invalidateDrawable(this);
    }
}
而getCallback的callback是在View中set的,view本身就是Callback。看下面代码,最终跟invalidate一样,都到了invalidateInternal。
public class View implements Drawable.Callback XXX{
    public void setBackgroundDrawable(Drawable background) {
        background.setCallback(this);
    }

    public void invalidateDrawable(@NonNull Drawable drawable) {
        if (verifyDrawable(drawable)) {
            final Rect dirty = drawable.getDirtyBounds();
            final int scrollX = mScrollX;
            final int scrollY = mScrollY;

            invalidate(dirty.left + scrollX, dirty.top + scrollY,
        }
    }

    public void invalidate(int l, int t, int r, int b) {
        final int scrollX = mScrollX;
        final int scrollY = mScrollY;
        invalidateInternal(l - scrollX, t - scrollY, r - scrollX, b - scrollY, true, false);
    }
}
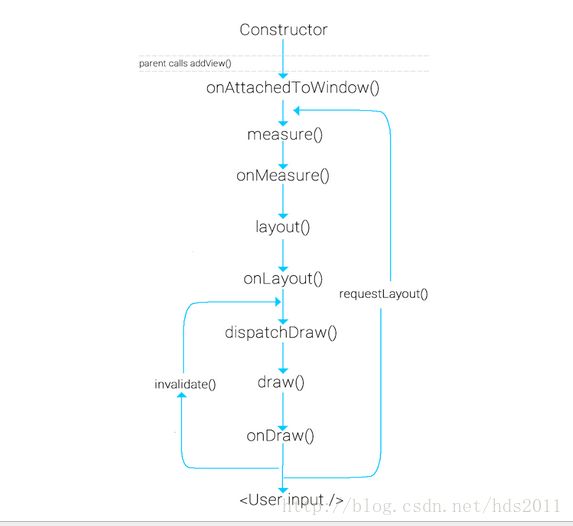
需要注意的是invalidate,measure和layout流程是不会重新执行的,因为视图没有改变重新测量的标志位,只执行了draw方法。
requestLayout()是重新执行所有步骤。
再强调一下这个图。

进阶介绍:https://github.com/Idtk/Blog/blob/master/Blog/9%E3%80%81Invalidate.md