树莓派3B+ 驱动开发之GPIO
1、查看树莓派GPIO地址映射基地址
方法一:
cat /proc/iomem结果 3f200000-3f2000b3 : /soc/gpio@7e200000。3f200000为基地址,
方法二:
root@raspberrypi:/home/pi/Desktop# cd /proc/device-tree/soc/
root@raspberrypi:/proc/device-tree/soc# hexdump  -C ranges
00000000  7e 00 00 00 3f 00 00 00  01 00 00 00 40 00 00 00  |~...?.......@...|
00000010  40 00 00 00 00 00 10 00                           |@.......|
00000018
2、使用 mmap或者ioremap函数映射地址
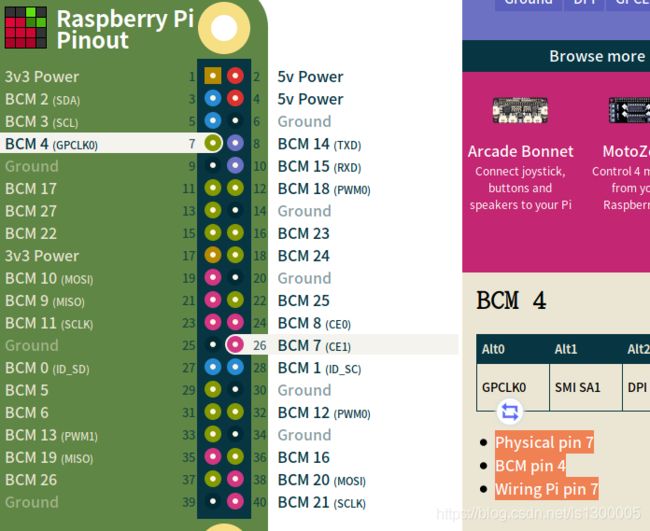
3、根据手册BCM2835-ARM-Peripherals.pdf操作GPIO pin 4的地址
参考GPIO
- Physical pin 7
- BCM pin 4
- Wiring Pi pin 7
BCM2835-ARM-Peripherals.pdf手册中的偏移地址就是 BCM pin 4
#include
#include
#include
#include
#include
#include
#include
#include


#define BCM2835_GPIO_BASE   0x3f200000
#define LED_ON  1
#define LED_OFF 0

#define GPFSEL0 (0x0/4)
#define GPFSEL1 (0x4/4)
#define GPFSEL2 (0x8/4)
#define GPFSEL3 (0xc/4)
#define GPFSEL4 (0x10/4)
#define GPFSEL5 (0x14/4)
#define GPSET0 (0x1c/4)
#define GPSET1 (0x20/4)
#define GPCLR0 (0x28/4)
#define GPCLR1 (0x2c/4)


int major = 111;
int minor = 0;
static dev_t devno;
static struct class *cls;
static struct device *test_device;

unsigned int * global_gpio = NULL;

 static int led_open (struct inode *inode, struct file *filep)
{//open
	int sel0_value = 0;
	//实现对pin 4引脚 设为输出操作
	sel0_value = *(global_gpio+GPFSEL0);
	sel0_value |= (1<<12);
	sel0_value &= ~(1<<13);
	sel0_value &= ~(1<<14);
	*(global_gpio+GPFSEL0) = sel0_value;

	printk(KERN_INFO"led_open dir set sel0_value = 0x%x\n", sel0_value);
	return 0;
}

 static ssize_t led_read(struct file *filep, char __user *buf, size_t len, loff_t *pos)
 {

	printk(KERN_INFO"led_read \n");
	 return 0;
 }

 static ssize_t led_write(struct file *filep, const char __user *buf, size_t len, loff_t *pos)
 {	//实现对pin 4引脚 高电平 低电平操作
	int set0_value = 0;
	char led_value = 0;
	unsigned long count = 1;

	if(copy_from_user((void *)&led_value, buf, count))
	{
		return -1;
	}

	printk(KERN_ERR"led_write led_num =%d \n",led_value);


	if (led_value > 0)
	{

		set0_value = *(global_gpio+GPSET0);
		set0_value |= (1<<4);
		 *(global_gpio+GPSET0) = set0_value;
		printk(KERN_ERR"0 write led_value =0x%x \n",set0_value);
	}
	else
	{
		set0_value = *(global_gpio+GPCLR0);
		set0_value |= (1<<4);
		 *(global_gpio+GPCLR0) = set0_value;
		printk(KERN_ERR"1 write led_value =0x%x \n",set0_value);
	}

	 printk(KERN_INFO"led_write end \n");

	 return 0;
 }


static struct file_operations led_ops = {

	.owner    =  THIS_MODULE,
	.open = led_open,
	.read = led_read,
	.write = led_write,
};


static int __init led_init(void)
{
	int ret;


	printk (KERN_INFO"global_gpio = 0x%lx\n", (unsigned long)global_gpio);

	global_gpio = ioremap(BCM2835_GPIO_BASE, 0x80);


	printk (KERN_INFO"global_gpio = 0x%lx\n", (unsigned long)global_gpio);

	devno = MKDEV(major,minor);

	ret = register_chrdev(major,"ledzfj", &led_ops);
	cls = class_create(THIS_MODULE, "myclass");
	   	if(IS_ERR(cls))
		{
			unregister_chrdev(major,"ledzfj");
			return -1;
		}
		test_device = device_create(cls,NULL,devno,NULL,"ledzfj");//mknod /dev/hello
		if(IS_ERR(test_device))
		{
			class_destroy(cls);
			unregister_chrdev(major,"ledzfj");
			return -1;
		}

       printk (KERN_INFO"\tinitialized\n");
       return 1;
}

static void __exit led_exit(void)

{
	iounmap(global_gpio);
	device_destroy(cls,devno);
	class_destroy(cls);
	unregister_chrdev(major,"ledzfj");
	printk(KERN_INFO"led_exit \n");
}

module_init(led_init);

module_exit(led_exit);

MODULE_LICENSE("GPL");
4、写makefile文件
ifneq ($(KERNELRELEASE),)
obj-m += test.o
else
PWD := $(shell pwd)
KDIR := /home/zfj/github/linux
all:
	make  -C  $(KDIR) M=$(PWD) modules ARCH=arm CROSS_COMPILE=arm-linux-gnueabihf-
clean:
	rm -rf *.o *.mod.c *.ko *.symvers *.order *.makers
endif
5、挂载驱动部分参考上一篇文章
6、调试代码
这个代码可以直接在树莓派上使用gcc 编译。
gcc -g 指令可以使用gdb进行调试。gdb的使用参考csdn gdb
#include
#include
#include
#include
#include
#include
 void main(int argc, char **argv)
 {
	 int fd,i,lednum;

	 fd = open("/dev/ledzfj",O_RDWR);
	 if(fd<0)
	 {
		 printf("open fail \n");
		 return ;
	 }
	 printf("open success fd=%d \n", fd);

	if( argc > 1 )
	{
         lednum= atoi(argv[1]);
	 write(fd,&lednum,sizeof(int));
	 printf(" str =%s \n", argv[1]);

	}


	 close(fd);
 }
7、调试驱动
在bcm pin4写入 0或1
./led.o 0

./led.o 1
参考:
树莓派LED驱动编写
C库说明
c-gpio-library-for-raspberry-pi
raspberrypi/linux
/bcm2835-1.58C库
RPi_Low-level_peripherals
BCM2835-ARM-Peripherals.pdf
gdb