Java中的SPI理念
SPI:Service provider Interface。
这个理念对于一般的Java开发者来说有点陌生的,它主要针对的还是中间服务商或者针对插件开发。最熟悉的莫过于数据库中的jar包问题,一般如果我们想使用mysql数据库,那么我们导入mysql的jar,Orcle数据库的话,我们导入Orcle的jar。这里运用的其实就是SPI的思想。
1.作用
为接口寻找实现类。
2.实现方式
2.1指定接口的标准
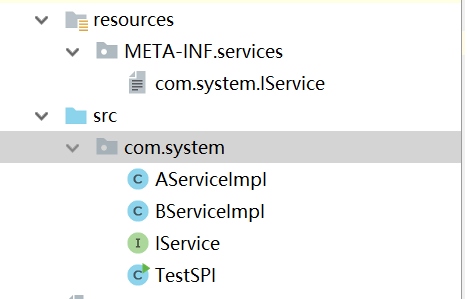
2.2不同厂商会针对这个标准实现自己的实现类,约定放在"CLassPath:META-INF/services/接口全名称",在这个文件里面规定实现类
2.3开发者引入jar包,即插即用~~~~
3.本地测试
3.1 模拟测试截图
3.2 通用接口标准
package com.system;

public interface IService {

    public void print();

}
3.3实现类A和实现类B
package com.system;

public class AServiceImpl implements IService {

    @Override
    public void print() {
        System.out.println("A print");
    }
}
package com.system;
public class BServiceImpl implements IService {
@Override
public void print() {
System.out.println("B print");
}
}com.system.AServiceImpl
com.system.BServiceImpl3.5测试Main
public class TestSPI {

    public static void main(String[] args) {

        ServiceLoader loadedImpl = ServiceLoader.load(IService.class);
        for (IService service : loadedImpl) {
            System.out.println(service.getClass());
            try {
                service.print();
            } catch (Exception e) {
                e.printStackTrace();
            }
        }
    }

}
3.6输出结果
class com.system.AServiceImpl
A print
class com.system.BServiceImpl
B print
4.源码解析:
4.1 属性:
    public final class ServiceLoader implements Iterable {
        //实现类所在目录
        private static final String PREFIX = "META-INF/services/";
        //接口
        private Class service;
        //类加载器
        private ClassLoader loader;
        //顺序缓存
        private LinkedHashMap providers = new LinkedHashMap<>();
        //延迟加载迭代器
        private LazyIterator lookupIterator;
    }
4.2 load过程
具体也没什么好说的,就是执行构造函数,并给属性赋值。此处实例化出来两个对象,一个是ServiceLoader,一个是它的内部类LazyIterator
    public static  ServiceLoader load(Class service) {
        ClassLoader cl = Thread.currentThread().getContextClassLoader();
        return ServiceLoader.load(service, cl);
    }
    public static  ServiceLoader load(Class service,
                                            ClassLoader loader)
    {
        return new ServiceLoader<>(service, loader);
    }
    private ServiceLoader(Class svc, ClassLoader cl) {
        service = svc;
        loader = cl;
        reload();
    }
    public void reload() {
        providers.clear();
        lookupIterator = new ServiceLoader.LazyIterator(service, loader);
    }
    private LazyIterator(Class service, ClassLoader loader) {
        this.service = service;
        this.loader = loader;
    }
4.3遍历过程。
4.3.1内部主要还是去遍历刚刚new出来的那个内部类lookupIterator。
            public boolean hasNext() {
                if (knownProviders.hasNext())
                    return true;
                return lookupIterator.hasNext();
            }

            public S next() {
                if (knownProviders.hasNext())
                    return knownProviders.next().getValue();
                return lookupIterator.next();
} public boolean hasNext() {
if (nextName != null) {
return true;
}
if (configs == null) {
try {
String fullName = PREFIX + service.getName();
if (loader == null)
configs = ClassLoader.getSystemResources(fullName);
else
configs = loader.getResources(fullName);
} catch (IOException x) {
fail(service, "Error locating configuration files", x);
}
}
while ((pending == null) || !pending.hasNext()) {
if (!configs.hasMoreElements()) {
return false;
}
pending = parse(service, configs.nextElement());
}
nextName = pending.next();
return true;
}4.3.3 next操作就是使用反射先获取实现类的Class对象,然后构造出实例返回。
        public S next() {
            if (!hasNext()) {
                throw new NoSuchElementException();
            }
            String cn = nextName;
            nextName = null;
            Class c = null;
            try {
                c = Class.forName(cn, false, loader);
            } catch (ClassNotFoundException x) {
                fail(service,
                     "Provider " + cn + " not found");
            }
            if (!service.isAssignableFrom(c)) {
                fail(service,
                     "Provider " + cn  + " not a subtype");
            }
            try {
                S p = service.cast(c.newInstance());
                providers.put(cn, p);
                return p;
            } catch (Throwable x) {
                fail(service,
                     "Provider " + cn + " could not be instantiated: " + x,
                     x);
            }
            throw new Error();          // This cannot happen
        }
总体感悟:
一、4.3.2 hasnext()和4.3.3 next()的共同点:都是先从缓存中获取,如果缓存中有的话直接返回,没有则通过内部类获取。
二、从源码可以看出,对于实现类的初始化并不是获取ServiceLoader的时候就立马会去实例化,而是去遍历时,根据当前的名称去实例化对象。三、可以看见内部使用的仍然是迭代器,获取某一个方法需要去遍历,效率不高,感觉使用map会更好。
主要还是要掌握SPI这个机制的思想。
