vue实现 UI 组件库
B站地址 https://www.bilibili.com/video/BV1nJ411V75n?p=1
模仿 element-ui 组件库,实现一个自己的组件库。
一、vue脚手架初始化一个项目
-
vue created 自己的项目名称。
-
这里我们选择自定义。
- 初始化好之后,我们将多余的东西去掉。
二,开始封装组件
在 componets下创建一个button.vue的文件,name 为 cbButton(名字就自己起,叫啥都行)。
<template>
  <button class="cb-button">
   按钮组件
  </button>
</template>

<script>

export default {
  name: 'cbButton'
}

</script>

<style lang="scss">

</style>
main.js
(注册组件)
import Vue from 'vue'
import App from './App.vue'
import OneButton from './components/button.vue'

Vue.config.productionTip = false

Vue.component(OneButton.name, OneButton)

new Vue({
  render: h => h(App)
}).$mount('#app')
App.vue(其他页面也可以)
注册完成后,组件就可以在项目中使用了。
<template>
  <div>
    <cb-button></cb-button>
  </div>
</template>
自此,一个最最基本的流程也就是这样了。不过组件是强调可复用的,自然我们需要在进行组件封装的时候考虑复用。
以 element-ui 的 button 组件为例。就考虑到了各种不同的样式。
<template>
  <button class="cb-button" :class="[`cb-button-${type}`,
  {'is-plain': plain},
  {'is-round': round},
  {'is-circle': circle},
  {'is-disabled': disabled}
  ]"
    @click="handleClick"
    :disabled="disabled"
  >
  </button>
</template>

<script>
export default {
  name: 'cbButton',
  props: {
    type: {
      type: String,
      default: 'default'
    },
    plain: {
      type: Boolean,
      default: false
    },
    round: {
      type: Boolean,
      default: false
    },
    circle: {
      type: Boolean,
      default: false
    },
    disabled: {
      type: Boolean,
      default: false
    }
  },
  methods: {
    handleClick(e) {
      this.$emit('click', e)
    }
  },
}
</script>

<style lang="scss" scoped>
  .cb-button{
    display: inline-block;
    line-height: 1;
    white-space: nowrap;
    cursor: pointer;
    background: #ffffff;
    border: 1px solid #dcdfe6;
    color: #606266;
    -webkit-appearance: none;
    text-align: center;
    box-sizing: border-box;
    outline: none;
    margin: 0;
    transition: 0.1s;
    font-weight: 500;
    //禁止元素的文字被选中
    -moz-user-select: none;
    -webkit-user-select: none;
    -moz-user-select: none;
    -ms-user-select: none;
    padding: 12px 20px;
    font-size: 14px;
    border-radius: 4px;
    &:hover,
    &:hover{
      color: #409eff;
      border-color: #c6e2ff;
      background-color: #ecf5ff;
    }
  }
  .cb-button-primary{
  color:#fff;
  background-color: #409eff;
  border-color: #409eff;
  &:hover,
  &:focus{
    background: #66b1ff;
    background-color: #66b1ff;
    color: #fff;
    }
  }
  .cb-button-success{
  color:#fff;
  background-color: #67c23a;
  border-color: #67c23a;
  &:hover,
  &:focus{
    background: #85ce61;
    background-color: #85ce61;
    color: #fff;
    }
  }
  .cb-button-info{
  color:#fff;
  background-color: #909399;
  border-color: #909399;
  &:hover,
  &:focus{
    background: #a6a9ad;
    background-color: #a6a9ad;
    color: #fff;
    }
  }
  .cb-button-warning{
  color:#fff;
  background-color: #e6a23c;
  border-color: #e6a23c;
  &:hover,
  &:focus{
    background: #ebb563;
    background-color: #ebb563;
    color: #fff;
    }
  }
  .cb-button-danger{
  color:#fff;
  background-color: #f56c6c;
  border-color: #f56c6c;
  &:hover,
  &:focus{
    background: #f78989;
    background-color: #f78989;
    color: #fff;
    }
  }
  // 朴素按钮样式
.cb-button.is-plain{
  &:hover,
  &:focus{
    background: #fff;
    border-color: #489eff;
    color: #409eff;
  }
}
.cb-button-primary.is-plain{
  color: #409eff;
  background: #ecf5ff;
  &:hover,
  &:focus{
    background: #409eff;
    border-color: #409eff;
    color: #fff;
  }
}
.cb-button-success.is-plain{
  color: #67c23a;
  background: #c2e7b0;
  &:hover,
  &:focus{
    background: #67c23a;
    border-color: #67c23a;
    color: #fff;
  }
}
.cb-button-info.is-plain{
  color: #909399;
  background: #d3d4d6;
  &:hover,
  &:focus{
    background: #909399;
    border-color: #909399;
    color: #fff;
  }
}
.cb-button-warning.is-plain{
  color: #e6a23c;
  background: #f5dab1;
  &:hover,
  &:focus{
    background: #e6a23c;
    border-color: #e6a23c;
    color: #fff;
  }
}
.cb-button-danger.is-plain{
  color: #f56c6c;
  background: #fbc4c4;
  &:hover,
  &:focus{
    background: #f56c6c;
    border-color: #f56c6c;
    color: #fff;
  }
}

.cb-button.is-round {
  border-radius: 20px;
  padding: 12px 23px;
}

.cb-button.is-circle {
  border-radius: 50%;
  padding: 12px;
}
.cb-button.is-disabled{
  cursor: no-drop;
}
</style>
封装比较简单的 button 组件就是这样了。
三,接下来我们进行打包。只有打包之后的代码才可以发布到 npm 上面,供其他开发者下载使用。
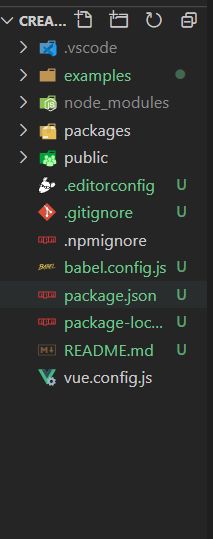
这里解释一下各个文件夹的来源
- .vscode 这个可有可无,
- examples 这个是原来的 src 文件夹改造而来的
- packages 这个是要自己新建的,里面的内容是 原来 src 文件夹里面的components 里面的各大组件原样复制一份过去。(如果项目中使用了 iconfont,那么你也要把 iconfont这个文件夹一起拷贝到里面)
在 packages 文件夹中新建一个 index.js
import Button from './button'
import Dialog from './dialog'
import Input from './input'
import Checkbox from './checkbox'
import Radio from './radio'
import RadioGroup from './radio-group'
import Switch from './switch'
import CheckboxGroup from './checkbox-group'
import Form from './form'
import FormItem from './form-item'
import './fonts/iconfont.css'

const components = [
  Button,
  Dialog,
  Input,
  Checkbox,
  Radio,
  RadioGroup,
  Switch,
  CheckboxGroup,
  Form,
  FormItem
]
// 定义install方法
const install = function (Vue) {
  // 注册所有的组件
  components.forEach(component => {
    Vue.component(component.name, component)
  })
}
// 判断是否直接引入文件,如果是,就不用调用Vue.use()
if (typeof window !== 'undefined' && window.Vue) {
  install(window.Vue)
}
// 导出install方法
export default {
  install
}
把所有到导出的组件都在这里面引用。
vue.config.js
const path = require('path')
module.exports = {
  pages:{
    index:{
      entry:'examples/main.js',
      template:'public/index.html',
      filename:'index.html'
    }
  },

  chainWebpack: config => {
    config.module
    .rule('js')
    .include.add(path.resolve(__dirname,'packages')).end()
    .use('babel')
    .loader('babel-loader')
    .tap(options => {
      return options
    })
  }
}
四 添加打包命令
package.json
{
  "name": "cream_peach",
  "version": "0.1.0",
  "scripts": {
    "serve": "vue-cli-service serve",
    "build": "vue-cli-service build",
    "lint": "vue-cli-service lint",
    "lib":"vue-cli-service build --target lib packages/index.js"
  },
}
运行 npm run lib
五,发布
package.json
"name": "cream_peach",
"version": "0.1.0",
"private": false,
"main": "dist/cream_peach.umd.min.js",
根目录添加 .npmignore 文件
# 忽略目录
examples/
packages/
public/

# 忽略指定文件
vue.config.js
babel.config.js
*.map
填写自己的信息进行登录
运行 npm publish
$ npm publish
npm notice
npm notice package: cream_peach@0.1.0
npm notice === Tarball Contents ===
npm notice 121B   .editorconfig
npm notice 21.2kB dist/cream_peach.css
npm notice 5.4kB  dist/fonts/iconfont.9878c240.eot
npm notice 196B   dist/demo.html
npm notice 89.3kB dist/cream_peach.common.js
npm notice 89.7kB dist/cream_peach.umd.js
npm notice 25.0kB dist/cream_peach.umd.min.js
npm notice 1.1kB  package.json
npm notice 38B    .vscode/settings.json
npm notice 273B   README.md
npm notice 14.1kB dist/img/iconfont.e95e657c.svg
npm notice 5.2kB  dist/fonts/iconfont.84f43333.ttf
npm notice === Tarball Details ===
npm notice name:          cream_peach
npm notice version:       0.1.0
npm notice package size:  65.4 kB
npm notice unpacked size: 251.7 kB
npm notice shasum:        40fee1d57369c828305f9c535d86a92f4ef0998b
npm notice integrity:     sha512-gIeb/3XKcvX2e[...]dGpQh2FOeeIKA==
npm notice total files:   12
npm notice
+ cream_peach@0.1.0
出现这些信息的时候,就证明你成功了
这个时候你可以到 npm 官网上通过你自己设定的包名,进行搜索,然后像平常使用 npm 包一样进行,安装下载
完结,散花 ✨✨✨✨✨✨✨✨


