ffmpeg:将YUV原始数据编码封装为mp4格式
因为需要看了一些关于视频编解码相关的知识,并在学习过程中接触到了ffmepg这个强大的视音频处理工具,针对ffmpeg基础库进行了一个初步的学习,基本把其编解码流程熟悉,这里做一个总结。备以后复习用。本人使用的ffmpeg版本为3.1window版本的。
一、ffmpeg库包在window上配置安装
下载地址为:http://ffmpeg.org/
该网站中的FFMPEG分为3个版本:Static,Shared,Dev。介绍如下:
前两个版本可以直接在命令行中使用,他们的区别在于:
Static里面只有3个应用程序:ffmpeg.exe,ffplay.exe,ffprobe.exe,每个exe的体积都很大,相关的Dll已经被编译到exe里面去了。
Shared里面除了3个应用程序:ffmpeg.exe,ffplay.exe,ffprobe.exe之外,还有一些Dll,比如说avcodec-54.dll之类的。Shared里面的exe体积很小,他们在运行的时候,到相应的Dll中调用功能。
Dev版本是用于开发的,里面包含了include(头文件xxx.h)和lib(库文件xxx.lib),这个版本不包含exe文件。
在vs使用和一般的库包一样只要把Dev版本下的include文件添加到包含目录,lib文件夹下的lib文件添加到附加依赖性项中。不要忘记在环境变量中添加bin目录。bin文件夹位于Shared版本里面。
二、视频编码封装
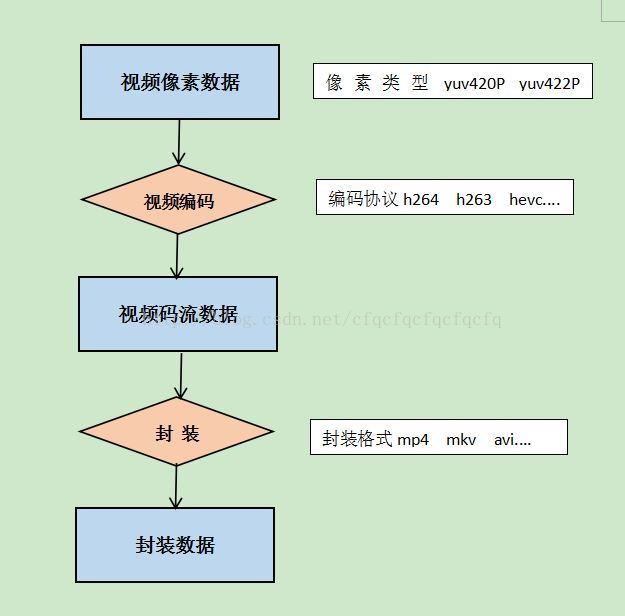
本文中实现的一个小功能是把一个YUV原始视频数据(时间序列图像)经过h264编码为视频码流,然后在使用mp4封装格式封装。流程图如下:
简单叙述一下ffmpeg编码流程:
1、首先使用av_register_all()函数注册所有的编码器和复用器(理解为格式封装器)。该步骤必须放在所有ffmpeg代码前第一个执行
2、avformat_alloc_output_context2():初始化包含有输出码流(AVStream)和解复用器(AVInputFormat)的AVFormatContext
3、avio_open( )打开输出文件
4、av_new_stream() 创建视频码流 该函数生成一个空AVstream 该结构存放编码后的视频码流 。视频码流被拆分为AVPacket新式保存在AVStream中。
5、设置编码器信息,该步骤主要是为AVCodecContext(从AVStream->codec 获取指针)结构体设置一些参数,包括codec_id、codec_type、width、height、pix_fmt ..... 根据编码器的不同,还要额外设置一些参数(如 h264 要设置qmax、qmin、qcompress参数才能正常使用h264编码)
6、查找并打开编码器,根据前一步设置的编码器参数信息,来查找初始化一个编码其,并将其打开。用到函数为av_fine_encoder()和av_open2()。
7、写头文件 avformat_write_header()。这一步主要是将封装格式的信息写入文件头部位置。
8、编码帧。用到的函数 avcodec_encode_video2() 将AVFrame编码为AVPacket
9、在写入文件之前 还需要做一件事情就是设置AVPacket一些信息。这些信息关乎最后封装格式能否被正确读取。后面回详细讲述该部分内容
10、编码帧写入文件 av_write_frame()
11、flush_encoder():输入的像素数据读取完成后调用此函数。用于输出编码器中剩余的AVPacket。
12、av_write_trailer():写文件尾(对于某些没有文件头的封装格式,不需要此函数。比如说MPEG2TS)。
下面贴上完整的程序代码:
extern "C"
{
#include
#include
#include
#include
}

using namespace std;

int flush_encoder(AVFormatContext *fmt_ctx,unsigned int stream_index);

int main(int argc, char *argv[])
{
    AVFormatContext *pFormatCtx=nullptr;
    AVOutputFormat *fmt=nullptr;
    AVStream *video_st=nullptr;
    AVCodecContext *pCodecCtx=nullptr;
    AVCodec *pCodec=nullptr;

    uint8_t *picture_buf=nullptr;
    AVFrame *picture=nullptr;
    int size;

    //打开视频
    FILE *in_file = fopen("F://src01_480x272.yuv", "rb");
    if(!in_file)
    {
        cout<<"can not open file!"<oformat;
    //[2]

    //[3] --打开文件
    if(avio_open(&pFormatCtx->pb,out_file,AVIO_FLAG_READ_WRITE))
    {
        cout<<"output file open fail!";
        goto end;
    }
    //[3]

    //[4] --初始化视频码流
    video_st = avformat_new_stream(pFormatCtx,0);
    if(video_st==NULL)
    { printf("failed allocating output stram\n");
        goto end;
    }
    video_st->time_base.num = 1;
    video_st->time_base.den =25;
    //[4]

    //[5] --编码器Context设置参数
    pCodecCtx = video_st->codec;
    pCodecCtx->codec_id = fmt->video_codec;
    pCodecCtx->codec_type = AVMEDIA_TYPE_VIDEO;
    pCodecCtx->pix_fmt = AV_PIX_FMT_YUV420P;
    pCodecCtx->width=in_w;
    pCodecCtx->height=in_h;
    pCodecCtx->time_base.num = 1;
    pCodecCtx->time_base.den = 25;
    pCodecCtx->bit_rate = 400000;
    pCodecCtx->gop_size = 12;

    if(pCodecCtx->codec_id == AV_CODEC_ID_H264)
    {
        pCodecCtx->qmin = 10;
        pCodecCtx->qmax = 51;
        pCodecCtx->qcompress = 0.6;
    }
    if (pCodecCtx->codec_id == AV_CODEC_ID_MPEG2VIDEO)
        pCodecCtx->max_b_frames = 2;
    if (pCodecCtx->codec_id == AV_CODEC_ID_MPEG1VIDEO)
        pCodecCtx->mb_decision = 2;
    //[5]

    //[6] --寻找编码器并打开编码器
    pCodec = avcodec_find_encoder(pCodecCtx->codec_id);
    if(!pCodec)
    {
        cout<<"no right encoder!"<width=pCodecCtx->width;
    picture->height=pCodecCtx->height;
    picture->format=pCodecCtx->pix_fmt;
    size = avpicture_get_size(pCodecCtx->pix_fmt,pCodecCtx->width,pCodecCtx->height);
    picture_buf = (uint8_t*)av_malloc(size);
    avpicture_fill((AVPicture*)picture,picture_buf,pCodecCtx->pix_fmt,pCodecCtx->width,pCodecCtx->height);

    //[7] --写头文件
    avformat_write_header(pFormatCtx,NULL);
    //[7]

    AVPacket pkt; //创建已编码帧
    int y_size = pCodecCtx->width*pCodecCtx->height;
    av_new_packet(&pkt,size*3);

    //[8] --循环编码每一帧
    for(int i=0;idata[0] = picture_buf; //亮度Y
        picture->data[1] = picture_buf+y_size; //U
        picture->data[2] = picture_buf+y_size*5/4; //V
        //AVFrame PTS
        picture->pts=i;
        int got_picture = 0;

        //编码
        int ret = avcodec_encode_video2(pCodecCtx,&pkt,picture,&got_picture);
        if(ret<0)
        {
            cout<<"encoder fail!"<index;
            av_packet_rescale_ts(&pkt, pCodecCtx->time_base, video_st->time_base);
            pkt.pos = -1;
            ret = av_interleaved_write_frame(pFormatCtx,&pkt);
            av_free_packet(&pkt);
        }
    }
    //[8]

    //[9] --Flush encoder
    int ret = flush_encoder(pFormatCtx,0);
    if(ret < 0)
    {
        cout<<"flushing encoder failed!"<codec);
        av_free(picture);
        av_free(picture_buf);
    }
    if(pFormatCtx)
    {
        avio_close(pFormatCtx->pb);
        avformat_free_context(pFormatCtx);
    }

    fclose(in_file);

    return 0;
}

int flush_encoder(AVFormatContext *fmt_ctx,unsigned int stream_index)
{
    int ret;
    int got_frame;
    AVPacket enc_pkt;
    if (!(fmt_ctx->streams[stream_index]->codec->codec->capabilities &
          CODEC_CAP_DELAY))
        return 0;
    while (1) {
        printf("Flushing stream #%u encoder\n", stream_index);
        enc_pkt.data = NULL;
        enc_pkt.size = 0;
        av_init_packet(&enc_pkt);
        ret = avcodec_encode_video2 (fmt_ctx->streams[stream_index]->codec, &enc_pkt,
                                     NULL, &got_frame);
        av_frame_free(NULL);
        if (ret < 0)
            break;
        if (!got_frame)
        {ret=0;break;}
        cout<<"success encoder 1 frame"<streams[stream_index]->codec->time_base,
                             fmt_ctx->streams[stream_index]->time_base);
        ret = av_interleaved_write_frame(fmt_ctx, &enc_pkt);
        if (ret < 0)
            break;
    }
    return ret;
}
在步骤9中已说明要完成最后的格式封装(mux),需要对AVPacket的参数进行设置。具体设置项如下:
 // parpare packet for muxing
        enc_pkt.stream_index = stream_index;
        av_packet_rescale_ts(&enc_pkt,
                             fmt_ctx->streams[stream_index]->codec->time_base,
fmt_ctx->streams[stream_index]->time_base);2、将pts(显示时间戳)和dts(编码时间戳)和duration(nextpts - curpts)按照不同time_base(时间基准)进行转换。具体的pts、dts、time_base概念可以见参考文献一。至于转换原因可以参考参考文献二。
参考文献:
1、pts dts
2、time_base
