Spring Security Oauth2 如何自定义授权获取token
Oauth2的默认授权模式有四种:
- 授权码模式-authorization_code
- 密码模式-password
- 客户端模式-client_credentials
- 隐式授权模式-implicit
我们先看一下获取token的运行流程:
(1)在发起 URL+/oauth/token 获取token的请求后,实际上是请求 TokenEndpoint 类的postAccessToken或者getAccessToken方法,就相当于一个普通的concoller请求方法,根据请求类型是get或者post,其实get请求内部也是调用post请求的方法)

(2)在postAccessToken这个方法中,在这个方法的132行调用TokenGranter类的grant方法来获取token,这个方法也是最重要的,通过这个方法我们可以对请求的参数进行校验是否合法,是否给予令牌。

(3)TokenGranter是一个接口,它有多个实现类,CompositeTokenGranter是其中之一,在grant方法中,会循环遍历所有的授权方式,根据请求参数携带的授权方式码,来匹配对应的授权处理实现类,调用实现类中的grant方法。那么关键点来了,请求参数中携带的是我们自定义的授权方式码,如果要匹配上,那么首先我们要创建自定义的授权处理类,然后把这个授权处理类放入Spring Security默认的授权处理集合中,这样才能循环匹配上,进行下一步。

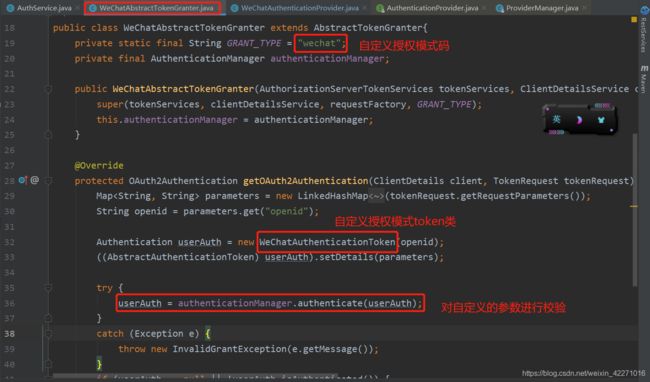
(4)创建自定义授权处理类,我们可以继承TokenGranter来实现自定义的身份验证以便获取token,而AbstractTokenGranter是一个继承TokenGranter的实现类,一般我们都会继承这个类进行使用。
从下面代码可以看出,这个抽象类的grant方法返回token,在最后调用了getOAuth2Authentication方法,所以
我们只需要继承AbstractTokenGranter类然后重写getOAuth2Authentication方法就可以了。

(5)下面是自己的实现类,重写了getOAuth2Authentication方法,对参数进行了自定义的校验,校验的方法在下图中标识出
package com.doudou.config;

import org.springframework.security.authentication.AbstractAuthenticationToken;
import org.springframework.security.core.GrantedAuthority;

import java.util.Collection;

/**
 * Created by zj on 2020/2/6 15:34
 */
public class WeChatAuthenticationToken extends AbstractAuthenticationToken {
    private static final long serialVersionUID = 1L;

    /** 账号 */
    private final Object principal;

    public WeChatAuthenticationToken(Object username) {
        super(null);
        this.principal = username;
        setAuthenticated(false);
    }

    /**
     * Creates a token with the supplied array of authorities.
     *
     * @param authorities the collection of GrantedAuthoritys for the principal
     *                    represented by this authentication object.
     * @param username
     */
    public WeChatAuthenticationToken(Collection authorities, Object username) {
        super(authorities);
        this.principal = username;
        super.setAuthenticated(true);
    }

    @Override
    public Object getCredentials() {
        return null;
    }

    @Override
    public Object getPrincipal() {
        return this.principal;
    }

    @Override
    public void setAuthenticated(boolean isAuthenticated) throws IllegalArgumentException {
        if (isAuthenticated) {
            throw new IllegalArgumentException(
                    "Cannot set this token to trusted - use constructor which takes a GrantedAuthority list instead");
        }

        super.setAuthenticated(false);
    }

    @Override
    public void eraseCredentials() {
        super.eraseCredentials();
    }
}
(6)对于参数的校验,在上图中36行代码,authenticationManager.authenticate(userAuth);这个方法中进行校验的,下面我们先看一下源码,再去实现自定义的认证提供商类AuthenticationProvider。
在源码中,AuthenticationProvider是一个接口,里面有两个方法,一个是校验参数的方法,另一个则是根据当前认证信息匹配出对应的认证提供商类,这个接口有很多实现类,其中ProviderManager类是非常关键的,在这个类中的参数校验方法中,会根据当前要认证的对象,获取符合要求的所有的认证提供商,然后循环匹配出对应的认证提供商,在调取校验方法进行参数校验

(7)由上图可知,我们只需要实现ProviderManager接口的两个方法,自定义自己的参数校验方法,并且把这个自定义的ProviderManager加入到认证提供商集合中,在循环匹配的时候即可匹配到我们自定义的ProviderManager,进行参数校验。

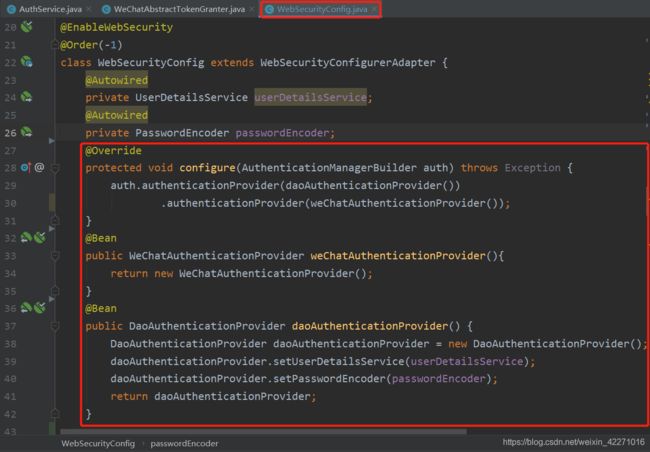
(8)把自定义的ProviderManager放入ProviderManager集合中,我的方法如下,在配置文件中,重写configure方法,配置ProviderManager,这里除了配置我们自定义的ProviderManager之外,还需要额外配置默认的密码授权模式的ProviderManager,否则client认证将不会通过。
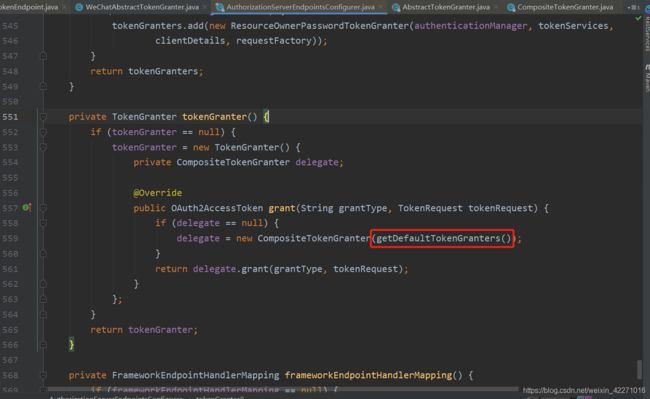
(9)经过以上步骤,已经实现自定义token的获取,最后要做的是把这个自定义授权模式类,放入系统默认的授权模式集合中,这样在CompositeTokenGranter的grant方法中,才能循环匹配到我们自定义的授权模式,进而直接获取token。我们先来看一下,系统默认的授权模式集合是在哪里初始化的?答案在AuthorizationServerEndpointsConfigurer这个类中559行,调用了getDefaultTokenGranters()方法,并且创建了 CompositeTokenGranter的实例对象,进行初始化。查看源码可以发现,系统已经把默认的授权模式全都写死在程序里了,因此我的解决思路是如下的

(10)把AuthorizationServerEndpointsConfigurer中,初始化默认授权方式的代码复制一下,在配置文件中额外重新配置自定义的模式,代码如下
package com.doudou.config;

import com.doudou.service.WeChatAbstractTokenGranter;
import org.springframework.beans.factory.annotation.Autowired;
import org.springframework.context.annotation.Bean;
import org.springframework.context.annotation.Configuration;
import org.springframework.security.authentication.AuthenticationManager;
import org.springframework.security.authentication.AuthenticationProvider;
import org.springframework.security.authentication.ProviderManager;
import org.springframework.security.core.userdetails.UserDetailsByNameServiceWrapper;
import org.springframework.security.core.userdetails.UserDetailsService;
import org.springframework.security.oauth2.common.OAuth2AccessToken;
import org.springframework.security.oauth2.provider.*;
import org.springframework.security.oauth2.provider.client.ClientCredentialsTokenGranter;
import org.springframework.security.oauth2.provider.code.AuthorizationCodeServices;
import org.springframework.security.oauth2.provider.code.AuthorizationCodeTokenGranter;
import org.springframework.security.oauth2.provider.code.InMemoryAuthorizationCodeServices;
import org.springframework.security.oauth2.provider.implicit.ImplicitTokenGranter;
import org.springframework.security.oauth2.provider.password.ResourceOwnerPasswordTokenGranter;
import org.springframework.security.oauth2.provider.refresh.RefreshTokenGranter;
import org.springframework.security.oauth2.provider.request.DefaultOAuth2RequestFactory;
import org.springframework.security.oauth2.provider.token.AuthorizationServerTokenServices;
import org.springframework.security.oauth2.provider.token.DefaultTokenServices;
import org.springframework.security.oauth2.provider.token.TokenEnhancer;
import org.springframework.security.oauth2.provider.token.TokenStore;
import org.springframework.security.web.authentication.preauth.PreAuthenticatedAuthenticationProvider;
import org.springframework.security.web.authentication.preauth.PreAuthenticatedAuthenticationToken;

import java.util.ArrayList;
import java.util.Arrays;
import java.util.List;

/**
 * Created by zj on 2020/2/6 22:17
 */
@Configuration
public class TokenGranterConfig {
    @Autowired
    private ClientDetailsService clientDetailsService;

    @Autowired
    private UserDetailsService userDetailsService;

    @Autowired
    private AuthenticationManager authenticationManager;

    @Autowired
    private TokenStore tokenStore;

    @Autowired
    TokenEnhancer tokenEnhancer;

    private AuthorizationCodeServices authorizationCodeServices;

    private boolean reuseRefreshToken = true;

    private AuthorizationServerTokenServices tokenServices;

    private TokenGranter tokenGranter;

    /**
     * 授权模式
     *
     * @return
     */
    @Bean
    public TokenGranter tokenGranter() {
        if (tokenGranter == null) {
            tokenGranter = new TokenGranter() {
                private CompositeTokenGranter delegate;

                @Override
                public OAuth2AccessToken grant(String grantType, TokenRequest tokenRequest) {
                    if (delegate == null) {
                        delegate = new CompositeTokenGranter(getDefaultTokenGranters());
                    }
                    return delegate.grant(grantType, tokenRequest);
                }
            };
        }
        return tokenGranter;
    }

    /**
     * 程序支持的授权类型
     *
     * @return
     */
    private List getDefaultTokenGranters() {
        AuthorizationServerTokenServices tokenServices = tokenServices();
        AuthorizationCodeServices authorizationCodeServices = authorizationCodeServices();
        OAuth2RequestFactory requestFactory = requestFactory();

        List tokenGranters = new ArrayList();
        // 添加授权码模式
        tokenGranters.add(new AuthorizationCodeTokenGranter(tokenServices, authorizationCodeServices, clientDetailsService, requestFactory));
        // 添加刷新令牌的模式
        tokenGranters.add(new RefreshTokenGranter(tokenServices, clientDetailsService, requestFactory));
        // 添加隐式授权模式
        tokenGranters.add(new ImplicitTokenGranter(tokenServices, clientDetailsService, requestFactory));
        // 添加客户端模式
        tokenGranters.add(new ClientCredentialsTokenGranter(tokenServices, clientDetailsService, requestFactory));
        // 添加自定义授权模式(实际是密码模式的复制)
        tokenGranters.add(new WeChatAbstractTokenGranter(tokenServices, clientDetailsService, requestFactory));
        if (authenticationManager != null) {
            // 添加密码模式
            tokenGranters.add(new ResourceOwnerPasswordTokenGranter(authenticationManager, tokenServices, clientDetailsService, requestFactory));
        }
        return tokenGranters;
    }

    /**
     * TokenServices
     *
     * @return
     */
    private AuthorizationServerTokenServices tokenServices() {
        if (tokenServices != null) {
            return tokenServices;
        }
        this.tokenServices = createDefaultTokenServices();
        return tokenServices;
    }

    /**
     * 授权码API
     *
     * @return
     */
    private AuthorizationCodeServices authorizationCodeServices() {
        if (authorizationCodeServices == null) {
            authorizationCodeServices = new InMemoryAuthorizationCodeServices();
        }
        return authorizationCodeServices;
    }

    /**
     * OAuth2RequestFactory的默认实现,它初始化参数映射中的字段,
     * 验证授权类型(grant_type)和范围(scope),并使用客户端的默认值填充范围(scope)(如果缺少这些值)。
     *
     * @return
     */
    private OAuth2RequestFactory requestFactory() {
        return new DefaultOAuth2RequestFactory(clientDetailsService);
    }

    /**
     * 默认 TokenService
     *
     * @return
     */
    private DefaultTokenServices createDefaultTokenServices() {
        DefaultTokenServices tokenServices = new DefaultTokenServices();
        tokenServices.setTokenStore(tokenStore);
        tokenServices.setSupportRefreshToken(true);
        tokenServices.setReuseRefreshToken(reuseRefreshToken);
        tokenServices.setClientDetailsService(clientDetailsService);
        tokenServices.setTokenEnhancer(tokenEnhancer);
        addUserDetailsService(tokenServices, this.userDetailsService);
        return tokenServices;
    }

    /**
     * 添加预身份验证
     *
     * @param tokenServices
     * @param userDetailsService
     */
    private void addUserDetailsService(DefaultTokenServices tokenServices, UserDetailsService userDetailsService) {
        if (userDetailsService != null) {
            PreAuthenticatedAuthenticationProvider provider = new PreAuthenticatedAuthenticationProvider();
            provider.setPreAuthenticatedUserDetailsService(new UserDetailsByNameServiceWrapper(userDetailsService));
            tokenServices.setAuthenticationManager(new ProviderManager(Arrays.asList(provider)));
        }
    }
}
(11)授权认证服务端点配置
package com.doudou.config;

import org.springframework.beans.factory.annotation.Autowired;
import org.springframework.cloud.bootstrap.encrypt.KeyProperties;
import org.springframework.context.annotation.Bean;
import org.springframework.context.annotation.Configuration;
import org.springframework.security.authentication.AuthenticationManager;
import org.springframework.security.core.userdetails.UserDetailsService;
import org.springframework.security.crypto.bcrypt.BCryptPasswordEncoder;
import org.springframework.security.oauth2.config.annotation.configurers.ClientDetailsServiceConfigurer;
import org.springframework.security.oauth2.config.annotation.web.configuration.AuthorizationServerConfigurerAdapter;
import org.springframework.security.oauth2.config.annotation.web.configuration.EnableAuthorizationServer;
import org.springframework.security.oauth2.config.annotation.web.configurers.AuthorizationServerEndpointsConfigurer;
import org.springframework.security.oauth2.config.annotation.web.configurers.AuthorizationServerSecurityConfigurer;
import org.springframework.security.oauth2.provider.ClientDetailsService;
import org.springframework.security.oauth2.provider.TokenGranter;
import org.springframework.security.oauth2.provider.client.JdbcClientDetailsService;
import org.springframework.security.oauth2.provider.token.DefaultAccessTokenConverter;
import org.springframework.security.oauth2.provider.token.TokenStore;
import org.springframework.security.oauth2.provider.token.store.JwtAccessTokenConverter;
import org.springframework.security.oauth2.provider.token.store.JwtTokenStore;
import org.springframework.security.oauth2.provider.token.store.KeyStoreKeyFactory;

import javax.annotation.Resource;
import javax.sql.DataSource;
import java.security.KeyPair;


@Configuration
@EnableAuthorizationServer
class AuthorizationServerConfig extends AuthorizationServerConfigurerAdapter {
    @Autowired
    private DataSource dataSource;

    @Autowired
    private JwtAccessTokenConverter jwtAccessTokenConverter;

    @Autowired
    private TokenGranter tokenGranter;

    @Autowired
    UserDetailsService userDetailsService;

    @Autowired
    AuthenticationManager authenticationManager;

    @Autowired
    TokenStore tokenStore;

    @Bean("keyProp")
    public KeyProperties keyProperties() {
        return new KeyProperties();
    }

    @Resource(name = "keyProp")
    private KeyProperties keyProperties;

    @Bean
    public ClientDetailsService clientDetails() {
        return new JdbcClientDetailsService(dataSource);
    }

    @Override
    public void configure(ClientDetailsServiceConfigurer clients) throws Exception {
        clients.jdbc(this.dataSource).clients(this.clientDetails());
    }

    @Bean
    @Autowired
    public TokenStore tokenStore(JwtAccessTokenConverter jwtAccessTokenConverter) {
        return new JwtTokenStore(jwtAccessTokenConverter);
    }

    @Bean
    public JwtAccessTokenConverter jwtAccessTokenConverter(CustomUserAuthenticationConverter customUserAuthenticationConverter) {
        JwtAccessTokenConverter converter = new JwtAccessTokenConverter();
        KeyPair keyPair = new KeyStoreKeyFactory
                (keyProperties.getKeyStore().getLocation(), keyProperties.getKeyStore().getSecret().toCharArray())
                .getKeyPair(keyProperties.getKeyStore().getAlias(), keyProperties.getKeyStore().getPassword().toCharArray());
        converter.setKeyPair(keyPair);
        //配置自定义的CustomUserAuthenticationConverter
        DefaultAccessTokenConverter accessTokenConverter = (DefaultAccessTokenConverter) converter.getAccessTokenConverter();
        accessTokenConverter.setUserTokenConverter(customUserAuthenticationConverter);
        return converter;
    }

    @Override
    public void configure(AuthorizationServerEndpointsConfigurer endpoints) throws Exception {
        endpoints.accessTokenConverter(jwtAccessTokenConverter)
                .tokenGranter(tokenGranter) //四种授权模式+刷新令牌的模式+自定义授权模式
                .authenticationManager(authenticationManager)//认证管理器
                .tokenStore(tokenStore)//令牌存储
                .userDetailsService(userDetailsService)//用户信息service
                ;
    }

    @Override
    public void configure(AuthorizationServerSecurityConfigurer oauthServer) throws Exception {
        oauthServer.allowFormAuthenticationForClients()
                .passwordEncoder(new BCryptPasswordEncoder())
                .tokenKeyAccess("permitAll()")
                .checkTokenAccess("isAuthenticated()");
    }


}
(12)经过以上设置,在请求的时候,默认的授权模式中已经有我们自定义的模式了,并且可以获取token,到此并未完结,还有一个小坑,在进入获取token的真正方法前还会有一次client的授权模式码的校验,主要是为了校验client是否拥有我们自定义的授权码,显然是没有的,因此我们要添加进去,否则这一步校验不能通过,无法获取token

(13)查看源码可以发现,当前clientid拥有的授权方式码是通过ClientDetails client = clientDetailsService.loadClientByClientId(clientId);获取的,在数据库中配置的,因此我们需要再oauth_client_details表中,在对应的clientid的authorized_grant_types字段中加上自定义的授权模式码。

到此获取token结束,还有一些spring security的配置文件,可以自行百度,这里不再赘述。额外 如果需要其他自定义授权模式,只需要重复上述步骤,创建新的自定义授权模式类,以及授权模式码,放入系统模式授权模式集合以及数据库中即可。
以上纯属个人观点,如有更好的方案,欢迎指教,不胜感激!