springboot集成tk.mybatis,及Druid数据源
一、springboot集成Druid数据源
1、添加Druid依赖
2、添加配置
具体步骤如下:
1、添加Druid依赖
            com.alibaba
            druid-spring-boot-starter
            1.1.10


            mysql
            mysql-connector-java
2、在配置文件中添加以下Druid相关的配置
spring:
  datasource:
    druid:
      url: jdbc:mysql://127.0.0.1:3306/test?serverTimezone=UTC&characterEncoding=utf8&zeroDateTimeBehavior=convertToNull&&&useSSL=true&tinyInt1isBit=false&allowMultiQueries=true
      username: root
      password: root
      driver-class-name: com.mysql.cj.jdbc.Driver
      #连接池配置
      initial-size: 5
      max-active: 100
      min-idle: 5
      max-wait: 60000
      pool-prepared-statements: true
      max-pool-prepared-statement-per-connection-size: 20
      validation-query-timeout: 60000
      validation-query: SELECT 1 FROM DUAL
      test-on-borrow: false
      test-on-return: false
      test-while-idle: true
      time-between-eviction-runs-millis: 60000
      min-evictable-idle-time-millis: 100000
      ###监控配置 begin###
      # WebStatFilter配置,说明请参考Druid Wiki,配置_配置WebStatFilter
      web-stat-filter:
        enabled: true
        url-pattern: /*
        exclusions: /druid/*,*.js,*.gif,*.jpg,*.png,*.css,*.ico
        # StatViewServlet配置,说明请参考Druid Wiki,配置_StatViewServlet配置
      stat-view-servlet:
        enabled: true
        url-pattern: /druid/*
        reset-enable: false
        login-username: admin
        login-password: admin
        allow: 127.0.0.1
      # 配置StatFilter
      filter:
        stat:
          db-type: mysql
          log-slow-sql: true
          slow-sql-millis: 5000
        # 配置WallFilter
        wall:
          enabled: true
          db-type: mysql
          config:
            delete-allow: false
            drop-table-allow: false
启动项目可以通过http://127.0.0.1:11000/druid访问Druid的web界面,账号密码是配置文件中配置的,这里配置的是admin/admin
二、springboot集成tk.mybatis
1、添加依赖
2、增加自定义Mapper类的基类,继承tk.mybatis的Mapper接口
3、在pom文件里配置mybatis自动生成代码插件
4、在resource文件里增加mybatis自动生成代码配置文件mybatis-generator.xml
5、在启动类增加@MapperScan({"com.xdk.demo.comxdkuser.mapper"})注解
6、在配置文件增加Mapper文件的位置的配置【可选】
7、使用方式
下面是具体步骤:
1、添加依赖,可以在公共模块的POM文件中添加:
            com.github.pagehelper
            pagehelper
            4.1.0


            tk.mybatis
            mapper-spring-boot-starter
            RELEASE
2、增加自定义Mapper类的基类,继承tk.mybatis的Mapper接口,可在公共模块中添加以下接口:
package com.xdk.common.config.mybatis;

import tk.mybatis.mapper.common.Mapper;
import tk.mybatis.mapper.common.MySqlMapper;

public interface MysqlBaseMapper extends Mapper, MySqlMapper {
}
3、在相应模块的pom文件里配置mybatis自动生成代码插件
                org.springframework.boot
                spring-boot-maven-plugin


                org.mybatis.generator
                mybatis-generator-maven-plugin
                1.3.6


                        tk.mybatis
                        mapper
                        RELEASE


                        mysql
                        mysql-connector-java
                        5.1.46


                        Generate MyBatis Artifacts
                        package

                            generate


                    true

                    true

                    src/main/resources/mybatis-generator.xml
4、在resource文件里增加mybatis自动生成代码配置文件mybatis-generator.xml
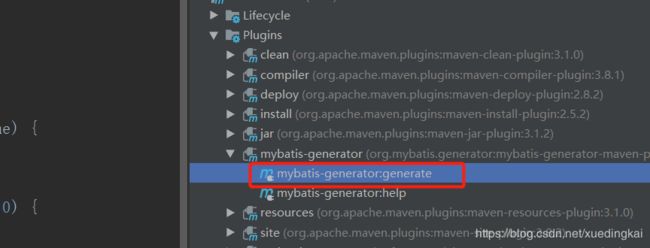
这样修改好自己的配置后,就可以点击maven里的以下插件,自动生成相应的mapper及model文件了。
5、在启动类上增加@MapperScan({"com.xdk.demo.comxdkuser.mapper"})注解,其中引号里的是生成的Mapper接口的包路径。
6、在配置文件增加Mapper文件的位置的配置
mybatis:
  mapper-locations: classpath:/mapper/*.xml
7、使用,这里简单的给出service层的一个示例
@Service
public class TestServiceImpl implements ITestService {

    @Autowired
    private TTestMapper tTestMapper;

    @Override
    public Integer insertData(String name) {
        TTest tTest = new TTest();
        tTest.setName(name);
        if (tTestMapper.insert(tTest) > 0) {
            return tTest.getId();
        }
        return -1;
    }
}
