RabbitMQ整合SpringCloud
文章目录
- rabbitmq-common
- rabbitmq-springcloud-consumer
- rabbitmq-springcloud-producer
rabbitmq-common
写一个实体类,方便测试。
Order :
注意的是这个类也是需要序列化的。
package com.zlk.rabbitmqcommon.entity;

import java.io.Serializable;


public class Order implements Serializable {

    private String id;
    private String name;

    public Order() {
    }
    public Order(String id, String name) {
        super();
        this.id = id;
        this.name = name;
    }
    public String getId() {
        return id;
    }
    public void setId(String id) {
        this.id = id;
    }
    public String getName() {
        return name;
    }
    public void setName(String name) {
        this.name = name;
    }
}
rabbitmq-springcloud-consumer
消费者模块:
1,pom.xml
    1.8


        org.springframework.boot
        spring-boot-starter


        com.zlk
        rabbitmq-common
        0.0.1-SNAPSHOT


        org.springframework.boot
        spring-boot-starter-test
        test


                org.junit.vintage
                junit-vintage-engine


        org.springframework.boot
        spring-boot-starter-amqp


        junit
        junit
        4.12
        test
2,Yml配置:
我的上篇博客中,有介绍了rabbitmq的一些特征和用法,但非常的麻烦,因为每个消费者和生产者都需要配置端口IP等重复性的代码,这非常的不方便,所以强烈建议大家使用配置文件配置。
spring.rabbitmq.addresses=192.168.81.138:5672
spring.rabbitmq.username=guest
spring.rabbitmq.password=guest
spring.rabbitmq.virtual-host=/
spring.rabbitmq.connection-timeout=15000

spring.rabbitmq.listener.simple.acknowledge-mode=manual
spring.rabbitmq.listener.simple.concurrency=5
spring.rabbitmq.listener.simple.max-concurrency=10

spring.rabbitmq.listener.order.queue.name=queue-2
spring.rabbitmq.listener.order.queue.durable=true
spring.rabbitmq.listener.order.exchange.name=exchange-2
spring.rabbitmq.listener.order.exchange.durable=true
spring.rabbitmq.listener.order.exchange.type=topic
spring.rabbitmq.listener.order.exchange.ignoreDeclarationExceptions=true
spring.rabbitmq.listener.order.key=springboot.*
3,RabbitReceiver :
package com.zlk.rabbitmqspringcloudconsumer.conusmer;
import com.rabbitmq.client.Channel;
import com.zlk.rabbitmqcommon.entity.Order;
import org.springframework.amqp.rabbit.annotation.*;
import org.springframework.amqp.support.AmqpHeaders;
import org.springframework.messaging.Message;
import org.springframework.messaging.handler.annotation.Headers;
import org.springframework.messaging.handler.annotation.Payload;
import org.springframework.stereotype.Component;
import java.util.Map;
@Component
public class RabbitReceiver {
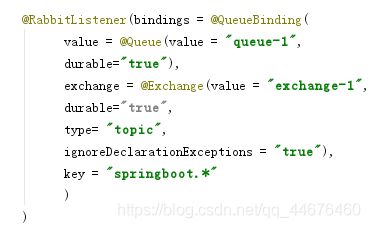
@RabbitListener(bindings = @QueueBinding(
value = @Queue(value = "queue-1",
durable="true"),
exchange = @Exchange(value = "exchange-1",
durable="true",
type= "topic",
ignoreDeclarationExceptions = "true"),
key = "springboot.*"
)
)
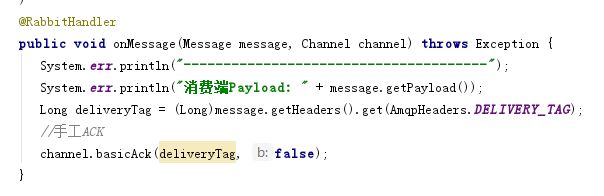
@RabbitHandler
public void onMessage(Message message, Channel channel) throws Exception {
System.err.println("--------------------------------------");
System.err.println("消费端Payload: " + message.getPayload());
Long deliveryTag = (Long)message.getHeaders().get(AmqpHeaders.DELIVERY_TAG);
//手工ACK
channel.basicAck(deliveryTag, false);
}
/**
*
* spring.rabbitmq.listener.order.queue.name=queue-2
spring.rabbitmq.listener.order.queue.durable=true
spring.rabbitmq.listener.order.exchange.name=exchange-1
spring.rabbitmq.listener.order.exchange.durable=true
spring.rabbitmq.listener.order.exchange.type=topic
spring.rabbitmq.listener.order.exchange.ignoreDeclarationExceptions=true
spring.rabbitmq.listener.order.key=springboot.*
* @param order
* @param channel
* @param headers
* @throws Exception
*/
@RabbitListener(bindings = @QueueBinding(
value = @Queue(value = "${spring.rabbitmq.listener.order.queue.name}",
durable="${spring.rabbitmq.listener.order.queue.durable}"),
exchange = @Exchange(value = "${spring.rabbitmq.listener.order.exchange.name}",
durable="${spring.rabbitmq.listener.order.exchange.durable}",
type= "${spring.rabbitmq.listener.order.exchange.type}",
ignoreDeclarationExceptions = "${spring.rabbitmq.listener.order.exchange.ignoreDeclarationExceptions}"),
key = "${spring.rabbitmq.listener.order.key}"
)
)
@RabbitHandler
public void onOrderMessage(@Payload Order order,
Channel channel,
@Headers Map headers) throws Exception {
System.err.println("--------------------------------------");
System.err.println("消费端order: " + order.getId());
Long deliveryTag = (Long)headers.get(AmqpHeaders.DELIVERY_TAG);
//手工ACK
channel.basicAck(deliveryTag, false);
}
}
这个类用两种方式演示了如何创建交换机和队列,讲这个之前先介绍一下@RabbitListener。
@RabbitListener注解的使用
消费端监听@RabbitListener注解,这个对于在实际工作中非常的好用
@RabbitListener是一个组合注解,里面可以注解配置(@QueueBinding、@Queue、@Exchange)直接通过这个组合注解一次性搞定消费端交换机、队列、绑定、路由、并且配置监听功能等。
第一种创建交换机和队列的方式是用@RabbitListener然后写死的方式。
第二个是通过全局配置文件来创建:
(注释的地方是我从yml文件copy过来的,方便查看)

对于这两个不同的创建交换机的方式,接收消息的方式也有两种:
写死的:
运用配置文件的:
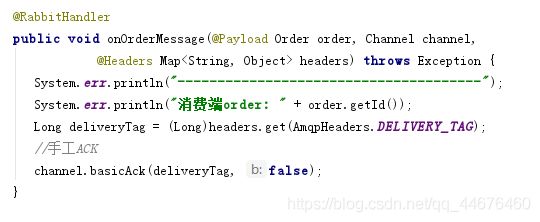
可以看到,第一种方式我是简单的打印,第二个方式我接收的是一个order类。方便后面测试。
搞定之后再添加一个扫描类:
用来扫描RabbitReceiver中的@Component注解
package com.zlk.rabbitmqspringcloudconsumer;

import org.springframework.context.annotation.ComponentScan;
import org.springframework.context.annotation.Configuration;

@Configuration
@ComponentScan({"com.zlk.rabbitmqspringcloudconsumer.*"})
public class MainConfig {

}
rabbitmq-springcloud-producer
生产端:
pom:
        1.8


            org.springframework.boot
            spring-boot-starter


            org.springframework.boot
            spring-boot-starter-test
            test


                    org.junit.vintage
                    junit-vintage-engine


            com.zlk
            rabbitmq-common
            0.0.1-SNAPSHOT


            org.springframework.boot
            spring-boot-starter-amqp


            junit
            junit
            4.12
            test
yml:
spring.rabbitmq.addresses=192.168.81.138:5672
spring.rabbitmq.username=guest
spring.rabbitmq.password=guest
spring.rabbitmq.virtual-host=/
spring.rabbitmq.connection-timeout=15000

spring.rabbitmq.publisher-confirms=true
spring.rabbitmq.publisher-returns=true
spring.rabbitmq.template.mandatory=true
RabbitSender:
package com.zlk.rabbitmqspringcloudproducer.producer;
import com.zlk.rabbitmqcommon.entity.Order;
import org.springframework.amqp.rabbit.connection.CorrelationData;
import org.springframework.amqp.rabbit.core.RabbitTemplate;
import org.springframework.amqp.rabbit.core.RabbitTemplate.ConfirmCallback;
import org.springframework.amqp.rabbit.core.RabbitTemplate.ReturnCallback;
import org.springframework.beans.factory.annotation.Autowired;
import org.springframework.messaging.Message;
import org.springframework.messaging.MessageHeaders;
import org.springframework.messaging.support.MessageBuilder;
import org.springframework.stereotype.Component;
import java.util.Map;
@Component
public class RabbitSender {
//自动注入RabbitTemplate模板类
@Autowired
private RabbitTemplate rabbitTemplate;
//回调函数: confirm确认
final ConfirmCallback confirmCallback = new ConfirmCallback() {
@Override
public void confirm(CorrelationData correlationData, boolean ack, String cause) {
System.err.println("correlationData: " + correlationData);
System.err.println("ack: " + ack);
if(!ack){
System.err.println("异常处理....");
}
}
};
//回调函数: return返回
final ReturnCallback returnCallback = new ReturnCallback() {
@Override
public void returnedMessage(org.springframework.amqp.core.Message message, int replyCode, String replyText,
String exchange, String routingKey) {
System.err.println("return exchange: " + exchange + ", routingKey: "
+ routingKey + ", replyCode: " + replyCode + ", replyText: " + replyText);
}
};
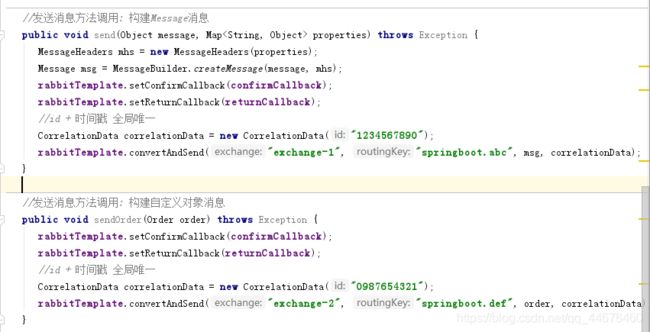
//发送消息方法调用: 构建Message消息
public void send(Object message, Map properties) throws Exception {
MessageHeaders mhs = new MessageHeaders(properties);
Message msg = MessageBuilder.createMessage(message, mhs);
rabbitTemplate.setConfirmCallback(confirmCallback);
rabbitTemplate.setReturnCallback(returnCallback);
//id + 时间戳 全局唯一
CorrelationData correlationData = new CorrelationData("1234567890");
rabbitTemplate.convertAndSend("exchange-1", "springboot.abc", msg, correlationData);
}
//发送消息方法调用: 构建自定义对象消息
public void sendOrder(Order order) throws Exception {
rabbitTemplate.setConfirmCallback(confirmCallback);
rabbitTemplate.setReturnCallback(returnCallback);
//id + 时间戳 全局唯一
CorrelationData correlationData = new CorrelationData("0987654321");
rabbitTemplate.convertAndSend("exchange-2", "springboot.def", order, correlationData);
}
}
这个类拥有两个机制, confirm和return,
生产消息两种方法:
扫描类:
package com.zlk.rabbitmqspringcloudproducer;

import org.springframework.context.annotation.ComponentScan;
import org.springframework.context.annotation.Configuration;

@Configuration
@ComponentScan({"com.zlk.rabbitmqspringcloudproducer.*"})
public class MainConfig {

}
Test测试类:
package com.zlk.rabbitmqspringcloudproducer.producer;

import com.zlk.rabbitmqcommon.entity.Order;
import org.springframework.amqp.rabbit.connection.CorrelationData;
import org.springframework.amqp.rabbit.core.RabbitTemplate;
import org.springframework.amqp.rabbit.core.RabbitTemplate.ConfirmCallback;
import org.springframework.amqp.rabbit.core.RabbitTemplate.ReturnCallback;
import org.springframework.beans.factory.annotation.Autowired;
import org.springframework.messaging.Message;
import org.springframework.messaging.MessageHeaders;
import org.springframework.messaging.support.MessageBuilder;
import org.springframework.stereotype.Component;

import java.util.Map;


@Component
public class RabbitSender {

   //自动注入RabbitTemplate模板类
   @Autowired
   private RabbitTemplate rabbitTemplate;

   //回调函数: confirm确认
   final ConfirmCallback confirmCallback = new ConfirmCallback() {
      @Override
      public void confirm(CorrelationData correlationData, boolean ack, String cause) {
         System.err.println("correlationData: " + correlationData);
         System.err.println("ack: " + ack);
         if(!ack){
            System.err.println("异常处理....");
         }
      }
   };

   //回调函数: return返回
   final ReturnCallback returnCallback = new ReturnCallback() {
      @Override
      public void returnedMessage(org.springframework.amqp.core.Message message, int replyCode, String replyText,
            String exchange, String routingKey) {
         System.err.println("return exchange: " + exchange + ", routingKey: "
            + routingKey + ", replyCode: " + replyCode + ", replyText: " + replyText);
      }
   };

   //发送消息方法调用: 构建Message消息
   public void send(Object message, Map properties) throws Exception {
      MessageHeaders mhs = new MessageHeaders(properties);
      Message msg = MessageBuilder.createMessage(message, mhs);
      rabbitTemplate.setConfirmCallback(confirmCallback);
      rabbitTemplate.setReturnCallback(returnCallback);
      //id + 时间戳 全局唯一
      CorrelationData correlationData = new CorrelationData("1234567890");
      rabbitTemplate.convertAndSend("exchange-1", "springboot.abc", msg, correlationData);
   }

   //发送消息方法调用: 构建自定义对象消息
   public void sendOrder(Order order) throws Exception {
      rabbitTemplate.setConfirmCallback(confirmCallback);
      rabbitTemplate.setReturnCallback(returnCallback);
      //id + 时间戳 全局唯一
      CorrelationData correlationData = new CorrelationData("0987654321");
      rabbitTemplate.convertAndSend("exchange-2", "springboot.def", order, correlationData);
   }

}
先开消费者再在Test中点击测试:
testSender1():


testSender2():

