一、项目背景
我本人所在公司是一个国有企业,自建有较大的内部网络门户群,几乎所有部门发布各类通知、工作要求等消息都在门户网站进行。由于对应的上级部门比较多,各类通知通告、领导讲话等内容类目繁多,要看一遍真需要花费点时间。更重要的是有些会议通知等时效性比较强的消息一旦遗漏错过重要会议就比较麻烦。为了改变这种状况,就想建立一个内部网络消息跟踪、通知系统。
二、基本功能
主要功能:系统功能比较简单,主要就是爬取内部网络固定的一些通知页面,发现新的通知就向指定的人发送通知邮件。
涉及到的功能点:
1.常规页面请求
2.post请求
3.数据存储
4.识别新消息
5.邮件通知
6.定时启动,循环运行
三、详细说明
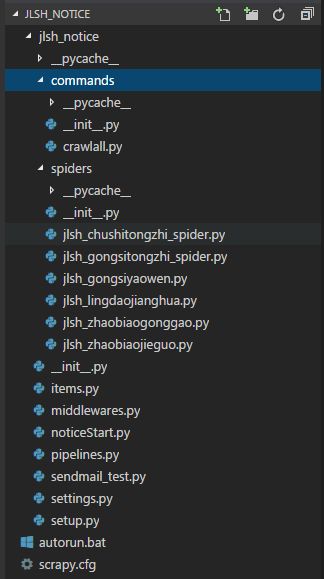
(一)文件结构
上图显示了完成状态的文件结构,与新建的scrapy项目相比增加的文件有两部分:
一是spiders目录下的6个爬虫文件,对应了6个栏目,以后根据需要还会再增加;
二是涉及定时启动、循环运行功能的几个文件,分别是commands文件夹、noticeStart.py、setup.py、autorun.bat
(二)各部分代码
1. items.py
import scrapy

class JlshNoticeItem(scrapy.Item):
    # define the fields for your item here like:
    # name = scrapy.Field()
    noticeType = scrapy.Field()     #通知类别
    noticeTitle = scrapy.Field()    #通知标题
    noticeDate = scrapy.Field()     #通知日期
    noticeUrl = scrapy.Field()      #通知URL
    noticeContent = scrapy.Field()  #通知内容
2. spider
篇幅关系,这里只拿一个爬虫做例子,其它的爬虫只是名称和start_url不同,下面代码尽量做到逐句注释。
代码
from scrapy import Request
from scrapy import FormRequest
from scrapy.spiders import Spider
from jlsh_notice.items import JlshNoticeItem
from jlsh_notice.settings import DOWNLOAD_DELAY
from scrapy.crawler import CrawlerProcess
from datetime import date
import requests
import lxml
import random
import re
#=======================================================
class jlsh_notice_spider_gongsitongzhi(Spider):
    #爬虫名称
    name = 'jlsh_gongsitongzhi'

    start_urls = [
        'http://www.jlsh.petrochina/sites/jlsh/news/inform/Pages/default.aspx', #公司通知
    ]
#=======================================================
    #处理函数
    def parse(self, response):
        noticeList = response.xpath('//ul[@class="w_newslistpage_list"]//li')
#=======================================================
        #创建item实例
        item = JlshNoticeItem()
        for i, notice in enumerate(noticeList):
            item['noticeType'] = '公司通知'

            item['noticeTitle'] = notice.xpath('.//a/@title').extract()[0]

            item['noticeUrl'] = notice.xpath('.//a/@href').extract()[0]
#=======================================================
            dateItem = notice.xpath('.//span[2]/text()').extract()[0]
            pattern = re.compile(r'\d+')
            datetime = pattern.findall(dateItem)
            yy = int(datetime[0])+2000
            mm = int(datetime[1])
            dd = int(datetime[2])
            item['noticeDate'] = date(yy,mm,dd)
#=======================================================
            content_html = requests.get(item['noticeUrl']).text
            content_lxml = lxml.etree.HTML(content_html)
            content_table = content_lxml.xpath( \
                '//div[@id="contentText"]/div[2]/div | \
                //div[@id="contentText"]/div[2]/p')


            item['noticeContent'] = []
            for j, p in enumerate(content_table):
                p = p.xpath('string(.)')
                #print('p:::::',p)
                p = p.replace('\xa0',' ')
                p = p.replace('\u3000', ' ')
                item['noticeContent'].append(p)

            yield item
#=======================================================
        pages = response.xpath('//div[@class="w_newslistpage_pager"]//span')
        nextPage = 0
        for i, page_tag in enumerate(pages):
            page = page_tag.xpath('./a/text()').extract()[0]
            page_url = page_tag.xpath('./a/@href').extract()
            if page == '下一页>>':
                pattern = re.compile(r'\d+')
                page_url = page_url[0]
                nextPage = int(pattern.search(page_url).group(0))
                break
#=======================================================
        if nextPage > 0 :
            postUrl = self.start_urls[0]
            formdata = {
                'MSOWebPartPage_PostbackSource':'',
                'MSOTlPn_SelectedWpId':'',
                'MSOTlPn_View':'0',
                'MSOTlPn_ShowSettings':'False',
                'MSOGallery_SelectedLibrary':'',
                'MSOGallery_FilterString':'',
                'MSOTlPn_Button':'none',
                '__EVENTTARGET':'',
                '__EVENTARGUMENT':'',
                '__REQUESTDIGEST':'',
                'MSOSPWebPartManager_DisplayModeName':'Browse',
                'MSOSPWebPartManager_ExitingDesignMode':'false',
                'MSOWebPartPage_Shared':'',
                'MSOLayout_LayoutChanges':'',
                'MSOLayout_InDesignMode':'',
                '_wpSelected':'',
                '_wzSelected':'',
                'MSOSPWebPartManager_OldDisplayModeName':'Browse',
                'MSOSPWebPartManager_StartWebPartEditingName':'false',
                'MSOSPWebPartManager_EndWebPartEditing':'false',
                '_maintainWorkspaceScrollPosition':'0',
                '__LASTFOCUS':'',
                '__VIEWSTATE':'',
                '__VIEWSTATEGENERATOR':'15781244',
                'query':'',
                'database':'GFHGXS-GFJLSH',
                'sUsername':'',
                'sAdmin':'',
                'sRoles':'',
                'activepage':str(nextPage),
                '__spDummyText1':'',
                '__spDummyText2':'',
                '_wpcmWpid':'',
                'wpcmVal':'',
            }

            yield FormRequest(postUrl,formdata=formdata, callback=self.parse)
说明,以下说明要配合上面源码来看,不单独标注了
start_urls #要爬取的页面地址,由于各个爬虫要爬取的页面规则略有差异,所以做了6个爬虫,而不是在一个爬虫中写入6个URL。通过查看scrapy源码,我们能够看到,start_urls中的地址会传给一个内件函数start_request(这个函数可以根据自己需要进行重写),start_request向这个start_urls发送请求以后,所得到的response会直接转到下面parse函数处理。
xpath ,下图是页面源码:

通过xpath获取到response中class类是'w_newslistpage_list'的ul标签下的所有li标签,这里所得到的就是通知的列表,接下来我们在这个列表中做循环。
先看下li标签内的结构:

notice.xpath('.//a/@title').extract()[0] #获取li标签内a标签中的title属性内容,这里就是通知标题
notice.xpath('.//a/@href').extract()[0] #获取li标签内a标签中的href属性内容,这里就是通知链接
notice.xpath('.//span[2]/text()').extract()[0] #获取li标签内第二个span标签中的内容,这里是通知发布的日期
接下来几行就是利用正则表达式讲日期中的年、月、日三组数字提取出来,在转换为日期类型存入item中。
再下一段,是获得通知内容,这里其实有两种方案,一个是用scrapy的request发送给内部爬虫引擎,得到另外一个response后再进行处理,另一种就是我现在这样直接去请求页面。由于内容页面比较简单,只要获得html代码即可,所以就不麻烦scrapy处理了。
request.get得到请求页面的html代码
利用lxml库的etree方法格式化html为xml结构
利用xpath获取到div[@id="contentText"]内所有p标签、div标签节点。(可以得到99%以上的页面内容)
所得到的所有节点将是一个list类型数据,所有我们做一个for in循环
p.xpath('string(.)') 是获取到p标签或div标签中的所有文本,而无视其他html标签。
用replace替换到页面中的半角、全角空格(xa0、u3000)
每得到一行清洗过的数据,就将其存入item['noticeContent']中
最后将item输出
在scrapy中,yield item后,item会提交给scrapy引擎,再又引擎发送给pipeline处理。pipeline一会再说。
接下来的代码就是处理翻页。这里的页面翻页是利用js提交请求完成的,提交请求后,会response一个新的页面列表

首先利用xpath找到页面导航栏的节点,在获取到的所有节点中做for in循环,直到找到带有“下一页”的节点,这里有下一页的页码,还是利用正则表达式来得到它,并将其转为int类型。
yield FormRequest(postUrl,formdata=formdata, callback=self.parse)
利用scrpay自带的FormRequest发送post请求,这里的formdata是跟踪post请求时得到的,要根据自己的网站调整,callback指示讲得到的response反馈给parse函数处理(也就是新的一页列表)
到此为止,就是spider文件的所有,这个文件唯一对外的输出就是item,它会有scrapy引擎转给pipeline处理
3. pipeline
代码
from scrapy import signals
from scrapy.contrib.exporter import CsvItemExporter
from jlsh_notice import settings
import pymysql
import time
import smtplib
from email.mime.text import MIMEText
from email.utils import formataddr
class JlshNoticePipeline(object):
def process_item(self, item, spider):
return item
# 用于数据库存储
class MySQLPipeline(object):
def process_item(self, item, spider):
#=======================================================
self.connect = pymysql.connect(
host=settings.MYSQL_HOST,
port=3306,
db=settings.MYSQL_DBNAME,
user=settings.MYSQL_USER,
passwd=settings.MYSQL_PASSWD,
charset='utf8',
use_unicode=True)
# 通过cursor执行增删查改
self.cursor = self.connect.cursor()
#=======================================================
# 查重处理
self.cursor.execute(
"""select * from jlsh_weblist where
noticeType = %s and
noticeTitle = %s and
noticeDate = %s """,
(item['noticeType'], item['noticeTitle'], item['noticeDate']))
# 是否有重复数据
repetition = self.cursor.fetchone()
#=======================================================
# 重复
if repetition:
print('===== Pipelines.MySQLPipeline ===== 数据重复,跳过,继续执行..... =====')
else:
# 插入数据
content_html = ''
for p in item['noticeContent']:
content_html = content_html + '' + p + '
'
self.cursor.execute(
"""insert into jlsh_weblist(noticeType, noticeTitle, noticeDate, noticeUrl, noticeContent, record_time)
value (%s, %s, %s, %s, %s, %s)""",
(item['noticeType'], item['noticeTitle'], item['noticeDate'], item['noticeUrl'], content_html, time.localtime(time.time())))
try:
# 提交sql语句
self.connect.commit()
print('===== Insert Success ! =====', \
item['noticeType'], item['noticeTitle'], item['noticeDate'], item['noticeUrl'])
except Exception as error:
# 出现错误时打印错误日志
print('===== Insert error: %s ====='%error)
#=======================================================
#定向发送邮件
if settings.SEND_MAIL:
sender='***@***.com' # 发件人邮箱账号
password = '********' # 发件人邮箱密码
receiver='*****@*****.com' # 收件人邮箱账号,我这边发送给自己
title = item['noticeTitle']
content = """
%s
%s
%s
""" % (item['noticeType'], item['noticeUrl'], item['noticeTitle'], item['noticeDate'], content_html)
ret=self.sendMail(sender, password, receiver, title, content)
if ret:
print("邮件发送成功")
else:
print("邮件发送失败")
pass
self.connect.close()
return item
#=======================================================
def sendMail(self, sender, password, receiver, title, content):
ret=True
try:
msg=MIMEText(content,'html','utf-8')
msg['From']=formataddr(['', sender]) # 括号里的对应发件人邮箱昵称、发件人邮箱账号
msg['To']=formataddr(["",receiver]) # 括号里的对应收件人邮箱昵称、收件人邮箱账号
msg['Subject']="邮件的主题 " + title # 邮件的主题,也可以说是标题
server=smtplib.SMTP("smtp.*****.***", 25) # 发件人邮箱中的SMTP服务器,端口是25
server.login(sender, password) # 括号中对应的是发件人邮箱账号、邮箱密码
server.sendmail(sender,[receiver,],msg.as_string()) # 括号中对应的是发件人邮箱账号、收件人邮箱账号、发送邮件
server.quit() # 关闭连接
except Exception: # 如果 try 中的语句没有执行,则会执行下面的 ret=False
ret=False
return ret
#======================================================= 说明
这里的pipeline是我自己建立的,写好后在setting中改一下设置就可以了。因为scrapy的去重机制只针对爬虫一次运行过程有效,多次循环爬取就不行了,所以为了实现不爬取重复数据,使用mysql就是比较靠谱的选择了。
pymysql是python链接mysql的包,没有的话pip安装即可。
首先建立一个pymysql.connect实例,将连接mysql的几个参数写进去,我这里是先写到setting里面再导入,也可以直接写,值得注意的是port参数(默认是3306)不要加引号,因为它必须是int类型的。
接下来建立一个cursor实例,用于对数据表进行增删查改。
cursor.execute() 方法是定义要执行的sql命令,这里注意就是execute只是定义,不是执行。
cursor.fetchone() 方法是执行sql并返回成功与否的结果。这里进行了数据查询,如果能够查到,说明这条记录已经建立,如果没有,就可以新增数据了。
由mysql数据库不接受list类型的数据,所以接下来要对item['noticeContent']做一下处理(他是list类型的,还记得么^_^)。在item['noticeContent']中做for in循环,把他的每一项内容用标签包起来,组成一个长字符串。
接下来还是写sql命令:insert into .....
写完以后用connect.commit()提交执行
最后就是发送邮件了,自建一个sendMail函数,发送邮件用到了两个python包:smtplib 和 email,具体没啥说的,照着写就行了,我是一次成功。。
到此为止,就可以运行爬虫了,可以看到数据库中已经有了爬取的内容。。。
4. settings.py
注册pipeline
ITEM_PIPELINES = {
    'jlsh_notice.pipelines.MySQLPipeline': 300,
}
log输出的定义,四个任选其一
LOG_LEVEL = 'INFO'
LOG_LEVEL = 'DEBUG'
LOG_LEVEL = 'WARNING'
LOG_LEVEL = 'CRITICAL'
关于爬虫终止条件的定义,默认不设置
#在指定时间过后,就终止爬虫程序.
CLOSESPIDER_TIMEOUT = 60

#抓取了指定数目的Item之后,就终止爬虫程序.
CLOSESPIDER_ITEMCOUNT = 10

#在收到了指定数目的响应之后,就终止爬虫程序.
CLOSESPIDER_PAGECOUNT = 100

#在发生了指定数目的错误之后,就终止爬虫程序.
CLOSESPIDER_ERRORCOUNT = 100
5. 实现自动执行
(1) 同时执行多个爬虫。
首先,在项目目录下建立新的目录(与spider目录同级),名为“commands”,内建两个文件:
__init__.py (空文件,但是要有)
crawlall.py
from scrapy.commands import ScrapyCommand
from scrapy.utils.project import get_project_settings


class Command(ScrapyCommand):

    requires_project = True

    def syntax(self):
        return '[options]'

    def short_desc(self):
        return 'Runs all of the spiders'

    def run(self, args, opts):
        spider_list = self.crawler_process.spiders.list()
        for name in spider_list:
            self.crawler_process.crawl(name, **opts.__dict__)
        self.crawler_process.start()
然后在项目目录下建立一个setup.py文件
from setuptools import setup, find_packages

setup(name='scrapy-mymodule',
    entry_points={
        'scrapy.commands': [
            'crawlall=jlsh_notice.commands:crawlall',
            ],
        },
    )
这个时候,在scrapy项目目录下执行scrapy crawlall即可运行所有的爬虫
(2) 每隔一段时间运行爬虫。
在项目目录下新建一个noticeStart.py文件(名称任意),利用python中的os和time包实现每隔一段时间运行一个命令。
import time
import os

while True:
    os.system("scrapy crawlall")
    remindTime = 5
    remindCount = 0
    sleepTime = 60
    while remindCount * remindTime < sleepTime:
        time.sleep(remindTime*60)
        remindCount = remindCount + 1
        print('已等待%s分钟,距离下一次搜集数据还有%s分钟......'%(remindCount*remindTime,(sleepTime/remindTime-(remindCount))*remindTime))
(3) 实现开机运行。
首先:由于cmd命令打开目录在c盘,我的scrapy项目在e盘,所以要做一个bat文件跳转目录并运行py文件
autorun.bat
e:
cd e:\PythonProjects\ScrapyProjects\jlsh_notice\jlsh_notice\
python noticeStart.py
其次:打开计划任务程序,创建基本任务,运行程序选择刚刚的bat文件,值得说明的是,计划任务触发器不要设置启动后立即执行,不然可能会失败,要延迟1分钟运行。
到此为止,所有的代码完成,以后还要根据实际情况增加更多的通知类别,也可以根据不同领导的关注点不同,分别发送邮件提醒。欢迎有兴趣的朋友留言交流。。。


