05.PyQt5基本窗口控件part3------PyQt5编程开发
十、窗口绘图类控件
在PyQt5中,一般可以通过QPainter、QPen和QBrush这三个类来实现绘图功能。此外,QPixmap的作用是加载并呈现本地图像,而图像的呈现本质上也是通过绘图方式实现的,所以QPixmap也可以被视为绘图的一个类。
1、QPainter
QPainter类在QWidget(控件)上执行绘图操作,绘图操作在QWidget.paintEvent()中完成。绘制方法必须放在QtGui.QPainter对象的begin()和end()之间。QPainter类常用方法:
begin():开始在目标设备上绘制
drawArc():在起始角度和最终角度之间画弧
drawEllipse():在一个矩形内画一个椭圆
drawLine(int x1,int y1,int x2,int y2):绘制一条指定了端点坐标的线。绘制从(x1,y1)到(x2,y2)的直线并设置当前画笔位置为(x2,y2)
drawPixmap():从图像文件中提取Pixmap并将其显示在指定的位置
drawPolygon():使用坐标数组绘制多边形
drawRect(int x,int y,int w,int h):以给定的宽度w和高度h从左上角坐标(x,y)绘制一个矩形
drawText():显示给定坐标处的文字
fillRect():使用QColor参数填充矩形
setBrush():设置画笔风格
setPen():设置用于绘制的笔的颜色、大小和样式
还可以设置画笔风格(PenStyle),这个是一个枚举类,可以由QPainter类绘制,画笔风格如下:
Qt.NoPen:没有线。
Qt.SolidLine:一条简单的线
Qt.DashLine:由一些像素分隔的短线
Qt.DotLine:由一些像素分隔的点
Qt.DashDotLine:轮流交替的点和短线
Qt.DashDotDotLine:一条短线、两个点
Qt.MPenStyle:画笔风格的掩码
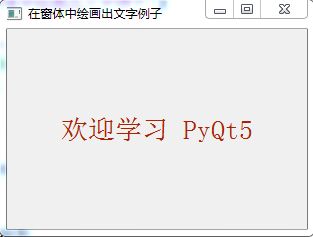
例一:绘制文字
| # -*- coding: utf-8 -*- | |
| """ | |
| 【简介】 | |
| 在窗体中绘画出文字的例子 | |
| """ | |
| import sys | |
| from PyQt5.QtWidgets import QApplication ,QWidget | |
| from PyQt5.QtGui import QPainter ,QColor ,QFont | |
| from PyQt5.QtCore import Qt | |
| class Drawing(QWidget): | |
| def __init__(self,parent=None): | |
| super(Drawing,self).__init__(parent) | |
| self.setWindowTitle("在窗体中绘画出文字例子") | |
| self.resize(300, 200) | |
| self.text = '欢迎学习 PyQt5' | |
| def paintEvent(self,event): | |
| painter = QPainter(self) | |
| painter.begin(self) | |
| # 自定义的绘画方法 | |
| self.drawText(event, painter) | |
| painter.end() | |
| def drawText(self, event, qp): | |
| # 设置笔的颜色 | |
| qp.setPen( QColor(168, 34, 3) ) | |
| # 设置字体 | |
| qp.setFont( QFont('SimSun', 20)) | |
| # 画出文本 | |
| qp.drawText(event.rect(), Qt.AlignCenter, self.text) | |
| if __name__ == "__main__": | |
| app = QApplication(sys.argv) | |
| demo = Drawing() | |
| demo.show() | |
| sys.exit(app.exec_()) |
运行结果:
例二、绘制点
| # -*- coding: utf-8 -*- | |
| """ | |
| 【简介】 | |
| 在窗体中绘画点的例子 | |
| """ | |
| import sys, math | |
| from PyQt5.QtWidgets import * | |
| from PyQt5.QtGui import * | |
| from PyQt5.QtCore import Qt | |
| class Drawing(QWidget): | |
| def __init__(self, parent=None): | |
| super(Drawing, self).__init__(parent) | |
| self.resize(300, 200) | |
| self.setWindowTitle("在窗体中画点") | |
| def paintEvent(self, event): | |
| qp = QPainter() | |
| qp.begin(self) | |
| # 自定义画点方法 | |
| self.drawPoints(qp) | |
| qp.end() | |
| def drawPoints(self, qp): | |
| qp.setPen( Qt.red) | |
| size = self.size() | |
| for i in range(1000): | |
| # [-100, 100]两个周期的正弦函数图像 | |
| x = 100 *(-1+2.0*i/1000)+ size.width()/2.0 | |
| y = -50 * math.sin((x - size.width()/2.0)*math.pi/50) + size.height()/2.0 | |
| qp.drawPoint(x, y) | |
| if __name__ == '__main__': | |
| app = QApplication(sys.argv) | |
| demo = Drawing() | |
| demo.show() | |
| sys.exit(app.exec_()) |
运行结果:

2、Qpen
QPen是一个基本的图形对象,用于绘制直线、曲线或者给轮廓画出矩形、椭圆形、多边形及其它形状等。
例子:
| # -*- coding: utf-8 -*- | |
| """ | |
| 【简介】 | |
| 绘图中QPen 的例子 ,绘制使用不同样式的6条线 | |
| """ | |
| import sys | |
| from PyQt5.QtWidgets import * | |
| from PyQt5.QtGui import * | |
| from PyQt5.QtCore import Qt | |
| class Drawing(QWidget): | |
| def __init__(self): | |
| super().__init__() | |
| self.initUI() | |
| def initUI(self): | |
| self.setGeometry(300, 300, 280, 270) | |
| self.setWindowTitle('钢笔样式例子') | |
| def paintEvent(self, e): | |
| qp = QPainter() | |
| qp.begin(self) | |
| self.drawLines(qp) | |
| qp.end() | |
| def drawLines(self, qp): | |
| pen = QPen(Qt.black, 2, Qt.SolidLine) | |
| qp.setPen(pen) | |
| qp.drawLine(20, 40, 250, 40) | |
pen.setStyle(Qt.DashLine) |
|
| qp.setPen(pen) | |
| qp.drawLine(20, 80, 250, 80) | |
| pen.setStyle(Qt.DashDotLine) | |
| qp.setPen(pen) | |
| qp.drawLine(20, 120, 250, 120) | |
| pen.setStyle(Qt.DotLine) | |
| qp.setPen(pen) | |
| qp.drawLine(20, 160, 250, 160) | |
| pen.setStyle(Qt.DashDotDotLine) | |
| qp.setPen(pen) | |
| qp.drawLine(20, 200, 250, 200) | |
| pen.setStyle(Qt.CustomDashLine) | |
| pen.setDashPattern([1, 4, 5, 4]) | |
| qp.setPen(pen) | |
| qp.drawLine(20, 240, 250, 240) | |
| if __name__ == '__main__': | |
| app = QApplication(sys.argv) | |
| demo = Drawing() | |
| demo.show() | |
| sys.exit(app.exec_()) |
运行结果:

3、QBrush
QBrush(画刷)是一个基本的图形对象,用于填充如矩形、椭圆或多边形等形状。QBrush有三种类型:预定义、过渡和纹理图案。
例子:
| # -*- coding: utf-8 -*- | |
| """ | |
| 【简介】 | |
| 绘图中QBrush 的例子 ,绘制九个不同样式的矩形。 | |
| """ | |
| import sys | |
| from PyQt5.QtWidgets import * | |
| from PyQt5.QtGui import * | |
| from PyQt5.QtCore import Qt | |
| class Drawing(QWidget): | |
| def __init__(self): | |
| super().__init__() | |
| self.initUI() | |
| def initUI(self): | |
| self.setGeometry(300, 300, 365, 280) | |
| self.setWindowTitle('画刷例子') | |
| self.show() | |
| def paintEvent(self, e): | |
| qp = QPainter() | |
| qp.begin(self) | |
| self.drawLines(qp) | |
| qp.end() | |
| def drawLines(self, qp): | |
| brush = QBrush(Qt.SolidPattern) | |
| qp.setBrush(brush) | |
| qp.drawRect(10, 15, 90, 60) | |
| brush = QBrush(Qt.Dense1Pattern) | |
| qp.setBrush(brush) | |
| qp.drawRect(130, 15, 90, 60) | |
| brush = QBrush(Qt.Dense2Pattern) | |
| qp.setBrush(brush) | |
| qp.drawRect(250, 15, 90, 60) | |
| brush = QBrush(Qt.Dense3Pattern) | |
| qp.setBrush(brush) | |
| qp.drawRect(10, 105, 90, 60) | |
| brush = QBrush(Qt.DiagCrossPattern) | |
| qp.setBrush(brush) | |
| qp.drawRect(10, 105, 90, 60) | |
| brush = QBrush(Qt.Dense5Pattern) | |
| qp.setBrush(brush) | |
| qp.drawRect(130, 105, 90, 60) | |
| brush = QBrush(Qt.Dense6Pattern) | |
| qp.setBrush(brush) | |
| qp.drawRect(250, 105, 90, 60) | |
| brush = QBrush(Qt.HorPattern) | |
| qp.setBrush(brush) | |
| qp.drawRect(10, 195, 90, 60) | |
| brush = QBrush(Qt.VerPattern) | |
| qp.setBrush(brush) | |
| qp.drawRect(130, 195, 90, 60) | |
| brush = QBrush(Qt.BDiagPattern) | |
| qp.setBrush(brush) | |
| qp.drawRect(250, 195, 90, 60) | |
| if __name__ == '__main__': | |
| app = QApplication(sys.argv) | |
| demo = Drawing() | |
| demo.show() | |
| sys.exit(app.exec_()) |
运行结果:

4、QPixmap
它用于绘图设备的图像显示,它可以作为一个QPaintDevice对象,也可以加载到一个控件中,通常是标签或按钮,用于在标签或按钮上显示图像。它可读取的图像文件类型有BMP,GIF,JPG,JPEG,PNG,PBM,PGM,PPM,XBM,XPM等,它的常用方法:
copy():从QRect对象复制到QPixmap对象
fromImage():将QImage对象转换为QPixmap对象
grabWidget():从给定的窗口小控件创建一个像素图
grabWindow():在窗口中创建数据的像素图
load():加载图像文件作为QPixmap对象
save():将QPixmap对象保存为文件
toImage():将QPixmap对象转换为QImage对象
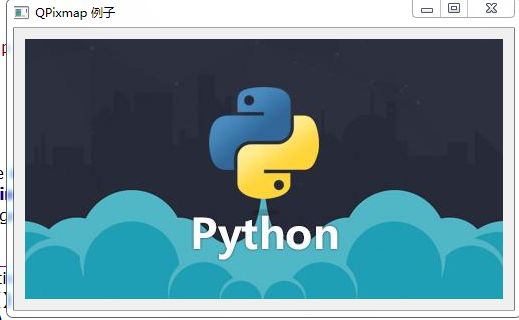
例子:
| # -*- coding: utf-8 -*- | |
| ''' | |
| 【简介】 | |
| PyQt5中 QPixmap 例子 | |
| ''' | |
| import sys | |
| from PyQt5.QtCore import * | |
| from PyQt5.QtGui import * | |
| from PyQt5.QtWidgets import * | |
| if __name__ == '__main__': | |
| app = QApplication(sys.argv) | |
| win = QWidget() | |
| lab1 = QLabel() | |
| lab1.setPixmap(QPixmap("./images/python.jpg")) | |
| vbox=QVBoxLayout() | |
| vbox.addWidget(lab1) | |
| win.setLayout(vbox) | |
| win.setWindowTitle("QPixmap 例子") | |
| win.show() | |
| sys.exit(app.exec_()) |
运行结果:
十一、拖拽与剪贴板
许多QWidget对象都支持拖拽动作,允许拖拽数据的控件必须设置QWidget.setDragEnabled()为True。另外,控件应该响应拖拽事件,以便存储所拖拽的数据。常用的拖拽事件如下:
DragEnterEvent:当执行应该拖拽控件操作,并且鼠标指针进入该控件时,这个事件将被触发。在这个事件中科院获得被操作的窗口控件,还可以有条件地接受或拒绝该拖拽操作。
DragMoveEvent:在拖拽操作进行时会触发该事件
DragLeaveEvent:当执行一个拖拽控件操作,并且鼠标指针离开该控件时,这个事件将被触发
DropEvent:当拖拽操作在目标控件上被释放时,这个事件将被触发
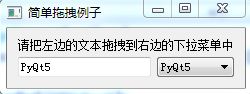
例子:
| # -*- coding: utf-8 -*- | |
| ''' | |
| 【简介】 | |
| PyQt5中 Drag and Drop 例子 | |
| ''' | |
| import sys | |
| from PyQt5.QtCore import * | |
| from PyQt5.QtGui import * | |
| from PyQt5.QtWidgets import * | |
| class Combo(QComboBox): | |
| def __init__(self, title, parent): | |
| super(Combo, self).__init__( parent) | |
| self.setAcceptDrops(True) | |
| def dragEnterEvent(self, e): | |
| print( e) | |
| if e.mimeData().hasText(): | |
| e.accept() | |
| else: | |
| e.ignore() | |
| def dropEvent(self, e): | |
| self.addItem(e.mimeData().text()) | |
| class Example(QWidget): | |
| def __init__(self): | |
| super(Example, self).__init__() | |
| self.initUI() | |
| def initUI(self): | |
| lo = QFormLayout() | |
| lo.addRow(QLabel("请把左边的文本拖拽到右边的下拉菜单中")) | |
| edit = QLineEdit() | |
| edit.setDragEnabled(True) | |
| com = Combo("Button", self) | |
| lo.addRow(edit,com) | |
| self.setLayout(lo) | |
| self.setWindowTitle('简单拖拽例子') | |
| if __name__ == '__main__': | |
| app = QApplication(sys.argv) | |
| ex = Example() | |
| ex.show() | |
| sys.exit(app.exec_()) |
运行结果:
2、QClipboard
它提供了对系统剪贴板的访问,可以在应用程序之间复制和粘贴数据。它的操作类似于QDrag类,并使用类似的数据类型。
QApplication类有一个静态方法clipboard(),它返回对剪贴板对象的引用。任何类型的MimeData都可以从剪贴板复制或粘贴,它的常用方法:
clear():清除剪贴板的内容
setImage():将QImage对象复制到剪贴板中
setMimeData():将MIME数据设置为剪贴板
setPixmap():从剪贴板中复制Pixmap对象
setText():从剪贴板中复制文本
text():从剪贴板中检索文本
例子:
| # -*- coding: utf-8 -*- | |
| ''' | |
| 【简介】 | |
| PyQt5中 QClipboard 例子 | |
| ''' | |
| import os | |
| import sys | |
| from PyQt5.QtCore import QMimeData | |
| from PyQt5.QtWidgets import (QApplication, QDialog, QGridLayout, QLabel,QPushButton) | |
| from PyQt5.QtGui import QPixmap | |
| class Form(QDialog): | |
| def __init__(self, parent=None): | |
| super(Form, self).__init__(parent) | |
| textCopyButton = QPushButton("&Copy Text") | |
| textPasteButton = QPushButton("Paste &Text") | |
| htmlCopyButton = QPushButton("C&opy HTML") | |
| htmlPasteButton = QPushButton("Paste &HTML") | |
| imageCopyButton = QPushButton("Co&py Image") | |
| imagePasteButton = QPushButton("Paste &Image") | |
| self.textLabel = QLabel("Original text") | |
| self.imageLabel = QLabel() | |
| self.imageLabel.setPixmap(QPixmap(os.path.join( | |
| os.path.dirname(__file__), "images/clock.png"))) | |
| layout = QGridLayout() | |
| layout.addWidget(textCopyButton, 0, 0) | |
| layout.addWidget(imageCopyButton, 0, 1) | |
| layout.addWidget(htmlCopyButton, 0, 2) | |
| layout.addWidget(textPasteButton, 1, 0) | |
| layout.addWidget(imagePasteButton, 1, 1) | |
| layout.addWidget(htmlPasteButton, 1, 2) | |
| layout.addWidget(self.textLabel, 2, 0, 1, 2) | |
| layout.addWidget(self.imageLabel, 2, 2) | |
| self.setLayout(layout) | |
| textCopyButton.clicked.connect(self.copyText) | |
| textPasteButton.clicked.connect(self.pasteText) | |
| htmlCopyButton.clicked.connect(self.copyHtml) | |
| htmlPasteButton.clicked.connect(self.pasteHtml) | |
| imageCopyButton.clicked.connect(self.copyImage) | |
| imagePasteButton.clicked.connect(self.pasteImage) | |
| self.setWindowTitle("Clipboard 例子") | |
| def copyText(self): | |
| clipboard = QApplication.clipboard() | |
| clipboard.setText("I've been clipped!") | |
| def pasteText(self): | |
| clipboard = QApplication.clipboard() | |
| self.textLabel.setText(clipboard.text()) | |
| def copyImage(self): | |
| clipboard = QApplication.clipboard() | |
| clipboard.setPixmap(QPixmap(os.path.join( | |
| os.path.dirname(__file__), "./images/python.png"))) | |
| def pasteImage(self): | |
| clipboard = QApplication.clipboard() | |
| self.imageLabel.setPixmap(clipboard.pixmap()) | |
| def copyHtml(self): | |
| mimeData = QMimeData() | |
| mimeData.setHtml("Bold and Red") | |
| clipboard = QApplication.clipboard() | |
| clipboard.setMimeData(mimeData) | |
| def pasteHtml(self): | |
| clipboard = QApplication.clipboard() | |
| mimeData = clipboard.mimeData() | |
| if mimeData.hasHtml(): | |
| self.textLabel.setText(mimeData.html()) | |
| if __name__ == "__main__": | |
| app = QApplication(sys.argv) | |
| form = Form() | |
| form.show() | |
| sys.exit(app.exec_()) |
运行结果:

十二、日历与时间
QCalendar是一个日历控件,它提供了一个基于月份的视图,允许用户通过鼠标或键盘选择日期,默认选中的是今天的日期。也可以对日历的日期范围进行规定。
例子:
| # -*- coding: utf-8 -*- | |
| ''' | |
| 【简介】 | |
| PyQt5中 QCalendarWidget 例子 | |
| ''' | |
| import sys | |
| from PyQt5 import QtCore | |
| from PyQt5.QtGui import * | |
| from PyQt5.QtWidgets import * | |
| from PyQt5.QtCore import QDate | |
| class CalendarExample( QWidget): | |
| def __init__(self): | |
| super(CalendarExample, self).__init__() | |
| self.initUI() | |
| def initUI(self): | |
| self.cal = QCalendarWidget(self) | |
| self.cal.setMinimumDate(QDate(1980, 1, 1)) | |
| self.cal.setMaximumDate(QDate(3000, 1, 1)) | |
| self.cal.setGridVisible(True) | |
| self.cal.move(20, 20) | |
| self.cal.clicked[QtCore.QDate].connect(self.showDate) | |
| self.lbl = QLabel(self) | |
| date = self.cal.selectedDate() | |
| self.lbl.setText(date.toString("yyyy-MM-dd dddd")) | |
| self.lbl.move(20, 300) | |
| self.setGeometry(100,100,400,350) | |
| self.setWindowTitle('Calendar 例子') | |
| def showDate(self, date): | |
| self.lbl.setText(date.toString("yyyy-MM-dd dddd") ) | |
| if __name__ == '__main__': | |
| app = QApplication(sys.argv) | |
| demo = CalendarExample() | |
| demo.show() | |
| sys.exit(app.exec_()) |
运行结果:

2、QDateTimeEdit
是一个允许用户编辑日期时间的控件,通过setDisplayFormat()函数来设置显示的日期时间格式。
QDateEdit和QTimeEdit类均继承自QDateTimeEdit类,前者用来编辑控件的日期,仅包括年、月和日;后者用来编辑控件的时间,仅包括小时、分钟和秒。如果要同时操作日期时间,使用QDateTimeEdit。
例子:
| # -*- coding: utf-8 -*- | |
| ''' | |
| 【简介】 | |
| PyQt5中 DateTimeEdit 例子 | |
| ''' | |
| import sys | |
| from PyQt5.QtGui import * | |
| from PyQt5.QtWidgets import * | |
| from PyQt5.QtCore import QDate, QDateTime , QTime | |
| class DateTimeEditDemo(QWidget): | |
| def __init__(self): | |
| super(DateTimeEditDemo, self).__init__() | |
| self.initUI() | |
| def initUI(self): | |
| self.setWindowTitle('QDateTimeEdit例子') | |
| self.resize(300, 90) | |
| vlayout = QVBoxLayout() | |
| self.dateEdit = QDateTimeEdit(QDateTime.currentDateTime(), self) | |
| self.dateEdit.setDisplayFormat("yyyy-MM-dd HH:mm:ss") | |
| # 设置最小日期 | |
| self.dateEdit.setMinimumDate(QDate.currentDate().addDays(-365)) | |
| # 设置最大日期 | |
| self.dateEdit.setMaximumDate(QDate.currentDate().addDays(365)) | |
| self.dateEdit.setCalendarPopup( True) | |
| self.dateEdit.dateChanged.connect(self.onDateChanged) | |
| self.dateEdit.dateTimeChanged.connect(self.onDateTimeChanged) | |
| self.dateEdit.timeChanged.connect(self.onTimeChanged) | |
| self.btn = QPushButton('获得日期和时间') | |
| self.btn.clicked.connect(self.onButtonClick) | |
| vlayout.addWidget( self.dateEdit ) | |
| vlayout.addWidget( self.btn ) | |
| self.setLayout(vlayout) | |
| # 日期发生改变时执行 | |
| def onDateChanged(self , date): | |
| print(date) | |
| # 无论日期还是时间发生改变,都会执行 | |
| def onDateTimeChanged(self , dateTime ): | |
| print(dateTime) | |
| # 时间发生改变时执行 | |
| def onTimeChanged(self , time): | |
| print(time) | |
| def onButtonClick(self ): | |
| dateTime = self.dateEdit.dateTime() | |
| # 最大日期 | |
| maxDate = self.dateEdit.maximumDate() | |
| # 最大日期时间 | |
| maxDateTime = self.dateEdit.maximumDateTime() | |
| # 最大时间 | |
| maxTime = self.dateEdit.maximumTime() | |
| # 最小日期 | |
| minDate = self.dateEdit.minimumDate() | |
| # 最小日期时间 | |
| minDateTime = self.dateEdit.minimumDateTime() | |
| # 最小时间 | |
| minTime = self.dateEdit.minimumTime() | |
| print('\n选择日期时间' ) | |
| print('dateTime=%s' % str(dateTime) ) | |
| print('maxDate=%s' % str(maxDate) ) | |
| print('maxDateTime=%s' % str(maxDateTime) ) | |
| print('maxTime=%s' % str(maxTime) ) | |
| print('minDate=%s' % str(minDate) ) | |
| print('minDateTime=%s' % str(minDateTime) ) | |
| print('minTime=%s' % str(minTime) ) | |
| if __name__ == '__main__': | |
| app = QApplication(sys.argv) | |
| demo = DateTimeEditDemo() | |
| demo.show() | |
| sys.exit(app.exec_()) |
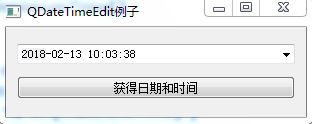
运行结果:
十三、菜单栏、工具栏与状态栏
1、菜单栏(QMenuBar)
重要方法:
menuBar():返回主窗口的QMenuBar对象
addMenu():在菜单栏中添加一个新的QMenu对象
addAction():向QMenu小控件中添加一个操作按钮,其中包含文本或图标
setEnabled():将操作按钮状态设置为启用/禁用
addSeperator():在菜单中添加一条分隔线
clear():删除菜单/菜单栏的内容
setShortcut():将快捷键关联到操作按钮
setText():设置菜单项文本
text():返回与QAction对象关联的文本
title():返回QMenu小控件的标题
例子;
| # -*- coding: utf-8 -*- | |
| ''' | |
| 【简介】 | |
| PyQt5中 Qmenu 例子 | |
| ''' | |
| import sys | |
| from PyQt5.QtCore import * | |
| from PyQt5.QtGui import * | |
| from PyQt5.QtWidgets import * | |
| class MenuDemo(QMainWindow): | |
| def __init__(self, parent=None): | |
| super(MenuDemo, self).__init__(parent) | |
| layout = QHBoxLayout() | |
| bar = self.menuBar() | |
| file = bar.addMenu("File") | |
| file.addAction("New") | |
| save = QAction("Save",self) | |
| save.setShortcut("Ctrl+S") | |
| file.addAction(save) | |
| edit = file.addMenu("Edit") | |
| edit.addAction("copy") | |
| edit.addAction("paste") | |
| quit = QAction("Quit",self) | |
| file.addAction(quit) | |
| file.triggered[QAction].connect(self.processtrigger) | |
| self.setLayout(layout) | |
| self.setWindowTitle("menu 例子") | |
| self.resize(350,300) | |
| def processtrigger(self,q): | |
| print( q.text()+" is triggered" ) | |
| if __name__ == '__main__': | |
| app = QApplication(sys.argv) | |
| demo = MenuDemo() | |
| demo.show() | |
| sys.exit(app.exec_()) |
运行结果:

2、工具栏(QToolBar)
QToolBar控件是由文本按钮、图标或其他小控件按钮组成的可移动面板,通常位于菜单栏下方。常用方法为:
addAction():添加具有文本或图标的工具按钮
addSeperator():分组显示工具按钮
adWidget():添加工具栏中按钮以外的控件
addToolBar():使用QMainWindow类的方法添加一个新的工具栏
setMovable():工具栏变得可移动
setOrientation():工具栏的方向可以设置为Qt.Horizontal或Qt.vertical
例子:
| # -*- coding: utf-8 -*- | |
| ''' | |
| 【简介】 | |
| PyQt5中 QToolBar 例子 | |
| ''' | |
| import sys | |
| from PyQt5.QtCore import * | |
| from PyQt5.QtGui import * | |
| from PyQt5.QtWidgets import * | |
| class ToolBarDemo( QMainWindow ): | |
| def __init__(self, parent=None): | |
| super(ToolBarDemo, self).__init__(parent) | |
| self.setWindowTitle("toolbar 例子") | |
| self.resize(300, 200) | |
| layout = QVBoxLayout() | |
| tb = self.addToolBar("File") | |
| new = QAction(QIcon("./images/new.png"),"new",self) | |
| tb.addAction(new) | |
| open = QAction(QIcon("./images/open.png"),"open",self) | |
| tb.addAction(open) | |
| save = QAction(QIcon("./images/save.png"),"save",self) | |
| tb.addAction(save) | |
| tb.actionTriggered[QAction].connect(self.toolbtnpressed) | |
| self.setLayout(layout) | |
| def toolbtnpressed(self,a): | |
| print("pressed tool button is",a.text() ) | |
| if __name__ == '__main__': | |
| app = QApplication(sys.argv) | |
| demo = ToolBarDemo() | |
| demo.show() | |
| sys.exit(app.exec_()) |
运行结果:

3、状态栏(QStatusBar)
用于永久的或临时的状态信息,常用方法为:
addWidget():在状态栏中添加给定的窗口小控件对象
addPermanentWidget():在状态栏中永久添加给定的窗口小控件对象
showMessage():在状态栏中显示一条临时信息指定时间间隔
clearMessage():删除正在显示的临时信息
removeWidget():从状态栏中删除指定的小控件
例子:
| # -*- coding: utf-8 -*- | |
| ''' | |
| 【简介】 | |
| PyQt5中 QStatusBar 例子 | |
| ''' | |
| import sys | |
| from PyQt5.QtCore import * | |
| from PyQt5.QtGui import * | |
| from PyQt5.QtWidgets import * | |
| class StatusDemo(QMainWindow): | |
| def __init__(self, parent=None): | |
| super(StatusDemo, self).__init__(parent) | |
| bar = self.menuBar() | |
| file = bar.addMenu("File") | |
| file.addAction("show") | |
| file.triggered[QAction].connect(self.processTrigger) | |
| self.setCentralWidget(QTextEdit()) | |
| self.statusBar= QStatusBar() | |
| self.setWindowTitle("QStatusBar 例子") | |
| self.setStatusBar(self.statusBar) | |
| def processTrigger(self,q): | |
| if (q.text()=="show"): | |
| self.statusBar.showMessage(q.text()+" 菜单选项被点击了",5000) | |
| if __name__ == '__main__': | |
| app = QApplication(sys.argv) | |
| demo = StatusDemo() | |
| demo.show() | |
| sys.exit(app.exec_()) |
运行结果:

十四、QPrinter
打印图像实际上是在QPaintDevice中画图,和在QWidget、QPixmap、QImage中画图一样,都是创建一个QPainter对象进行画图,只是打印使用的是QPrinter,它本质上也是一个QPaintDevice
例子:
| # -*- coding: utf-8 -*- | |
| """ | |
| 【简介】 | |
| 打印图像例子 | |
| """ | |
| from PyQt5.QtCore import Qt | |
| from PyQt5.QtGui import QImage , QIcon, QPixmap | |
| from PyQt5.QtWidgets import QApplication , QMainWindow, QLabel, QSizePolicy , QAction | |
| from PyQt5.QtPrintSupport import QPrinter, QPrintDialog | |
| import sys | |
| class MainWindow(QMainWindow): | |
| def __init__(self,parent=None): | |
| super(MainWindow,self).__init__(parent) | |
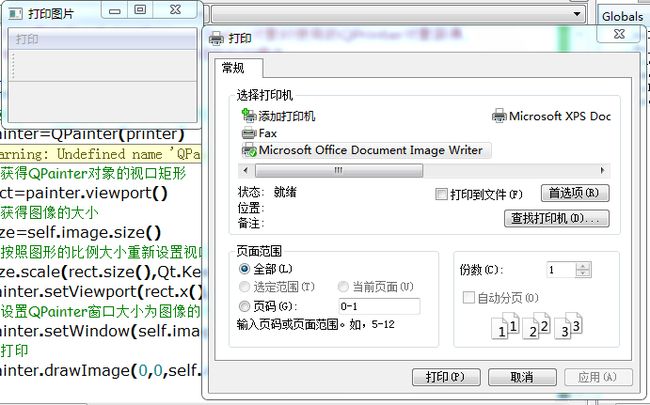
| self.setWindowTitle(self.tr("打印图片")) | |
| # 创建一个放置图像的QLabel对象imageLabel,并将该QLabel对象设置为中心窗体。 | |
| self.imageLabel=QLabel() | |
| self.imageLabel.setSizePolicy(QSizePolicy.Ignored,QSizePolicy.Ignored) | |
| self.setCentralWidget(self.imageLabel) | |
| self.image=QImage() | |
| # 创建菜单,工具条等部件 | |
| self.createActions() | |
| self.createMenus() | |
| self.createToolBars() | |
| # 在imageLabel对象中放置图像 | |
| if self.image.load("./images/screen.png"): | |
| self.imageLabel.setPixmap(QPixmap.fromImage(self.image)) | |
| self.resize(self.image.width(),self.image.height()) | |
| def createActions(self): | |
| self.PrintAction=QAction(QIcon("./images/printer.png"),self.tr("打印"),self) | |
| self.PrintAction.setShortcut("Ctrl+P") | |
| self.PrintAction.setStatusTip(self.tr("打印")) | |
| self.PrintAction.triggered.connect(self.slotPrint) | |
| def createMenus(self): | |
| PrintMenu=self.menuBar().addMenu(self.tr("打印")) | |
| PrintMenu.addAction(self.PrintAction) | |
| def createToolBars(self): | |
| fileToolBar=self.addToolBar("Print") | |
| fileToolBar.addAction(self.PrintAction) | |
| def slotPrint(self): | |
| # 新建一个QPrinter对象 | |
| printer=QPrinter() | |
| # 创建一个QPrintDialog对象,参数为QPrinter对象 | |
| printDialog=QPrintDialog(printer,self) | |
| ''' | |
| 判断打印对话框显示后用户是否单击“打印”按钮,若单击“打印”按钮, | |
| 则相关打印属性可以通过创建QPrintDialog对象时使用的QPrinter对象获得, | |
| 若用户单击“取消”按钮,则不执行后续的打印操作。 | |
| ''' | |
| if printDialog.exec_(): | |
| # 创建一个QPainter对象,并指定绘图设备为一个QPrinter对象。 | |
| painter=QPainter(printer) | |
| # 获得QPainter对象的视口矩形 | |
| rect=painter.viewport() | |
| # 获得图像的大小 | |
| size=self.image.size() | |
| # 按照图形的比例大小重新设置视口矩形 | |
| size.scale(rect.size(),Qt.KeepAspectRatio) | |
| painter.setViewport(rect.x(),rect.y(),size.width(),size.height()) | |
| # 设置QPainter窗口大小为图像的大小 | |
| painter.setWindow(self.image.rect()) | |
| # 打印 | |
| painter.drawImage(0,0,self.image) | |
| if __name__ == "__main__": | |
| app=QApplication(sys.argv) | |
| main=MainWindow() | |
| main.show() | |
| sys.exit(app.exec_()) |
运行结果: