vue-cli3配置骨架屏方案
vue-cli3配置骨架屏方案
前言
最近在学vue,准备使用vue写一个移动端项目。考虑到首页白屏优化,需要实现骨架屏需求。这里介绍两种方案,当然都是根据现有的轮子搭的
步骤
- 安装
vue-skeleton-webpack-plugin插件
npm install --save-dev vue-skeleton-webpack-plugin
- vue.config.js配置
const path = require('path')
const SkeletonWebpackPlugin = require('vue-skeleton-webpack-plugin');

module.exports = {
    css: {
         extract: true, // css拆分ExtractTextPlugin插件,默认true - 骨架屏需要为true
    },

    configureWebpack: (config)=>{
        // vue骨架屏插件配置
        config.plugins.push(new SkeletonWebpackPlugin({
          webpackConfig: {
            entry: {
              app: path.join(__dirname, './src/utils/skeleton.js'),
            },
          },
          minimize: true,
          quiet: true,
        }))
  },
}
- 新建一个
skeleton.js文件放在src->utils文件夹下面、
import Vue from 'vue';
import Skeleton from '../components/Skeleton/skeleton-2';

export default new Vue({
  components: {
    Skeleton,
  },
  render: h => h(Skeleton),
});
这个文件是用来注入骨架屏的
- 新建一个
skeleton-2.vue骨架屏组件
<template>
  <div class="skeleton page">
    <div class="skeleton-nav"></div>
    <div class="skeleton-swiper"></div>
    <ul class="skeleton-tabs">
      <li v-for="i in 8" class="skeleton-tabs-item"><span></span></li>
    </ul>
    <div class="skeleton-banner"></div>
    <div v-for="i in 6" class="skeleton-productions"></div>
  </div>
</template>

<style>
  .skeleton {
    position: relative;
    height: 100%;
    overflow: hidden;
    padding: 15px;
    box-sizing: border-box;
    background: #fff;
  }
  .skeleton-nav {
    height: 45px;
    background: #eee;
    margin-bottom: 15px;
  }
  .skeleton-swiper {
    height: 160px;
    background: #eee;
    margin-bottom: 15px;
  }
  .skeleton-tabs {
    list-style: none;
    padding: 0;
    margin: 0 -15px;
    display: flex;
    flex-wrap: wrap;
  }
  .skeleton-tabs-item {
    width: 25%;
    height: 55px;
    box-sizing: border-box;
    text-align: center;
    margin-bottom: 15px;
  }
  .skeleton-tabs-item span {
    display: inline-block;
    width: 55px;
    height: 55px;
    border-radius: 55px;
    background: #eee;
  }
  .skeleton-banner {
    height: 60px;
    background: #eee;
    margin-bottom: 15px;
  }
  .skeleton-productions {
    height: 20px;
    margin-bottom: 15px;
    background: #eee;
  }

  .skeleton {
    padding: 10px;
  }

  .skeleton .skeleton-head,
  .skeleton .skeleton-title,
  .skeleton .skeleton-content {
    background: rgb(194, 207, 214);
  }

  .skeleton-head {
    width: 100px;
    height: 100px;
    float: left;
  }

  .skeleton-body {
    margin-left: 110px;
  }

  .skeleton-title {
    width: 500px;
    height: 60px;
    transform-origin: left;
    animation: skeleton-stretch .5s linear infinite alternate;
  }

  .skeleton-content {
    width: 260px;
    height: 30px;
    margin-top: 10px;
    transform-origin: left;
    animation: skeleton-stretch .5s -.3s linear infinite alternate;
  }

  @keyframes skeleton-stretch {
    from {
      transform: scalex(1);
    }
    to {
      transform: scalex(.3);
    }
  }
</style>
- 新建一个
skeleton-1.vue骨架屏组件
<template>
  <div class="skeleton">
    <div class="skeleton-head"></div>
    <div class="skeleton-body">
      <div class="skeleton-title"></div>
      <div class="skeleton-content"></div>
    </div>
  </div>
</template>

<style>
.skeleton {
  padding: 10px;
}

.skeleton .skeleton-head,
.skeleton .skeleton-title,
.skeleton .skeleton-content {
  background: rgb(194, 207, 214);
}

.skeleton-head {
  width: 100px;
  height: 100px;
  float: left;
}

.skeleton-body {
  margin-left: 110px;
}

.skeleton-title {
  width: 500px;
  height: 60px;
  transform-origin: left;
  animation: skeleton-stretch 0.5s linear infinite alternate;
}

.skeleton-content {
  width: 260px;
  height: 30px;
  margin-top: 10px;
  transform-origin: left;
  animation: skeleton-stretch 0.5s -0.3s linear infinite alternate;
}

@keyframes skeleton-stretch {
  from {
    transform: scalex(1);
  }
  to {
    transform: scalex(0.3);
  }
}
</style>
- 修改
main.js配置
const app = new Vue({
  store,
  router,
  render: h => h(App)
}).$mount('#app')
- 重启项目
思路
- 将骨架屏也看成路由组件,在构建时使用 Vue 预渲染功能,将骨架屏组件的渲染结果 HTML 片段插入 HTML 页面模版的挂载点中,将样式内联到 head 标签中。这样等前端渲染完成时,Vue 将使用客户端混合,把挂载点中的骨架屏内容替换成真正的页面内容。
缺点
- 这种方案实现的是固定死的骨架(可以查看
skeleton-2.vueskeleton-1.vue)两个文件,不能够自动根据页面DOM结构生成骨架
优化的方向 (这里补充第二种方案)
饿了么团队 page-skeleton-webpack-plugin开发的自动生成页面骨架屏方案
- 安装
page-skeleton-webpack-pluginhtml-webpack-plugin
npm install --save-dev page-skeleton-webpack-plugin //这个包有140M 需要注意是否成功下载
npm install --save-dev html-webpack-plugin
- 配置插件
这里使用的vue-cli3,故先新建文件vue.config.js
const HtmlWebpackPlugin = require('html-webpack-plugin')
const SkeletonPlugin  = require('page-skeleton-webpack-plugin').SkeletonPlugin
const path = require('path')

module.exports = {
  configureWebpack: {
    plugins: [
      new HtmlWebpackPlugin({
        filename: 'index.html',
        template: 'public/index.html'
      }),
      new SkeletonPlugin({
        pathname: path.resolve(__dirname, `./shell`), // 用来存储 shell 文件的地址
        staticDir: path.resolve(__dirname, './dist'), // 最好和 `output.path` 相同
        routes: ['/', '/about'] // 将需要生成骨架屏的路由添加到数组中
      })
    ]
  }
}
- 修改HTML Webpack Plugin 插件的模板
因为我们的项目用的是vue-cli脚手架创建的,所以修改public/index.html内容,修改如下:
<html lang="en">
  <head>
    <meta charset="utf-8">
    <meta http-equiv="X-UA-Compatible" content="IE=edge">
    <meta name="viewport" content="width=device-width,initial-scale=1.0">
    <title>vue-skeletontitle>
  head>
  <body>
    <noscript>
      <strong>We're sorry but vue-skeleton doesn't work properly without JavaScript enabled. Please enable it to continue.strong>
    noscript>
    <div id="app">

    div>

  body>
html>
重点是 ,因为插件是根据这个来找到往哪个DOM节点下面动态的插入骨架屏的html文件的。
- 重启项目
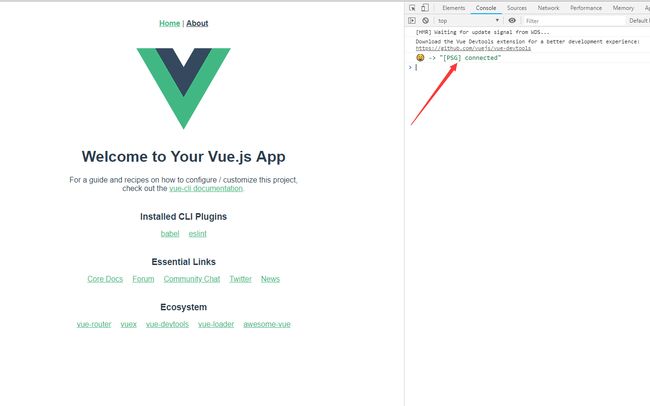
可以打开控制台,看到有如下提示说明插件已经正常运行了
- 启动插件
在开发页面中通过 Ctrl|Cmd + enter 呼出插件交互界面,或者在在浏览器的 JavaScript 控制台内输入toggleBar呼出交互界面。点击交互界面中的按钮,进行骨架页面的预览,这一过程可能会花费 20s 左右时间,当插件准备好骨架页面后,会自动通过浏览器打开预览页面,如下图。
参考
- 饿了么的 PWA 升级实践
- 为vue项目添加骨架屏

