Meaven+ SSM框架搭建Web工程(IDE为:Eclipse)
一 下载 配置Meaven
连接:http://maven.apache.org/download.cgi
下载完成 进行解压,
然后进行配置 meaven
1 新建 MEAVEN_HOME,值为:解压的meaven路径
2 建立 MEAVEN_OPTS 值为:-Xms128m -Xmx512m,这是为了防止Meaven 在执行期间出现 堆栈溢出
3 然后添加到系统的路径 %MEAVEN_HOME%\bin:
4 打开 cmd 测试:
成功。
二 修改 Meaven 的 setting.xml
以下直接给出一个比较快的 setting.xml 可以直接复制粘切进行覆盖:
直接复制粘贴覆盖就行。
三 将Meaven 加入 Eclipse
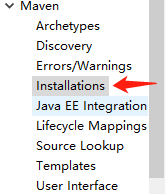
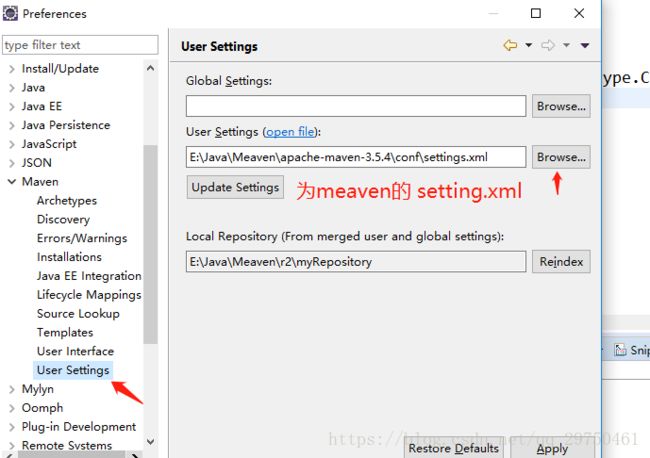
1 Window---->Perferences--->meaven
将 Meaven 的解压路径添加进去。
下一步:
四 创建新的Meaven Project
File ---> New --->Meaven Project,选择默认配置 点击Next,出现以下界面,选择最后一个 创建 Web 项目:
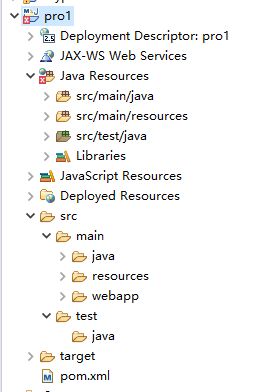
然后点击 Finish 完成空白项目创建. 基本目录如下,如果有没有的目录,可以进行自己创建。
项目创建完成后,如果出现错误,解决方法:右键项目,选择maven,然后update project 就可以了
五 接下来进行配置 pom.xml
配置 log4j.properties
#USE THIS SETTING FOR OUTPUT MYBATIS`s SQL ON THE CONSOLE
log4j.rootLogger=DEBUG, Console
#Console
log4j.appender.Console=org.apache.log4j.ConsoleAppender
log4j.appender.Console.layout=org.apache.log4j.PatternLayout
log4j.appender.Console.layout.ConversionPattern=%d [%t] %-5p [%c] - %m%n
log4j.logger.java.sql.ResultSet=INFO
log4j.logger.org.apache=INFO
log4j.logger.java.sql.Connection=DEBUG
log4j.logger.java.sql.Statement=DEBUG
log4j.logger.java.sql.PreparedStatement=DEBUG
生成 db.properties
user=***//数据库名
password=****//数据库密码
driver=com.mysql.jdbc.Driver
url=jdbc:mysql://localhost:3306/test
配置DataSource.xml
xmlns:c="http://www.springframework.org/schema/c"
xmlns:util="http://www.springframework.org/schema/util"
xmlns:context="http://www.springframework.org/schema/context"
xsi:schemaLocation="http://www.springframework.org/schema/beans http://www.springframework.org/schema/beans/spring-beans.xsd
http://www.springframework.org/schema/util http://www.springframework.org/schema/util/spring-util.xsd
http://www.springframework.org/schema/context http://www.springframework.org/schema/context/spring-context.xsd ">
配置 springmvc.xml
xmlns:mvc="http://www.springframework.org/schema/mvc"
xsi:schemaLocation="
http://www.springframework.org/schema/beans http://www.springframework.org/schema/beans/spring-beans.xsd
http://www.springframework.org/schema/context http://www.springframework.org/schema/context/spring-context.xsd
http://www.springframework.org/schema/mvc http://www.springframework.org/schema/mvc/spring-mvc.xsd">
配置 spring-tx.xml
xmlns:c="http://www.springframework.org/schema/c"
xmlns:util="http://www.springframework.org/schema/util"
xmlns:aop="http://www.springframework.org/schema/aop"
xmlns:context="http://www.springframework.org/schema/context"
xmlns:tx="http://www.springframework.org/schema/tx"
xsi:schemaLocation="http://www.springframework.org/schema/beans http://www.springframework.org/schema/beans/spring-beans.xsd
http://www.springframework.org/schema/util http://www.springframework.org/schema/util/spring-util.xsd
http://www.springframework.org/schema/context http://www.springframework.org/schema/context/spring-context.xsd
http://www.springframework.org/schema/aop http://www.springframework.org/schema/aop/spring-aop-2.0.xsd
http://www.springframework.org/schema/tx http://www.springframework.org/schema/tx/spring-tx-2.0.xsd">
配置 mybatis-config.xml
PUBLIC "-//mybatis.org//DTD Config 3.0//EN"
"http://mybatis.org/dtd/mybatis-3-config.dtd">
配置 spring-mybatis.xml
xsi:schemaLocation="
http://www.springframework.org/schema/beans http://www.springframework.org/schema/beans/spring-beans.xsd">
最后配置 web.xml
xmlns="http://java.sun.com/xml/ns/javaee" xmlns:xsi="http://www.w3.org/2001/XMLSchema-instance" xsi:schemaLocation="http://java.sun.com/xml/ns/javaee http://java.sun.com/xml/ns/javaee/web-app_2_5.xsd">
六 写java代码测试:
先看下目录结构:
1 实体类:
package com.shxt.pro.pojo;
import org.springframework.stereotype.Component;
@Component
public class User {
private Integer id;
private String name;
public User() {
super();
}
public User(Integer id, String name) {
super();
this.id = id;
this.name = name;
}
public Integer getId() {
return id;
}
public void setId(Integer id) {
this.id = id;
}
public String getName() {
return name;
}
public void setName(String name) {
this.name = name;
}
@Override
public String toString() {
return "User [id=" + id + ", name=" + name + "]";
}
}
2 实体方法:
package com.shxt.pro.dao;
import java.util.List;
import org.springframework.stereotype.Component;
import com.shxt.pro.pojo.User;
@Component
public interface UserMapper {
public List
}
UserMapper.xml实现:
"http://mybatis.org/dtd/mybatis-3-mapper.dtd">
3 UserService 接口:
package com.shxt.pro.service;
import java.util.List;
import com.shxt.pro.pojo.User;
public interface UserService {
public List
}
接口实现:
package com.shxt.pro.service;
import java.util.List;
import org.springframework.beans.factory.annotation.Autowired;
import org.springframework.stereotype.Service;
import com.shxt.pro.dao.UserMapper;
import com.shxt.pro.pojo.User;
@Service("userService")
public class UserServiceImp implements UserService{
@Autowired
public UserMapper userMapper;
@Override
public List
return userMapper.getUsers();
}
}
4 Controller 层
package com.shxt.pro.controller;
import org.springframework.beans.factory.annotation.Autowired;
import org.springframework.stereotype.Controller;
import org.springframework.web.bind.annotation.RequestMapping;
import com.shxt.pro.service.UserServiceImp;
@Controller
public class UserController {
@Autowired
public UserServiceImp userService;
@RequestMapping("/login")
public String toIndex() {
return "index";
}
}
5 测试Jsp
Hello World!adsfsadf
然后发布在 tomcat上 访问即可。


