接前面一,下面我们利用vuex实现顶部导航栏事件和右上角状态栏。
本系列教程是用Vue.js + Nuxt.js + Element + Vuex + 开源js绘图库,打造一个属于自己的在线绘图软件,最终效果:http://topology.le5le.com 。如果你觉得好,欢迎给文章和开源库点赞,让我们更有动力去做好!
本系列教程源码地址:Github
一、利用vuex进行消息通信,发送菜单命令
vue消息通信的方式很多,我们这里只讲vuex的方式。
1. 新建一个文件store/event.js
export const state = () => ({
  event: {
    name: '',
    data: null
  }
})

export const mutations = {
  // 更新state的函数一
    // 参数:state,上面的state
    // 参数:event,新的数据
  emit(state, event) {
    state.event = event
  }
}
这里,我们只用关注state和mutations即可,Nuxt.js会自动补全完整的vuex。store文件下的文件名event会自动转换为vuex的module:event。
其中,state是我们的全局数据保存状态;mutations是没有异步的更新数据的方法集合;actions是异步更新数据的方法集合(这里暂时没有)。
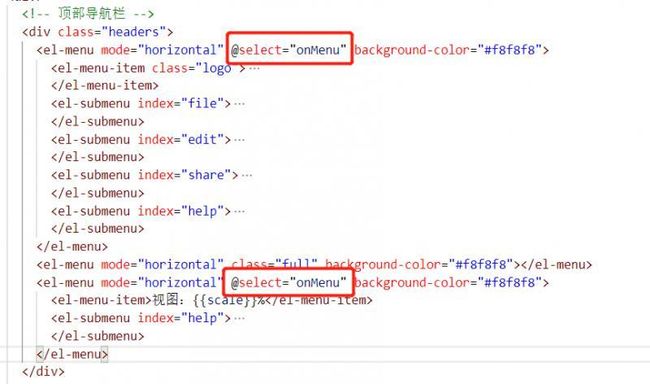
2. 在顶部导航菜单事件里,更新数据
layouts/default.vue的菜单响应事件:
 methods: {
    onMenu(key, keyPath) {
      if (!key || key.indexOf('/') === 0) {
        return
      }

      switch (key) {
        case 'about':
        case 'about2':
          this.about = true
          break
        case 'license':
          this.license = true
          break
        case 'joinin':
          this.joinin = true
          break
        default:
          this.$store.commit('event/emit', {
            name: key
          })
          break
      }
    }
  }
其中,通过this.$store.commit去发送无异步状态的更新store数据请求。'event/emit' 中的event指store的module:event(.js);emit指mutations或actions中的函数名。因为这里是通过commit方式去更新数据,所以对应的是mutations中的emit函数。commit的第二个参数,是我们要更新的最新数据。
3.在pages/index.vue监听消息事件
当我们更新store数据后,各个页面数据会自动更新。我们这里通过watch的方式去监听消息:
computed: {
    event() {
      return this.$store.state.event.event
    }
  },
  watch: {
    event(curVal) {
      if (this['handle_' + curVal.name]) {
        this['handle_' + curVal.name](curVal.data)
      }
    }
  }
首先,我们通过动态的属性计算computed来设置一个动态属性event,然后通过watch监听event的变化,即完成了消息监听。
不同的菜单事件对应的画布操作,参考画布的API文档
二、利用vuex,实现右上角状态栏
1. 新建一个文件store/canvas.js,保存全局画布状态
export const state = () => ({
  data: {
    scale: 1,
    lineName: 'curve',
    fromArrowType: '',
    toArrowType: 'triangleSolid',
    locked: 0
  }
})

export const mutations = {
  data(state, data) {
    state.data = data
  }
}
2. 在onMessage(画布消息返回函数)监听状态变化,更新数据
onMessage(event, data) {
      switch (event) {
        case 'node':
        case 'addNode':
          this.props = {
            node: data,
            line: null,
            multi: false
          }
          break
        case 'line':
        case 'addLine':
          this.props = {
            node: null,
            line: data,
            multi: false
          }
          break
        case 'multi':
          this.props = {
            node: null,
            line: null,
            multi: true
          }
          break
        case 'space':
          this.props = {
            node: null,
            line: null,
            multi: false
          }
          break
        case 'moveOut':
          break
        case 'moveNodes':
        case 'resizeNodes':
          if (data.length > 1) {
            this.props = {
              node: null,
              line: null,
              multi: true
            }
          } else {
            this.props = {
              node: data[0],
              line: null,
              multi: false
            }
          }
          break
        case 'resize':
        case 'scale':
        case 'locked':
          if (this.canvas && this.canvas.data) {
            this.$store.commit('canvas/data', {
              scale: this.canvas.data.scale || 1,
              lineName: this.canvas.data.lineName,
              fromArrowType: this.canvas.data.fromArrowType,
              toArrowType: this.canvas.data.toArrowType,
              fromArrowlockedType: this.canvas.data.locked
            })
          }
          break
      }
    }
canvas.data数据很多,这里我们只关注几个全局状态属性。也是因为vuex的原因,不能直接传入原始json对象this.$store.commit('canvas/data', this.canvas.data),会报错。
3. 在layouts/default.vue状态栏显示数据
[这里只实现了部分]我们通过computed动态属性来暴露给ui显示:
computed: {
    scale() {
      return Math.floor(this.$store.state.canvas.data.scale * 100)
    },
    lineName() {
      const lineNames = {
        curve: '曲线',
        polyline: '折线',
        line: '直线'
      }
      return lineNames[this.$store.state.canvas.data.lineName]
    }
  }
4. 右上角状态栏下拉选项,通过前面消息事件通信,修改画布状态
三、其他
至此,顶部导航菜单和简单的状态栏就完成了,后续功能完善待续。
但,但,但...完整状态栏还没完成,希望大家根据开发文档去参与完善,展示自己舞台的机会到了,可加入贡献者名单哦!不清楚的,欢迎联系管理员:(微信)alsmile123,或加群:![]()
如何贡献
通过GitHub的pr方式:
- 阅读开发文档,了解相关属性。
- fork仓库到自己名下
- 本地修改并提交到自己的git仓库
- 在自己的fork仓库找到 “Pull request” 按钮,提交
![]()
开源项目不易,欢迎大家一起参与,给【文章、GitHub开源库】点星点赞,或资助服务器: ![]()
