Latex大全
本文介绍了latex中常用的功能
目录
- 符号大全
- 字母样式
- 分式、矩阵、多项式
- 重音符号(向量符号)
- 希腊字母
- 二元关系
- 运算符
- 大运算符(积分求和)
- 箭头
- 定界符(括号)
- 其他符号
- 基本结构
- 注释
- 换行
- 空格
- 中文
- 算法
- 表格
- 表格字体大小
- 单元格内换行
- 调整间距
- 插入图片
- 更高级的插图
- 公式
- 页脚注释
- 枚举
- 字体与字号
符号大全
因为符号更常用,所以放到前面了。
字母样式
第一行是罗马体,第二行是斜体,第三行类似于斜体

斜体(强烈推荐用于文本)
语法 \emph{Precision}
粗体(强烈推荐用于文本)
语法 \textbf{Precision}
粗斜体(强烈推荐用于文本)
语法 \textbf{\emph{Precision}}
上述三种用于文本,其余用于公式
正粗体
语法 \mathbf{012…abc…ABC…}
粗体
语法 \boldsymbol{012…abc…ABC…\alpha \beta\gamma…}
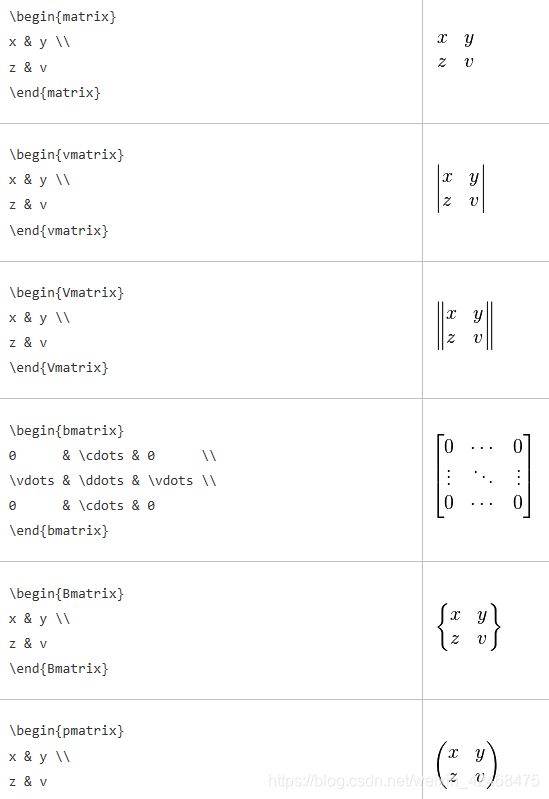
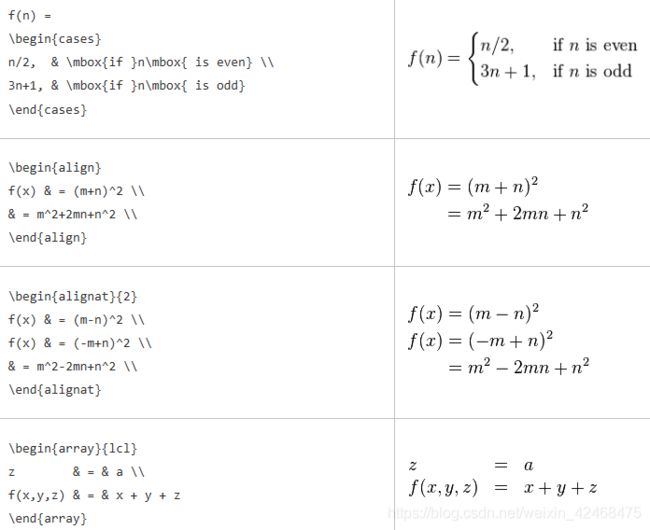
分式、矩阵、多项式
| 语法 | 效果 |
|---|---|
| \frac{2}{4}=0.5 | 2 4 = 0.5 \frac{2}{4}=0.5 42=0.5 |
| \cfrac{2}{c + \cfrac{2}{d + \cfrac{2}{4}}} =a | 2 c + 2 d + 2 4 = a \cfrac{2}{c + \cfrac{2}{d + \cfrac{2}{4}}} =a c+d+4222=a |
| \dbinom{n}{r}=\binom{n}{n-r}=Cn_r=Cn_{n-r} | ( n r ) = ( n n − r ) = C r n = C n − r n \dbinom{n}{r}=\binom{n}{n-r}=C^n_r=C^n_{n-r} (rn)=(n−rn)=Crn=Cn−rn |
矩阵
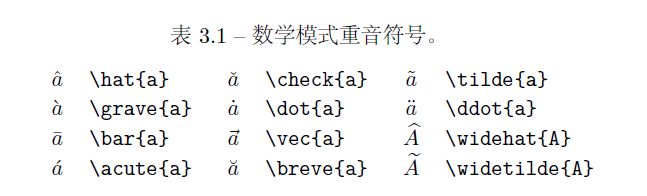
重音符号(向量符号)
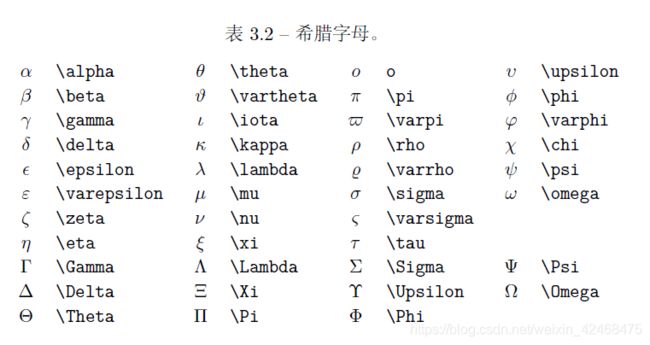
希腊字母
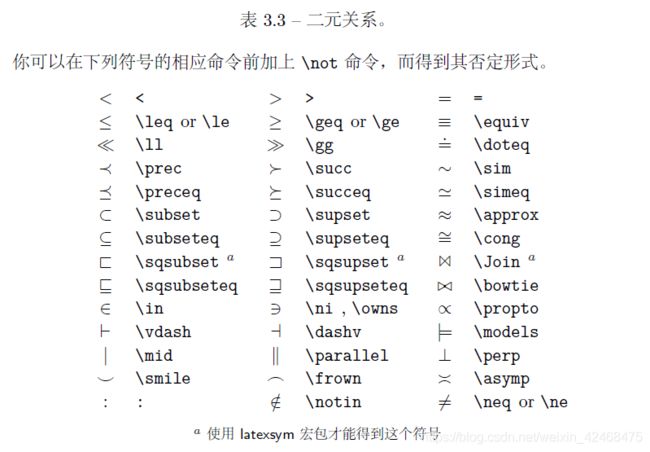
二元关系


运算符

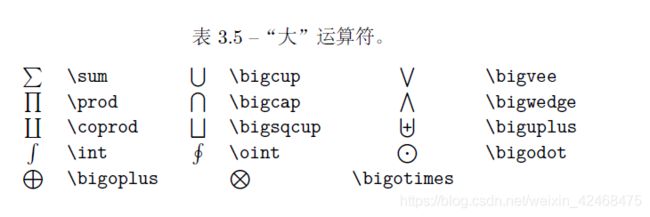
大运算符(积分求和)
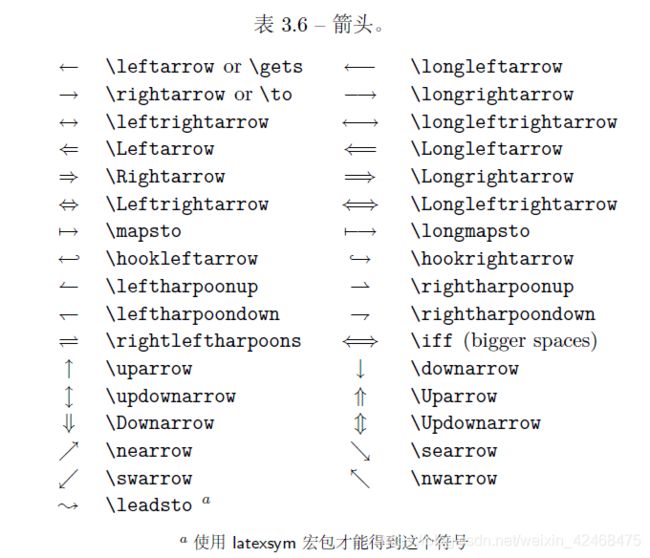
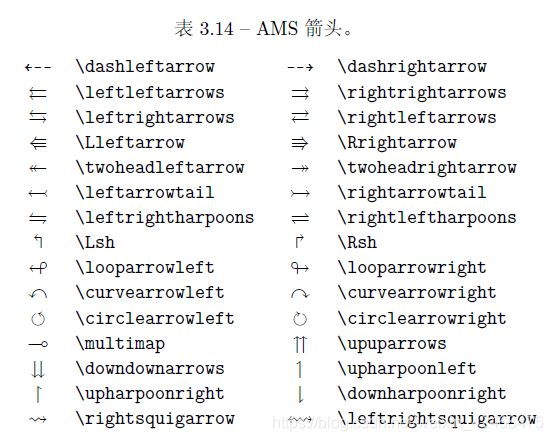
箭头
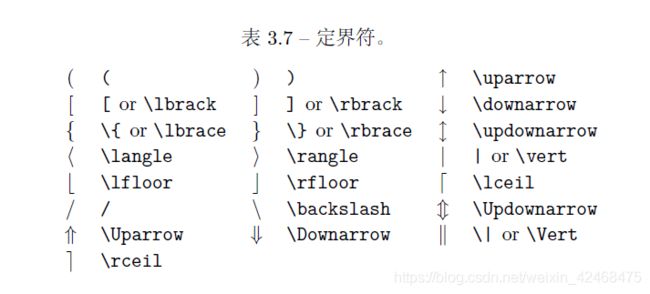
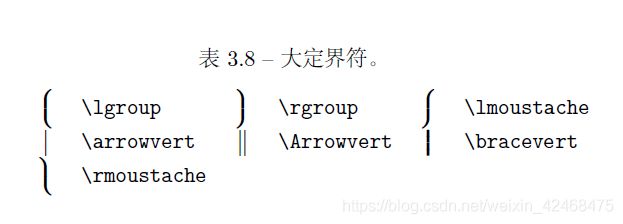
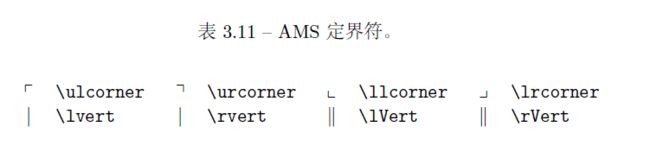
定界符(括号)
其他符号

\Delta: Δ \Delta Δ
前置上下标: ![]() 1 2 X 3 4 {}_1^2\!X_3^4 12X34
1 2 X 3 4 {}_1^2\!X_3^4 12X34
基本结构
\documentclass[12pt, letterpaper]{article}
\usepackage[utf8]{inputenc}
\usepackage{comment}

% Title
\title{Document Title} %标题
\author{Rooney \thanks{Somebody}}
\date{2020-05-09}

\begin{document}

\begin{titlepage}
\maketitle
\end{titlepage}

\tableofcontents

\begin{abstract}
This is a simple paragraph at the beginning of the
document. A brief introduction about the main subject.
\end{abstract}

First document. This is a simple example, with no
extra parameters or packages included.

% Comments
\begin{comment}
This text won't show up in the compiled pdf
this is just a multi-line comment. Useful
to, for instance, comment out slow-rendering
while working on the draft. 相当于加强版的 %
\end{comment}

\end{document}
其中,\documentclass命令是用于设置LaTex文件所生成文档的格式. 其命令语法如下所示: \documentclass[options]{class}
常见的class可选项:
| class | 文体 |
|---|---|
| article | 科技论文,报告,软件文档等 |
| IEEEtran | IEEE Transactions 格式. |
| report | 长篇报告(如:学位论文) |
常见的option可选项:
| option | 內容 |
|---|---|
| 12pt | 文档正文使用的字体大小(默认为10pt) |
| twoside, oneside | 分成几列,一般期刊论文是两列 |
| report | 长篇报告(如:学位论文) |
注释
先加载宏包:
\usepackage{comment}
一般用 % 注释一段话,看也可以用\begin{comment} 注释内容 \end{comment }来注释好几段话。
换行
两个反斜杠 \
空格
波浪线~
中文
将WinEdt设置为默认使用UTF8格式打开tex文件。
如果WinEdt打开一个UTF-8格式的文件显示乱码,可在Document->Document Setting->Format->File Format中选择UTF-8
或者在在该文件的开始处添加一行
% !Mode:: "TeX:UTF-8"
Latex环境中使用中文需要注意的一点是: Latex编辑器读入文件的使用的编码格式一定要与该文件的编码格式一致。
1.使用ctexart
\documentclass[UTF8]{ctexart}
\usepackage{CJK}

\begin{document}
Hello, World!
世界, 你好!
\emph{世界, 你好!}  %斜体
\textbf{世界, 你好!}  % 粗体
{\CJKfamily{hei}  黑体}
{\CJKfamily{kai}  楷体}
{\CJKfamily{li} 隶书}
{\CJKfamily{fs} 仿宋}
{\CJKfamily{song} 宋体}

\end{document}

2.使用CTEX中文包(UTF8格式)
\documentclass[UTF8]{article}
\usepackage{CTEX}

\begin{document}
\section{字体设置}
{\kaishu 楷体}
{\songti 宋体}
{\heiti 黑体}
{\fangsong 仿宋}
\end{document}

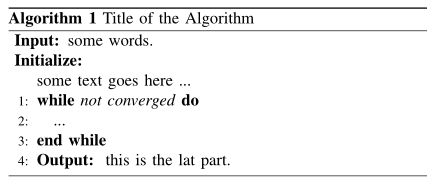
算法
先加载宏包:
\usepackage{algorithm}
\usepackage{algorithmic}
\renewcommand{\algorithmicrequire}{ \textbf{Input:}}     % Input 代替 Require
\renewcommand{\algorithmicensure}{ \textbf{Initialize:}} % Initialize 代替 Ensure
\renewcommand{\algorithmicreturn}{ \textbf{Output:}}     % Output 代替 Return
\begin{algorithm}
	\caption{Title of the Algorithm}
	\label{algo:ref}
	\begin{algorithmic}[1]
		\REQUIRE some words.  % this command shows "Input"
		\ENSURE ~\\           % this command shows "Initialized"
		some text goes here ...\\
		\WHILE {\emph{not converged}}
		\STATE ... \\  % line number at left side
		\ENDWHILE
		\RETURN this is the lat part.  % this command shows "Output"
	\end{algorithmic}
\end{algorithm}
表格
需要加载宏包:
\usepackage{booktabs}
\begin{table}[h]
\centering  %居中表格
\caption{this is my table}
\begin{tabular}{llr}  %%前两列左对齐,第三列右对齐
%也可以设置每一列的宽度 \begin{tabular}{p{3.5cm}|p{2cm}|p{5cm}}
%也可以设置表格总宽度的宽度 \begin{tabularx}{12cm}
\hline
\multicolumn{2}{c}{Item} \\ %Item写于前两列的合并
\cline{1-2}  %只画前两行的横线
Animal    & Description & Price (\$) \\
\hline
Gnat      & per gram    & 13.65      \\
          & each        & 0.01       \\
Gnu       & stuffed     & 92.50      \\
Emu       & stuffed     & 33.33      \\
Armadillo & frozen      & 8.99       \\
\hline
\end{tabular}
\end{table}
代码第四行决定表格中内容的对齐形式:
\begin{tabular}[pos]{table spec}
table spec选项:
| table spec | 作用 | 样例 |
|---|---|---|
| l | 左对齐 | {l c r} |
| c | 居中 | {l c r} |
| r | 右对齐 | {l c r} |
表格内容中的一些符号作用
| 符号 | 作用 |
|---|---|
| & | 列分隔 |
| \ | 新列 |
| \hline | 画一条水平线 |
| \newline | 在列中换行 |
| \cline{i-j} | 在水平方向从第 i 列 到 第 j 列画横线段 |
表格中行间距
\renewcommand{\arraystretch}{1.5} %默认是1.0
三线表格(更常用)
\begin{table}[h]
\caption{This my second table}
\centering
\begin{tabular}{ccc}
\toprule %命令是画出表格最上边的一条粗实线(rule)
Name & ID & Gender\\
\midrule % 命令是画出表格中间的细实线。 效果如下图所示:
Tom & 001& Male\\
Rose & 002& Female\\
\bottomrule %命令是画出表格最下边的一条粗实线.
\end{tabular}
\end{table}

表格字体大小
插入\begin{table}[h] 和 \begin{tabular}之间。
\tiny
\scriptsize
\footnotesize
\small
\normalsize % 默认
\large
\Large
\LARGE
\huge
\Huge
单元格内换行
\shortstack{ 第一行的內容 \ 第二行的内容 }
{\emph{Suspect}} & \shortstack{Authenticate \\ Accuracy} & {\emph{Authenticate Accuracy}} & \shortstack{First line\\(second line)} \\
调整间距
以下的命令都放在 \begin{tabular} 之前
行间距调整
\setlength{\baselineskip}{1.5em} % 行间距
段间距调整
\setlength{\parskip}{2.0ex} % 段间距
表格列宽度的调整
\renewcommand\tabcolsep{5.0pt} % 调整表格列间的长度 可以用7mm代替5.0pt
调整表格整体宽度,这里用的时候要注意
\resizebox{\textwidth}{15mm}{
\begin{tabular}{cccccccccccc}
。。。。。。表格內容

\end{tabular}}
插入图片
\usepackage[pdftex]{graphicx}
% 设置图片文件存放路径
\graphicspath{../figures}

\begin{document}
% 在正文中引用图片时使用\ref
  In Figure \ref{fig:foo}
\begin{figure}
%设置对齐格式
\centering   %图片居于页面中部
%指定图形大小和图形名称
\includegraphics [width=0.8,height=2.5]{foo.png}
%设置标题
\caption{Foo}
%设置图形引用名称
\label{fig:foo}
\end{figure}

\end{document}
插入pdf格式的图片:
添加包 \usepackage{graphicx}
\begin{figure}[htbp]
\centering
\includegraphics[height=4.5cm, width=7.5cm]{pdf_file}
\caption{Design}
\end{figure}
# 其中,pdf_file表示要插入的pdf图片文件名,不需要加后缀。
更高级的插图
插入多组图片并实现自动编号:
首先使用宏包:
\usepackage{graphicx}
\usepackage{subfigure}
竖向插入
\begin{figure}
\centering
\subfigure[the first subfigure]{
\begin{minipage}[b]{0.2\textwidth}
\includegraphics[width=1\textwidth]{fig1.eps} \\
\includegraphics[width=1\textwidth]{fig2.eps}
\end{minipage}}

\subfigure[the second subfigure]{
\begin{minipage}[b]{0.2\textwidth}
\includegraphics[width=1\textwidth]{fig3.eps} \\
\includegraphics[width=1\textwidth]{fig4.eps}
\end{minipage}}
\end{figure}
横向插入
\begin{figure}
\begin{minipage}[t]{0.5\linewidth}
\centering
\includegraphics[width=2.2in]{fig1.eps}
\caption{fig1}
\label{fig:side:a}
\end{minipage}%

\begin{minipage}[t]{0.5\linewidth}
\centering\includegraphics[width=2.2in]{fig2.eps}
\caption{fig2}
\label{fig:side:b}
\end{minipage}
\end{figure}
插入占据双列的图片
\begin{figure*}
\centering
\subfigure[XGB]{
\includegraphics[width=5cm]{number_of_classes_0.pdf}}
\subfigure[DT]{
\includegraphics[width=5cm]{number_of_classes_1.pdf}}
\subfigure[LR1]{
\includegraphics[width=5cm]{number_of_classes_2.pdf}}

\subfigure[LR2]{
\includegraphics[width=4cm]{number_of_classes_3.pdf}}
\subfigure[SVC]{
\includegraphics[width=4cm]{number_of_classes_4.pdf}}
\subfigure[DNN]{
\includegraphics[width=4cm]{number_of_classes_5.pdf}}
\subfigure[RF]{
\includegraphics[width=4cm]{number_of_classes_6.pdf}}
\caption{MainfigureCaption}
\end{figure*}
效果:

公式
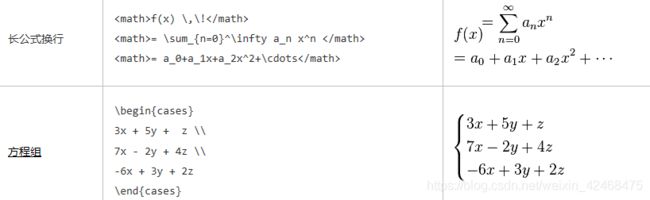
数学公式在文中的位置可分为两种: 行中公式和独立公式。
行中公式
毕达哥拉斯定理 \begin{math} x^{2}+y^{2}=z^{2} \end{math}又称勾股定理。
或
毕达哥拉斯定理 $ x^{2}+y^{2}=z^{2} $又称勾股定理。
以上两种效果是一样的。
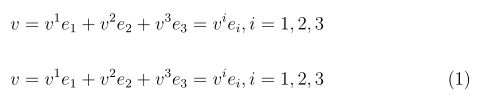
独立公式
$$
v = v^{1}e_{1} + v^{2}e_{2} + v^{3}e_{3} = v^{i}e_{i}, i = 1,2,3
$$
或
\begin{equation}
v = v^{1}e_{1} + v^{2}e_{2} + v^{3}e_{3} = v^{i}e_{i}, i = 1,2,3
\end{equation}
注意下面的这一种会自带公式编号
引用公式
\begin{equation}\label{eq:Pythagorean theorem}
x^{2}+y^{2}=z^{2}
\end{equation}
公式\ref{eq:Pythagorean theorem}是毕达哥拉斯定理,在中国又称勾股定理。%这里引用了
公式中插入中文
使用\mbox{}可在数学公式中插入中文。
$$
\mbox{例如:} x_{1}, x_{2}, \cdots, x_{N}
$$
页脚注释
在正文中添加页脚注释的命令是:\footnote, 例如:
正文内容\footnote{注释内容}
也可以使用\footnotemark和\footnotetext 添加页脚注释,例如:
在这里添加页脚注释角标\footnotemark
%% ...
在这里设置注释内容\footnotetext{注释内容}
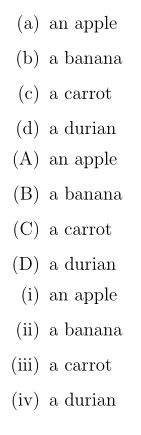
枚举
先加载宏包:
\usepackage{enumitem}
有很多款式,随意选择:
\begin{enumerate}[label=(\alph*)]
\item an apple
\item a banana
\item a carrot
\item a durian
\end{enumerate}

\begin{enumerate}[label=(\Alph*)] % 大写
\item an apple
\item a banana
\item a carrot
\item a durian
\end{enumerate}

\begin{enumerate}[label=(\roman*)]  %罗马字体
\item an apple
\item a banana
\item a carrot
\item a durian
\end{enumerate}
字体与字号
Latex的字体由小到大分别为
\tiny
\scriptsize
\footnotesize
\small
\normalsize
\large
\Large
\LARGE
\huge
\Huge
例如
如果在文档局部微调某些字句的字体大小:
    {\tiny           Hello}\\
    {\scriptsize     Hello}\\
    {\footnotesize   Hello}\\
    {\small          Hello}\\
    {\normalsize     Hello}\\
    {\large          Hello}\\
    {\Large          Hello}\\
    {\LARGE          Hello}\\
    {\huge           Hello}\\
    {\Huge           Hello}\\
如果需要在大范围调整,可使用\begin{}和\end{}命令。 例如:
\begin{footnotesize}
The  package uses new font size other than default size.
\end{footnotesize}
Latex字体大小一般以pt做单位,pt是point的简写。
Latex文档字体大小的默认值\normalsize 是 10 points。\documentclass命令可以在导言区修改字体大小默认值,例如:
\documentclass[12pt, letterpaper]{article}
中文排版通常使用字号,例如:五号字,六号字等。 字号与pt的关系如下所列:
\begin{tabular}{lll}
\hline
七号   & 5.25pt  & 1.845mm \\
六号   & 7.875pt & 2.768mm \\
小五号 & 9pt     & 3.163mm \\
五号   & 10.5pt  & 3.69mm \\
小四号 & 12pt    & 4.2175mm \\
四号   & 13.75pt & 4.83mm \\
三号   & 15.75pt & 5.53mm \\
二号   & 21pt    & 7.38mm \\
一号   & 27.5pt  & 9.48mm \\
小初号 & 36pt    & 12.65mm \\
初号   & 42pt    & 14.76mm \\
\hline
\end{tabular}
参考:https://blog.csdn.net/cocoonyang/article/details/78036326
https://blog.csdn.net/guifeng93/article/details/81035335
https://www.cnblogs.com/veagau/articles/11733769.html