C# winForm自定义弹出页面
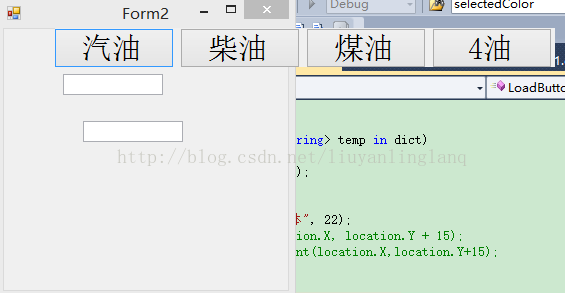
在C#的windows窗体应用程序中,添加弹出框效果.最后就是这样的效果.
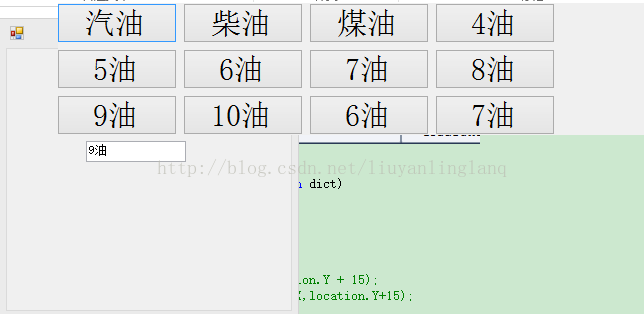
页面Form2上有2个文本框,textBox1和textBox2.点击任意一个文本框,根据准备好的数据,弹出Form1.其中Form1中的button个数是根据准备好的数据生成的.并且Form1的弹出位置,应该是文本框上面.最后,点击任意一个按钮,会将按钮上的值,显示到对应的文本框中,然后弹出页面关闭.
两个文本框显示的数据效果就是如下,这是textBox2.
这个是textBox1的效果.
主要做法就是,自定义了一个用户控件.由于此代码是在颜料板的基础上改过来的,所以起名不大对.这个用户控件的作用就是根据数据生成button数,并且给button绑定click事件,并且接收参数textBox.在click事件中,获取button的text,然后给之前的textBox的Text赋值button的text,然后textBox初始化.这样就可以在textBox上显示button按钮上的值.而生成的button是放在flowLayoutPanel1控件中,这样他就会自动的一个一个排列.
首先单独新建一个windows窗体应用程序,叫ColorHelper.然后在里面加自定义用户控件ColorSelector.整个项目完成之后的截图是这样的.
然后再ColorSelector中,拖一个flowLayoutpanel控件就是flowLayoutPanel1。
using System;
using System.Collections.Generic;
using System.ComponentModel;
using System.Drawing;
using System.Drawing.Drawing2D;
using System.Data;
using System.Text;
using System.Windows.Forms;

namespace ColorHelper
{
    ///
    /// 自定义颜色控件
    ///
    public partial class ColorSelector : UserControl
    {

        //接收传递的参数,文本框和键值对的数据。
        public Control textBox = new Control();
        public Dictionary dict = new Dictionary();

        public Dictionary Dict
        {
            get { return dict; }
            set
            {
                dict = value;
            }
        }

        //构造函数
        public ColorSelector()
        {
            InitializeComponent();
        }

        //选中的Text值
        private string selectText;

        public string SelectedText
        {
            get { return selectText; }
            set
            {
                selectText = value;
            }
        }

        //选中的Key值
        private string selectKey;

        public string SelectedKey
        {
            get { return selectKey; }
            set
            {
                selectKey = value;
            }
        }

        ///
        /// 生成Button
        ///
        public void LoadButton()
        {
            //情况panel中原来的所有控件
            flowLayoutPanel1.Controls.Clear();

            //根据传递的dict键值对生成Button,并设置button的大小,Text,Tag值,以及绑定鼠标点击事件。
            foreach (KeyValuePair temp in dict)
            {
                Button button1 = new Button();
                button1.Text = temp.Value;
                button1.Tag = temp.Key;
                button1.Font = new Font("宋体", 22);
                button1.AutoSize = true;
                button1.Width = 120;
                button1.MouseClick += new MouseEventHandler(button_MouseClick);
                flowLayoutPanel1.Controls.Add(button1);
            }
        }


        ///
        /// 绑定到button上的事件
        ///
        ///
        ///
        private void button_MouseClick(object sender, MouseEventArgs e)
        {
            //声明一个button,获取到button上的Text和Tag上的值,分别是value和key。
            Button cb = (Button)sender;
            selectText = cb.Text;
            selectKey = cb.Tag.ToString();
            //将value和key分别给textBox的Text和Tag。
            textBox.Text = selectText;
            textBox.Tag = selectKey;
            //重绘textBox
            textBox.Invalidate();
            textBox.Enabled = true;
            //隐藏控件,并将控件所在的Form关闭
            this.Visible = false;
            this.FindForm().Close();
        }

    }

} 然后自定义用户控件建立好了。可以再建立一个项目ColorTest,然后建立2个Form。其中Form1放这个控件,Form2放文本框,弹出Form1.
然后再ColorTest中添加引用,把colorHelper引用过来。
而添加到工具箱中,需要在工具箱中右击,选择选择项,然后浏览找到dll或者exe,就可以了。效果就是这样。
然后就能把这个Colorselector的自定义控件拖到Form1上。然后Form1的边框风格FormBorderStyle改为None,并且Form的AutoSize一定要是false。还有Form1的startPosition属性要改为Manual,自定义。
using System;
using System.Collections.Generic;
using System.ComponentModel;
using System.Data;
using System.Drawing;
using System.Text;
using System.Windows.Forms;

namespace colorTest
{
    public partial class Form1 : Form
    {
        //接收textBox和dict数据
        public TextBox textBox;
        public Dictionary dict;

        //有参构造函数,接收Form1传递的值
        public Form1(TextBox textBox, Dictionary dict)
        {
            InitializeComponent();
            this.textBox = textBox;
            this.dict = dict;
        }

        //加载时将textBox和Dict给自定义控件,并生成button按钮,最后显示button框
        private void Form1_Load(object sender, EventArgs e)
        {
            //设置重画控件
            colorSelector1.textBox = textBox;

            //返回到自定义用户控件上
            colorSelector1.Dict = dict;
            colorSelector1.LoadButton();
            //设置弹出事件
            colorSelector1.Visible = true;
        }


    }
}
using System;
using System.Collections.Generic;
using System.ComponentModel;
using System.Data;
using System.Drawing;
using System.Linq;
using System.Text;
using System.Windows.Forms;

namespace colorTest
{
    public partial class Form2 : Form
    {
        public Form2()
        {
            InitializeComponent();
        }

        private void textBox2_MouseClick(object sender, MouseEventArgs e)
        {
            //先去查询数据,获取到返回值为实体数组,转成Dictionary
            Dictionary dict = new Dictionary();
            dict.Add("1", "汽油");
            dict.Add("2", "柴油");
            dict.Add("3", "煤油");
            dict.Add("4", "4油");
            Form1 form = new Form1(this.textBox2, dict);
            form.Size = new Size(10, 10);
            //MessageBox.Show(textBox2.Location.X + " " + textBox2.Height + " " + textBox2.Location.Y + " " + textBox2.Width + " ");
            //form.Location = new Point(textBox2.Location.X + this.Location.X, this.Location.Y + textBox2.Location.Y - textBox2.Height);
            //MessageBox.Show(textBox2.Location.X + " " + textBox2.Height+" "+ textBox2.Location.Y+" " +textBox2.Width+ " " );
            //form.Location = new Point(textBox2.Location.X - textBox2.Height, textBox2.Location.Y - textBox2.Width);
            //MessageBox.Show(this.Location.X + " " + this.Location.Y );
            //每行显示5个button按钮
            if (dict.Count >= 5)
            {
                //并且设置5个时,form的size,直接为626,这个是多次测试过得到的结果。
                form.Size = new Size(626, 33 * (dict.Count / 5 + 1));
            }
            else
            {
                form.Size = new Size(125 * dict.Count, 33);
            }

            //form的弹出位置,必须要设置Form2的startposition为自定义,否则不管用。
            //在窗体的x的基础上,加上textBox的x坐标,就能控制弹出框的x坐标,而窗体的y坐标加上窗体的y坐标,还要考虑form的height
            form.Location = new Point(textBox2.Location.X + this.Location.X, this.Location.Y + textBox2.Location.Y - 15 * (dict.Count / 5 + 1));

            //弹出form
            form.ShowDialog();

        }

        ///
        /// textBox1的鼠标点击事件
        ///
        ///
        ///
        private void textBox1_MouseClick(object sender, MouseEventArgs e)
        {
            //先去查询数据,获取到返回值为实体数组,转成Dictionary
            Dictionary dict = new Dictionary();
            dict.Add("1", "汽油");
            dict.Add("2", "柴油");
            dict.Add("3", "煤油");
            dict.Add("4", "4油");
            dict.Add("5", "5油");
            dict.Add("7", "6油");
            dict.Add("8", "7油");
            dict.Add("9", "8油");
            dict.Add("10", "9油");
            dict.Add("11", "10油");
            dict.Add("12", "6油");
            dict.Add("13", "7油");
            dict.Add("14", "8油");
            dict.Add("15", "9油");
            dict.Add("16", "10油");
            Form1 form = new Form1(this.textBox1, dict);

            if (dict.Count >= 5)
            {
                form.Size = new Size(626, 33 * (dict.Count/5+1));
            }
            else
            {
                form.Size = new Size(125 * dict.Count, 33);
            }
            form.Location = new Point(textBox2.Location.X + this.Location.X, this.Location.Y + textBox2.Location.Y -15*(dict.Count/5+1));


            form.ShowDialog();
        }
    }
}
以上就是弹出框的全部代码了。花了我不少时间,并且,学会了算x,y的值。发现所有的显示的location的值,都是相对值,相对于包含他们的容器。textBox是在form2中,他的location是相对于form2,而form2的location的相对于屏幕。
知道了改不来FlowLayoutpanel,每5个换一行,可以控制他的容器Form1,控制他的大小。所以里面的FlowLayoutpanel也不能设置autosize为true,不能自适应,否则他就一行显示了。


