1.环境搭建、nginx、cors(跨域)、oss(对象存储)
整体架构框架:springCloud-alibaba
	注册中心:nacos	eureka zookeeper consule(原生)
	配置中心:nacos  appollo(携程)  config(原生)  zookeeper
	远程调用组件:feign(ribbon + hystrix) httpClient(原生)
	网关组件:gateway(spring-webflux netty) zuul(servlet springmvc)
	链路追踪:sleuth(分布式链路追踪框架zipkin  skywalking)
	流控组件:sentinel(熔断)

	分布式事务框架:seata
	分布式锁框架:redisson (手写分布式锁)
	分布式定时任务:时间驱动,xxl-job(elastic-job)
	分布式消息队列:rabbitmq(spring-amqp)

	基础框架:
		SSM:springMVC spring mybatis(mp:mybatis-plus)
		springdata-redis
		springdata-elasticsearch:elasticsearch
		springTask:@EnableAsync @Async

	组件:
		nginx(反向代理 动静分离 负载均衡)
		redis:缓存 购物车
		CompletableFuture:多线程异步编排框架
		jwt:单点登录
1. 谷粒商城介绍
1.1. 项目分类
主要从需求方、盈利模式、技术侧重点这三个方面来看它们的不同
1.1.1. 传统项目
各种企业里面用的管理系统(ERP(企业资源管理系统)、HR(人事管理系统)、OA(办公自动化)、CRM(客户资源管理系统)、物流管理系统。。。。。。。)
- 需求方:公司、企业内部
- 盈利模式:项目本身卖钱
- 技术侧重点:业务功能
1.1.2. 互联网项目
门户网站、电商网站:baidu.com、qq.com、taobao.com、jd.com …
- 需求方:广大用户群体
- 盈利模式:虚拟币、增值服务、广告收益…
- 技术侧重点:网站性能、业务功能
而我们今天要聊的就是互联网项目中的重要角色:电商
1.2. 为什么我们要讲电商?
因为就互联网平台来说,电商网站有很多典型的特征:
- 访问量大
- 数据量大
- 有一定的业务复杂性
- 涉及支付 考虑一定安全性
1.3. 常见电商模式
电商行业的一些常见模式:
- B2C:商家对个人,如:亚马逊、当当等
- C2C平台:个人对个人,如:闲鱼、拍拍网、ebay
- B2B平台:商家对商家,如:阿里巴巴、八方资源网等
- O2O:线上和线下结合,如:饿了么、电影票、团购等
- P2P:在线金融,贷款,如:网贷之家、人人聚财等。
- B2C平台:天猫、京东、一号店等
2. 搭建项目
2.1. 项目结构说明
核心是microservice这块儿,它分两类微服务:
-
后台CRUD微服务
-
pms:商品管理系统(product) 18081
-
ums:用户管理系统(user)18082
-
wms:仓库管理系统(warehouse) 18083
-
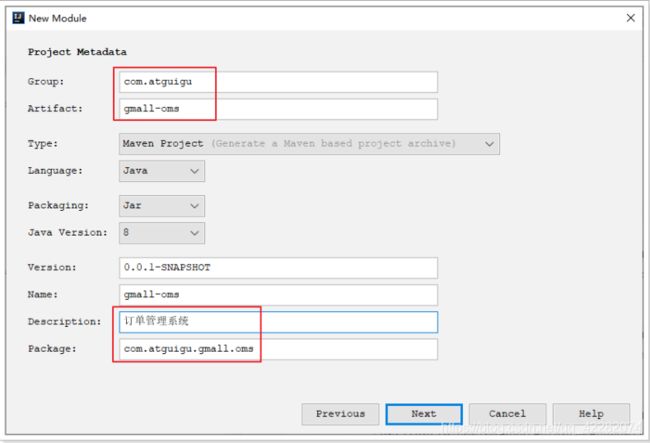
oms:订单管理系统(order)18084
-
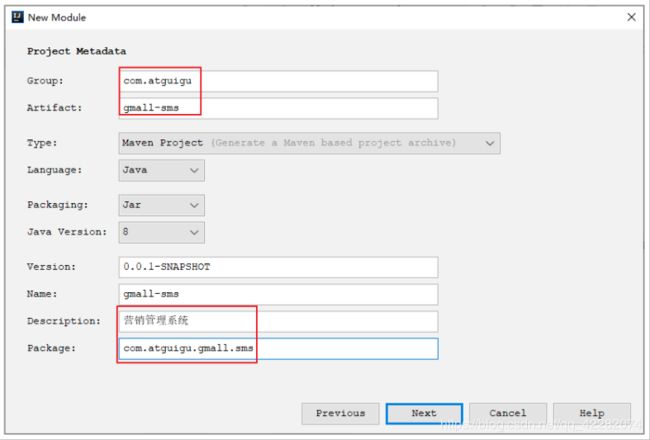
sms:营销管理系统(sale) 18085
。。。。
-
-
前台数据接口微服务
- cart:购物车微服务
- order:订单微服务
- search:搜索微服务
- item:商品详情微服务
- member:会员微服务
第三方微服务:物流、短信、支付、云存储。。。。
数据层:mysql(分库分表中间件:Mycat)、redis、elasticsearch、rabbitmq、阿里OSS
后台管理前端:gmall-admin(1000)
前台门户:gmall-shop (2000)
网关:gmall-gateway(8888)
2.2. 数据准备
把课前资料中的数据文件导入数据库:
![]()
导入数据库之后:
2.3. 使用github创建仓库
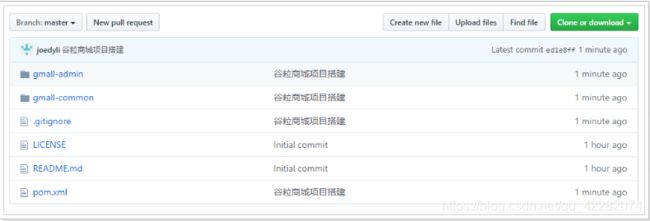
克隆到本地:
开源协议参考:
2.4. 项目初始创建
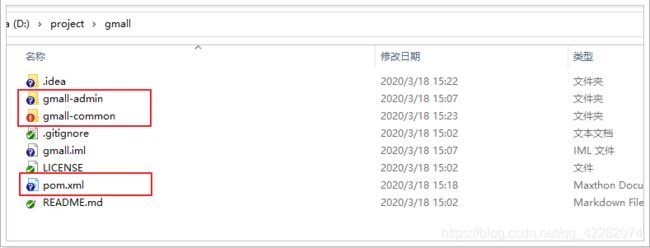
把课前资料/基础工程中的文件
copy到 clone下来的gmall工程中
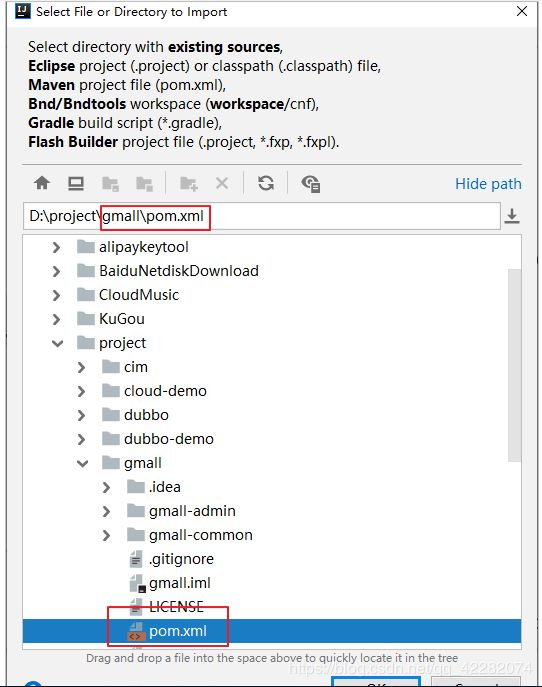
接下来在idea中导入gmall工程:
![]()
点击“OK”,一路下一步:
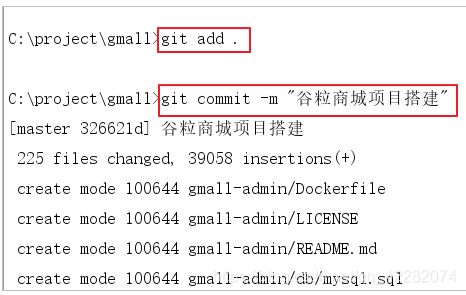
在idea的Terminal窗口,查看git状态:
把.idea/和gmall.iml添加到忽略列表:
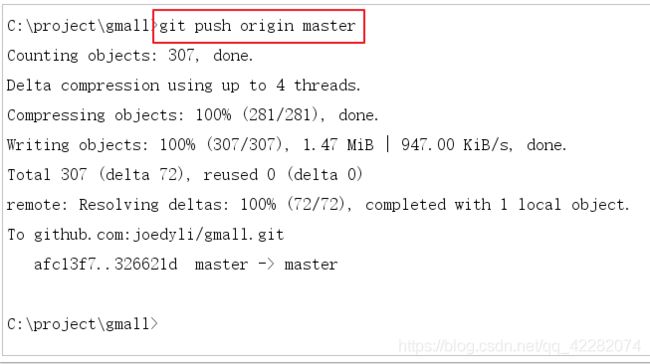
推送到远程仓库:git push origin master
效果:
2.5. 依赖分析
gmall工程:是父工程,在pom.xml中统一管理了常用依赖的版本号
gmall-common:包含了通用的实体类及工具类,所有工程都依赖于该common工程
gmall-admin:后台管理控制台菜单管理系统。此项目不用关注,和业务无关。
springboot的常用依赖有:
- redis
- web
springCloud的常用依赖有:
- openfeign 用于远程调用
- alibaba-nacos-discovery 用于注册中心
- alibaba-nacos-config 用于配置中心
- alibaba-sentinel 用于熔断保护
- zipkin等
需要链接数据库的工程需要引入mybatis相关依赖。
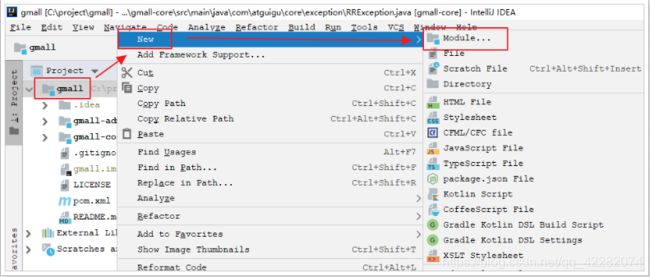
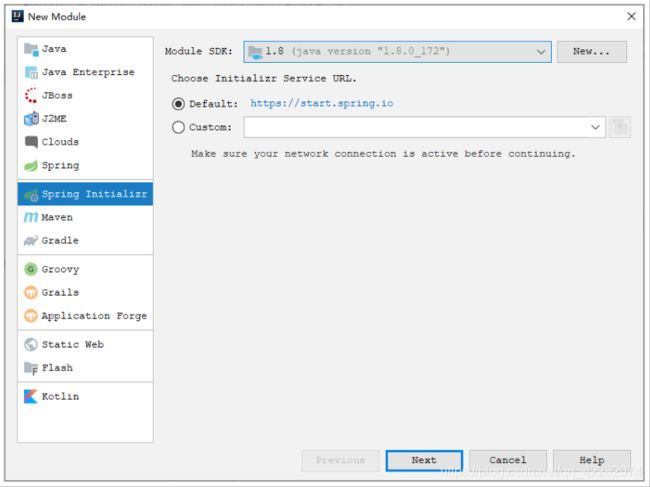
2.6. 创建项目其他模块
任何项目都要依赖common工程。
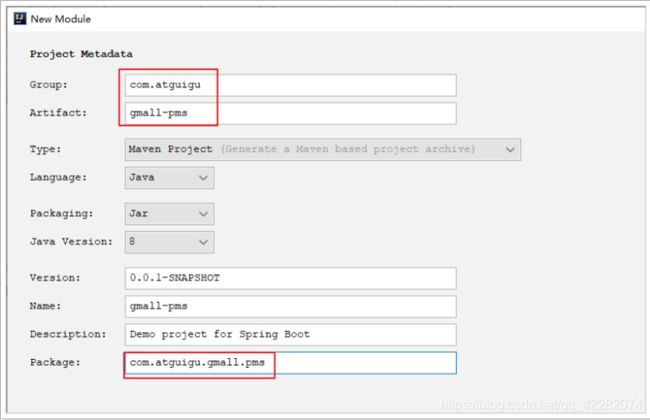
2.6.1. 创建商品管理模块
创建完成:
需要手动导入的依赖:
<dependency>
    <groupId>com.atguigugroupId>
    <artifactId>gmall-commonartifactId>
    <version>0.0.1-SNAPSHOTversion>
dependency>
<dependency>
    <groupId>com.baomidougroupId>
    <artifactId>mybatis-plus-boot-starterartifactId>
dependency>
<dependency>
    <groupId>mysqlgroupId>
    <artifactId>mysql-connector-javaartifactId>
dependency>
创建springboot工程,默认是以spring-boot-starter-parent为父工程,需要改为gmall为父工程:
<parent>
    <groupId>com.atguigugroupId>
    <artifactId>gmallartifactId>
    <version>0.0.1-SNAPSHOTversion>
parent>
并且把pms工程中的如下springCloud依赖管理去掉:
<spring-cloud-alibaba.version>2.2.0.RELEASEspring-cloud-alibaba.version>
<spring-cloud.version>Hoxton.SR3spring-cloud.version>

<dependencyManagement>
    <dependencies>
        <dependency>
            <groupId>org.springframework.cloudgroupId>
            <artifactId>spring-cloud-dependenciesartifactId>
            <version>${spring-cloud.version}version>
            <type>pomtype>
            <scope>importscope>
        dependency>

        <dependency>
            <groupId>com.alibaba.cloudgroupId>
            <artifactId>spring-cloud-alibaba-dependenciesartifactId>
            <version>${spring-cloud-alibaba.version}version>
            <type>pomtype>
            <scope>importscope>
        dependency>
    dependencies>
dependencyManagement>
2.6.2. 创建用户管理模块
其他项,参考商品管理模块。
2.6.3. 创建订单管理模块
其他项参考商品管理模块
2.6.4. 创建营销管理模块
2.6.5. 创建仓库管理模块
搭建工程:
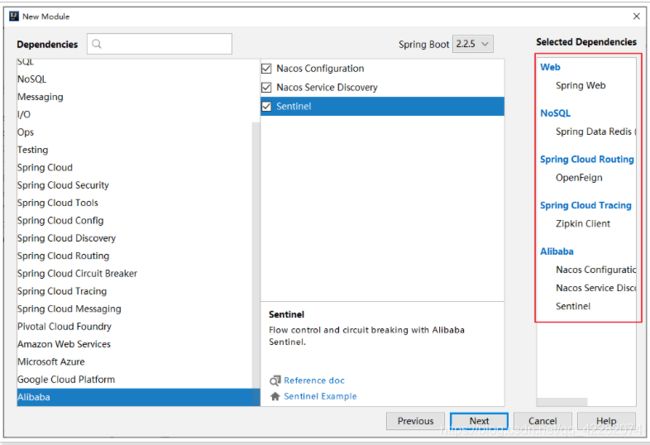
	1.创建工程,选择依赖:
		web启动器
		redis
		nacos-discovery
		nacos-config
		sentinel
		zipkin启动器
		openfeign启动器
	2.pom.xml修改:
		以gmall工程作为父工程
		去掉properties
		添加依赖:mp启动器 mysql驱动 gmall-common
		去掉dependencyManagement
	3.bootstrap.yml
		spring.application.name=pms-service
		spring.cloud.nacos.config.server-addr=localhost:8848
		spring.cloud.nacos.config.namespace=namespace的id
		spring.cloud.nacos.config.group=dev
		spring.cloud.nacos.config.file-extension=yml
	4.application.yml
		server.port=18081
		spring.cloud.nacos.discovery.server-addr=localhost:8848
		spring.cloud.sentinel.transport.dashboard=localhost:8080
		spring.cloud.sentinel.transport.port=8719
		spring.zipkin.base-url=http://localhost:9411
		spring.zipkin.discovery-client-enable=false
		spring.zipkin.sender.type=web
		spring.sleuth.sampler.probability=1
		spring.datasource.driver/url/username/password
		spring.redis.host=xxx
		feign.sentinel.enable=true
		mybatis-plus.mapper-location=classpath:xxx/*.xml
		mybatis-plus.type-aliases-package=entity包路径
		mybatis-plus.global-config.db-config.id-type=auto
	5.启动类上的注解
		@SpringBootApplication
		@EnableSwagger2
		@MapperScan("mapper包路径")
		@EnableFeignClients
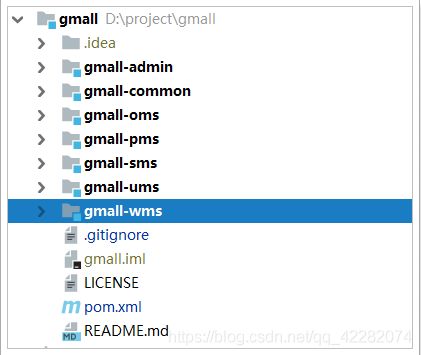
2.6.6. 完整工程
接下来把这些新模块push到github。
先添加忽略:
git add .
git commit -m "创建后台工程"
git push origin master
2.7. 逆向工程生成代码
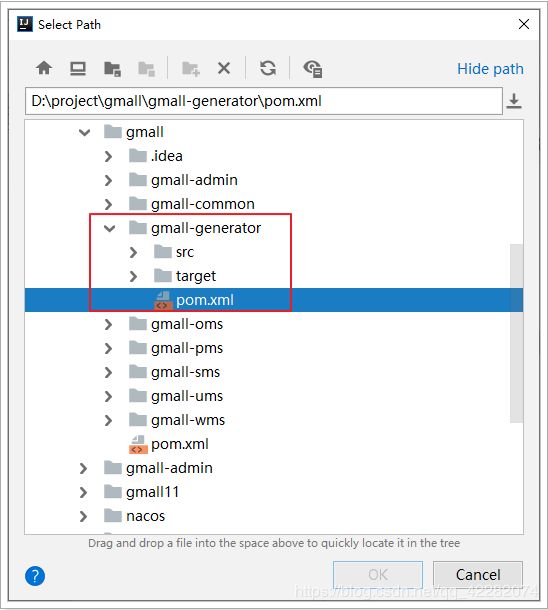
课前资料/逆向工程:
copy到gmall项目下:
回到idea,把逆向工程作为maven工程导入idea
下面以生成pms的代码为例,其他模块操作类似!!!!!!!
2.7.1. 修改配置
修改逆向工程的application.yml,把数据库的连接信息改成自己的:
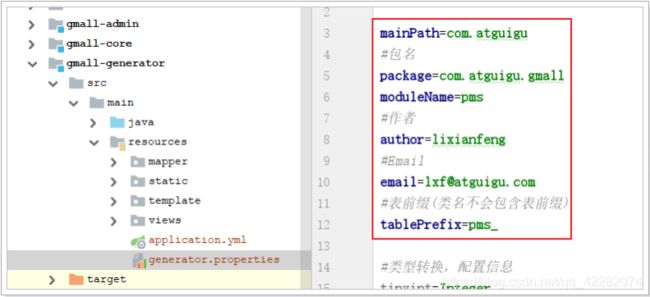
修改generator.properties:
2.7.2. 启动逆向工程
启动RenrenApplication:
启动成功,监听端口号为80。浏览器访问
生成一个压缩包,被下载下来:
即找到压缩包。
2.7.3. 把文件copy到对应工程
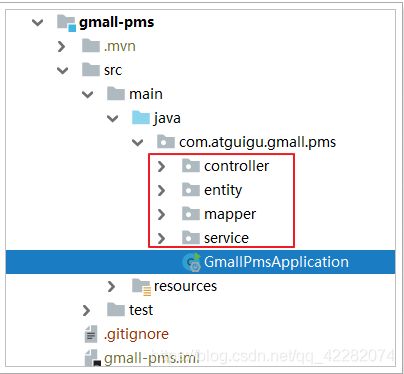
- 打开压缩包,压缩包/main/java下的com目录,copy到gmall-pms模块的src/main/java:
效果如下:
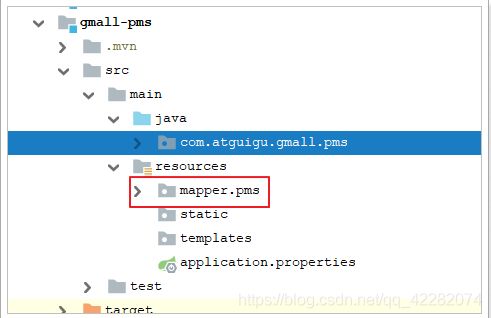
- 把压缩包/main/resources下的mapper目录,copy到gmall-pms模块的src/java/resources目录下:
如下:
2.8. 各个模块工程的配置
后台管理模块,每个工程的配置方式基本一样。下面还是以gmall-pms工程为例:
2.8.1. 工程参数配置
application.yml配置文件:
server:
  port: 18081
spring:
  cloud:
    nacos:
      discovery:
        server-addr: 127.0.0.1:8848
    sentinel:
      transport:
        dashboard: localhost:8080
        port: 8719
  datasource:
    driver-class-name: com.mysql.jdbc.Driver
    url: jdbc:mysql://172.16.116.100:3306/guli_pms?useUnicode=true&characterEncoding=UTF-8&useSSL=false
    username: root
    password: root
  redis:
    host: 172.16.116.100
  zipkin:
    base-url: http://localhost:9411
    discovery-client-enabled: false
    sender:
      type: web
  sleuth:
    sampler:
      probability: 1 #采集率
mybatis-plus:
  mapper-locations: classpath:mapper/pms/*.xml  # 读取映射文件
  type-aliases-package: com.atguigu.gmall.pms.entity #配置完以后,不需要写全限定类名,只需类名即可。
  global-config:
    db-config:
      id-type: auto  # 默认使用数据库自增
feign:
  sentinel:
    enabled: true
bootstrap.yml配置文件:
spring:
  application:
    name: pms-service
  cloud:
    nacos:
      config:
        server-addr: 127.0.0.1:8848
#        namespace: 90864336-a209-431f-9082-3b429d0b38cd
#        group: dev
#        file-extension: yml #指定配置文件的后缀是yml,默认找服务名.properties文件
2.8.2. 在引导类上添加注解
在gmall-pms工程的引导类(GmallPmsApplication)上添加注解:
@SpringBootApplication
@MapperScan(basePackages = "com.atguigu.gmall.pms.mapper")
@EnableSwagger2
public class GmallPmsApplication {

    public static void main(String[] args) {
        SpringApplication.run(GmallPmsApplication.class, args);
    }

}
使用mybatis-plus步骤:
- 配置目录中引入映射文件
- 在引导类上添加@MapperScan扫描所有mapper/dao接口
- 编写mapper接口实现BaseMapper即可
- 编写service接口继承IService,编写xxxService继承ServiceImpl
- 查询分页要添加分页过滤器:
@Configuration
public class MybatisPlusConfig {

    @Bean
    public PaginationInterceptor paginationInterceptor() {
        PaginationInterceptor paginationInterceptor = new PaginationInterceptor();
        // 设置请求的页面大于最大页后操作, true调回到首页,false 继续请求  默认false
        // paginationInterceptor.setOverflow(false);
        // 设置最大单页限制数量,默认 500 条,-1 不受限制
        // paginationInterceptor.setLimit(500);
        // 开启 count 的 join 优化,只针对部分 left join
        paginationInterceptor.setCountSqlParser(new JsqlParserCountOptimize(true));
        return paginationInterceptor;
    }
}
2.8.3. 配置到nacos
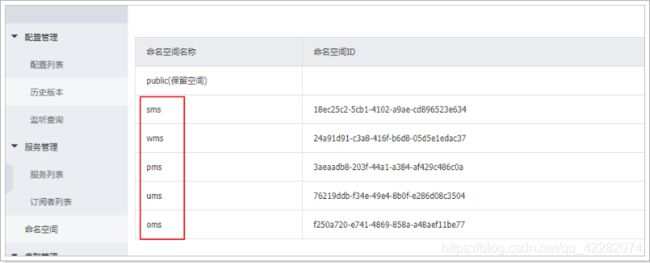
创建名称空间:
给pms添加配置:
修改bootstrap.yml配置:
spring:
  application:
    name: pms-service
  cloud:
    nacos:
      config:
        server-addr: 127.0.0.1:8848
        namespace: 3aeaadb8-203f-44a1-a384-af429c486c0a
        group: dev
        file-extension: yml  # 默认找服务名.properties文件
在GmallPmsApplication类上添加@RefreshScope注解:
2.9. 参照PMS完成其他管理模块
其他模块都按照gmall-pms的方式完成搭建。
所有后台管理模块,都需要完成以下操作:
-
逆向工程,copy生成的java文件及映射文件到对应的目录下
-
在pom.xml中配置父工程、去掉springCloud的版本管理、引入common工程及mybatis mysql的依赖
<parent> <groupId>com.atguigugroupId> <artifactId>gmallartifactId> <version>0.0.1-SNAPSHOTversion> parent> <dependency> <groupId>com.atguigugroupId> <artifactId>gmall-commonartifactId> <version>0.0.1-SNAPSHOTversion> dependency> <dependency> <groupId>com.baomidougroupId> <artifactId>mybatis-plus-boot-starterartifactId> dependency> <dependency> <groupId>mysqlgroupId> <artifactId>mysql-connector-javaartifactId> dependency> -
添加application.yml配置,建议把该配置放到nacos中。例如:
server:
  port: 18081
spring:
  cloud:
    nacos:
      discovery:
        server-addr: 127.0.0.1:8848
    sentinel:
      transport:
        dashboard: localhost:8080
        port: 8719
  datasource:
    driver-class-name: com.mysql.jdbc.Driver
    url: jdbc:mysql://172.16.116.100:3306/guli_pms?useUnicode=true&characterEncoding=UTF-8&useSSL=false
    username: root
    password: root
  redis:
    host: 172.16.116.100
  zipkin:
    base-url: http://localhost:9411
    discovery-client-enabled: false
    sender:
      type: web
  sleuth:
    sampler:
      probability: 1
mybatis-plus:
  mapper-locations: classpath:mapper/pms/*.xml  # 读取映射文件
  type-aliases-package: com.atguigu.gmall.pms.entity
  global-config:
    db-config:
      id-type: auto  # 默认使用数据库自增
feign:
  sentinel:
    enabled: true
注意:不同模块需要修改server.port、spring.datasource.url以及mybatis-plus相关的值
-
添加bootstrap.yml配置,例如:
spring:
  application:
    name: pms-service
  cloud:
    nacos:
      config:
        server-addr: 127.0.0.1:8848
        namespace: 3aeaadb8-203f-44a1-a384-af429c486c0a
        group: dev
        file-extension: yml  # 默认找服务名.properties文件
注意:不同模块需要修改spring.application.name及spring.cloud.nacos.config.namespace的值
-
给引导类添加注解,例如:
@SpringBootApplication
@MapperScan(basePackages = "com.atguigu.gmall.pms.mapper")
@EnableSwagger2
@RefreshScope
public class GmallXxxApplication {
    .....
}
注意:需要修改basePackages的值
2.10. 搭建网关服务
nacos容器内的所有服务,可以直接相互访问。nacos外的服务,为了保证安全,必须通过网关访问后台各个管理模块
pom.xml:
这里也要以gmall父工程为父,去掉cloud及alibaba版本号管理。
<project xmlns="http://maven.apache.org/POM/4.0.0" xmlns:xsi="http://www.w3.org/2001/XMLSchema-instance"
         xsi:schemaLocation="http://maven.apache.org/POM/4.0.0 https://maven.apache.org/xsd/maven-4.0.0.xsd">
    <modelVersion>4.0.0modelVersion>
    <parent>
        <groupId>com.atguigugroupId>
        <artifactId>gmallartifactId>
        <version>0.0.1-SNAPSHOTversion>
    parent>
    <groupId>com.atguigugroupId>
    <artifactId>gmall-gatewayartifactId>
    <version>0.0.1-SNAPSHOTversion>
    <name>gmall-gatewayname>
    <description>Demo project for Spring Bootdescription>

    <properties>
        <java.version>1.8java.version>
    properties>

    <dependencies>
        <dependency>
            <groupId>com.alibaba.cloudgroupId>
            <artifactId>spring-cloud-starter-alibaba-nacos-configartifactId>
        dependency>
        <dependency>
            <groupId>com.alibaba.cloudgroupId>
            <artifactId>spring-cloud-starter-alibaba-nacos-discoveryartifactId>
        dependency>
        <dependency>
            <groupId>org.springframework.cloudgroupId>
            <artifactId>spring-cloud-starter-gatewayartifactId>
        dependency>

        <dependency>
            <groupId>org.springframework.bootgroupId>
            <artifactId>spring-boot-starter-testartifactId>
            <scope>testscope>
            <exclusions>
                <exclusion>
                    <groupId>org.junit.vintagegroupId>
                    <artifactId>junit-vintage-engineartifactId>
                exclusion>
            exclusions>
        dependency>
    dependencies>

    <build>
        <plugins>
            <plugin>
                <groupId>org.springframework.bootgroupId>
                <artifactId>spring-boot-maven-pluginartifactId>
            plugin>
        plugins>
    build>

project>
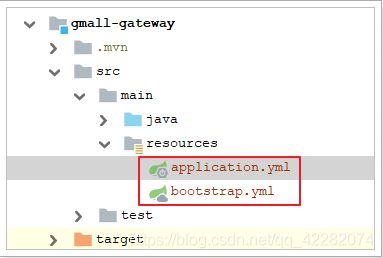
添加配置:
bootstrap.yml配置如下:
spring:
  application:
    name: gateway-api
  cloud:
    nacos:
      config:
        server-addr: 127.0.0.1:8848
application.yml配置如下:
server:
  port: 8888
spring:
  cloud:
    nacos:
      discovery:
        server-addr: 127.0.0.1:8848
    gateway:
      routes:
        - id: pms-route # 商品管理路由
          uri: lb://pms-service
          predicates:
            - Path=/pms/**
        - id: oms-route # 订单管理路由
          uri: lb://oms-service
          predicates:
            - Path=/oms/**
        - id: ums-route # 用户管理路由
          uri: lb://ums-service
          predicates:
            - Path=/ums/**
        - id: wms-route # 仓库管理路由
          uri: lb://wms-service
          predicates:
            - Path=/wms/**
        - id: sms-route # 营销管理路由
          uri: lb://sms-service
          predicates:
            - Path=/sms/**
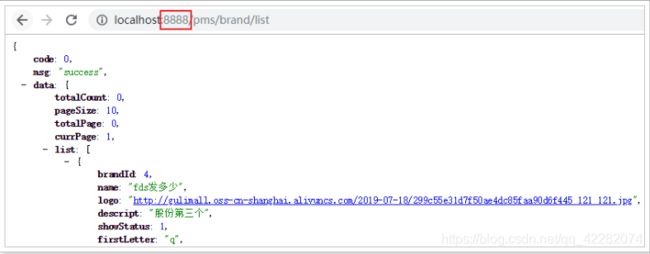
测试:
3. 通过域名访问
3.1. 统一环境
我们现在访问页面使用的是:http://localhost:8888
有没有什么问题?
实际开发中,会有不同的环境:
- 开发环境:自己的电脑
- 测试环境:提供给测试人员使用的环境
- 预发布环境:数据是和生成环境的数据一致,运行最新的项目代码进去测试
- 生产环境:项目最终发布上线的环境
如果不同环境使用不同的ip去访问,可能会出现一些问题。为了保证所有环境的一致,我们会在各种环境下都使用域名来访问。
我们将使用以下域名:
- 主域名是:gmall.com
- 管理系统域名:manage.gmall.com
- 网关域名:api.gmall.com
- …
但是最终,我们希望这些域名指向的还是我们本机的某个端口。
那么,当我们在浏览器输入一个域名时,浏览器是如何找到对应服务的ip和端口的呢?
3.2. 域名解析
一个域名一定会被解析为一个或多个ip。这一般会包含两步:
-
本地域名解析
浏览器会首先在本机的hosts文件中查找域名映射的IP地址,如果查找到就返回IP ,没找到则进行域名服务器解析,一般本地解析都会失败,因为默认这个文件是空的。
- Windows下的hosts文件地址:C:/Windows/System32/drivers/etc/hosts
- Linux下的hosts文件所在路径: /etc/hosts
样式:
# My hosts 127.0.0.1 localhost -
域名服务器(DNS)解析
本地解析失败,才会进行域名服务器解析,域名服务器就是网络中的一台计算机,里面记录了所有注册备案的域名和ip映射关系,一般只要域名是正确的,并且备案通过,一定能找到。
我们不可能去购买一个域名,因此我们可以伪造本地的hosts文件,实现对域名的解析。修改本地的host为:
127.0.0.1 www.gmall.com api.gmall.com item.gmall.com cart.gmall.com order.gmall.com auth.gmall.com search.gmall.com manager.gmall.com
这样就实现了域名的关系映射了。
通过域名访问:
3.3. nginx反向代理
域名问题解决了,但是现在要访问后台页面,还得自己加上端口:http://api.gmall.com:8888。
这就不够优雅了。我们希望的是直接域名访问:http://api.gmall.com。这种情况下端口默认是80,而80端口只有一个,将来我们可能有多个工程需要通过域名访问,如何让多个工程都直接通过域名访问呢?
这里就要用到反向代理工具:Nginx
nginx安装:略。。。。。。
3.4. 配置反向代理
windows宿主机hosts文件,配置如下:
172.16.116.100 api.gmall.com manager.gmall.com
172.16.116.100 www.gmall.com gmall.com static.gmall.com
172.16.116.100 search.gmall.com item.gmall.com sso.gmall.com cart.gmall.com
172.16.116.100 order.gmall.com payment.gmall.com
注意:172.16.116.100改成你自己虚拟机的ip地址
修改nginx配置文件,完整配置如下:
#user  nobody;
worker_processes  1;

#error_log  logs/error.log;
#error_log  logs/error.log  notice;
#error_log  logs/error.log  info;

#pid        logs/nginx.pid;


events {
    worker_connections  1024;
}


http {
    include       mime.types;
    default_type  application/octet-stream;

    #log_format  main  '$remote_addr - $remote_user [$time_local] "$request" '
    #                  '$status $body_bytes_sent "$http_referer" '
    #                  '"$http_user_agent" "$http_x_forwarded_for"';

    #access_log  logs/access.log  main;

    sendfile        on;
    #tcp_nopush     on;

    #keepalive_timeout  0;
    keepalive_timeout  65;

    #gzip  on;

	# 代理网关
    server {
        listen       80;
        server_name  api.gmall.com;

        #charset koi8-r;

        #access_log  logs/host.access.log  main;

        location / {
            proxy_pass   http://192.168.3.2:8888;
        }
    }

	# 代理后台管理
	server {
        listen       80;
        server_name  manager.gmall.com;

        #charset koi8-r;

        #access_log  logs/host.access.log  main;

        location / {
            proxy_pass   http://192.168.3.2:1000;
        }
    }

}
重启nginx命令:nginx -s reload
启动nginx命令:nginx
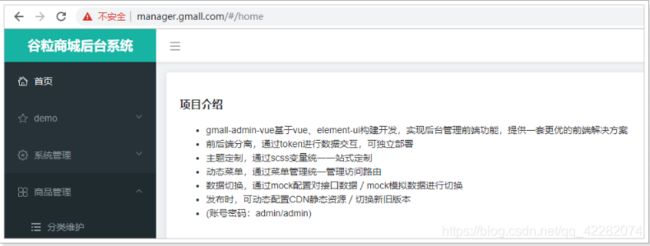
在浏览器中测试,完美!
4. 系统管理前后端联调
4.1. 启动系统管理前端工程
把课前资料/前端工程/gmall-admin-vue.zip解压到工作空间下,例如:
这是一个用nodejs构建的项目,解压后进入项目根目录,打开cmd窗口执行:
npm install  # 安装npm依赖包
npm start	# 启动该项目
启动成功:
此时还不能登录,因为没有对应的后台管理系统。
4.2. 启动系统管理后台工程
要想正常登陆,并使用后台管理系统,还需要启动如下工程
启动前,需要修改配置:
数据库连接信息:
然后开始启动gmall-admin工程,启动成功后,刷新管理前端页面即可通过admin/admin登录
打开品牌管理试试:
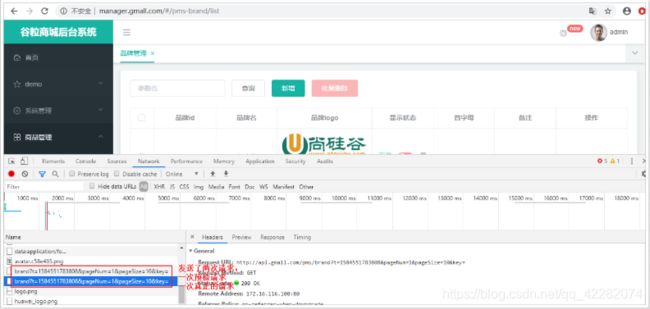
这时,你使用浏览器直接访问品牌查询接口,发现访问没事,但是这里却报错,什么原因?
这其实是浏览器的同源策略造成的跨域问题。
5. 跨域问题
跨域:浏览器对于javascript的同源策略的限制 。
以下情况都属于跨域:
| 跨域原因说明 | 示例 |
|---|---|
| 域名不同 | www.jd.com 与 www.taobao.com |
| 域名相同,端口不同 | www.jd.com:8080 与 www.jd.com:8081 |
| 二级域名不同 | item.jd.com 与 miaosha.jd.com |
com属于顶级域名。
如果域名和端口都相同,但是请求路径不同,不属于跨域,如:
www.jd.com/item
www.jd.com/goods
http和https也属于跨域
而我们刚才是从manager.gmall.com去访问api.gmall.com,这属于端口不同,跨域了。
5.1. 为什么有跨域问题?
跨域不一定都会有跨域问题。
因为跨域问题是浏览器对于ajax请求的一种安全限制:一个页面发起的ajax请求,只能是与当前页域名相同的路径,这能有效的阻止跨站攻击。
因此:跨域问题 是针对ajax的一种限制。
但是这却给我们的开发带来了不便,而且在实际生产环境中,肯定会有很多台服务器之间交互,地址和端口都可能不同,怎么办?
5.2. 解决跨域问题的方案
目前比较常用的跨域解决方案有3种:
-
Jsonp
最早的解决方案,利用script标签可以跨域的原理实现。
限制:
- 需要服务的支持
- 只能发起GET请求
-
nginx反向代理
思路是:利用nginx把跨域反向代理为不跨域,支持各种请求方式
缺点:需要在nginx进行额外配置,语义不清晰
违背了devops思想。(开发人员多为运维人员考虑) -
CORS
规范化的跨域请求解决方案,安全可靠。
优势:
- 在服务端进行控制是否允许跨域,可自定义规则
- 支持各种请求方式
缺点:
- 会产生额外的请求
我们这里会采用cors的跨域方案。
5.3. 什么是cors
CORS是一个W3C标准,全称是"跨域资源共享"(Cross-origin resource sharing)。
它允许浏览器向跨源服务器,发出[XMLHttpRequest]请求 (就是Ajax请求,它是Ajax底层的一个对象),从而克服了AJAX只能同源使用的限制。
CORS需要浏览器和服务器同时支持。目前,所有浏览器都支持该功能,IE浏览器不能低于IE10。
-
浏览器端:
目前,所有浏览器都支持该功能(IE10以下不行)。整个CORS通信过程,都是浏览器自动完成,不需要用户参与。
-
服务端:
CORS通信与AJAX没有任何差别,因此你不需要改变以前的业务逻辑。只不过,浏览器会在请求中携带一些头信息,我们需要以此判断是否允许其跨域,然后在响应头中加入一些信息即可。这一般通过过滤器完成即可。
5.4. 原理有点复杂
预检请求
跨域请求会在正式通信之前,增加一次HTTP查询请求,称为"预检"请求(preflight)。
浏览器先询问服务器,当前网页所在的域名是否在服务器的许可名单之中,以及可以使用哪些HTTP动词和头信息字段。只有得到肯定答复,浏览器才会发出正式的XMLHttpRequest请求,否则就报错。
options就是一个预检请求。
一个“预检”请求的样板:
OPTIONS /cors HTTP/1.1
# 从哪过来的请求。(是不是在服务器的白名单中)
Origin: http://localhost:1000
# 支持什么方式的请求
Access-Control-Request-Method: GET
# 将携带什么头信息
Access-Control-Request-Headers: X-Custom-Header
User-Agent: Mozilla/5.0...
-
Origin:会指出当前请求属于哪个域(协议+域名+端口)。服务会根据这个值决定是否允许其跨域。
-
Access-Control-Request-Method:接下来会用到的请求方式,比如PUT
-
Access-Control-Request-Headers:会额外用到的头信息
预检请求的响应
服务的收到预检请求,如果许可跨域,会发出响应:
HTTP/1.1 200 OK
Date: Mon, 01 Dec 2008 01:15:39 GMT
Server: Apache/2.0.61 (Unix)
Access-Control-Allow-Origin: http://miaosha.jd.com
Access-Control-Allow-Credentials: true
Access-Control-Allow-Methods: GET, POST, PUT
Access-Control-Allow-Headers: X-Custom-Header
Access-Control-Max-Age: 1728000
Content-Type: text/html; charset=utf-8
Content-Encoding: gzip
Content-Length: 0
Keep-Alive: timeout=2, max=100
Connection: Keep-Alive
Content-Type: text/plain
如果服务器允许跨域,需要在返回的响应头中携带下面信息:
- Access-Control-Allow-Origin:可接受的域,是一个具体域名或者*(代表任意域名)
- Access-Control-Allow-Credentials:是否允许携带cookie,默认情况下,cors不会携带cookie,除非这个值是true
- Access-Control-Allow-Methods:允许访问的方式
- Access-Control-Allow-Headers:允许携带的头
- Access-Control-Max-Age:本次许可的有效时长,单位是秒,过期之前的ajax请求就无需再次进行预检了
有关cookie:
要想操作cookie,需要满足3个条件:
- 服务的响应头中需要携带Access-Control-Allow-Credentials并且为true。
- 浏览器发起ajax需要指定withCredentials 为true
- 响应头中的Access-Control-Allow-Origin一定不能为*,必须是指定的域名( * 表示所有域名都可以跨域访问)
5.5. 实现非常简单
虽然原理比较复杂,但是前面说过:
- 浏览器端都有浏览器自动完成,我们无需操心
- 服务端可以通过拦截器统一实现,不必每次都去进行跨域判定的编写。
事实上,Spring已经帮我们写好了CORS的跨域过滤器,内部已经实现了刚才所讲的判定逻辑。
spring-webmvc:CorsFilter
spring-webflux:CorsWebFilter
springcloud-gateway集成的是webflux,所以这里使用的是CorsWebFilter
在gmall-gateway中编写一个配置类,并且注册CorsWebFilter:
@Configuration
public class CorsConfig {

    @Bean
    public CorsWebFilter corsWebFilter() {

        // 初始化CORS配置对象
        CorsConfiguration config = new CorsConfiguration();
        // 允许的域,不要写*,否则cookie就无法使用了
        //setAllowedOrigin(集合)也是一样的作用。
        config.addAllowedOrigin("http://manager.gmall.com");
        config.addAllowedOrigin("http://www.gmall.com");
        config.addAllowedOrigin("http://127.0.0.1:1000");
        config.addAllowedOrigin("http://localhost:1000");
        // 允许的头信息
        config.addAllowedHeader("*");
        // 允许的请求方式
        config.addAllowedMethod("*");
        // 是否允许携带Cookie信息
        config.setAllowCredentials(true);

        // 添加映射路径,我们拦截一切请求
        UrlBasedCorsConfigurationSource corsConfigurationSource = new UrlBasedCorsConfigurationSource();
        corsConfigurationSource.registerCorsConfiguration("/**", config);

        return new CorsWebFilter(corsConfigurationSource);
    }
}
测试:完美解决!
进行分页插件
在pms中创建一个config包,然后把类放进去。(MP分页)
SpringBoot1.x需要手动声明启动事务。2.x不需要手动声明。
@Configuration
public class MybatisPlusConfig {

    @Bean
    public PaginationInterceptor paginationInterceptor() {
        PaginationInterceptor paginationInterceptor = new PaginationInterceptor();
        // 设置请求的页面大于最大页后操作, true调回到首页,false 继续请求  默认false
        // paginationInterceptor.setOverflow(false);
        // 设置最大单页限制数量,默认 500 条,-1 不受限制
        // paginationInterceptor.setLimit(500);
        // 开启 count 的 join 优化,只针对部分 left join
        paginationInterceptor.setCountSqlParser(new JsqlParserCountOptimize(true));
        return paginationInterceptor;
    }
}
6. 图片上传
这里使用阿里云对象存储(OSS)
官方文档:https://help.aliyun.com/document_detail/64041.html?spm=5176.87240.400427.54.1bfd4614VN7fDp
我们之前采用sdk的方式,图片–>后台服务器–>阿里云。
这样后台服务器面临并发压力,既然是上传给阿里云,可不可以直接传给阿里云服务器。
上传成功后,只需要给我一个图片地址保存到数据库即可。
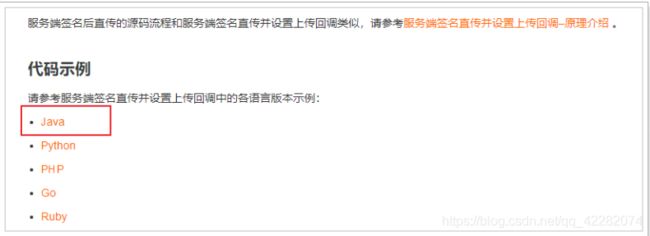
查看官方文档,发现提供了浏览器直接上传到阿里云的参考文档:
6.1. 阿里云配置
登录到个人阿里云控制台,并创建bucket。
找到权限设置–>跨域设置
点击设置–>创建规则–>如下填写表单–>点击确定
6.2. 服务端签名后直传
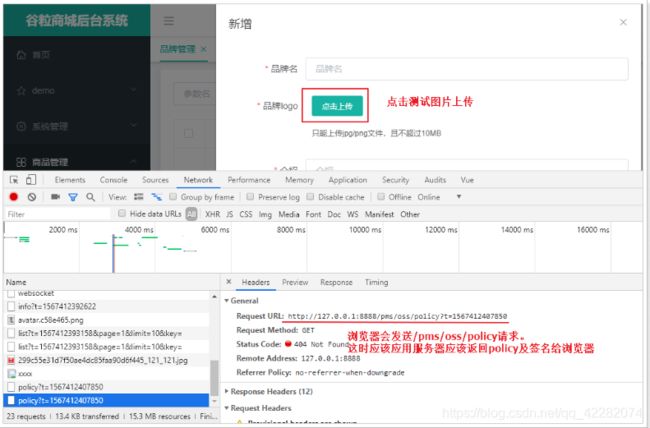
用户发送请求到应用服务端,服务端怎么返回policy和签名?
官方文档再往下翻,有java示例:
点进去就有示例代码:
6.3. 编写代码实现签名获取
请求路径:/pms/oss/policy
请求方式:GET
请求参数:无
响应数据:统一都是Resp对象
6.3.1. 导入OSS的依赖
<dependency>
    <groupId>com.aliyun.ossgroupId>
    <artifactId>aliyun-sdk-ossartifactId>
    <version>3.5.0version>
dependency>
6.3.2. 编写Controller方法
@RequestMapping("pms/oss")
@RestController
public class PmsOssController {

    String accessId = "LTAI4FuGwRrRAh1M8mRkndr6"; // 请填写您的AccessKeyId。
    String accessKey = "LvIZkyPyKqoBGcVTY2wABYhv4QJmYT"; // 请填写您的AccessKeySecret。
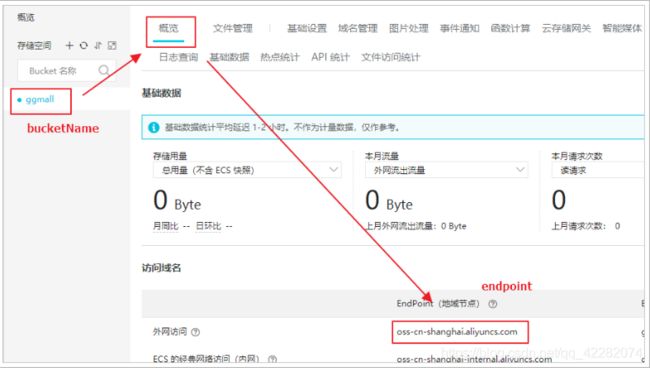
    String endpoint = "oss-cn-shanghai.aliyuncs.com"; // 请填写您的 endpoint。
    String bucket = "ggmall"; // 请填写您的 bucketname 。
    String host = "https://" + bucket + "." + endpoint; // host的格式为 bucketname.endpoint
    // callbackUrl为 上传回调服务器的URL,请将下面的IP和Port配置为您自己的真实信息。
    //String callbackUrl = "http://88.88.88.88:8888";
    // 图片目录,每天一个目录
    SimpleDateFormat sdf = new SimpleDateFormat("yyyy-MM-dd");
    String dir = sdf.format(new Date()); // 用户上传文件时指定的前缀。

    @GetMapping("policy")
    public ResponseVo<Object> policy() throws UnsupportedEncodingException {

        OSSClient client = new OSSClient(endpoint, accessId, accessKey);

        long expireTime = 30;
        long expireEndTime = System.currentTimeMillis() + expireTime * 1000;
        Date expiration = new Date(expireEndTime);
        PolicyConditions policyConds = new PolicyConditions();
        policyConds.addConditionItem(PolicyConditions.COND_CONTENT_LENGTH_RANGE, 0, 1048576000);
        policyConds.addConditionItem(MatchMode.StartWith, PolicyConditions.COND_KEY, dir);

        String postPolicy = client.generatePostPolicy(expiration, policyConds);
        byte[] binaryData = postPolicy.getBytes("utf-8");
        String encodedPolicy = BinaryUtil.toBase64String(binaryData);
        String postSignature = client.calculatePostSignature(postPolicy);

        Map<String, String> respMap = new LinkedHashMap<String, String>();
        respMap.put("accessid", accessId);
        respMap.put("policy", encodedPolicy);
        respMap.put("signature", postSignature);
        respMap.put("dir", dir);
        respMap.put("host", host);
        respMap.put("expire", String.valueOf(expireEndTime / 1000));
        // respMap.put("expire", formatISO8601Date(expiration));

        return ResponseVo.ok(respMap);
    }
}
6.3.3. 上传测试
6.4. 参数说明
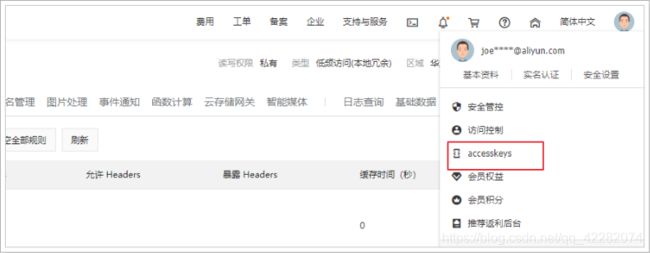
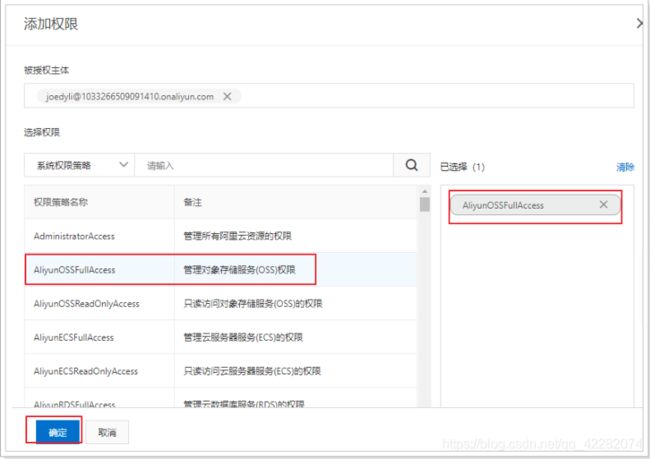
6.4.1. AccessKeyID及AccessKeySecret
选择用户,添加权限:
选择OSS所有权限
完成权限的添加


