Vue -- v-for 深度实践 & cascader 选择器回显 & el-switch 回显
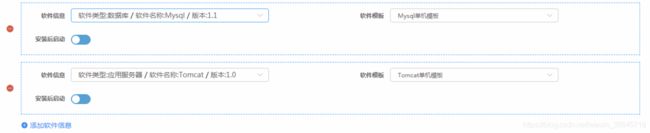
效果:初始有一个空框,点击下方 添加软件信息 按钮可以添加一个信息框,点击左侧的小减号可以删除一个信息框

html
<el-form :model="appTemplateForm" ref="appTemplateForm" :rules="rules" label-width="100px">
	<el-row>
 		<el-col :span="24" v-for="(item,index) in appTemplateForm.softwareInfo" :key="index">
 			<span style="float:left;position:relative;font-size:16px;color:#D65C49;cursor:pointer;margin-top:45px;margin-left:30px;"
		 		class="el-icon-remove" @click="removeSoftInfo(index)"></span>
	 		<div class="sideline_outer">
	 			<div class="sideline_inner">
	 				其中内容见下
	 			</div>
	 		</div>
 		</el-col>
	</el-row>
	<div style="font-size:14px;color:#2C8DF4;cursor:pointer;margin-left:60px"
		class="el-icon-circle-plus" @click="addSoftInfo">
 				{{$t('btn.add')}}{{$t('labels.softwareInfo')}}
	 </div>
</el-form>
具体内容
<el-row>
	<el-col :span="12" class="software-info">
		<el-form-item :label="$t('labels.softwareInfo')" prop="softwareName">
			<el-cascader class="cascader-select" v-model="item.softwareName" clearable :options="softwareOptions" expand-trigger="hover"
				@change="handleChange(index)" style="width:400px ;">
			</el-cascader>
		</el-form-item>
	</el-col>
	<el-col :span="12" class="software-info">
		<el-form-item :label="$t('labels.softwareTemp')" prop="softwareTempName">
			<el-select v-model="item.softwareTempName" :placeholder="$t('placeholder.softwareTemp')"
         			style="width : 300px ;">
       			<el-option v-for="itemRel in item.relatedTemps" :key="itemRel.value" :label="itemRel.label"
					:value="itemRel.value"></el-option>
			</el-select>
		</el-form-item>
	</el-col>
</el-row>
<el-row>
	<el-col :span="12">
		<el-form-item :label="$t('labels.afterInstall')" prop="afterInstall">
			<el-switch v-model="item.afterInstall" active-color="#13ce66" inactive-color="#56A1D5">
			</el-switch>
		</el-form-item>
	</el-col>
</el-row>
注1:v-for="(item,index) in appTemplateForm.softwareInfo
遍历 appTemplateForm.softwareInfo 中的元素,index 表示索引,item 表示 appTemplateForm.softwareInfo 中的一个 jsonObj 对象。每个信息框都是基于 item 作为数据源的。obj 对象中包含的属性可以参考 addSoftInfo 方法
js
appTemplateForm:{
	softwareInfo:[]
},
// 选项框三层级联,软件信息下拉框数据源
// 这个数据源是通用的,每个信息框的源都一致
softwareOptions: [],
this.methods = {
    getSoftwareOptions(){
      	 let _self = this;
      	 $.ajax({
  				url : path + "/test/testAction!getSoftwareOptions.action",
  				cache: false,
  				type : 'post',
  				dataType:'json',
  				success : function(data) {
  					_self.softwareOptions=data;
  				},
  				error : function(err) {
  				}
 		 });
    },
    // 级联选择框变化时触发的事件
	handleChange(index) {
		let _self = this;
		var _softwareName = _self.appTemplateForm.softwareInfo[index].softwareName;
		// 信息框选择的软件变了,则自动清空与其相关联的模板信息
		_self.appTemplateForm.softwareInfo[index].softwareTempName = '';
		// _softwareName示例:
		// cascader组件--下拉框有值被选中后,选中值的数据格式
		// ["8a84ad4d7152b99e017152bce05b0005", "Tomcat", "8a84ad4d71bae97e0171baf166d30004"]
		// 第一个参数是swTypeId,第二个参数是软件名,第三个参数是softwareId
		_self.getTempOptions(_softwareName,index);
    },
  	getTempOptions(_softwareName,index){
       	 let _self = this;
       	 $.ajax({
			url : path + "/test/testAction!getTempOptions.action",
			cache: false,
			type : 'post',
			dataType:'json',
			data:{
				version:_softwareName[2]
			},
			success : function(data) {
				// 这个方法的作用在于:
				// 在每个信息框中,前面的软件信息选中之后,后面的模板信息下拉框也会跟着变化
				// 找出与这个软件关联的软件模板
				var template = data.template;
				var relatedTemps=[];
				for(var i=0;i<template.length;i++){
					var obj={};
					obj.value=template[i].id;
					obj.label=template[i].name;
					relatedTemps.push(obj);
				}
				// relatedTemps为信息框中模板下拉框的数据源
				_self.appTemplateForm.softwareInfo[index].relatedTemps = relatedTemps;
			},
			error : function(err) {
			}
		});
    },
    // 点击信息框左侧的小减号触发的事件
    // 效果是清除一个信息框
    removeSoftInfo(index){
      	 var _self = this;
      	 // 保证至少有一个信息框
         if(_self.appTemplateForm.softwareInfo.length == 1){
			 _self.$message({
             showClose: true,
             message: _self.$t('tips.oneMoreInfo'),
             type: 'error'
         });
		 }else{
			 this.appTemplateForm.softwareInfo.splice(index, 1);
		 }
    },
    // 点击信息框下方的 添加软件信息 按钮出发的事件
    addSoftInfo(){
    	 // softwareInfo中属性的情况
    	 // softwareName是数组是因为其对应的是一个cascader选择框,只有数组中的三个value与数据源的三层value都能对上,选择框才能成功回显
    	 // softwareTempName为模板Id
    	 // relatedTemps为模板下拉框的数据源
       	 var softwareObj={softwareName:[],softwareTempName:'',relatedTemps:[],afterInstall:false};
		 this.appTemplateForm.softwareInfo.push(softwareObj);
    },
}
注1:cascader 选择器回显:先准备好下拉框的数据源,即 :options="softwareOptions" 中的 softwareOptions,具体是在 this.mounted 中调用 getSoftwareOptions 方法
后台需要将 v-model="item.softwareName" 中的 softwareName 构造成一个 List 数组,需要注意的是构造的数组值必须是选择器的 value 值,而非 label 值。并且三个 value 值与 softwareOptions 中的值必须完全对应,才可以正确回显
List<String> sfInfo = new ArrayList<String>();
sfInfo.add(sf.getCategory());
sfInfo.add(sf.getName());
sfInfo.add(softwareId);
jsonobj.put("softwareName", sfInfo);
注2:el-switch 回显:v-model="item.afterInstall" 对应的值必须是 boolean 类型才能回显成功
jsonobj.put("afterInstall", Boolean.parseBoolean(jo.getString("afterInstall")));
this.mounted=function(){
	this.getSoftwareOptions();
	// 新增时默认给一个框
	if(this.isAdd){
		this.addSoftInfo();
	}else{
		// 编辑时回显
		this.getAppTemplateInfo();
	}
}
.sideline_inner{
	width:100%;
	border:1px dashed #409EFF;
	display: inline-block;
}

.sideline_outer{
	margin:0px 100px 10px 60px;
}
三层级联后台数据源格式参考:https://element.eleme.cn/#/zh-CN/component/cascader